ROS官网新手级教程总结
第 1 关卡:安装和配置 ROS 环境
目标:在计算机上安装和配置 ROS 环境。
安装 ROS
按照 ROS 安装说明进行安装。
管理环境
确定环境变量 ROS_ROOT 和 ROS_PACKAGE_PATH 已经设置好了。以我的为例:
printenv | grep ROS 输出为:
ROS_ETC_DIR=/opt/ros/melodic/etc/ros
ROS_ROOT=/opt/ros/melodic/share/ros
ROS_MASTER_URI=http://localhost:11311
ROS_VERSION=1
ROS_PYTHON_VERSION=2
ROS_PACKAGE_PATH=/opt/ros/melodic/share
ROSLISP_PACKAGE_DIRECTORIES=
ROS_DISTRO=melodic
每次会话进入的时候都需要执行一次(注意 melodic 根据版本不同而更换):
source /opt/ros/melodic/setup.bash
为了方便,可以把这条语句放在 .bashrc 脚本中。
创建 ROS 工作空间
相对于 rosbuild 而言,catkin 是目前官方推荐的用于管理代码的方法。
创建一个 catkin 工作空间:
mkdir -p ~/catkin_ws/src
cd ~/catkin_ws/
catkin_make
这会创建出类似这样的目录结构:
.
├── build
│   ├── CATKIN_IGNORE
│   ├── CMakeCache.txt
│   ├── CMakeFiles
│   │   ├── 3.10.2
│   │   │   ├── CMakeCCompiler.cmake
│   │   │   ├── CMakeCXXCompiler.cmake
│   │   │   ├── CMakeDetermineCompilerABI_C.bin
│   │   │   ├── CMakeDetermineCompilerABI_CXX.bin
│   │   │   ├── CMakeSystem.cmake
│   │   │   ├── CompilerIdC
│   │   │   │   ├── CMakeCCompilerId.c
│   │   │   │   ├── a.out
│   │   │   │   └── tmp
│   │   │   └── CompilerIdCXX
│   │   │       ├── CMakeCXXCompilerId.cpp
│   │   │       ├── a.out
│   │   │       └── tmp
│   │   ├── CMakeDirectoryInformation.cmake
│   │   ├── CMakeError.log
│   │   ├── CMakeOutput.log
│   │   ├── CMakeRuleHashes.txt
│   │   ├── CMakeTmp
│   │   ├── Makefile.cmake
│   │   ├── Makefile2
│   │   ├── TargetDirectories.txt
│   │   ├── clean_test_results.dir
│   │   │   ├── DependInfo.cmake
│   │   │   ├── build.make
│   │   │   ├── cmake_clean.cmake
│   │   │   └── progress.make
│   │   ├── cmake.check_cache
│   │   ├── download_extra_data.dir
│   │   │   ├── DependInfo.cmake
│   │   │   ├── build.make
│   │   │   ├── cmake_clean.cmake
│   │   │   └── progress.make
│   │   ├── doxygen.dir
│   │   │   ├── DependInfo.cmake
│   │   │   ├── build.make
│   │   │   ├── cmake_clean.cmake
│   │   │   └── progress.make
│   │   ├── feature_tests.bin
│   │   ├── feature_tests.c
│   │   ├── feature_tests.cxx
│   │   ├── progress.marks
│   │   ├── run_tests.dir
│   │   │   ├── DependInfo.cmake
│   │   │   ├── build.make
│   │   │   ├── cmake_clean.cmake
│   │   │   └── progress.make
│   │   └── tests.dir
│   │       ├── DependInfo.cmake
│   │       ├── build.make
│   │       ├── cmake_clean.cmake
│   │       └── progress.make
│   ├── CTestConfiguration.ini
│   ├── CTestCustom.cmake
│   ├── CTestTestfile.cmake
│   ├── Makefile
│   ├── atomic_configure
│   │   ├── _setup_util.py
│   │   ├── env.sh
│   │   ├── local_setup.bash
│   │   ├── local_setup.sh
│   │   ├── local_setup.zsh
│   │   ├── setup.bash
│   │   ├── setup.sh
│   │   └── setup.zsh
│   ├── catkin
│   │   └── catkin_generated
│   │       └── version
│   │           └── package.cmake
│   ├── catkin_generated
│   │   ├── env_cached.sh
│   │   ├── generate_cached_setup.py
│   │   ├── installspace
│   │   │   ├── _setup_util.py
│   │   │   ├── env.sh
│   │   │   ├── local_setup.bash
│   │   │   ├── local_setup.sh
│   │   │   ├── local_setup.zsh
│   │   │   ├── setup.bash
│   │   │   ├── setup.sh
│   │   │   └── setup.zsh
│   │   ├── order_packages.cmake
│   │   ├── order_packages.py
│   │   ├── setup_cached.sh
│   │   └── stamps
│   │       └── Project
│   │           ├── _setup_util.py.stamp
│   │           ├── interrogate_setup_dot_py.py.stamp
│   │           ├── order_packages.cmake.em.stamp
│   │           └── package.xml.stamp
│   ├── catkin_make.cache
│   ├── cmake_install.cmake
│   ├── gtest
│   │   ├── CMakeFiles
│   │   │   ├── CMakeDirectoryInformation.cmake
│   │   │   └── progress.marks
│   │   ├── CTestTestfile.cmake
│   │   ├── Makefile
│   │   ├── cmake_install.cmake
│   │   └── googlemock
│   │       ├── CMakeFiles
│   │       │   ├── CMakeDirectoryInformation.cmake
│   │       │   ├── gmock.dir
│   │       │   │   ├── DependInfo.cmake
│   │       │   │   ├── __
│   │       │   │   │   └── googletest
│   │       │   │   │       └── src
│   │       │   │   ├── build.make
│   │       │   │   ├── cmake_clean.cmake
│   │       │   │   ├── depend.make
│   │       │   │   ├── flags.make
│   │       │   │   ├── link.txt
│   │       │   │   ├── progress.make
│   │       │   │   └── src
│   │       │   ├── gmock_main.dir
│   │       │   │   ├── DependInfo.cmake
│   │       │   │   ├── __
│   │       │   │   │   └── googletest
│   │       │   │   │       └── src
│   │       │   │   ├── build.make
│   │       │   │   ├── cmake_clean.cmake
│   │       │   │   ├── depend.make
│   │       │   │   ├── flags.make
│   │       │   │   ├── link.txt
│   │       │   │   ├── progress.make
│   │       │   │   └── src
│   │       │   └── progress.marks
│   │       ├── CTestTestfile.cmake
│   │       ├── Makefile
│   │       ├── cmake_install.cmake
│   │       └── gtest
│   │           ├── CMakeFiles
│   │           │   ├── CMakeDirectoryInformation.cmake
│   │           │   ├── gtest.dir
│   │           │   │   ├── DependInfo.cmake
│   │           │   │   ├── build.make
│   │           │   │   ├── cmake_clean.cmake
│   │           │   │   ├── depend.make
│   │           │   │   ├── flags.make
│   │           │   │   ├── link.txt
│   │           │   │   ├── progress.make
│   │           │   │   └── src
│   │           │   ├── gtest_main.dir
│   │           │   │   ├── DependInfo.cmake
│   │           │   │   ├── build.make
│   │           │   │   ├── cmake_clean.cmake
│   │           │   │   ├── depend.make
│   │           │   │   ├── flags.make
│   │           │   │   ├── link.txt
│   │           │   │   ├── progress.make
│   │           │   │   └── src
│   │           │   └── progress.marks
│   │           ├── CTestTestfile.cmake
│   │           ├── Makefile
│   │           └── cmake_install.cmake
│   └── test_results
├── devel
│   ├── _setup_util.py
│   ├── cmake.lock
│   ├── env.sh
│   ├── lib
│   ├── local_setup.bash
│   ├── local_setup.sh
│   ├── local_setup.zsh
│   ├── setup.bash
│   ├── setup.sh
│   └── setup.zsh
└── src└── CMakeLists.txt -> /opt/ros/melodic/share/catkin/cmake/toplevel.cmake
运行以下命令可以让该工作空间添加到 ROS 环境变量中,使得 ROS 可以识别:
source devel/setup.bash
查看 ROS 环境变量确认这个目录已经添加进来了:
echo $ROS_PACKAGE_PATH 我的环境变量如下:
/workspace/catkin_ws/src:/opt/ros/melodic/share
其中 /workspace/catkin_ws/src 是我新创建的工作空间。
第 2 关卡:浏览 ROS 文件系统
目标:介绍 ROS 文件系统概念,用到了 roscd,rosls,rospack 命令。
准备工作
下载:
sudo apt-get install ros-<distro>-ros-tutorials
<distro> 对应相应的版本。
ROS 文件系统概念
- 包(package):ROS 代码的软件组织单元。
- Manifests(package.xml):包的描述性文件。
文件系统工具
rospack
获取包信息:
rospack find roscpp 输出:
/opt/ros/melodic/share/roscpp
roscd
改变当前目录:
roscd roscpp
pwd
输出:
/opt/ros/melodic/share/roscpp
注意,这几个识别 ROS 包的命令都是根据 ROS 环境变量(ROS_PACKAGE_PATH)去找包的。
进入包内的子目录:
roscd roscpp/cmake/
pwd
输出:
/opt/ros/melodic/share/roscpp/cmake
进入 ROS 应用的日志目录:
roscd log
注意:如果还没有运行 ROS 输出日志的话,会显示:
No active roscore
之类的信息。
rosls
显示包内的文件:
rosls roscpp_tutorials
输出:
cmake launch package.xml srv
第 3 关卡:包的创建
目标:使用 roscreate-pkg 和 catkin 创建包,rospack 列出包的依赖。
catkin 包必须满足的条件:
- 包含描述性文件 package.xml
- 包含使用了 catkin 的 CMakeLists.txt 文件
- 每个包都有独立的目录,没有嵌套
最简单的包结构如下:
my_package/CMakeLists.txtpackage.xml
典型的工作区中包结构的样子:
workspace_folder/ -- WORKSPACEsrc/ -- SOURCE SPACECMakeLists.txt -- 'Toplevel' CMake file, provided by catkinpackage_1/CMakeLists.txt -- CMakeLists.txt file for package_1package.xml -- Package manifest for package_1...package_n/CMakeLists.txt -- CMakeLists.txt file for package_npackage.xml -- Package manifest for package_n
创建 catkin 包
进入 src 目录并创建 catkin 包:
cd ~/catkin_ws/src
catkin_create_pkg beginner_tutorials std_msgs rospy roscpp
catkin_create_pkg 会指定包名及其依赖:
# This is an example, do not try to run this
# catkin_create_pkg <package_name> [depend1] [depend2] [depend3]
工作区中包的编译
cd ~/catkin_ws
catkin_make
source devel/setup.bash
包依赖
查看一阶依赖:
rospack depends1 beginner_tutorials
输出:
roscpp
rospy
std_msgs
这些依赖可以在包描述性文件中查看:
roscd beginner_tutorials
cat package.xml
输出:
<?xml version="1.0"?>
<package format="2"><name>beginner_tutorials</name><version>0.0.0</version><description>The beginner_tutorials package</description><!-- One maintainer tag required, multiple allowed, one person per tag --><!-- Example:  --><!-- <maintainer email="jane.doe@example.com">Jane Doe</maintainer> --><maintainer email="root@todo.todo">root</maintainer><!-- One license tag required, multiple allowed, one license per tag --><!-- Commonly used license strings: --><!--   BSD, MIT, Boost Software License, GPLv2, GPLv3, LGPLv2.1, LGPLv3 --><license>TODO</license><!-- Url tags are optional, but multiple are allowed, one per tag --><!-- Optional attribute type can be: website, bugtracker, or repository --><!-- Example: --><!-- <url type="website">http://wiki.ros.org/beginner_tutorials</url> --><!-- Author tags are optional, multiple are allowed, one per tag --><!-- Authors do not have to be maintainers, but could be --><!-- Example: --><!-- <author email="jane.doe@example.com">Jane Doe</author> --><!-- The *depend tags are used to specify dependencies --><!-- Dependencies can be catkin packages or system dependencies --><!-- Examples: --><!-- Use depend as a shortcut for packages that are both build and exec dependencies --><!--   <depend>roscpp</depend> --><!--   Note that this is equivalent to the following: --><!--   <build_depend>roscpp</build_depend> --><!--   <exec_depend>roscpp</exec_depend> --><!-- Use build_depend for packages you need at compile time: --><!--   <build_depend>message_generation</build_depend> --><!-- Use build_export_depend for packages you need in order to build against this package: --><!--   <build_export_depend>message_generation</build_export_depend> --><!-- Use buildtool_depend for build tool packages: --><!--   <buildtool_depend>catkin</buildtool_depend> --><!-- Use exec_depend for packages you need at runtime: --><!--   <exec_depend>message_runtime</exec_depend> --><!-- Use test_depend for packages you need only for testing: --><!--   <test_depend>gtest</test_depend> --><!-- Use doc_depend for packages you need only for building documentation: --><!--   <doc_depend>doxygen</doc_depend> --><buildtool_depend>catkin</buildtool_depend><build_depend>roscpp</build_depend><build_depend>rospy</build_depend><build_depend>std_msgs</build_depend><build_export_depend>roscpp</build_export_depend><build_export_depend>rospy</build_export_depend><build_export_depend>std_msgs</build_export_depend><exec_depend>roscpp</exec_depend><exec_depend>rospy</exec_depend><exec_depend>std_msgs</exec_depend><!-- The export tag contains other, unspecified, tags --><export><!-- Other tools can request additional information be placed here --></export>
</package>
依赖也会有自己的依赖,比如:
rospack depends1 roscpp
输出:
cpp_common
message_runtime
rosconsole
roscpp_serialization
roscpp_traits
rosgraph_msgs
rostime
std_msgs
xmlrpcpp
要查看包的所有依赖(区别于一阶依赖):
rospack depends beginner_tutorials
输出:
cpp_common
rostime
roscpp_traits
roscpp_serialization
catkin
genmsg
genpy
message_runtime
gencpp
geneus
gennodejs
genlisp
message_generation
rosbuild
rosconsole
std_msgs
rosgraph_msgs
xmlrpcpp
roscpp
rosgraph
ros_environment
rospack
roslib
rospy
包的定制化
修改 package.xml:
roscd beginner_tutorials
vim package.xml
整个文件内容如下:
 1 <?xml version="1.0"?>
 2 <package format="2">
 3   <name>beginner_tutorials</name>
 4   <version>0.0.0</version>
 5   <description>The beginner_tutorials package</description>
 6
 7   <!-- One maintainer tag required, multiple allowed, one person per tag -->
 8   <!-- Example:  -->
 9   <!-- <maintainer email="jane.doe@example.com">Jane Doe</maintainer> -->
10   <maintainer email="root@todo.todo">root</maintainer>
11
12
13   <!-- One license tag required, multiple allowed, one license per tag -->
14   <!-- Commonly used license strings: -->
15   <!--   BSD, MIT, Boost Software License, GPLv2, GPLv3, LGPLv2.1, LGPLv3 -->
16   <license>TODO</license>
17
18
19   <!-- Url tags are optional, but multiple are allowed, one per tag -->
20   <!-- Optional attribute type can be: website, bugtracker, or repository -->
21   <!-- Example: -->
22   <!-- <url type="website">http://wiki.ros.org/beginner_tutorials</url> -->
23
24
25   <!-- Author tags are optional, multiple are allowed, one per tag -->
26   <!-- Authors do not have to be maintainers, but could be -->
27   <!-- Example: -->
28   <!-- <author email="jane.doe@example.com">Jane Doe</author> -->
29
30
31   <!-- The *depend tags are used to specify dependencies -->
32   <!-- Dependencies can be catkin packages or system dependencies -->
33   <!-- Examples: -->
34   <!-- Use depend as a shortcut for packages that are both build and exec dependencies -->
35   <!--   <depend>roscpp</depend> -->
36   <!--   Note that this is equivalent to the following: -->
37   <!--   <build_depend>roscpp</build_depend> -->
38   <!--   <exec_depend>roscpp</exec_depend> -->
39   <!-- Use build_depend for packages you need at compile time: -->
40   <!--   <build_depend>message_generation</build_depend> -->
41   <!-- Use build_export_depend for packages you need in order to build against this package: -->
42   <!--   <build_export_depend>message_generation</build_export_depend> -->
43   <!-- Use buildtool_depend for build tool packages: -->
44   <!--   <buildtool_depend>catkin</buildtool_depend> -->
45   <!-- Use exec_depend for packages you need at runtime: -->
46   <!--   <exec_depend>message_runtime</exec_depend> -->
47   <!-- Use test_depend for packages you need only for testing: -->
48   <!--   <test_depend>gtest</test_depend> -->
49   <!-- Use doc_depend for packages you need only for building documentation: -->
50   <!--   <doc_depend>doxygen</doc_depend> -->
51   <buildtool_depend>catkin</buildtool_depend>
52   <build_depend>roscpp</build_depend>
53   <build_depend>rospy</build_depend>
54   <build_depend>std_msgs</build_depend>
55   <build_export_depend>roscpp</build_export_depend>
56   <build_export_depend>rospy</build_export_depend>
57   <build_export_depend>std_msgs</build_export_depend>
58   <exec_depend>roscpp</exec_depend>
59   <exec_depend>rospy</exec_depend>
60   <exec_depend>std_msgs</exec_depend>
61
62
63   <!-- The export tag contains other, unspecified, tags -->
64   <export>
65     <!-- Other tools can request additional information be placed here -->
66
67   </export>
68 </package>
更新第 5 行的 description:The very good beginner-tutorials package
更新第 10 行的维护者标签。
更新第 16 行的证书。
最终修改后的文件如下:
 1 <?xml version="1.0"?>
 2 <package format="2">
 3   <name>beginner_tutorials</name>
 4   <version>0.0.0</version>
 5   <description>The very good beginner_tutorials package</description>
 6
 7   <!-- One maintainer tag required, multiple allowed, one person per tag -->
 8   <!-- Example:  -->
 9   <!-- <maintainer email="jane.doe@example.com">Jane Doe</maintainer> -->
10   <maintainer email="1183851628@qq.com">heyulong</maintainer>
11
12
13   <!-- One license tag required, multiple allowed, one license per tag -->
14   <!-- Commonly used license strings: -->
15   <!--   BSD, MIT, Boost Software License, GPLv2, GPLv3, LGPLv2.1, LGPLv3 -->
16   <license>BSD</license>
17
18
19   <!-- Url tags are optional, but multiple are allowed, one per tag -->
20   <!-- Optional attribute type can be: website, bugtracker, or repository -->
21   <!-- Example: -->
22   <!-- <url type="website">http://wiki.ros.org/beginner_tutorials</url> -->
23
24
25   <!-- Author tags are optional, multiple are allowed, one per tag -->
26   <!-- Authors do not have to be maintainers, but could be -->
27   <!-- Example: -->
28   <!-- <author email="jane.doe@example.com">Jane Doe</author> -->
29
30
31   <!-- The *depend tags are used to specify dependencies -->
32   <!-- Dependencies can be catkin packages or system dependencies -->
33   <!-- Examples: -->
34   <!-- Use depend as a shortcut for packages that are both build and exec dependencies -->
35   <!--   <depend>roscpp</depend> -->
36   <!--   Note that this is equivalent to the following: -->
37   <!--   <build_depend>roscpp</build_depend> -->
38   <!--   <exec_depend>roscpp</exec_depend> -->
39   <!-- Use build_depend for packages you need at compile time: -->
40   <!--   <build_depend>message_generation</build_depend> -->
41   <!-- Use build_export_depend for packages you need in order to build against this package: -->
42   <!--   <build_export_depend>message_generation</build_export_depend> -->
43   <!-- Use buildtool_depend for build tool packages: -->
44   <!--   <buildtool_depend>catkin</buildtool_depend> -->
45   <!-- Use exec_depend for packages you need at runtime: -->
46   <!--   <exec_depend>message_runtime</exec_depend> -->
47   <!-- Use test_depend for packages you need only for testing: -->
48   <!--   <test_depend>gtest</test_depend> -->
49   <!-- Use doc_depend for packages you need only for building documentation: -->
50   <!--   <doc_depend>doxygen</doc_depend> -->
51   <buildtool_depend>catkin</buildtool_depend>
52   <build_depend>roscpp</build_depend>
53   <build_depend>rospy</build_depend>
54   <build_depend>std_msgs</build_depend>
55   <build_export_depend>roscpp</build_export_depend>
56   <build_export_depend>rospy</build_export_depend>
57   <build_export_depend>std_msgs</build_export_depend>
58   <exec_depend>roscpp</exec_depend>
59   <exec_depend>rospy</exec_depend>
60   <exec_depend>std_msgs</exec_depend>
61
62
63   <!-- The export tag contains other, unspecified, tags -->
64   <export>
65     <!-- Other tools can request additional information be placed here -->
66
67   </export>
68 </package>
第 4 关卡:包的编译
目标:介绍编译包的工具链。
首先记得确认激活环境配置,在工作区下输入:
source devel/setup.bash
前面已经用过,使用 catkin_make 可以同时编译多个包:
# In a catkin workspace
$ catkin_make [make_targets] [-DCMAKE_VARIABLES=...]
这会自动编译 src 目录下的包。如果包名是自定义的,比如说 my_src,那么应该这样做:
# In a catkin workspace
catkin_make --source my_src
上一关卡修改了 package.xml,这里在工作区内输入:
catkin_make
输出:
Base path: /workspace/catkin_ws
Source space: /workspace/catkin_ws/src
Build space: /workspace/catkin_ws/build
Devel space: /workspace/catkin_ws/devel
Install space: /workspace/catkin_ws/install
####
#### Running command: "make cmake_check_build_system" in "/workspace/catkin_ws/build"
####
-- Using CATKIN_DEVEL_PREFIX: /workspace/catkin_ws/devel
-- Using CMAKE_PREFIX_PATH: /workspace/catkin_ws/devel;/opt/ros/melodic
-- This workspace overlays: /workspace/catkin_ws/devel;/opt/ros/melodic
-- Found PythonInterp: /usr/bin/python2 (found suitable version "2.7.15", minimum required is "2")
-- Using PYTHON_EXECUTABLE: /usr/bin/python2
-- Using Debian Python package layout
-- Using empy: /usr/bin/empy
-- Using CATKIN_ENABLE_TESTING: ON
-- Call enable_testing()
-- Using CATKIN_TEST_RESULTS_DIR: /workspace/catkin_ws/build/test_results
-- Found gmock sources under '/usr/src/googletest': gmock will be built
-- Found PythonInterp: /usr/bin/python2 (found version "2.7.15")
-- Found gtest sources under '/usr/src/googletest': gtests will be built
-- Using Python nosetests: /usr/bin/nosetests-2.7
-- catkin 0.7.17
-- BUILD_SHARED_LIBS is on
-- BUILD_SHARED_LIBS is on
-- ~~~~~~~~~~~~~~~~~~~~~~~~~~~~~~~~~~~~~~~~~~~~~~~~~
-- ~~  traversing 1 packages in topological order:
-- ~~  - beginner_tutorials
-- ~~~~~~~~~~~~~~~~~~~~~~~~~~~~~~~~~~~~~~~~~~~~~~~~~
-- +++ processing catkin package: 'beginner_tutorials'
-- ==> add_subdirectory(beginner_tutorials)
-- Configuring done
-- Generating done
-- Build files have been written to: /workspace/catkin_ws/build
####
#### Running command: "make -j2 -l2" in "/workspace/catkin_ws/build"
####
第 5 关卡:认识 ROS 节点
目标:介绍 ROS 图的概念,使用 roscore、rosnode、rosrun 命令。
准备条件
apt-get install ros-<distro>-ros-tutorials 图概念介绍
- 节点(node):使用 ROS 与其他节点通信的可执行文件。
- 消息(message):当订阅或者发布主题时使用的 ROS 数据类型。
- 主题(topic):节点可以向主题发布消息,也可以向主题订阅消息。
- 主节点(master):ROS 的命名服务(name service),帮助各节点找到对方。
- rosout:ROS 中的 stdout/stderr。
- roscore:master、rosout、parameter 服务器。
节点
节点(node)就是 ROS 包中的可执行文件。ROS 节点使用 ROS 客户端库来与各节点进行通信。
节点可以发布或者订阅主题。
节点也可以提供或者消费服务。
客户端库
ROS 客户端可以允许用不同的语言编写的节点进行通信。
- rospy:Python 客户端库
- roscpp:C++ 客户端库
roscore
运行 roscore 开启 ROS 主服务:
roscore
输出:
... logging to /root/.ros/log/c10afc7a-da7e-11e9-bbfa-0242ac110004/roslaunch-57c67ed2b135-886.log
Checking log directory for disk usage. This may take awhile.
Press Ctrl-C to interrupt
Done checking log file disk usage. Usage is <1GB.started roslaunch server http://57c67ed2b135:38567/
ros_comm version 1.14.3SUMMARY
========PARAMETERS* /rosdistro: melodic* /rosversion: 1.14.3NODESauto-starting new master
process[master]: started with pid [896]
ROS_MASTER_URI=http://57c67ed2b135:11311/setting /run_id to c10afc7a-da7e-11e9-bbfa-0242ac110004
process[rosout-1]: started with pid [907]
started core service [/rosout]
使用 rosnode
在运行 roscore 后,另外打开一个终端,输入:
rosnode list
输出:
/rosout
这说明当前只有一个 rosout 节点在运行,该节点总是在运行,为了收集记录节点的输出日志。
查看某节点的信息:
rosnode info /rosout 输出:
--------------------------------------------------------------------------------
Node [/rosout]
Publications: * /rosout_agg [rosgraph_msgs/Log]Subscriptions: * /rosout [unknown type]Services: * /rosout/get_loggers* /rosout/set_logger_levelcontacting node http://57c67ed2b135:34783/ ...
Pid: 907
使用 rosrun
rosrun 用于直接运行包中的节点:
rosrun [package_name] [node_name]
打开一个新的终端,输入:
rosrun turtlesim turtlesim_node

打开一个新的终端,输入:
rosnode list
输出:
/rosout
/turtlesim
关闭 turtlesim 窗口,重新打开该节点,并且指定节点名:
rosrun turtlesim turtlesim_node __name:=my_turtle
在那个窗口输入 rosnode list 后显示:
/my_turtle
/rosout
查看与某节点之间的通信:
rosnode ping my_turtle 输出:
rosnode: node is [/my_turtle]
pinging /my_turtle with a timeout of 3.0s
xmlrpc reply from http://57c67ed2b135:37817/    time=29.969931ms
xmlrpc reply from http://57c67ed2b135:37817/    time=1.099825ms
xmlrpc reply from http://57c67ed2b135:37817/    time=1.539230ms
xmlrpc reply from http://57c67ed2b135:37817/    time=2.717018ms
......
第 6 关卡:认识 ROS 主题
目标:介绍 ROS 主题以及 rostopic 和 rqt_plot 命令的使用。
配置
接着上一关卡做的东西。
确保 roscore 以及运行起来了:
roscore
确保 turtlesim_node 运行起来了:
rosrun turtlesim turtlesim_node __name:=my_turtle
然后,在一个新的终端运行一个新节点:
rosrun turtlesim turtle_teleop_key
输出:
Reading from keyboard
---------------------------
Use arrow keys to move the turtle.
在这个节点里动一动箭头键:

ROS 主题
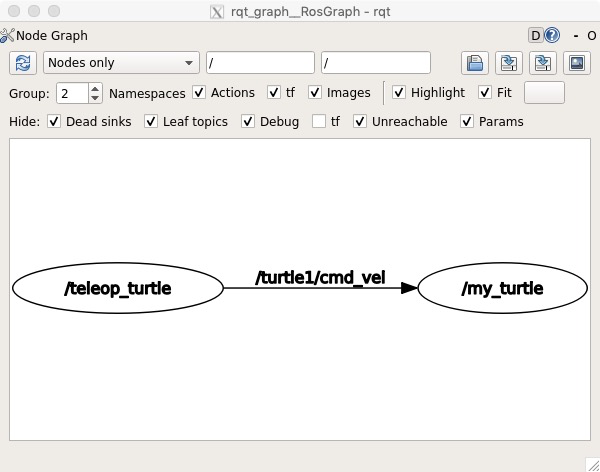
my_turtle 节点和 turtle_teleop_key 节点通过 ROS 主题(topic)进行通信。
turtle_teleop_key 以主题的方式发布按键,而 my_turtle 订阅该主题接收按键。
rqt_graph
使用 rqt_graph 创建 ROS 系统动态图结构。
安装:
apt-get install ros-<distro>-rqt
apt-get install ros-<distro>-rqt-common-plugins
输入:
rosrun rqt_graph rqt_graph
得到:
rostopic
rostopic 用于获取 ROS 主题的信息。
rostopic -h
输出:
rostopic is a command-line tool for printing information about ROS Topics.Commands:rostopic bw display bandwidth used by topicrostopic delay display delay of topic from timestamp in headerrostopic echo print messages to screenrostopic find find topics by typerostopic hz display publishing rate of topic rostopic info print information about active topicrostopic list list active topicsrostopic pub publish data to topicrostopic type print topic or field typeType rostopic <command> -h for more detailed usage, e.g. 'rostopic echo -h'
显示主题的发布数据:
rostopic echo /turtle1/cmd_vel 在发布按键主题的节点中活动箭头键后,这边的 rostopic 会显示出:
linear: x: 0.0y: 0.0z: 0.0
angular: x: 0.0y: 0.0z: 2.0
---
linear: x: 0.0y: 0.0z: 0.0
angular: x: 0.0y: 0.0z: 2.0
---
linear: x: 0.0y: 0.0z: 0.0
angular: x: 0.0y: 0.0z: 2.0
---
linear: x: 0.0y: 0.0z: 0.0
angular: x: 0.0y: 0.0z: 2.0
---
linear: x: 0.0y: 0.0z: 0.0
angular: x: 0.0y: 0.0z: 2.0
---
linear: x: 0.0y: 0.0z: 0.0
angular: x: 0.0y: 0.0z: 2.0
---
linear: x: -2.0y: 0.0z: 0.0
angular: x: 0.0y: 0.0z: 0.0
---
......
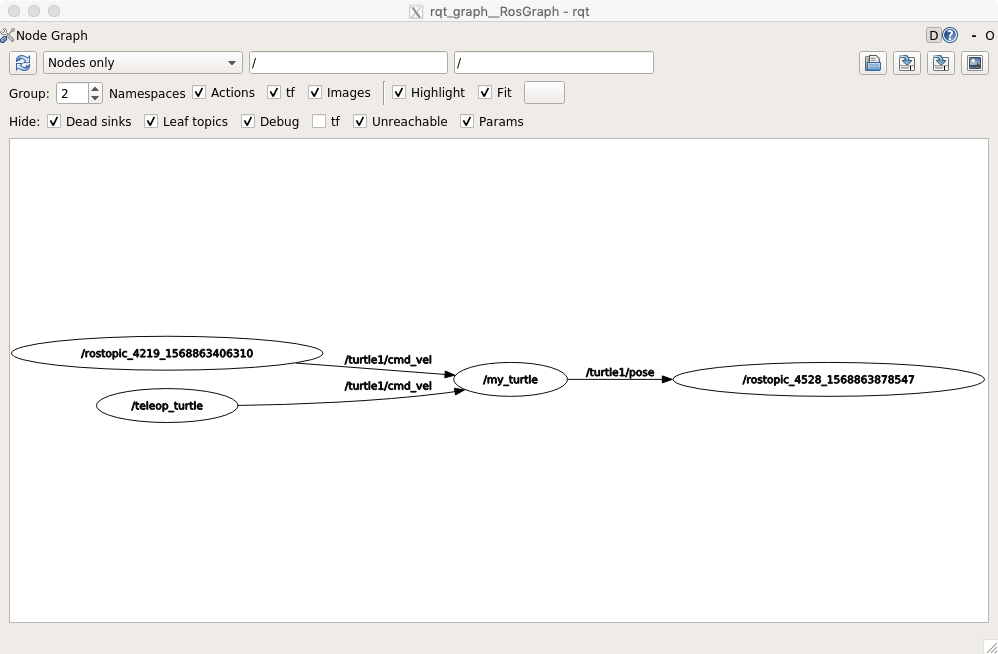
重新查看 rqt_graph 出的图(刷新或者重启),可以看到 rostopic 也订阅了 /turtle1/cmd_vel 主题了。

查看当前发布和订阅的主题:
rostopic list -v
输出:
Published topics:* /turtle1/color_sensor [turtlesim/Color] 1 publisher* /turtle1/cmd_vel [geometry_msgs/Twist] 1 publisher* /rosout [rosgraph_msgs/Log] 5 publishers* /rosout_agg [rosgraph_msgs/Log] 1 publisher* /turtle1/pose [turtlesim/Pose] 1 publisherSubscribed topics:* /turtle1/cmd_vel [geometry_msgs/Twist] 2 subscribers* /rosout [rosgraph_msgs/Log] 1 subscriber* /statistics [rosgraph_msgs/TopicStatistics] 2 subscribers
主题间的通信通过节点间发送的 ROS 消息(message)来实现。发布者和订阅者之间要通信,必须发送和接收相同的消息类型。
消息类型定义了主题的类型。
查看发布主题的消息类型:
# rostopic type [topic]
rostopic type /turtle1/cmd_vel
输出:
geometry_msgs/Twist
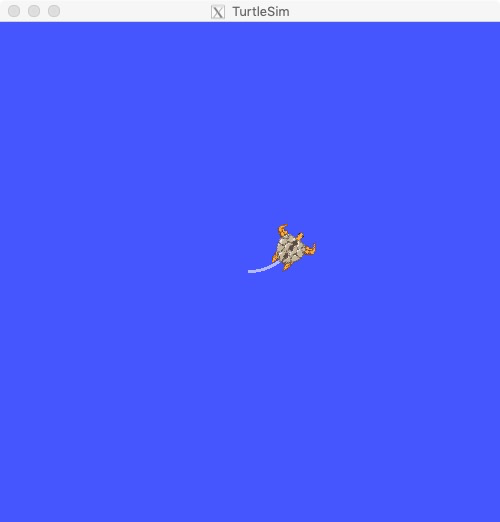
使用 rostopic pub 发送某一主题的数据:
# rostopic pub [topic] [msg_type] [args]
rostopic pub -1 /turtle1/cmd_vel geometry_msgs/Twist -- '[2.0, 0.0, 0.0]' '[0.0, 0.0, 1.8]'
效果如下:
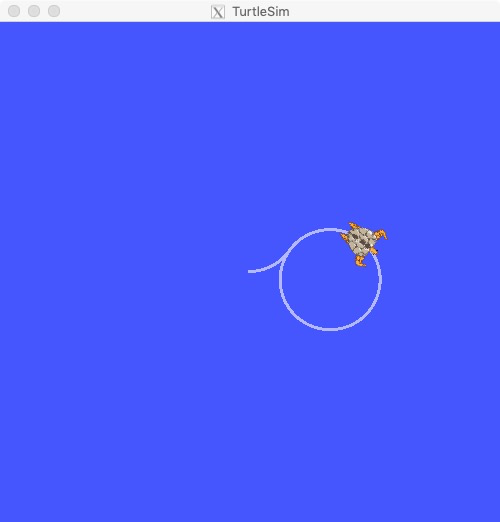
发布稳定的数据流:
rostopic pub /turtle1/cmd_vel geometry_msgs/Twist -r 1 -- '[2.0, 0.0, 0.0]' '[0.0, 0.0, -1.8]'
此时乌龟会不断地转圈移动:
查看目前的 ROS 图:

订阅查看 /turtle1/pose 主题:
rostopic echo /turtle1/pose 输出:
......
x: 5.10276937485
y: 5.45978927612
theta: 0.407544314861
linear_velocity: 2.0
angular_velocity: -1.79999995232
---
x: 5.13250160217
y: 5.47162103653
theta: 0.37874430418
linear_velocity: 2.0
angular_velocity: -1.79999995232
---
x: 5.16256189346
y: 5.48259210587
theta: 0.349944293499
linear_velocity: 2.0
angular_velocity: -1.79999995232
---
......
查看目前的图结构:
使用 rostopic hz 查看主题发布的频率:
# rostopic hz [topic]
rostopic hz /turtle1/pose
输出:
subscribed to [/turtle1/pose]
average rate: 30.777min: 0.030s max: 0.036s std dev: 0.00128s window: 29
average rate: 30.489min: 0.030s max: 0.042s std dev: 0.00181s window: 60
average rate: 30.510min: 0.029s max: 0.042s std dev: 0.00211s window: 90
average rate: 30.517min: 0.029s max: 0.042s std dev: 0.00208s window: 121
average rate: 30.354min: 0.029s max: 0.042s std dev: 0.00207s window: 151
average rate: 30.378min: 0.029s max: 0.062s std dev: 0.00296s window: 181
average rate: 30.380min: 0.029s max: 0.062s std dev: 0.00287s window: 212
average rate: 29.823min: 0.029s max: 0.062s std dev: 0.00439s window: 237
...
可以看到 my_turtle 以 30Hz 的速率不断发数据。
查看消息的更多细节:
rostopic type /turtle1/cmd_vel | rosmsg show
输出:
geometry_msgs/Vector3 linearfloat64 xfloat64 yfloat64 z
geometry_msgs/Vector3 angularfloat64 xfloat64 yfloat64 z
输入:
rostopic type /turtle1/pose | rosmsg show
输出:
float32 x
float32 y
float32 theta
float32 linear_velocity
float32 angular_velocity
rqt_plot
rqt_plot 可以显示主题上发布的数据滚动式时间图。
rosrun rqt_plot rqt_plot
第 7 关卡:ROS 服务和参数
目标:熟悉 ROS 服务和参数,使用 rosservice 和 rosparam。
服务(servece)节点相互通信的另一种方式。服务使得节点可以发送请求和接收响应。
rosservice
rosservice 可以很容易用上 ROS 的客户端/服务端框架。
rosservice -h
输出:
Commands:rosservice args print service argumentsrosservice call call the service with the provided argsrosservice find find services by service typerosservice info print information about servicerosservice list list active servicesrosservice type print service typerosservice uri print service ROSRPC uriType rosservice <command> -h for more detailed usage, e.g. 'rosservice call -h'
rosservece list 显示当前服务的列表:
rosservice list
输出:
/clear
/kill
/my_turtle/get_loggers
/my_turtle/set_logger_level
/reset
/rosout/get_loggers
/rosout/set_logger_level
/rostopic_4219_1568863406310/get_loggers
/rostopic_4219_1568863406310/set_logger_level
/rqt_gui_py_node_3673/get_loggers
/rqt_gui_py_node_3673/set_logger_level
/rqt_gui_py_node_4098/get_loggers
/rqt_gui_py_node_4098/set_logger_level
/rqt_gui_py_node_4237/get_loggers
/rqt_gui_py_node_4237/set_logger_level
/spawn
/teleop_turtle/get_loggers
/teleop_turtle/set_logger_level
/turtle1/set_pen
/turtle1/teleport_absolute
/turtle1/teleport_relative
rosservice type 查询服务类型:
rosservice type /clear 输出:
std_srvs/Empty
Empty 表示该服务既没有参数也没有返回值。
rosservice call 调用服务:
# rosservice call [service] [args]
rosservice call /clear
输入之后 my_turtle 节点的背景轨迹清空了:
rossrv show 查询 /spawn 的参数和返回值信息。
rosservice type /spawn | rossrv show
输出:
float32 x
float32 y
float32 theta
string name
---
string name
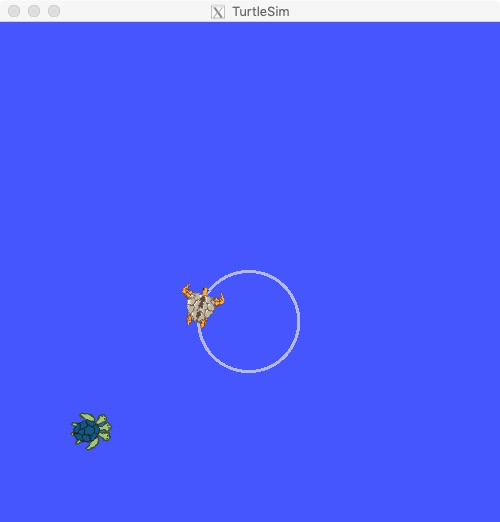
调用 /spawn 创建另一只乌龟:
rosservice call /spawn 2 2 0.2 "good turtle"
效果如下:
name: "good_turtle"
rosparam
rosparam 可以存储和操作 ROS 参数服务器(parameter server)上的数据。
参数服务器可以存储整型、浮点数、布尔型、字典和列表。
rosparame 使用 YAML 标记语言的语法。
rosparam -h
输出:
rosparam is a command-line tool for getting, setting, and deleting parameters from the ROS Parameter Server.Commands:rosparam set set parameterrosparam get get parameterrosparam load load parameters from filerosparam dump dump parameters to filerosparam delete delete parameterrosparam list list parameter names
set 和 get:
设置参数:
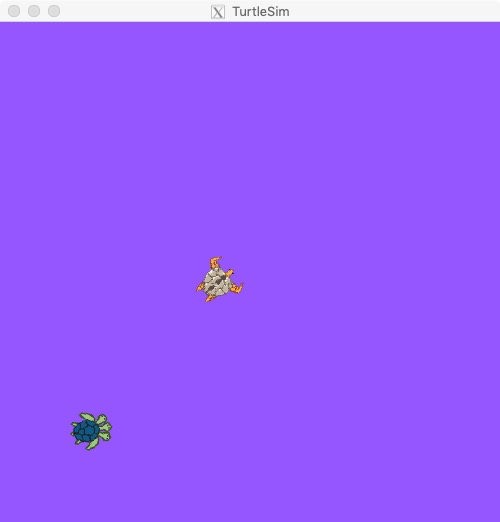
# rosparam set [param_name]
rosparam set /background_r 150
# refresh
rosservice call /clear
效果如下:
获取参数:
# rosparam get [param_name]
rosparam get /background_g
输出:
86
显示参数服务器中所有的参数:
rosparam get /
输出:
background_b: 255
background_g: 86
background_r: 150
rosdistro: 'melodic'
roslaunch:uris: {host_57c67ed2b135__39317: 'http://57c67ed2b135:39317/'}
rosversion: '1.14.3'
run_id: 9a92ffb2-da87-11e9-9b98-0242ac110004
rosparam 进行参数的持久化和加载
# usage
# rosparam dump [file_name] [namespace]
# rosparam load [file_name] [namespace]
rosparam dump 进行持久化:
rosparam dump params.yaml
会在当前目录生成一个 params.yaml 文件。
rosparam dump 加载参数到一个新的命名空间(如 version2):
rosparam load params.yaml version2
rosparam get /version2/background_b
返回:
255
第 8 关卡:使用 rqt_console 和 roslaunch
目标:使用 rqt_console 和 rqt_logger_level 进行调试;roslaunch 一次性启动多个节点。
准备条件
apt-get install ros-melodic-rqt ros-melodic-rqt-common-plugins ros-melodic-turtlesim 使用 rqt_console 和 rqt_logger_level
rqt_console 利用了 ROS 的日志框架,用于显示节点的输出。
rqt_logger_level 可以用于调节日志的 verbosity 级别。
在两个终端分别运行两个命令,首先打开 console:
rosrun rqt_console rqt_console
然后打开 logger level:
rosrun rqt_logger_level rqt_logger_level
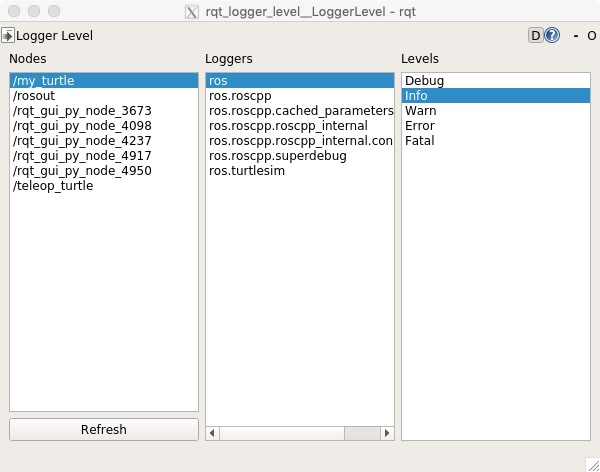
重启乌龟应用:
rosrun turtlesim turtlesim_node __name:=my_turtle
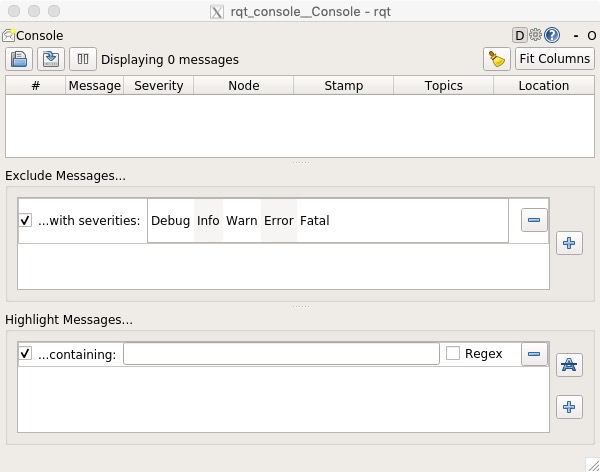
显示出来一条日志:

使用 roslaunch
# Usage
# roslaunch [package] [filename.launch]
进入 beginner_tutorials 目录:
source devel/setup.bash
roscd beginner_tutorials
创建 launch 目录:
mkdir launch
cd launch
创建 Launch 文件:
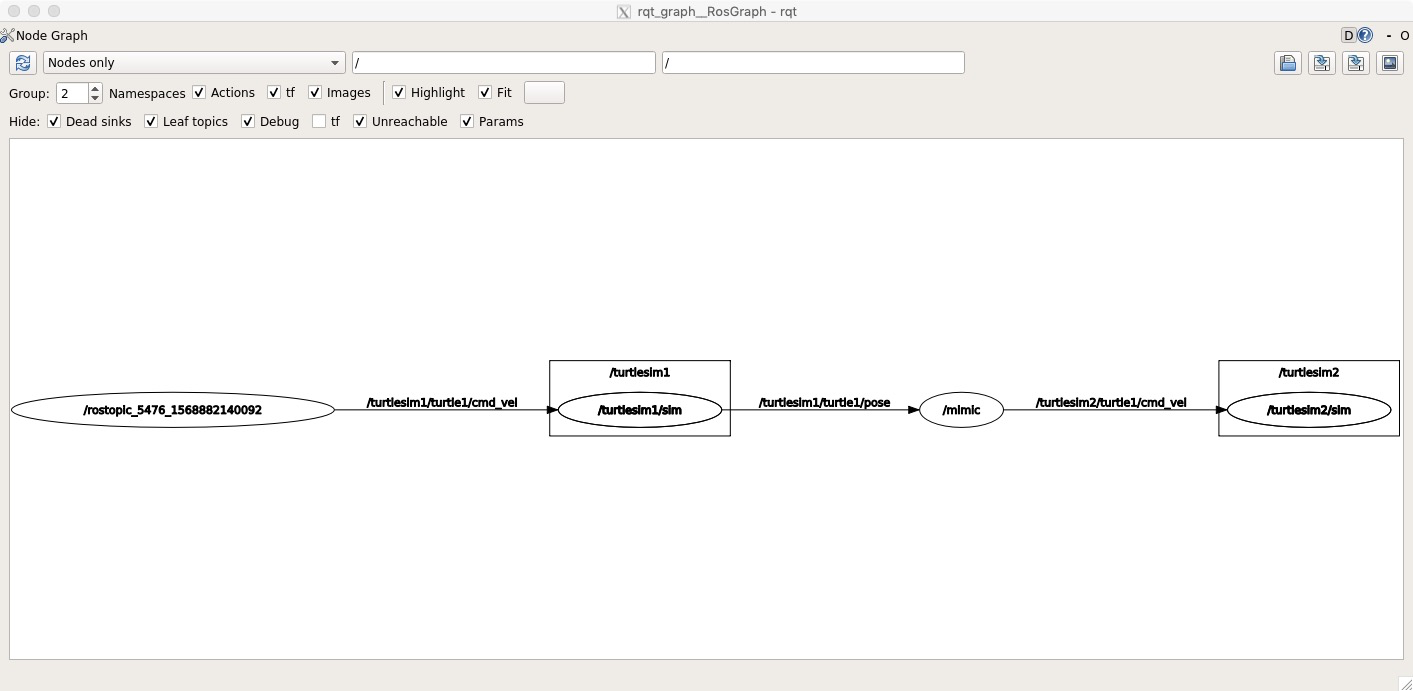
vim turtlemimic.launch
 1 <launch>
 2     <group ns="turtlesim1">
 3         <node pkg="turtlesim" name="sim" type="turtlesim_node"/>
 4     </group>
 5
 6     <group ns="turtlesim2">
 7         <node pkg="turtlesim" name="sim" type="turtlesim_node"/>
 8     </group>
 9
10     <node pkg="turtlesim" name="mimic" type="mimic">
11         <remap from="input" to="turtlesim1/turtle1"/>
12         <remap from="output" to="turtlesim2/turtle1"/>
13     </node>
14
15 </launch>
注解:
- 第 1 行:表示这是个 launch 文件。
- 第 2-8 行:创建两个 turtlesim 节点,其命名空间不冲突。
- 第 10-13 行:创建一个 mimic 节点,其中 turtlesim2 会模仿 turtlesim1。
启动 launch 文件:
roslaunch beginner_tutorials turtlemimic.launch
再开一个终端向 turtlesim1 发送数据流:
rostopic pub /turtlesim1/turtle1/cmd_vel geometry_msgs/Twist -r 1 -- '[2.0, 0.0, 0.0]' '[0.0, 0.0, -1.8]'

查看图结构:
rqt_graph
第 9 关卡:使用 rosed 修改 ROS 文件
目标:使用 rosed 进行编辑。
# Usage
# rosed [package_name] [filename]
修改 roscpp 包中的 Logger.msg 文件(默认使用 vim 打开)。
第 10 关卡:创建 ROS msg 和 srv
目标:创建和构建 msg 和 srv 文件;使用 rosmsg、rossrv、roscp 命令。
msg 和 srv 的介绍
- msg:msg 文件是描述 ROS 消息字段的文本文件。它用于生成不同编程语言的消息源代码。
- srv:srv 用于描述服务。它包含两部分:请求和响应。
msg 文件存储于包中的 msg 目录,而 srv 文件存储于 srv 目录。
在 msg 文件中,每行都是一个字段类型和对应的字段名称。
字段类型种类有:
- int8, int16, int32, int64 (plus uint*)
- float32, float64
- string
- time, duration
- 其他 msg 文件
- 变长数组 array[] 和固定长度数组 array[C]
ROS 中还有特殊的类型:Header,header 包含了时间戳和坐标系信息。
一个 msg 文件的例子:
Header header
string child_frame_id
geometry_msgs/PoseWithCovariance pose
geometry_msgs/TwistWithCovariance twist
srv 文件与 msg 文件类似,只不过通过 --- 分割了请求和响应两部分。
int64 A
int64 B
---
int64 Sum
创建 msg 及其配置
创建一个 Num.msg 文件:
roscd beginner_tutorials
mkdir msg
echo "int64 num" > msg/Num.msg
为了保证该文件转换为其他语言的源代码,打开 package.xml,确保添加了以下两行:
<build_depend>message_generation</build_depend>
<exec_depend>message_runtime</exec_depend>
message_generation 在编译时有用,message_runtime 用在运行时。
打开 CMakeLists.txt 添加 message_generation 的依赖,这样才能生成消息。
## Find catkin macros and libraries
## if COMPONENTS list like find_package(catkin REQUIRED COMPONENTS xyz)
## is used, also find other catkin packages
find_package(catkin REQUIRED COMPONENTSroscpprospystd_msgsmessage_generation
)
并且确保道出了 message_runtime 依赖:
catkin_package(...CATKIN_DEPENDS message_runtime ......)
还要添加 msg 文件:
add_message_files(FILESNum.msg
)
确保 generate_messages 函数的调用:
generate_messages(DEPENDENCIESstd_msgs
)
使用 rosmsg
# Usage
# rosmsg show [message type]
生成一个消息:
catkin_make
rosmsg show beginner_tutorials/Num
输出:
int64 num
使用 srv
创建 srv 目录:
roscd beginner_tutorials
mkdir srv
复制一个 srv 文件过去:
roscp rospy_tutorials AddTwoInts.srv srv/AddTwoInts.srv
文件的内容如下:
int64 a
int64 b
---
int64 sum
同样,配置 package.xml 文件,确保 srv 文件会转换为源代码(前面已经完成)。
<build_depend>message_generation</build_depend>
<exec_depend>message_runtime</exec_depend>
配置 CMakeLists.txt 文件,处理依赖(前面已经完成):
# Do not just add this line to your CMakeLists.txt, modify the existing line
find_package(catkin REQUIRED COMPONENTSroscpprospystd_msgsmessage_generation
)
注册服务文件:
add_service_files(FILESAddTwoInts.srv
)
使用 rossrv
# Usage
# rossrv show <service type>
编译后运行例子:
catkin_make
rossrv show beginner_tutorials/AddTwoInts
输出:
int64 a
int64 b
---
int64 sum
第 11 关卡:编写简单的发布者和订阅者(C++)
目标:用 C++ 编写发布者和订阅者。
编写发布者节点
进入目录:
roscd beginner_tutorials
mkdir src
创建 src/talker.cpp 文件:
 1 #include "ros/ros.h"
 2 #include "std_msgs/String.h"
 3
 4 #include <sstream>
 5
 6 /**
 7  * This tutorial demonstrates simple sending of messages over the ROS system.
 8  */
 9 int main(int argc, char **argv)
10 {
11   /**
12    * The ros::init() function needs to see argc and argv so that it can perform
13    * any ROS arguments and name remapping that were provided at the command line.
14    * For programmatic remappings you can use a different version of init() which takes
15    * remappings directly, but for most command-line programs, passing argc and argv is
16    * the easiest way to do it.  The third argument to init() is the name of the node.
17    *
18    * You must call one of the versions of ros::init() before using any other
19    * part of the ROS system.
20    */
21   ros::init(argc, argv, "talker");
22
23   /**
24    * NodeHandle is the main access point to communications with the ROS system.
25    * The first NodeHandle constructed will fully initialize this node, and the last
26    * NodeHandle destructed will close down the node.
27    */
28   ros::NodeHandle n;
29
30   /**
31    * The advertise() function is how you tell ROS that you want to
32    * publish on a given topic name. This invokes a call to the ROS
33    * master node, which keeps a registry of who is publishing and who
34    * is subscribing. After this advertise() call is made, the master
35    * node will notify anyone who is trying to subscribe to this topic name,
36    * and they will in turn negotiate a peer-to-peer connection with this
37    * node.  advertise() returns a Publisher object which allows you to
38    * publish messages on that topic through a call to publish().  Once
39    * all copies of the returned Publisher object are destroyed, the topic
40    * will be automatically unadvertised.
41    *
42    * The second parameter to advertise() is the size of the message queue
43    * used for publishing messages.  If messages are published more quickly
44    * than we can send them, the number here specifies how many messages to
45    * buffer up before throwing some away.
46    */
47   ros::Publisher chatter_pub = n.advertise<std_msgs::String>("chatter", 1000);
48
49   ros::Rate loop_rate(10);
50
51   /**
52    * A count of how many messages we have sent. This is used to create
53    * a unique string for each message.
54    */
55   int count = 0;
56   while (ros::ok())
57   {
58     /**
59      * This is a message object. You stuff it with data, and then publish it.
60      */
61     std_msgs::String msg;
62
63     std::stringstream ss;
64     ss << "hello world " << count;
65     msg.data = ss.str();
66
67     ROS_INFO("%s", msg.data.c_str());
68
69     /**
70      * The publish() function is how you send messages. The parameter
71      * is the message object. The type of this object must agree with the type
72      * given as a template parameter to the advertise<>() call, as was done
73      * in the constructor above.
74      */
75     chatter_pub.publish(msg);
76
77     ros::spinOnce();
78
79     loop_rate.sleep();
80     ++count;
81   }
82
83
84   return 0;
85 }
该代码流程:
- 初始化 ROS 系统。
- 向 master 通知:以主题 chatter 发布 std_msgs/String 消息。
- 以 10 Hz 的频率进行消息发布。
编写订阅者节点
创建 listener.cpp 文件:
 1 #include "ros/ros.h"
 2 #include "std_msgs/String.h"
 3
 4 /**
 5  * This tutorial demonstrates simple receipt of messages over the ROS system.
 6  */
 7 void chatterCallback(const std_msgs::String::ConstPtr& msg)
 8 {
 9   ROS_INFO("I heard: [%s]", msg->data.c_str());
10 }
11
12 int main(int argc, char **argv)
13 {
14   /**
15    * The ros::init() function needs to see argc and argv so that it can perform
16    * any ROS arguments and name remapping that were provided at the command line.
17    * For programmatic remappings you can use a different version of init() which takes
18    * remappings directly, but for most command-line programs, passing argc and argv is
19    * the easiest way to do it.  The third argument to init() is the name of the node.
20    *
21    * You must call one of the versions of ros::init() before using any other
22    * part of the ROS system.
23    */
24   ros::init(argc, argv, "listener");
25
26   /**
27    * NodeHandle is the main access point to communications with the ROS system.
28    * The first NodeHandle constructed will fully initialize this node, and the last
29    * NodeHandle destructed will close down the node.
30    */
31   ros::NodeHandle n;
32
33   /**
34    * The subscribe() call is how you tell ROS that you want to receive messages
35    * on a given topic.  This invokes a call to the ROS
36    * master node, which keeps a registry of who is publishing and who
37    * is subscribing.  Messages are passed to a callback function, here
38    * called chatterCallback.  subscribe() returns a Subscriber object that you
39    * must hold on to until you want to unsubscribe.  When all copies of the Subscriber
40    * object go out of scope, this callback will automatically be unsubscribed from
41    * this topic.
42    *
43    * The second parameter to the subscribe() function is the size of the message
44    * queue.  If messages are arriving faster than they are being processed, this
45    * is the number of messages that will be buffered up before beginning to throw
46    * away the oldest ones.
47    */
48   ros::Subscriber sub = n.subscribe("chatter", 1000, chatterCallback);
49
50   /**
51    * ros::spin() will enter a loop, pumping callbacks.  With this version, all
52    * callbacks will be called from within this thread (the main one).  ros::spin()
53    * will exit when Ctrl-C is pressed, or the node is shutdown by the master.
54    */
55   ros::spin();
56
57   return 0;
58 }
该代码的流程:
- 初始化 ROS 系统。
- 订阅 chatter 主题。
- spin:等待消息到达。
- 当消息到达时,调用 chatterCallback()。
编译节点
确保 CMakeLists.txt 的配置:
cmake_minimum_required(VERSION 2.8.3)
project(beginner_tutorials)## Find catkin and any catkin packages
find_package(catkin REQUIRED COMPONENTS roscpp rospy std_msgs genmsg)## Declare ROS messages and services
add_message_files(FILES Num.msg)
add_service_files(FILES AddTwoInts.srv)## Generate added messages and services
generate_messages(DEPENDENCIES std_msgs)## Declare a catkin package
catkin_package()## Build talker and listener
include_directories(include ${catkin_INCLUDE_DIRS})add_executable(talker src/talker.cpp)
target_link_libraries(talker ${catkin_LIBRARIES})
add_dependencies(talker beginner_tutorials_generate_messages_cpp)add_executable(listener src/listener.cpp)
target_link_libraries(listener ${catkin_LIBRARIES})
add_dependencies(listener beginner_tutorials_generate_messages_cpp)
构建后会创建两个可执行文件 talker 和 listener,放在 ~/catkin_ws/devel/lib/<package name> 中。
在工作区上运行:
catkin_make
第 12 关卡:编写简单的发布者和订阅者(Python)
目标:用 Python 编写发布者和订阅者。
编写发布者节点
进入目录:
roscd beginner_tutorials
mkdir scripts
cd scripts
创建 talker.py:
 1 #!/usr/bin/env python
 2 import rospy
 3 from std_msgs.msg import String
 4
 5 def talker():
 6     pub = rospy.Publisher('chatter', String, queue_size=10)
 7     rospy.init_node('talker', anonymous=True)
 8     rate = rospy.Rate(10) # 10hz
 9     while not rospy.is_shutdown():
10         hello_str = "hello world %s" % rospy.get_time()
11         rospy.loginfo(hello_str)
12         pub.publish(hello_str)
13         rate.sleep()
14
15 if __name__ == '__main__':
16     try:
17         talker()
18     except rospy.ROSInterruptException:
19         pass
编写订阅者节点
在 scripts 下面创建 listener.py 文件:
 1 #!/usr/bin/env python
 2 import rospy
 3 from std_msgs.msg import String
 4
 5 def callback(data):
 6     rospy.loginfo(rospy.get_caller_id() + "I heard %s", data.data)
 7
 8 def listener():
 9
10     # In ROS, nodes are uniquely named. If two nodes with the same
11     # name are launched, the previous one is kicked off. The
12     # anonymous=True flag means that rospy will choose a unique
13     # name for our 'listener' node so that multiple listeners can
14     # run simultaneously.
15     rospy.init_node('listener', anonymous=True)
16
17     rospy.Subscriber("chatter", String, callback)
18
19     # spin() simply keeps python from exiting until this node is stopped
20     rospy.spin()
21
22 if __name__ == '__main__':
23     listener()
编译节点
注意需要运行的 Python 脚本必须修改成可执行文件,scripts 目录下:
chmod +x talker.py
chmod +x listener.py
工作区下面输入:
catkin_make
第 13 关卡:运行检查简单的发布者和订阅者
目标:运行检查编写好的发布者和订阅者。
运行发布者
工作区下面,启动主节点:
roscore
另开启一个终端激活环境:
source devel/setup.bash
运行发布者:
# C++
rosrun beginner_tutorials talker
# Python
rosrun beginner_tutorials talker.py
不断输出:
[INFO] [WallTime: 1314931831.774057] hello world 1314931831.77
[INFO] [WallTime: 1314931832.775497] hello world 1314931832.77
[INFO] [WallTime: 1314931833.778937] hello world 1314931833.78
[INFO] [WallTime: 1314931834.782059] hello world 1314931834.78
[INFO] [WallTime: 1314931835.784853] hello world 1314931835.78
[INFO] [WallTime: 1314931836.788106] hello world 1314931836.79
在另一个终端用同样的方式运行订阅者:
# C++
rosrun beginner_tutorials listener
# Python
rosrun beginner_tutorials listener.py
不断输出:
[INFO] [WallTime: 1314931969.258941] /listener_17657_1314931968795I heard hello world 1314931969.26
[INFO] [WallTime: 1314931970.262246] /listener_17657_1314931968795I heard hello world 1314931970.26
[INFO] [WallTime: 1314931971.266348] /listener_17657_1314931968795I heard hello world 1314931971.26
[INFO] [WallTime: 1314931972.270429] /listener_17657_1314931968795I heard hello world 1314931972.27
[INFO] [WallTime: 1314931973.274382] /listener_17657_1314931968795I heard hello world 1314931973.27
[INFO] [WallTime: 1314931974.277694] /listener_17657_1314931968795I heard hello world 1314931974.28
[INFO] [WallTime: 1314931975.283708] /listener_17657_1314931968795I heard hello world 1314931975.28
第 14 关卡:编写简单的服务器和客户端(C++)
目标:用 C++ 编写服务器和客户端节点。
编写服务器节点
在 beginner_tutorials/src 里编写 add_two_ints_server.cpp:
 1 #include "ros/ros.h"
 2 #include "beginner_tutorials/AddTwoInts.h"
 3
 4 bool add(beginner_tutorials::AddTwoInts::Request  &req,
 5          beginner_tutorials::AddTwoInts::Response &res)
 6 {
 7   res.sum = req.a + req.b;
 8   ROS_INFO("request: x=%ld, y=%ld", (long int)req.a, (long int)req.b);
 9   ROS_INFO("sending back response: [%ld]", (long int)res.sum);
10   return true;
11 }
12
13 int main(int argc, char **argv)
14 {
15   ros::init(argc, argv, "add_two_ints_server");
16   ros::NodeHandle n;
17
18   ros::ServiceServer service = n.advertiseService("add_two_ints", add);
19   ROS_INFO("Ready to add two ints.");
20   ros::spin();
21
22   return 0;
23 }
编写客户端节点
再创建 add_two_ints_client.cpp 文件:
 1 #include "ros/ros.h"
 2 #include "beginner_tutorials/AddTwoInts.h"
 3 #include <cstdlib>
 4
 5 int main(int argc, char **argv)
 6 {
 7   ros::init(argc, argv, "add_two_ints_client");
 8   if (argc != 3)
 9   {
10     ROS_INFO("usage: add_two_ints_client X Y");
11     return 1;
12   }
13
14   ros::NodeHandle n;
15   ros::ServiceClient client = n.serviceClient<beginner_tutorials::AddTwoInts>("add_two_ints");
16   beginner_tutorials::AddTwoInts srv;
17   srv.request.a = atoll(argv[1]);
18   srv.request.b = atoll(argv[2]);
19   if (client.call(srv))
20   {
21     ROS_INFO("Sum: %ld", (long int)srv.response.sum);
22   }
23   else
24   {
25     ROS_ERROR("Failed to call service add_two_ints");
26     return 1;
27   }
28
29   return 0;
30 }
编译节点
在 beginner_tutorials 包中的 CMakeLists.txt 添加配置:
add_executable(add_two_ints_server src/add_two_ints_server.cpp)
target_link_libraries(add_two_ints_server ${catkin_LIBRARIES})
add_dependencies(add_two_ints_server beginner_tutorials_gencpp)add_executable(add_two_ints_client src/add_two_ints_client.cpp)
target_link_libraries(add_two_ints_client ${catkin_LIBRARIES})
add_dependencies(add_two_ints_client beginner_tutorials_gencpp)
最后在工作区进行编译:
# In your catkin workspace
cd ~/catkin_ws
catkin_make
第 15 关卡:编写简单的服务器和客户端(Python)
目标:用 Python 编写服务器和客户端节点。
编写服务器节点
在 beginner_tutorials/scripts 里编写 add_two_ints_server.py:
 1 #!/usr/bin/env python
 2
 3 from beginner_tutorials.srv import AddTwoInts,AddTwoIntsResponse
 4 import rospy
 5
 6 def handle_add_two_ints(req):
 7     print "Returning [%s + %s = %s]"%(req.a, req.b, (req.a + req.b))
 8     return AddTwoIntsResponse(req.a + req.b)
 9
10 def add_two_ints_server():
11     rospy.init_node('add_two_ints_server')
12     s = rospy.Service('add_two_ints', AddTwoInts, handle_add_two_ints)
13     print "Ready to add two ints."
14     rospy.spin()
15
16 if __name__ == "__main__":
17     add_two_ints_server()
使脚本可执行:
chmod +x add_two_ints_server.py 编写客户端节点
再创建 add_two_ints_client.py 文件:
#!/usr/bin/env pythonimport sys
import rospy
from beginner_tutorials.srv import *def add_two_ints_client(x, y):rospy.wait_for_service('add_two_ints')try:add_two_ints = rospy.ServiceProxy('add_two_ints', AddTwoInts)resp1 = add_two_ints(x, y)return resp1.sumexcept rospy.ServiceException, e:print "Service call failed: %s"%edef usage():return "%s [x y]"%sys.argv[0]if __name__ == "__main__":if len(sys.argv) == 3:x = int(sys.argv[1])y = int(sys.argv[2])else:print usage()sys.exit(1)print "Requesting %s+%s"%(x, y)print "%s + %s = %s"%(x, y, add_two_ints_client(x, y))
使脚本可执行:
chmod +x add_two_ints_client.py 最后编译一下即可。
第 16 关卡:运行检查简单的服务器和客户端
目标:运行检查编写好的服务器和客户端。
运行服务器
工作区下面,启动主节点:
roscore
另开启一个终端激活环境:
source devel/setup.bash
运行服务器:
# C++
rosrun beginner_tutorials add_two_ints_server
# Python
rosrun beginner_tutorials add_two_ints_server.py
输出:
[ INFO] [1568949373.838082500]: Ready to add two ints.
运行客户端
运行客户端:
# C++
rosrun beginner_tutorials add_two_ints_client 1 3
# Python
rosrun beginner_tutorials add_two_ints_client.py 1 3
输出:
[ INFO] [1568949401.094979600]: Sum: 4
第 17 关卡:录制和播放数据
目标:从运行的 ROS 系统上将数据录制为 .bag 文件;重新播放 .bag 文件上的数据。
录制数据
这里解决如何从运行的 ROS 系统中录制主题数据,主题数据最终会汇聚为一个 bag 文件。
下面执行我们前面已经熟悉了几个操作。
终端 1:
roscore
终端 2:
rosrun turtlesim turtlesim_node
终端 3:
rosrun turtlesim turtle_teleop_key
查看当前运行系统中发布的主题列表:
rostopic list -v
输出:
Published topics:* /turtle1/color_sensor [turtlesim/Color] 1 publisher* /rosout [rosgraph_msgs/Log] 2 publishers* /rosout_agg [rosgraph_msgs/Log] 1 publisher* /turtle1/cmd_vel [geometry_msgs/Twist] 1 publisher* /turtle1/pose [turtlesim/Pose] 1 publisherSubscribed topics:* /turtle1/cmd_vel [geometry_msgs/Twist] 1 subscriber* /rosout [rosgraph_msgs/Log] 1 subscriber
其中,/turtle1/cmd_vel 是 teleop_turtle 发布的主题数据。
打开新终端,运行命令录制所有正在发布的主题数据(rosbag record):
mkdir ~/bagfiles
cd ~/bagfiles
rosbag record -a
然后在 turtle_teleop 终端里面滑动方向键,移动乌龟十来秒,接着在最新的 rosbag record 命令的终端窗口下面终止进程。查看当前目录,可以发现已经生成了一个新的 bag 文件。
2019-09-19-17-55-44.bag
这个 bag 文件现在包含了所有 rosbag record 期间的所有节点发布的主题数据。
检查并播放 bag 文件
使用 rosbag info 检查 bag 文件信息:
rosbag info 2019-09-19-17-55-44.bag
输出:
path:        2019-09-19-17-55-44.bag
version:     2.0
duration:    57.9s
start:       Sep 19 2019 17:55:44.60 (1568886944.60)
end:         Sep 19 2019 17:56:42.50 (1568887002.50)
size:        413.4 KB
messages:    5842
compression: none [1/1 chunks]
types:       geometry_msgs/Twist [9f195f881246fdfa2798d1d3eebca84a]rosgraph_msgs/Log   [acffd30cd6b6de30f120938c17c593fb]turtlesim/Color     [353891e354491c51aabe32df673fb446]turtlesim/Pose      [863b248d5016ca62ea2e895ae5265cf9]
topics:      /rosout                    5 msgs    : rosgraph_msgs/Log   (2 connections)/turtle1/cmd_vel         105 msgs    : geometry_msgs/Twist/turtle1/color_sensor   2869 msgs    : turtlesim/Color    /turtle1/pose           2863 msgs    : turtlesim/Pose
接下来重播 bag 文件以生成 ROS 当时运行时的行为。
首先中断 teleop 程序,免得它一直发数据。而 turtlesim 继续运行。
接着运行命令:
rosbag play <your bagfile>
进行播放,最后输出:
[ INFO] [1568887897.273155900]: Opening 2019-09-19-17-55-44.bagWaiting 0.2 seconds after advertising topics... done.Hit space to toggle paused, or 's' to step.[RUNNING]  Bag Time: 1568887002.474074   Duration: 57.874504 / 57.904033
Done.
这个时候乌龟会继续按照之前记录好的套路动起来。
记录数据的子集
rosbag record 支持录制特定主题的数据。
rosbag record -O subset /turtle1/cmd_vel /turtle1/pose
故技重施,生成了文件 subset.bag 文件。-O 指定了文件名,后面跟的两个参数制定了特定的主题。
rosbag info subset.bag 输出:
path:        subset.bag
version:     2.0
duration:    38.1s
start:       Sep 19 2019 18:22:02.74 (1568888522.74)
end:         Sep 19 2019 18:22:40.83 (1568888560.83)
size:        144.5 KB
messages:    1787
compression: none [1/1 chunks]
types:       geometry_msgs/Twist [9f195f881246fdfa2798d1d3eebca84a]turtlesim/Pose      [863b248d5016ca62ea2e895ae5265cf9]
topics:      /turtle1/cmd_vel     72 msgs    : geometry_msgs/Twist/turtle1/pose      1715 msgs    : turtlesim/Pose
参考:
- ROS Tutorials
- cn ROS Tutorials
转载于:https://www.cnblogs.com/noluye/p/11544530.html
如若内容造成侵权/违法违规/事实不符,请联系编程学习网邮箱:809451989@qq.com进行投诉反馈,一经查实,立即删除!
相关文章
- 在ROS中发布IMU数据
本文主要是来发布sensor_msgs/Imu类型的消息,其中IMu的数据为虚拟的。 1.在自己的工作空间中创建ros程序包 (这个包依靠std_msgs、roscpp、rospy) catkin_create_pkg imu_publish std_msgs rospy roscpp进…...
2024/4/24 0:44:55 - ROS学习笔记五:理解ROS topics
版权声明:本文为博主原创文章,遵循 CC 4.0 BY-SA 版权协议,转载请附上原文出处链接和本声明。 本文链接:https://blog.csdn.net/mountzf/article/details/52314364 ROS学习笔记五:理解ROS topics 本节主要介绍ROS top…...
2024/4/20 15:35:23 - ros接入IMU数据,打包发布topic
1 串口读入IMU数据 1.1 serial工具 IMU接入ros系统可以使用I2C,串口或者其他方式实现,这里考虑使用usb转TTL解决。 参考博客ROS使用官方包进行串口通信几点说明: 在catkin_workspace/src 在创建package $ cd ~/catkin_ws/src $ catkin_crea…...
2024/4/21 12:19:35 - 用自己的机器人和ubuntu PC实现通信和控制--26
原创博客:转载请表明出处:http://www.cnblogs.com/zxouxuewei/ 前提: 1.拥有一台能够采用手动或者自动移动的机器人移动平台。 2.在电机端需要安装高分辨率的霍尔编码器。 3.在终端控制板上有基本的电机PWM控制,PID电机补偿调速。编码器输入捕获…...
2024/4/21 12:19:34 - Gazebo使用笔记(10) —— gazebo插件与传感器的添加
文章目录0. 插件类型添加ModelPlugin添加SensorPlugin1. 相机普通相机多机位相机深度相机2. 激光GPU LaserLaserBlock Laser3. IMUIMU (GazeboRosImu)IMU sensor (GazeboRosImuSensor)4. 其他F3D (Force Feedback Ground Truth)ForceJoint Pose TrajectoryP3D (3D Position Int…...
2024/4/21 12:19:33 - ROS2官网学习笔记 理解ROS2话题篇
ROS2官网学习笔记 理解ROS2话题篇背景要准备的条件学习内容1. 启动节点2. rqt_graph3. ros2 topic list4. ros2 topic echo5. ros2 topic info6. ros2 interface show7. ros2 topic pub8. ros2 topic hz9. 关闭节点总结学习目标:使用rqt_graph和命令行工具查看ROS2的…...
2024/4/21 12:19:33 - ROS学习笔记 使用imu_tools对imu_raw数据进行滤波和可视化
目录 1 前言 2. 安装 From source files 3. IMU原始数据测试 3.1 文件系统 注:遇到串口权限问题,请安装此步骤解决 3.2 运行imu_read_node 运行节点launch文件 查看节点和话题信息 查看原始数据: 3.3 打开rviz查看原始的imu数据 …...
2024/4/21 12:19:31 - ROS学习笔记(二)-----发布者publisher的编程实现、订阅者Subscriber的编程实现、话题消息的定义和使用
本系列文章是与大家分享一下,我在学习ROS过程中所做的笔记,目前主要的学习资料是古月老师(胡春旭老师)的 ROS入门21讲,以及其编著的《ROS机器人开发实践》,当然其中也加入了我自己的理解和其他的相关资料&a…...
2024/4/21 12:19:31 - 发布导航需要的传感器信息和里程计消息---21
摘要: 原创博客:转载请表明出处:http://www.cnblogs.com/zxouxuewei/ 一。ROS使用tf来决定机器人的位置和静态地图中的传感器数据,但是tf中没有机器人的速度信息,所以导航功能包要求机器人 能够通过里程计信息源发布包含速度信息的里程计nav_msgs/Odomet…...
2024/4/21 12:19:30 - ROS与GAZEBO实时硬件仿真(3)——将gazebo和ros连接起来
版权声明: https://blog.csdn.net/wubaobao1993/article/details/81054570 写在前面 通过上两节的博客,相信朋友们已经对gazebo的一些标签有了较为深入的认识,但是特别是上一节,程序写完了之后发现并没有什么特别的变化。着实&a…...
2024/4/21 12:19:29 - ROS 订阅雷达/scan信息和定位信息的数据融合进行目标跟随
雷达信息scan的数据类型如下(通过rosmsg show 查看): 代码中用到的min(range)代表离障碍物的最小距离,而且代码含有简单的过滤功能,请仔细研读!!! Header header # Head…...
2024/4/20 16:30:41 - 机器人系统仿真(十六)——摄像头和kinect信息仿真以及显示
参考视频:【奥特学园】ROS机器人入门课程《ROS理论与实践》零基础教程_哔哩哔哩_bilibili 参考文档:http://www.autolabor.com.cn/book/ROSTutorials/ 一、摄像头信息仿真以及显示 通过 Gazebo 模拟摄像头传感器,并在 Rviz 中显示摄像头数据。…...
2024/5/3 15:04:21 - ROS基础入门(一) 创建指令/工作空间和功能包的新建
目录1.常见命令汇总2.工作空间3.publist话题发布4. 自定义话题的发布和接受过程4.1 问题描述case1: 完全重新做case2: 继续第3节往下做1.常见命令汇总 小海龟的自由运动仿真 1.一个…...
2024/5/5 5:41:24 - 【SLAM建图和导航仿真实例】(一)- 模型构建
引言 在这个-SLAM建图和导航仿真实例-项目中,主要分为三个部分,分别是 (一)模型构建(二)根据已知地图进行定位和导航(三)使用RTAB-MAP进行建图和导航 该项目的slam_bot已经上传我…...
2024/4/20 16:30:37 - ROS小车记录系列(二)IMU采集、过滤,与odom数据融合,发布新的odom话题
(二)IMU采集、过滤,利用EKF将IMU与odom融合,发布新的odom话题A、ROS采集节点B、imu_tools过滤imu数据C、使用 robot_pose_ekf 对imu和odom进行融合____先说整体处理流程:底层使用STM32F4,采集MPU9250、编码…...
2024/5/5 10:36:50 - 通过游戏手柄控制机器人(ROS,Twist)
1.适配与测试游戏手柄 首先把手柄插入主机,一般来说可以通过检查/dev/input查看,里面js#的设备一般就是手柄了 ls /dev/input/ 然后使用jstest,安装的话sudo apt-get install就好,使用jstest的语句如下: sudo jstest …...
2024/4/21 12:19:26 - 基于ArbotiX和rviz控制前轮转向后轮驱动的SmartCar_xacro模型
基于ArbotiX和rviz控制前轮转向后轮驱动的四轮小车xacro模型前言一、前轮转向后轮驱动的SmartCar_URDF模型1、创建SmartCar工作空间2、创建SmartCar代码包3、创建SmartCar模型描述文件4、创建描述文件的launch文件夹5、编译工程6、模型在rviz显示二、前轮转向后轮驱动的四轮小车…...
2024/4/28 9:20:21 - 初学ROS--joy包学习
joy包是支持所有的Linux的操作手柄的一个包。这个包有一个用来作为操作手柄到ROS的接口的节点:joy_node.里面包含有操作手柄的按键和轴的信息。 这个驱动会论询可以读的端口,这个端口里会发布操作手柄的状态信息。如果这个端口关闭或者读取失败…...
2024/4/27 7:30:35 - 基于ROS和gmapping,通过伪造的odom,完成Kinect建图
传感器信息: 环境深度信息:sensor_msgs/laserScan -----> RGBD三维点云数据:通过ros功能包depthimage to laserscan完成深度相机数据转换成激光数据里程计信息:机器人发布的nav_msgs/Odemetry(pose:x,y,z三轴位置与方向以及矫正误差的协方差矩阵;twi…...
2024/5/5 14:16:38 - 用自己的机器人和ubuntu PC实现通信和控制
前提: 1.拥有一台能够采用手动或者自动移动的机器人移动平台。 2.在电机端需要安装高分辨率的霍尔编码器。 3.在终端控制板上有基本的电机PWM控制,PID电机补偿调速。编码器输入捕获,串口数据收发的驱动。 以下是我的机器人: 控制…...
2024/5/5 13:46:45
最新文章
- 【Linux系统化学习】网络套接字(编写简单的TCP服务端和客户端)
目录 TCP服务端 创建套接字 解决绑定失败问题 填充网络信息 绑定 设置监听状态 接受请求 收取和反馈消息 完整的服务端封装代码 TCP客户端 创建套接字 填充网络信息 发起连接 发送和收取消息 客户端完整代码 一些补充 TCP服务端 初始化服务端 创建套接字 和U…...
2024/5/6 8:40:51 - 梯度消失和梯度爆炸的一些处理方法
在这里是记录一下梯度消失或梯度爆炸的一些处理技巧。全当学习总结了如有错误还请留言,在此感激不尽。 权重和梯度的更新公式如下: w w − η ⋅ ∇ w w w - \eta \cdot \nabla w ww−η⋅∇w 个人通俗的理解梯度消失就是网络模型在反向求导的时候出…...
2024/3/20 10:50:27 - ensp设置远程登录路由器
[AR1]aaa #aaa服务专门存储账号密码 [AR1-aaa]local-user 用户名 privilege level 15(1~15) password cipher 123456 #预设账号密码 [AR1-aaa]local-user 用户名 service-type telnet [AR1]user-interface vty 0 4 #虚拟接口调用,0~4口,可同时…...
2024/5/4 2:28:17 - c++类的继承方式
在 C 中,类的继承方式有三种:公有继承(public inheritance)、保护继承(protected inheritance)和私有继承(private inheritance)。这些继承方式决定了派生类对基类成员的访问权限。 …...
2024/5/3 14:42:38 - 金融数据_PySpark-3.0.3决策树(DecisionTreeClassifier)实例
金融数据_PySpark-3.0.3决策树(DecisionTreeClassifier)实例 逻辑回归: 逻辑回归常被用于二分类问题, 比如涨跌预测。你可以将涨跌标记为类别, 然后使用逻辑回归进行训练。 决策树和随机森林: 决策树和随机森林是用于分类问题的强大模型。它们能够处理非线性关系, 并且对于特…...
2024/5/4 17:20:04 - 【外汇早评】美通胀数据走低,美元调整
原标题:【外汇早评】美通胀数据走低,美元调整昨日美国方面公布了新一期的核心PCE物价指数数据,同比增长1.6%,低于前值和预期值的1.7%,距离美联储的通胀目标2%继续走低,通胀压力较低,且此前美国一季度GDP初值中的消费部分下滑明显,因此市场对美联储后续更可能降息的政策…...
2024/5/4 23:54:56 - 【原油贵金属周评】原油多头拥挤,价格调整
原标题:【原油贵金属周评】原油多头拥挤,价格调整本周国际劳动节,我们喜迎四天假期,但是整个金融市场确实流动性充沛,大事频发,各个商品波动剧烈。美国方面,在本周四凌晨公布5月份的利率决议和新闻发布会,维持联邦基金利率在2.25%-2.50%不变,符合市场预期。同时美联储…...
2024/5/4 23:54:56 - 【外汇周评】靓丽非农不及疲软通胀影响
原标题:【外汇周评】靓丽非农不及疲软通胀影响在刚结束的周五,美国方面公布了新一期的非农就业数据,大幅好于前值和预期,新增就业重新回到20万以上。具体数据: 美国4月非农就业人口变动 26.3万人,预期 19万人,前值 19.6万人。 美国4月失业率 3.6%,预期 3.8%,前值 3…...
2024/5/4 23:54:56 - 【原油贵金属早评】库存继续增加,油价收跌
原标题:【原油贵金属早评】库存继续增加,油价收跌周三清晨公布美国当周API原油库存数据,上周原油库存增加281万桶至4.692亿桶,增幅超过预期的74.4万桶。且有消息人士称,沙特阿美据悉将于6月向亚洲炼油厂额外出售更多原油,印度炼油商预计将每日获得至多20万桶的额外原油供…...
2024/5/4 23:55:17 - 【外汇早评】日本央行会议纪要不改日元强势
原标题:【外汇早评】日本央行会议纪要不改日元强势近两日日元大幅走强与近期市场风险情绪上升,避险资金回流日元有关,也与前一段时间的美日贸易谈判给日本缓冲期,日本方面对汇率问题也避免继续贬值有关。虽然今日早间日本央行公布的利率会议纪要仍然是支持宽松政策,但这符…...
2024/5/4 23:54:56 - 【原油贵金属早评】欧佩克稳定市场,填补伊朗问题的影响
原标题:【原油贵金属早评】欧佩克稳定市场,填补伊朗问题的影响近日伊朗局势升温,导致市场担忧影响原油供给,油价试图反弹。此时OPEC表态稳定市场。据消息人士透露,沙特6月石油出口料将低于700万桶/日,沙特已经收到石油消费国提出的6月份扩大出口的“适度要求”,沙特将满…...
2024/5/4 23:55:05 - 【外汇早评】美欲与伊朗重谈协议
原标题:【外汇早评】美欲与伊朗重谈协议美国对伊朗的制裁遭到伊朗的抗议,昨日伊朗方面提出将部分退出伊核协议。而此行为又遭到欧洲方面对伊朗的谴责和警告,伊朗外长昨日回应称,欧洲国家履行它们的义务,伊核协议就能保证存续。据传闻伊朗的导弹已经对准了以色列和美国的航…...
2024/5/4 23:54:56 - 【原油贵金属早评】波动率飙升,市场情绪动荡
原标题:【原油贵金属早评】波动率飙升,市场情绪动荡因中美贸易谈判不安情绪影响,金融市场各资产品种出现明显的波动。随着美国与中方开启第十一轮谈判之际,美国按照既定计划向中国2000亿商品征收25%的关税,市场情绪有所平复,已经开始接受这一事实。虽然波动率-恐慌指数VI…...
2024/5/4 23:55:16 - 【原油贵金属周评】伊朗局势升温,黄金多头跃跃欲试
原标题:【原油贵金属周评】伊朗局势升温,黄金多头跃跃欲试美国和伊朗的局势继续升温,市场风险情绪上升,避险黄金有向上突破阻力的迹象。原油方面稍显平稳,近期美国和OPEC加大供给及市场需求回落的影响,伊朗局势并未推升油价走强。近期中美贸易谈判摩擦再度升级,美国对中…...
2024/5/4 23:54:56 - 【原油贵金属早评】市场情绪继续恶化,黄金上破
原标题:【原油贵金属早评】市场情绪继续恶化,黄金上破周初中国针对于美国加征关税的进行的反制措施引发市场情绪的大幅波动,人民币汇率出现大幅的贬值动能,金融市场受到非常明显的冲击。尤其是波动率起来之后,对于股市的表现尤其不安。隔夜美国股市出现明显的下行走势,这…...
2024/5/6 1:40:42 - 【外汇早评】美伊僵持,风险情绪继续升温
原标题:【外汇早评】美伊僵持,风险情绪继续升温昨日沙特两艘油轮再次发生爆炸事件,导致波斯湾局势进一步恶化,市场担忧美伊可能会出现摩擦生火,避险品种获得支撑,黄金和日元大幅走强。美指受中美贸易问题影响而在低位震荡。继5月12日,四艘商船在阿联酋领海附近的阿曼湾、…...
2024/5/4 23:54:56 - 【原油贵金属早评】贸易冲突导致需求低迷,油价弱势
原标题:【原油贵金属早评】贸易冲突导致需求低迷,油价弱势近日虽然伊朗局势升温,中东地区几起油船被袭击事件影响,但油价并未走高,而是出于调整结构中。由于市场预期局势失控的可能性较低,而中美贸易问题导致的全球经济衰退风险更大,需求会持续低迷,因此油价调整压力较…...
2024/5/4 23:55:17 - 氧生福地 玩美北湖(上)——为时光守候两千年
原标题:氧生福地 玩美北湖(上)——为时光守候两千年一次说走就走的旅行,只有一张高铁票的距离~ 所以,湖南郴州,我来了~ 从广州南站出发,一个半小时就到达郴州西站了。在动车上,同时改票的南风兄和我居然被分到了一个车厢,所以一路非常愉快地聊了过来。 挺好,最起…...
2024/5/4 23:55:06 - 氧生福地 玩美北湖(中)——永春梯田里的美与鲜
原标题:氧生福地 玩美北湖(中)——永春梯田里的美与鲜一觉醒来,因为大家太爱“美”照,在柳毅山庄去寻找龙女而错过了早餐时间。近十点,向导坏坏还是带着饥肠辘辘的我们去吃郴州最富有盛名的“鱼头粉”。说这是“十二分推荐”,到郴州必吃的美食之一。 哇塞!那个味美香甜…...
2024/5/4 23:54:56 - 氧生福地 玩美北湖(下)——奔跑吧骚年!
原标题:氧生福地 玩美北湖(下)——奔跑吧骚年!让我们红尘做伴 活得潇潇洒洒 策马奔腾共享人世繁华 对酒当歌唱出心中喜悦 轰轰烈烈把握青春年华 让我们红尘做伴 活得潇潇洒洒 策马奔腾共享人世繁华 对酒当歌唱出心中喜悦 轰轰烈烈把握青春年华 啊……啊……啊 两…...
2024/5/4 23:55:06 - 扒开伪装医用面膜,翻六倍价格宰客,小姐姐注意了!
原标题:扒开伪装医用面膜,翻六倍价格宰客,小姐姐注意了!扒开伪装医用面膜,翻六倍价格宰客!当行业里的某一品项火爆了,就会有很多商家蹭热度,装逼忽悠,最近火爆朋友圈的医用面膜,被沾上了污点,到底怎么回事呢? “比普通面膜安全、效果好!痘痘、痘印、敏感肌都能用…...
2024/5/5 8:13:33 - 「发现」铁皮石斛仙草之神奇功效用于医用面膜
原标题:「发现」铁皮石斛仙草之神奇功效用于医用面膜丽彦妆铁皮石斛医用面膜|石斛多糖无菌修护补水贴19大优势: 1、铁皮石斛:自唐宋以来,一直被列为皇室贡品,铁皮石斛生于海拔1600米的悬崖峭壁之上,繁殖力差,产量极低,所以古代仅供皇室、贵族享用 2、铁皮石斛自古民间…...
2024/5/4 23:55:16 - 丽彦妆\医用面膜\冷敷贴轻奢医学护肤引导者
原标题:丽彦妆\医用面膜\冷敷贴轻奢医学护肤引导者【公司简介】 广州华彬企业隶属香港华彬集团有限公司,专注美业21年,其旗下品牌: 「圣茵美」私密荷尔蒙抗衰,产后修复 「圣仪轩」私密荷尔蒙抗衰,产后修复 「花茵莳」私密荷尔蒙抗衰,产后修复 「丽彦妆」专注医学护…...
2024/5/4 23:54:58 - 广州械字号面膜生产厂家OEM/ODM4项须知!
原标题:广州械字号面膜生产厂家OEM/ODM4项须知!广州械字号面膜生产厂家OEM/ODM流程及注意事项解读: 械字号医用面膜,其实在我国并没有严格的定义,通常我们说的医美面膜指的应该是一种「医用敷料」,也就是说,医用面膜其实算作「医疗器械」的一种,又称「医用冷敷贴」。 …...
2024/5/4 23:55:01 - 械字号医用眼膜缓解用眼过度到底有无作用?
原标题:械字号医用眼膜缓解用眼过度到底有无作用?医用眼膜/械字号眼膜/医用冷敷眼贴 凝胶层为亲水高分子材料,含70%以上的水分。体表皮肤温度传导到本产品的凝胶层,热量被凝胶内水分子吸收,通过水分的蒸发带走大量的热量,可迅速地降低体表皮肤局部温度,减轻局部皮肤的灼…...
2024/5/4 23:54:56 - 配置失败还原请勿关闭计算机,电脑开机屏幕上面显示,配置失败还原更改 请勿关闭计算机 开不了机 这个问题怎么办...
解析如下:1、长按电脑电源键直至关机,然后再按一次电源健重启电脑,按F8健进入安全模式2、安全模式下进入Windows系统桌面后,按住“winR”打开运行窗口,输入“services.msc”打开服务设置3、在服务界面,选中…...
2022/11/19 21:17:18 - 错误使用 reshape要执行 RESHAPE,请勿更改元素数目。
%读入6幅图像(每一幅图像的大小是564*564) f1 imread(WashingtonDC_Band1_564.tif); subplot(3,2,1),imshow(f1); f2 imread(WashingtonDC_Band2_564.tif); subplot(3,2,2),imshow(f2); f3 imread(WashingtonDC_Band3_564.tif); subplot(3,2,3),imsho…...
2022/11/19 21:17:16 - 配置 已完成 请勿关闭计算机,win7系统关机提示“配置Windows Update已完成30%请勿关闭计算机...
win7系统关机提示“配置Windows Update已完成30%请勿关闭计算机”问题的解决方法在win7系统关机时如果有升级系统的或者其他需要会直接进入一个 等待界面,在等待界面中我们需要等待操作结束才能关机,虽然这比较麻烦,但是对系统进行配置和升级…...
2022/11/19 21:17:15 - 台式电脑显示配置100%请勿关闭计算机,“准备配置windows 请勿关闭计算机”的解决方法...
有不少用户在重装Win7系统或更新系统后会遇到“准备配置windows,请勿关闭计算机”的提示,要过很久才能进入系统,有的用户甚至几个小时也无法进入,下面就教大家这个问题的解决方法。第一种方法:我们首先在左下角的“开始…...
2022/11/19 21:17:14 - win7 正在配置 请勿关闭计算机,怎么办Win7开机显示正在配置Windows Update请勿关机...
置信有很多用户都跟小编一样遇到过这样的问题,电脑时发现开机屏幕显现“正在配置Windows Update,请勿关机”(如下图所示),而且还需求等大约5分钟才干进入系统。这是怎样回事呢?一切都是正常操作的,为什么开时机呈现“正…...
2022/11/19 21:17:13 - 准备配置windows 请勿关闭计算机 蓝屏,Win7开机总是出现提示“配置Windows请勿关机”...
Win7系统开机启动时总是出现“配置Windows请勿关机”的提示,没过几秒后电脑自动重启,每次开机都这样无法进入系统,此时碰到这种现象的用户就可以使用以下5种方法解决问题。方法一:开机按下F8,在出现的Windows高级启动选…...
2022/11/19 21:17:12 - 准备windows请勿关闭计算机要多久,windows10系统提示正在准备windows请勿关闭计算机怎么办...
有不少windows10系统用户反映说碰到这样一个情况,就是电脑提示正在准备windows请勿关闭计算机,碰到这样的问题该怎么解决呢,现在小编就给大家分享一下windows10系统提示正在准备windows请勿关闭计算机的具体第一种方法:1、2、依次…...
2022/11/19 21:17:11 - 配置 已完成 请勿关闭计算机,win7系统关机提示“配置Windows Update已完成30%请勿关闭计算机”的解决方法...
今天和大家分享一下win7系统重装了Win7旗舰版系统后,每次关机的时候桌面上都会显示一个“配置Windows Update的界面,提示请勿关闭计算机”,每次停留好几分钟才能正常关机,导致什么情况引起的呢?出现配置Windows Update…...
2022/11/19 21:17:10 - 电脑桌面一直是清理请关闭计算机,windows7一直卡在清理 请勿关闭计算机-win7清理请勿关机,win7配置更新35%不动...
只能是等着,别无他法。说是卡着如果你看硬盘灯应该在读写。如果从 Win 10 无法正常回滚,只能是考虑备份数据后重装系统了。解决来方案一:管理员运行cmd:net stop WuAuServcd %windir%ren SoftwareDistribution SDoldnet start WuA…...
2022/11/19 21:17:09 - 计算机配置更新不起,电脑提示“配置Windows Update请勿关闭计算机”怎么办?
原标题:电脑提示“配置Windows Update请勿关闭计算机”怎么办?win7系统中在开机与关闭的时候总是显示“配置windows update请勿关闭计算机”相信有不少朋友都曾遇到过一次两次还能忍但经常遇到就叫人感到心烦了遇到这种问题怎么办呢?一般的方…...
2022/11/19 21:17:08 - 计算机正在配置无法关机,关机提示 windows7 正在配置windows 请勿关闭计算机 ,然后等了一晚上也没有关掉。现在电脑无法正常关机...
关机提示 windows7 正在配置windows 请勿关闭计算机 ,然后等了一晚上也没有关掉。现在电脑无法正常关机以下文字资料是由(历史新知网www.lishixinzhi.com)小编为大家搜集整理后发布的内容,让我们赶快一起来看一下吧!关机提示 windows7 正在配…...
2022/11/19 21:17:05 - 钉钉提示请勿通过开发者调试模式_钉钉请勿通过开发者调试模式是真的吗好不好用...
钉钉请勿通过开发者调试模式是真的吗好不好用 更新时间:2020-04-20 22:24:19 浏览次数:729次 区域: 南阳 > 卧龙 列举网提醒您:为保障您的权益,请不要提前支付任何费用! 虚拟位置外设器!!轨迹模拟&虚拟位置外设神器 专业用于:钉钉,外勤365,红圈通,企业微信和…...
2022/11/19 21:17:05 - 配置失败还原请勿关闭计算机怎么办,win7系统出现“配置windows update失败 还原更改 请勿关闭计算机”,长时间没反应,无法进入系统的解决方案...
前几天班里有位学生电脑(windows 7系统)出问题了,具体表现是开机时一直停留在“配置windows update失败 还原更改 请勿关闭计算机”这个界面,长时间没反应,无法进入系统。这个问题原来帮其他同学也解决过,网上搜了不少资料&#x…...
2022/11/19 21:17:04 - 一个电脑无法关闭计算机你应该怎么办,电脑显示“清理请勿关闭计算机”怎么办?...
本文为你提供了3个有效解决电脑显示“清理请勿关闭计算机”问题的方法,并在最后教给你1种保护系统安全的好方法,一起来看看!电脑出现“清理请勿关闭计算机”在Windows 7(SP1)和Windows Server 2008 R2 SP1中,添加了1个新功能在“磁…...
2022/11/19 21:17:03 - 请勿关闭计算机还原更改要多久,电脑显示:配置windows更新失败,正在还原更改,请勿关闭计算机怎么办...
许多用户在长期不使用电脑的时候,开启电脑发现电脑显示:配置windows更新失败,正在还原更改,请勿关闭计算机。。.这要怎么办呢?下面小编就带着大家一起看看吧!如果能够正常进入系统,建议您暂时移…...
2022/11/19 21:17:02 - 还原更改请勿关闭计算机 要多久,配置windows update失败 还原更改 请勿关闭计算机,电脑开机后一直显示以...
配置windows update失败 还原更改 请勿关闭计算机,电脑开机后一直显示以以下文字资料是由(历史新知网www.lishixinzhi.com)小编为大家搜集整理后发布的内容,让我们赶快一起来看一下吧!配置windows update失败 还原更改 请勿关闭计算机&#x…...
2022/11/19 21:17:01 - 电脑配置中请勿关闭计算机怎么办,准备配置windows请勿关闭计算机一直显示怎么办【图解】...
不知道大家有没有遇到过这样的一个问题,就是我们的win7系统在关机的时候,总是喜欢显示“准备配置windows,请勿关机”这样的一个页面,没有什么大碍,但是如果一直等着的话就要两个小时甚至更久都关不了机,非常…...
2022/11/19 21:17:00 - 正在准备配置请勿关闭计算机,正在准备配置windows请勿关闭计算机时间长了解决教程...
当电脑出现正在准备配置windows请勿关闭计算机时,一般是您正对windows进行升级,但是这个要是长时间没有反应,我们不能再傻等下去了。可能是电脑出了别的问题了,来看看教程的说法。正在准备配置windows请勿关闭计算机时间长了方法一…...
2022/11/19 21:16:59 - 配置失败还原请勿关闭计算机,配置Windows Update失败,还原更改请勿关闭计算机...
我们使用电脑的过程中有时会遇到这种情况,当我们打开电脑之后,发现一直停留在一个界面:“配置Windows Update失败,还原更改请勿关闭计算机”,等了许久还是无法进入系统。如果我们遇到此类问题应该如何解决呢࿰…...
2022/11/19 21:16:58 - 如何在iPhone上关闭“请勿打扰”
Apple’s “Do Not Disturb While Driving” is a potentially lifesaving iPhone feature, but it doesn’t always turn on automatically at the appropriate time. For example, you might be a passenger in a moving car, but your iPhone may think you’re the one dri…...
2022/11/19 21:16:57