springboot入门so easy
跟我学习springboot入门
- 1、springboot入门简介
- 一、产生背景
- 二、什么是SpringBoot?
- 三、SpringBoot解决的问题
- 四、springboot主要特性
- 五、springboot的核心功能
- 六、springboot的优点
- 七、springboot的缺点
- 2、创建第一个springboot应用项目
- 1、spring官方对环境系统要求
- 2、创建操作步骤:
- a、创建一个Empty Project并配置相关参数
- b、创建maven项目
- c、导入springboot的相关依赖
- e、创建运行的主程序
- f、启动主程序
- f、访问下部署成功的应用接口服务
- 3、如何部署打包
- 4、总结Helloworld
- 1、pom文件
- 2、主程序类
- 3、根据向导快速创建springboot应用
- 1、使用spring initianlizr快速创建springboot应用项目
- 2、创建好的项目具有哪些特征?
- 3、实现业务逻辑controller,运行springboot应用
- 4、springBoot配置文件
- a、默认全局配置文件
- b、yaml的用法
- 1、简介
- 2、语法规则
- 3、基本用法
- c、属性值注入
- 1、使用@Value为属性注入值(spring原来的方法)
- 2、使用application.properties为属性注入值
- 3、使用application.yml为属性注入值
- 4、原来的spring属性注入值的方法@Value与springboot的@ConfigurationProperties属性注入值的方法的区别:
- d、多环境配置
- 方法1、创建多个properties文件
- 方法2、定义多个yml文档块
- e、加载外部配置文件
- 一、加载外部properties文件
- 二、加载外部spring配置文件
- 三、使用注解方式添加组件
- f、springboot自动配置原理
- 5、使用springboot开发web应用
- 1) 开发操作步骤
- 2) 静态资源的映射
- 3) 欢迎页
- 4) 访问图标及其收藏夹的图标
- 4) springboot模板引擎
- 1、springboot模板引擎简介
- 2、springboot模板引擎Thymeleaf的使用方法
- 3、thymeleaf语法规则
- 3.1 常用属性
- 3.2 thymeleaf表达式
- 6、springboot进阶
- 6.1 热部署
- 6.2 扩展默认的SpringMVC功能
- 6.3 全局异常处理
- 6.3.1 定义错误码页面
- 6.3.2 定义异常通知
- 6.4 注册servlet组件
- 6.5 使用外部的Servlet容器
- 6.5.1 如何使用外部的Servlet容器?
- 7、springboot整合其他技术
- 7.1 springboot整合JDBC
- 7.2 springboot整合myBatis
- 7.3 配置pageHelper分页
- 7.4 Springboot整合redis
- 附录
- 课件源码地址:https://gitee.com/yeyuehongying/springboot.git
1、springboot入门简介
一、产生背景
Spring开发变的越来越笨重,大量的XML文件,繁琐的配置,复杂的部署流程,整合第三方技术时难度大等,导致开发效率低。SpringBoot是一个用来简化Spring应用的初始化创建和开发的框架,简化配置,实现快速开发。
二、什么是SpringBoot?
在Spring框架这个大家族中,产生了很多衍生框架,比如Spring、SpringMvc框架等,Spring的核心内容在于控制反转(IOC)和依赖注入(DI),所谓控制反转并非是一种技术,而是一种思想,在操作方面是指在spring配置文件中创建,依赖注入即为由spring容器为应用程序的某个对象提供资源,比如引用对象、常量数据等。SpringBoot是一个框架,一种全新的编程规范,他的产生简化了框架的使用,所谓简化是指简化了Spring众多框架中所需的大量且繁琐的配置文件,所以SpringBoot是一个服务于框架的框架,服务范围是简化配置文件。
三、SpringBoot解决的问题
1、使编码变得简单
2、使配置变得简单
3、使部署变得简单
4、使监控变得简单
四、springboot主要特性
1、遵循习惯优于配置的原则。使用springboot我们只需要很少的配置,大多数使用默认配置即可
2、项目快速搭建。springboot帮助开发者快速搭建spring框架,可无需配置的自动整合第三方框架
3、可以完全不使用xml配置,只需要自动配置和Java config
4、内嵌servlet容器,降低了对环境的要求,可用命令直接执行项目
5、提供了starter POM,能够非常方便的进行包管理
6、对主流框架无配置集成
7、与云计算天然集成
五、springboot的核心功能
1、独立运行spring项目。springboot可以以jar包的形式进行独立运行,使用java -jar xx.jar 就可以成功运行项目。
2、内嵌servlet容器。内嵌容器,使得我们可以执行运行项目的主程序main函数,使得项目可以快速运行。
3、提供starter简化Maven配置。springboot提供了一系列的start pol用来简化maven依赖。如:常用的spring-boot-starter-web、spring-boot-starter-tomcat、spring-boot-starter-actuator等
4、自动配置spring。springboot会根据我们项目中类路径的jar包,为jar包的类进行自动装配bean。
5、应用监控。springboot提供了基于HTTP、ssh、telnet对运行时的项目进行监控。
springboot提供了actuator组件,只需要在配置中加入spring-boot-starter-actuator依赖,通过继承AbstractHealthIndicator这个抽象类,然后在doHealthCheck()方法中检测服务健康的方法,就可以实现一个简单的监控。具体可参考该博客:https://www.jianshu.com/p/41c1026f2c9d
六、springboot的优点
(参见spring官方的Features章节的解释https://spring.io/projects/spring-boot
):
快速创建独立运行的Spring应用并与主流框架集成
内置Servlet容器,应用无需打包war包
使用starter(启动器)管理依赖并进行版本控制
大量的自动配置,简化开发
提供了准生产环境的运行时监控,如指标、 健康检查、外部配置等
无需配置XML,没有生成冗余代码,开箱即用
七、springboot的缺点
1、高度集成,使用的时候不知道底层实现
2、由于不了解底层,导致项目出了问题会很难排查
2、创建第一个springboot应用项目
这里使用的springboot的2.1.6版本,每个版本都有环境要求,具体可以查看spring的官方说明
1、spring官方对环境系统要求
链接地址:9. System Requirements-https://docs.spring.io/spring-boot/docs/2.1.6.RELEASE/reference/html/getting-started-system-requirements.html
如下图所示:
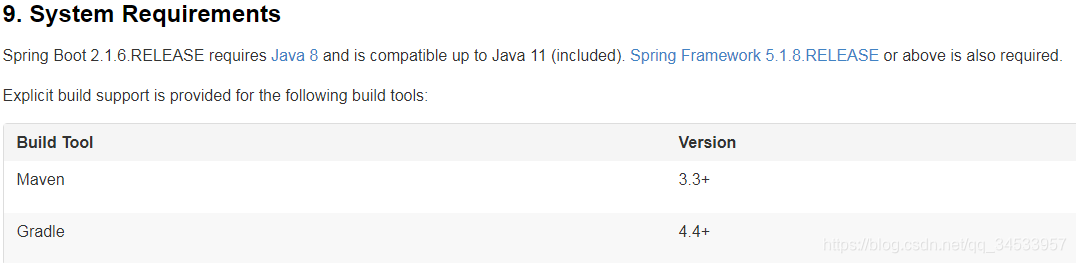
总结之,环境要求:
SpringBoot 2.x(基于Spring5.x)
JDK 1.8或者JDK11及以上
Maven 3.3及以上
Tomcat 9.0及以上
IDEA较新版本
2、创建操作步骤:
传统的web工程,先创建web工程,然后打成war包,放到tomcat里面运行。–太麻烦
而springboot只需要创建一个java工程,后期直接打包成一个可执行的jar包(内置tomcat)
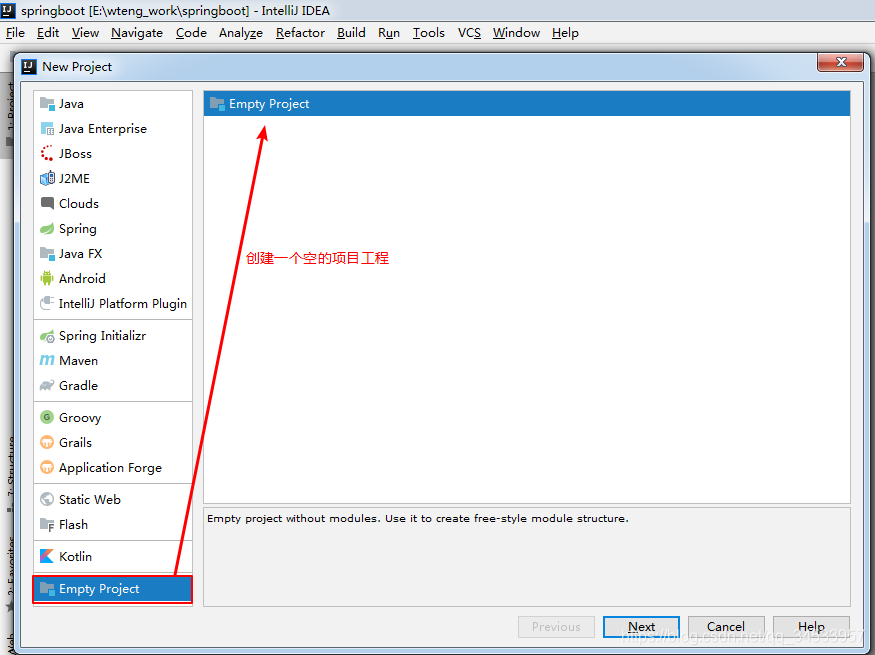
a、创建一个Empty Project并配置相关参数
打开IDEA,File–>New–>project,选择“Empty Project”,点击创建
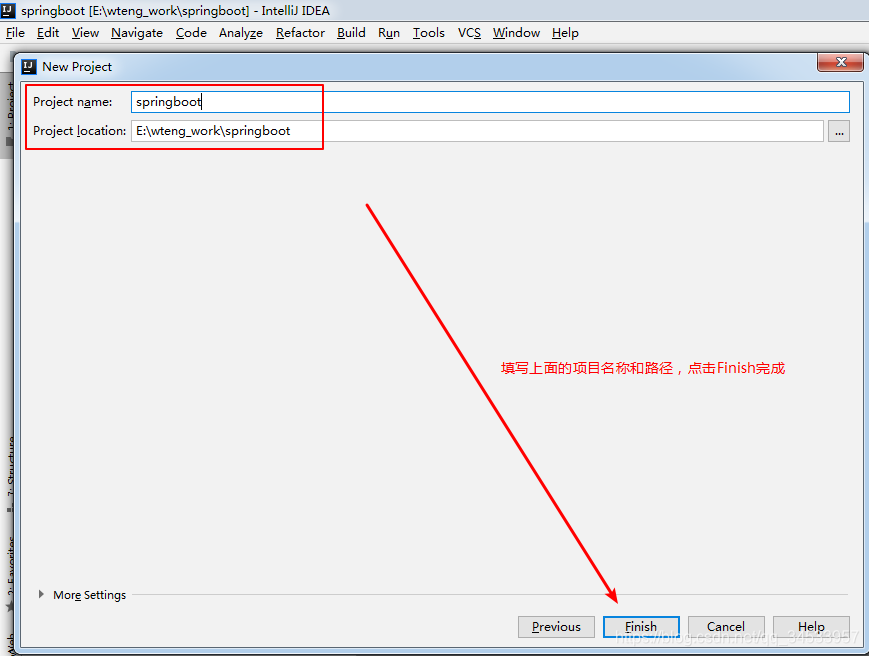
输入工程名称和路径,点击Finish完成,如下图
 接下来修改下工程proeject相关的参数,
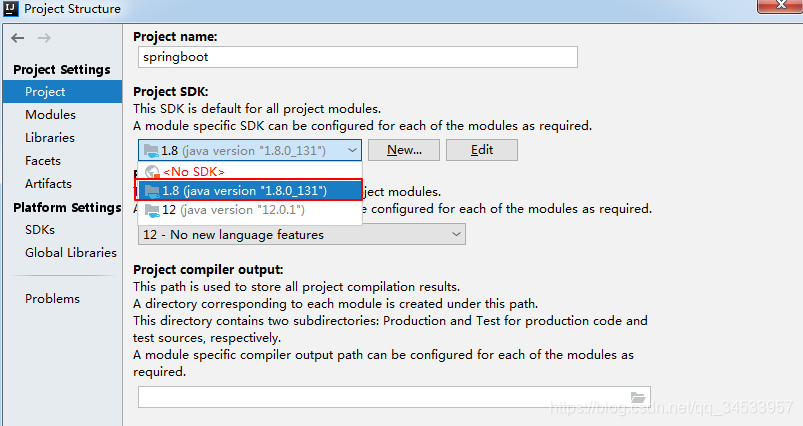
- 1、设置工程project的JDK版本
右击上面创建的springboot工程,选择“Open Module Setting”,选择“Project”,在Project SDK一栏选择JDK版本,我这里使用的JDK1.8,如下图
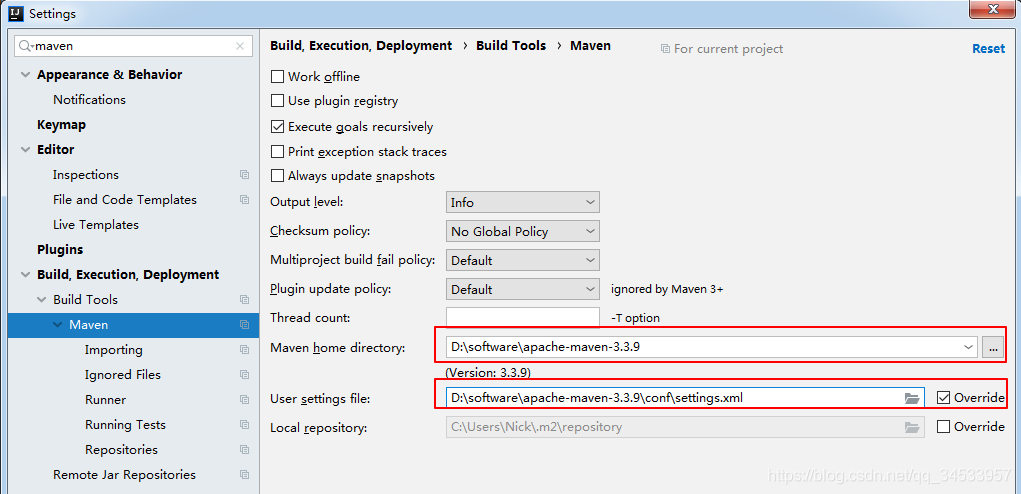
- 2、设置Maven配置
如果不使用IDEA自带的Maven,可以参考此步骤配置外部的Maven。
打开IDEA,选择File菜单,找到Setting,在打开的窗口,输入maven查询,在maven选项卡,
修改如下图所示的红色框内的部分。
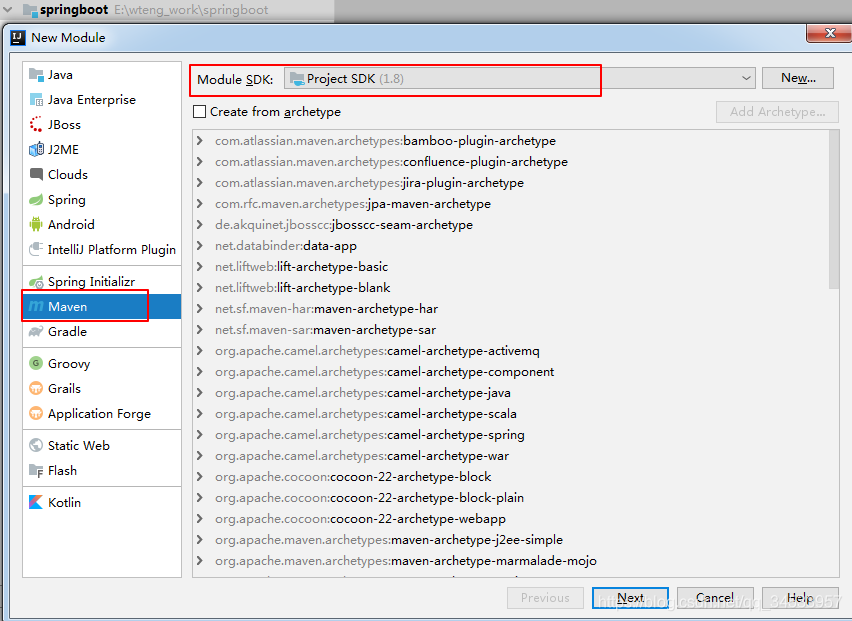
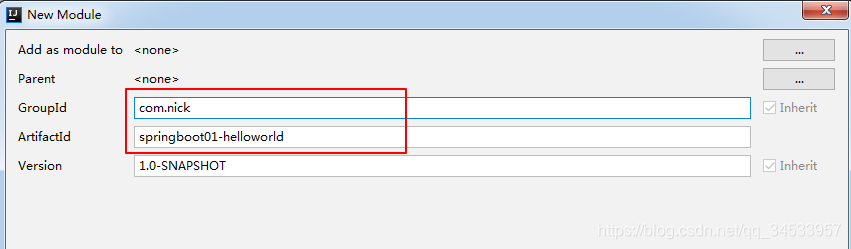
b、创建maven项目
File–>New–>Module,选择Maven,设置Module SDK我这里选择JDK1.8(备注:Archetype是Maven工程的模板工具包,这里用不到,暂时不选择),下面的步骤根据如下图示操作
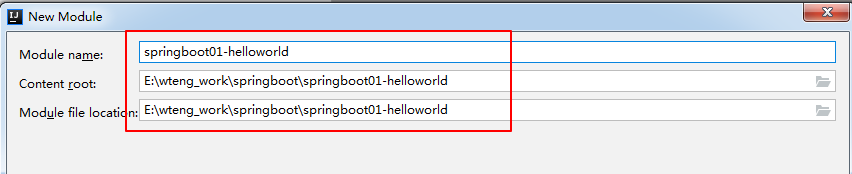
如下创建成功,然后设置下packaging打包方式为jar,

c、导入springboot的相关依赖
建议参考spring官方的建议导入,链接地址:
https://docs.spring.io/spring-boot/docs/2.1.6.RELEASE/reference/html/getting-started-installing-spring-boot.html#getting-started-maven-installation
如下内容:
import org.springframework.stereotype.Controller;
import org.springframework.web.bind.annotation.RequestMapping;
import org.springframework.web.bind.annotation.ResponseBody;
/**
- @author Nick
*/
@Controller
public class HelloController {
@RequestMapping("/hello")
@ResponseBody
public String hello(String name) {
return “Hello world” + name;
}
}
e、创建运行的主程序
这里新建com.nick.RunMainApplication的class类
package com.nick;
import org.springframework.boot.SpringApplication;
import org.springframework.boot.autoconfigure.SpringBootApplication;
/**
- @author Nick
- SpringBootApplication:表示主程序类,这个是一个springboot应用
*/
@SpringBootApplication
public class RunMainApplication {
public static void main(String[] args) {
//开始启动springboot应用
SpringApplication.run(RunMainApplication.class, args);
}
}
f、启动主程序
右键选择“Run RunMainApplication”启动主程序。
可以看到启动日志如下,
. ____ _ __ _ _
/\ / ’ __ _ () __ __ _ \ \ \
( ( )__ | '_ | '| | ’ / ` | \ \ \
\/ )| |)| | | | | || (| | ) ) ) )
’ || .__|| ||| |__, | / / / /
=|_|======|/=////
:: Spring Boot :: (v2.1.6.RELEASE)
2019-08-01 21:14:59.842 INFO 9108 — [ main] com.nick.RunMainApplication : Starting RunMainApplication on Nick-PC with PID 9108 (E:\wteng_work\springboot\springboot01-helloworld\target\classes started by Nick in E:\wteng_work\springboot)
2019-08-01 21:14:59.844 INFO 9108 — [ main] com.nick.RunMainApplication : No active profile set, falling back to default profiles: default
2019-08-01 21:15:04.269 INFO 9108 — [ main] o.s.b.w.embedded.tomcat.TomcatWebServer : Tomcat initialized with port(s): 8080 (http)
2019-08-01 21:15:04.532 INFO 9108 — [ main] o.apache.catalina.core.StandardService : Starting service [Tomcat]
2019-08-01 21:15:04.533 INFO 9108 — [ main] org.apache.catalina.core.StandardEngine : Starting Servlet engine: [Apache Tomcat/9.0.21]
2019-08-01 21:15:06.884 INFO 9108 — [ main] o.a.c.c.C.[Tomcat].[localhost].[/] : Initializing Spring embedded WebApplicationContext
2019-08-01 21:15:06.884 INFO 9108 — [ main] o.s.web.context.ContextLoader : Root WebApplicationContext: initialization completed in 7002 ms
2019-08-01 21:15:07.649 INFO 9108 — [ main] o.s.s.concurrent.ThreadPoolTaskExecutor : Initializing ExecutorService ‘applicationTaskExecutor’
2019-08-01 21:15:08.129 INFO 9108 — [ main] o.s.b.w.embedded.tomcat.TomcatWebServer : Tomcat started on port(s): 8080 (http) with context path ‘’
2019-08-01 21:15:08.135 INFO 9108 — [ main] com.nick.RunMainApplication : Started RunMainApplication in 8.632 seconds (JVM running for 11.836)
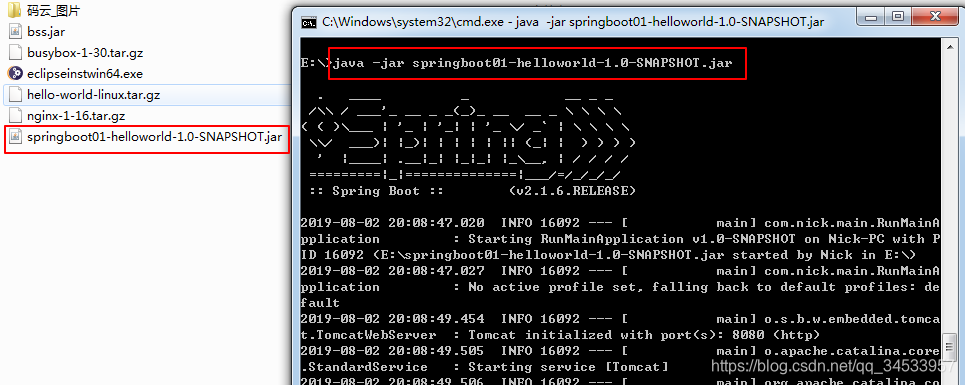
可以看到启动了内置的tomcat监听8080端口。
f、访问下部署成功的应用接口服务
至此第一个springboot的Helloworld应用创建成功。
备注:
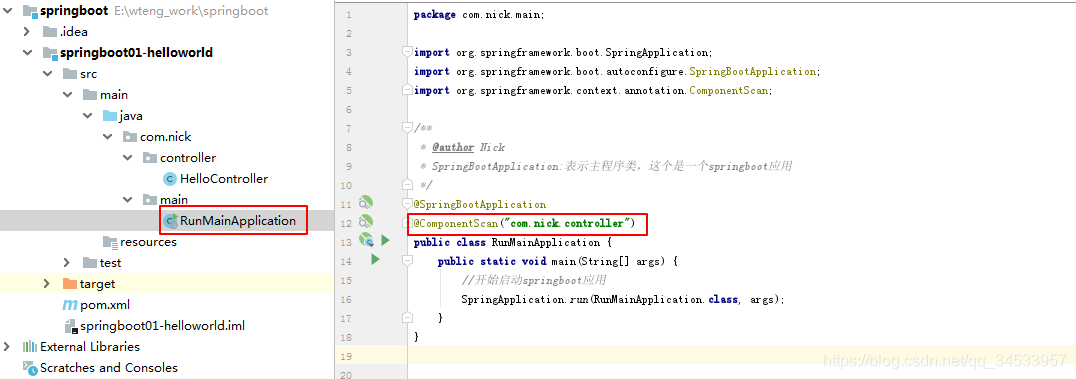
- 默认情况下springboot只会扫描主程序类及其所在的包的子包的类文件。
- 如果业务接口处理类不在主程序所在包的子包里面,可以在主程序类上面使用@ComponentScan(“com.nick.controller”)指定业务处理类的路径。如下示例,
3、如何部署打包
应该创建的springboot应用如何给别人使用?如何打包部署的 ?
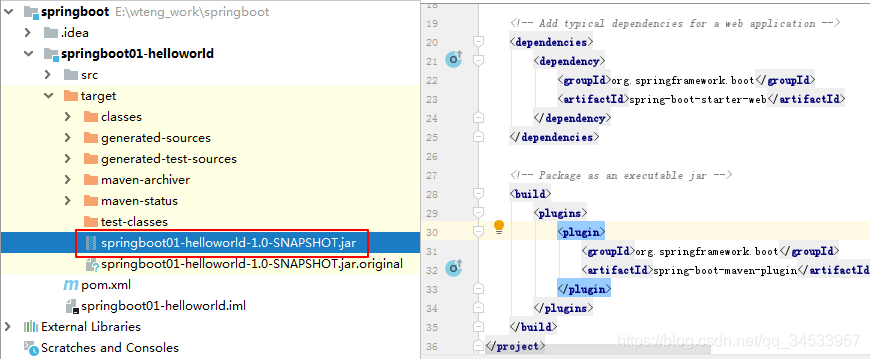
查看下官网的spring告诉我们是如何打包的,需要增加如下插件的依赖
https://docs.spring.io/spring-boot/docs/2.1.6.RELEASE/reference/html/getting-started-installing-spring-boot.html#getting-started-maven-installation
<build><plugins><plugin><groupId>org.springframework.boot</groupId><artifactId>spring-boot-maven-plugin</artifactId></plugin></plugins>
</build>
把以上内容copy到springboot项目中的pom.xml中。
然后,按照如下图示打包成jar文件即可

打包好的jar文件放在该工程的target文件夹下面,如下图
在cmd中使用java -jar springboot01-helloworld-1.0-SNAPSHOT.jar命令发现该springboot应用启动成功。
4、总结Helloworld
1、pom文件
- 1.1 父工程使用spring-boot-starter-parent
<!-- Inherit defaults from Spring Boot --><parent><groupId>org.springframework.boot</groupId><artifactId>spring-boot-starter-parent</artifactId><version>2.1.6.RELEASE</version></parent>
父工程的父工程使用spring-boot-dependencies
<parent><groupId>org.springframework.boot</groupId><artifactId>spring-boot-dependencies</artifactId><version>2.1.6.RELEASE</version><relativePath>../../spring-boot-dependencies</relativePath></parent>
spring-boot-dependencies是用来管理springboot应用中依赖的版本,进行版本控制。如下:
<properties>....省略...<spring-cloud-connectors.version>2.0.5.RELEASE</spring-cloud-connectors.version><spring-data-releasetrain.version>Lovelace-SR9</spring-data-releasetrain.version><spring-framework.version>${spring.version}</spring-framework.version><spring-hateoas.version>0.25.1.RELEASE</spring-hateoas.version><spring-integration.version>5.1.6.RELEASE</spring-integration.version><spring-kafka.version>2.2.7.RELEASE</spring-kafka.version><spring-ldap.version>2.3.2.RELEASE</spring-ldap.version><spring-plugin.version>1.2.0.RELEASE</spring-plugin.version>
....省略...
</properties>
- 1.2 通过starter指定依赖
springboot提供了很多starter(启动器)
关于 starter的解释可以看下spring官网给的解释
https://docs.spring.io/spring-boot/docs/2.1.6.RELEASE/reference/html/using-boot-build-systems.html#using-boot-starter
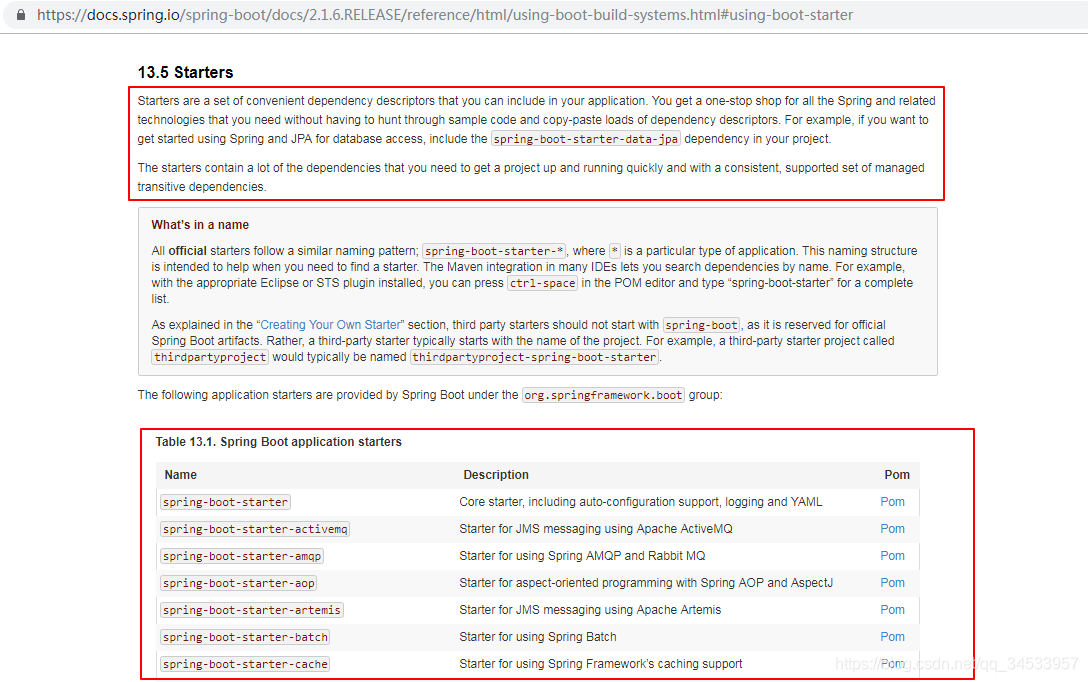
例如,上面的Helloworld应用使用的是spring-boot-starter-web这个starter这个启动器
在pom中添加对应的starter启动器,springboot就会把对应的依赖插件引入到应用项目中。
可以根据不同使用场景引入不同的starter启动器,例如,
spring-boot-starter-jdbc:使用JDBC相关的功能
spring-boot-starter-data-redis:使用redis相关的功能
spring-boot-starter-json:使用JSON相关的功能
spring-boot-starter-test:使用单元测试相关的功能
2、主程序类
- @SpringBootApplication
标注下类上,表示这是个springboot的主程序类,通过运行该类的main方法来启动springboot应用。
@Target({ElementType.TYPE})
@Retention(RetentionPolicy.RUNTIME)
@Documented
@Inherited
@SpringBootConfiguration
@EnableAutoConfiguration
@ComponentScan(excludeFilters = {@Filter(type = FilterType.CUSTOM,classes = {TypeExcludeFilter.class}
), @Filter(type = FilterType.CUSTOM,classes = {AutoConfigurationExcludeFilter.class}
)}
)
public @interface SpringBootApplication {
- @SpringBootConfiguration
标注在类上,表示这个是springboot的配置类 - @Configuration
标注在类上,表示这个是spring的配置类,相当于是xml配置文件 - @Component
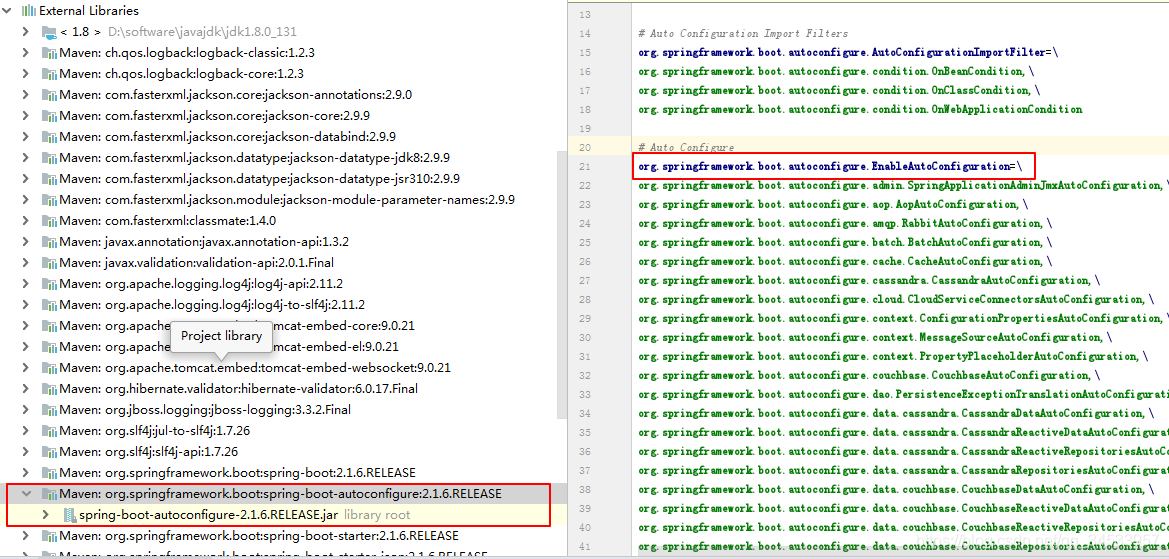
上面的层级关系是:@SpringBootConfiguration–>@Configuration–>@Component - @EnableAutoConfiguration
开启自动配置功能,简化之前spring的繁琐配置。
springboot在启动的时候会在类路径下的/META_INF/spring.factories中获取EnableAutoConfiguration的值,自动添加到容器中,自动 完成许多配置工作。
@ComponentScan(“com.nick.controller”)
标注在类上,指定需要扫描的包。
3、根据向导快速创建springboot应用
1、使用spring initianlizr快速创建springboot应用项目
- 1、创建方法如下:
在springboot工程上右击选择“New”–>Module–>Spring Initializr,选择Module SDK我这里使用JDK1.8版本。Choose Initializr Service URL保持默认,使用从spring官方获取https://start.spring.io/启动器。
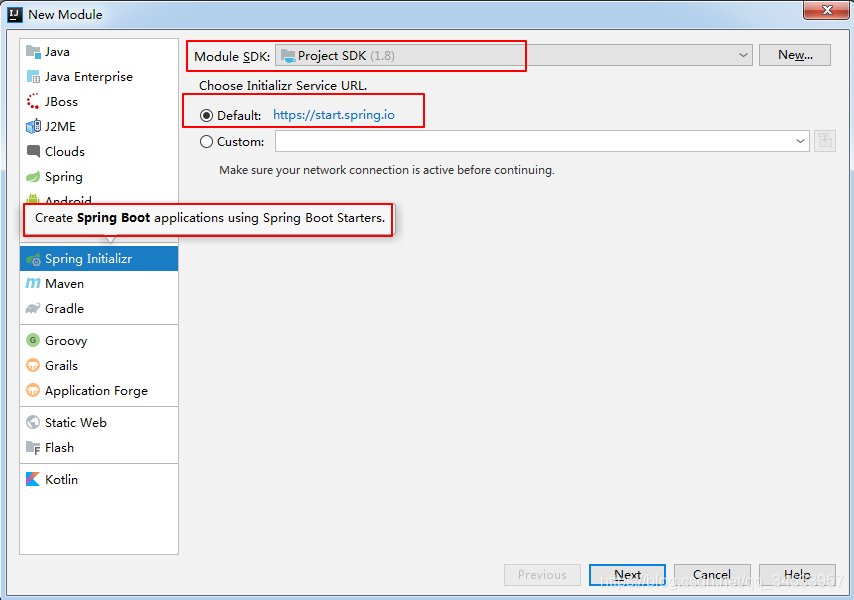
点击Next下一步,输入相关信息,
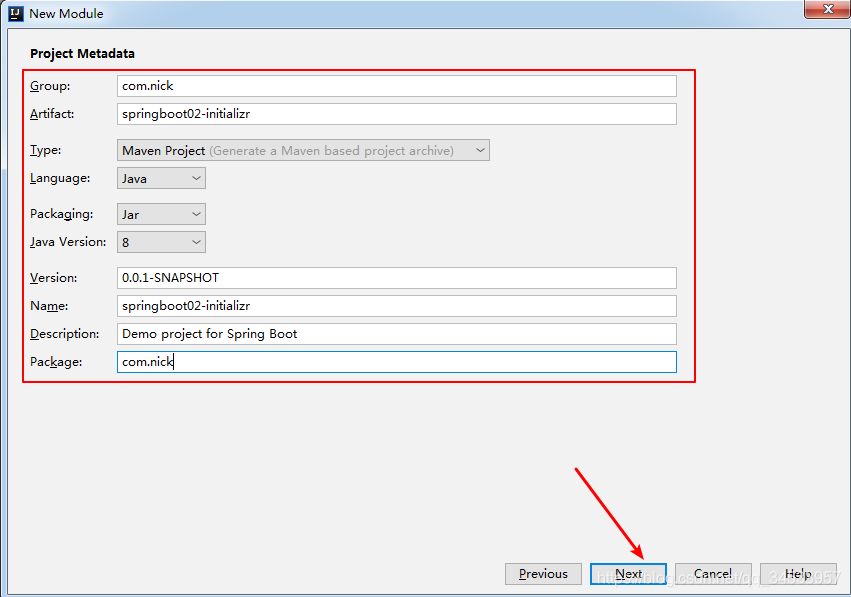
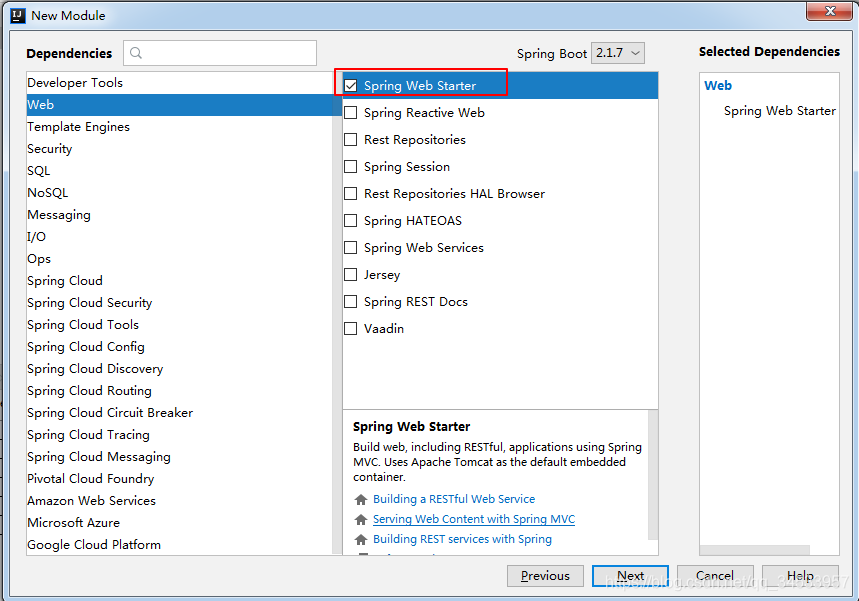
点击Next下一步,根据实际情况选择所需要的依赖关系的启动器,我这里使用的web启动器,如下选择,
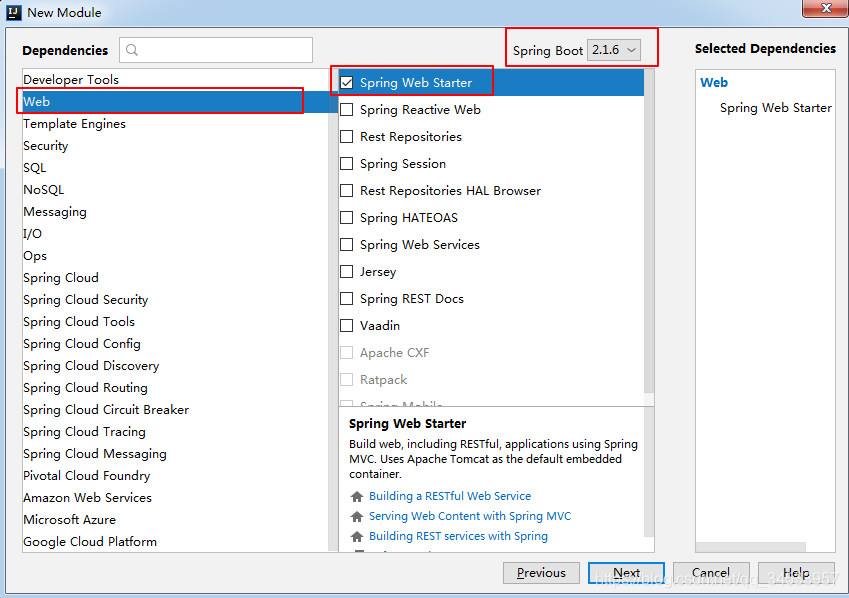
点击Next下一步,
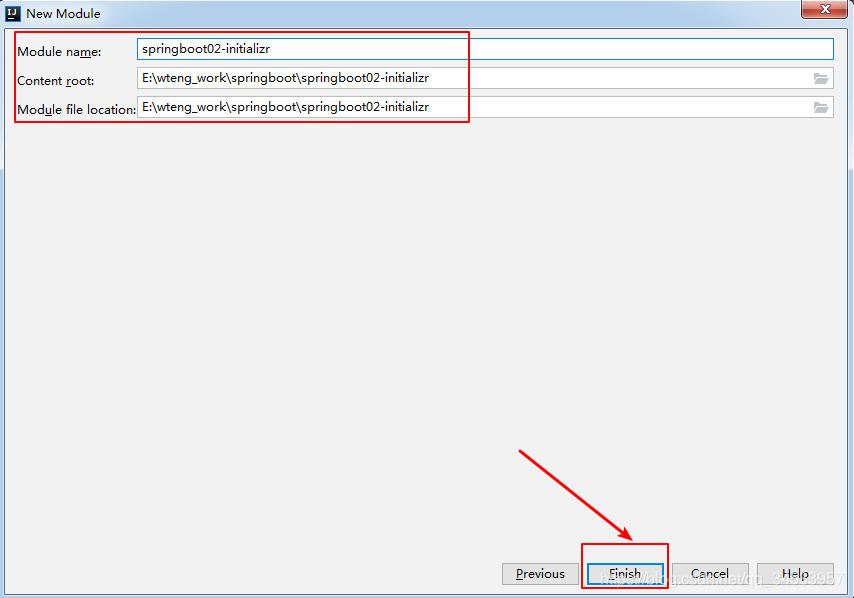
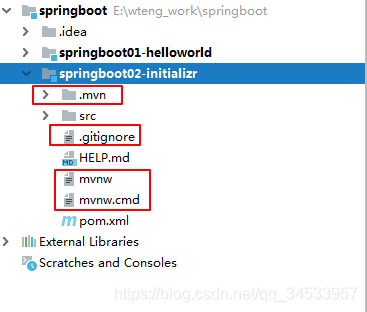
新创建的springboot的项目,如下图示的4个文件/文件夹可以删除,没有什么用。
2、创建好的项目具有哪些特征?
a). pom.xml中的依赖关系和主程序类已经生成,接下来直接写业务逻辑代码即可。
b). 生成了resource文件夹。
resources文件夹的目录结构:
static:用来存放静态资源的,例如,存在css,js,images文件等
templates:存放模板页面,可以使用模板引擎thymeleaf,freemarker等
application.properties:springboot应用的配置文件,可以修改一些默认设置。例如,修改tomcat的端口号,把server.port=8181加入到此文件即可。
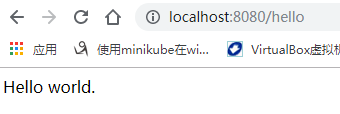
3、实现业务逻辑controller,运行springboot应用
package com.nick.controller;import org.springframework.stereotype.Controller;
import org.springframework.web.bind.annotation.RequestMapping;
import org.springframework.web.bind.annotation.ResponseBody;
import org.springframework.web.bind.annotation.RestController;//@Controller
//@RestController等同于@Controller+@ResponseBody
@RestController
public class HelloController {@RequestMapping("/hello")//@ResponseBodypublic String hello() {return "Hello world.";}
}
运行主程序启动下
D:\software\javajdk\jdk1.8.0_131\bin\java.exe -XX:TieredStopAtLevel=1 -noverify -Dspring.output.ansi.enabled=always -Dcom.sun.management.jmxremote -Dspring.jmx.enabled=true -Dspring.liveBeansView.mbeanDomain -Dspring.application.admin.enabled=true -javaagent:C:\Users\Nick\AppData\Local\JetBrains\Toolbox\apps\IDEA-U\ch-0\191.7479.19\lib\idea_rt.jar=51955:C:\Users\Nick\AppData\Local\JetBrains\Toolbox\apps\IDEA-U\ch-0\191.7479.19\bin -Dfile.encoding=UTF-8 -classpath D:\software\javajdk\jdk1.8.0_131\jre\lib\charsets.jar;D:\software\javajdk\jdk1.8.0_131\jre\lib\deploy.jar;D:\software\javajdk\jdk1.8.0_131\jre\lib\ext\access-bridge-64.jar;D:\software\javajdk\jdk1.8.0_131\jre\lib\ext\cldrdata.jar;D:\software\javajdk\jdk1.8.0_131\jre\lib\ext\dnsns.jar;D:\software\javajdk\jdk1.8.0_131\jre\lib\ext\jaccess.jar;D:\software\javajdk\jdk1.8.0_131\jre\lib\ext\jfxrt.jar;D:\software\javajdk\jdk1.8.0_131\jre\lib\ext\localedata.jar;D:\software\javajdk\jdk1.8.0_131\jre\lib\ext\nashorn.jar;D:\software\javajdk\jdk1.8.0_131\jre\lib\ext\sunec.jar;D:\software\javajdk\jdk1.8.0_131\jre\lib\ext\sunjce_provider.jar;D:\software\javajdk\jdk1.8.0_131\jre\lib\ext\sunmscapi.jar;D:\software\javajdk\jdk1.8.0_131\jre\lib\ext\sunpkcs11.jar;D:\software\javajdk\jdk1.8.0_131\jre\lib\ext\zipfs.jar;D:\software\javajdk\jdk1.8.0_131\jre\lib\javaws.jar;D:\software\javajdk\jdk1.8.0_131\jre\lib\jce.jar;D:\software\javajdk\jdk1.8.0_131\jre\lib\jfr.jar;D:\software\javajdk\jdk1.8.0_131\jre\lib\jfxswt.jar;D:\software\javajdk\jdk1.8.0_131\jre\lib\jsse.jar;D:\software\javajdk\jdk1.8.0_131\jre\lib\management-agent.jar;D:\software\javajdk\jdk1.8.0_131\jre\lib\plugin.jar;D:\software\javajdk\jdk1.8.0_131\jre\lib\resources.jar;D:\software\javajdk\jdk1.8.0_131\jre\lib\rt.jar;E:\wteng_work\springboot\springboot02-initializr\target\classes;C:\Users\Nick.m2\repository\org\springframework\boot\spring-boot-starter-web\2.1.6.RELEASE\spring-boot-starter-web-2.1.6.RELEASE.jar;C:\Users\Nick.m2\repository\org\springframework\boot\spring-boot-starter\2.1.6.RELEASE\spring-boot-starter-2.1.6.RELEASE.jar;C:\Users\Nick.m2\repository\org\springframework\boot\spring-boot\2.1.6.RELEASE\spring-boot-2.1.6.RELEASE.jar;C:\Users\Nick.m2\repository\org\springframework\boot\spring-boot-autoconfigure\2.1.6.RELEASE\spring-boot-autoconfigure-2.1.6.RELEASE.jar;C:\Users\Nick.m2\repository\org\springframework\boot\spring-boot-starter-logging\2.1.6.RELEASE\spring-boot-starter-logging-2.1.6.RELEASE.jar;C:\Users\Nick.m2\repository\ch\qos\logback\logback-classic\1.2.3\logback-classic-1.2.3.jar;C:\Users\Nick.m2\repository\ch\qos\logback\logback-core\1.2.3\logback-core-1.2.3.jar;C:\Users\Nick.m2\repository\org\apache\logging\log4j\log4j-to-slf4j\2.11.2\log4j-to-slf4j-2.11.2.jar;C:\Users\Nick.m2\repository\org\apache\logging\log4j\log4j-api\2.11.2\log4j-api-2.11.2.jar;C:\Users\Nick.m2\repository\org\slf4j\jul-to-slf4j\1.7.26\jul-to-slf4j-1.7.26.jar;C:\Users\Nick.m2\repository\javax\annotation\javax.annotation-api\1.3.2\javax.annotation-api-1.3.2.jar;C:\Users\Nick.m2\repository\org\yaml\snakeyaml\1.23\snakeyaml-1.23.jar;C:\Users\Nick.m2\repository\org\springframework\boot\spring-boot-starter-json\2.1.6.RELEASE\spring-boot-starter-json-2.1.6.RELEASE.jar;C:\Users\Nick.m2\repository\com\fasterxml\jackson\core\jackson-databind\2.9.9\jackson-databind-2.9.9.jar;C:\Users\Nick.m2\repository\com\fasterxml\jackson\core\jackson-annotations\2.9.0\jackson-annotations-2.9.0.jar;C:\Users\Nick.m2\repository\com\fasterxml\jackson\core\jackson-core\2.9.9\jackson-core-2.9.9.jar;C:\Users\Nick.m2\repository\com\fasterxml\jackson\datatype\jackson-datatype-jdk8\2.9.9\jackson-datatype-jdk8-2.9.9.jar;C:\Users\Nick.m2\repository\com\fasterxml\jackson\datatype\jackson-datatype-jsr310\2.9.9\jackson-datatype-jsr310-2.9.9.jar;C:\Users\Nick.m2\repository\com\fasterxml\jackson\module\jackson-module-parameter-names\2.9.9\jackson-module-parameter-names-2.9.9.jar;C:\Users\Nick.m2\repository\org\springframework\boot\spring-boot-starter-tomcat\2.1.6.RELEASE\spring-boot-starter-tomcat-2.1.6.RELEASE.jar;C:\Users\Nick.m2\repository\org\apache\tomcat\embed\tomcat-embed-core\9.0.21\tomcat-embed-core-9.0.21.jar;C:\Users\Nick.m2\repository\org\apache\tomcat\embed\tomcat-embed-el\9.0.21\tomcat-embed-el-9.0.21.jar;C:\Users\Nick.m2\repository\org\apache\tomcat\embed\tomcat-embed-websocket\9.0.21\tomcat-embed-websocket-9.0.21.jar;C:\Users\Nick.m2\repository\org\hibernate\validator\hibernate-validator\6.0.17.Final\hibernate-validator-6.0.17.Final.jar;C:\Users\Nick.m2\repository\javax\validation\validation-api\2.0.1.Final\validation-api-2.0.1.Final.jar;C:\Users\Nick.m2\repository\org\jboss\logging\jboss-logging\3.3.2.Final\jboss-logging-3.3.2.Final.jar;C:\Users\Nick.m2\repository\com\fasterxml\classmate\1.4.0\classmate-1.4.0.jar;C:\Users\Nick.m2\repository\org\springframework\spring-web\5.1.8.RELEASE\spring-web-5.1.8.RELEASE.jar;C:\Users\Nick.m2\repository\org\springframework\spring-beans\5.1.8.RELEASE\spring-beans-5.1.8.RELEASE.jar;C:\Users\Nick.m2\repository\org\springframework\spring-webmvc\5.1.8.RELEASE\spring-webmvc-5.1.8.RELEASE.jar;C:\Users\Nick.m2\repository\org\springframework\spring-aop\5.1.8.RELEASE\spring-aop-5.1.8.RELEASE.jar;C:\Users\Nick.m2\repository\org\springframework\spring-context\5.1.8.RELEASE\spring-context-5.1.8.RELEASE.jar;C:\Users\Nick.m2\repository\org\springframework\spring-expression\5.1.8.RELEASE\spring-expression-5.1.8.RELEASE.jar;C:\Users\Nick.m2\repository\org\slf4j\slf4j-api\1.7.26\slf4j-api-1.7.26.jar;C:\Users\Nick.m2\repository\org\springframework\spring-core\5.1.8.RELEASE\spring-core-5.1.8.RELEASE.jar;C:\Users\Nick.m2\repository\org\springframework\spring-jcl\5.1.8.RELEASE\spring-jcl-5.1.8.RELEASE.jar com.nick.Springboot02InitializrApplication
. ____ _ __ _ _
/\ / ’ __ _ () __ __ _ \ \ \
( ( )__ | '_ | '| | ’ / ` | \ \ \
\/ )| |)| | | | | || (| | ) ) ) )
’ || .__|| ||| |__, | / / / /
=|_|======|/=////
:: Spring Boot :: (v2.1.6.RELEASE)
2019-08-04 07:18:02.521 INFO 4336 — [ main] c.n.Springboot02InitializrApplication : Starting Springboot02InitializrApplication on Nick-PC with PID 4336 (E:\wteng_work\springboot\springboot02-initializr\target\classes started by Nick in E:\wteng_work\springboot)
2019-08-04 07:18:02.554 INFO 4336 — [ main] c.n.Springboot02InitializrApplication : No active profile set, falling back to default profiles: default
2019-08-04 07:18:08.410 INFO 4336 — [ main] o.s.b.w.embedded.tomcat.TomcatWebServer : Tomcat initialized with port(s): 8181 (http)
2019-08-04 07:18:08.691 INFO 4336 — [ main] o.apache.catalina.core.StandardService : Starting service [Tomcat]
2019-08-04 07:18:08.692 INFO 4336 — [ main] org.apache.catalina.core.StandardEngine : Starting Servlet engine: [Apache Tomcat/9.0.21]
2019-08-04 07:18:09.128 INFO 4336 — [ main] o.a.c.c.C.[Tomcat].[localhost].[/] : Initializing Spring embedded WebApplicationContext
2019-08-04 07:18:09.128 INFO 4336 — [ main] o.s.web.context.ContextLoader : Root WebApplicationContext: initialization completed in 6160 ms
2019-08-04 07:18:09.792 INFO 4336 — [ main] o.s.s.concurrent.ThreadPoolTaskExecutor : Initializing ExecutorService ‘applicationTaskExecutor’
2019-08-04 07:18:10.169 INFO 4336 — [ main] o.s.b.w.embedded.tomcat.TomcatWebServer : Tomcat started on port(s): 8181 (http) with context path ''
2019-08-04 07:18:10.172 INFO 4336 — [ main] c.n.Springboot02InitializrApplication : Started Springboot02InitializrApplication in 12.141 seconds (JVM running for 25.227)
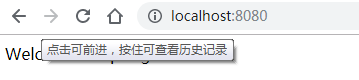
如上启动日志,启动成功,并且监听已经修改的8181端口。
可以使用http://localhost:8181/hello访问下
4、springBoot配置文件
a、默认全局配置文件
以下两种配置文件的名字是固定的,要放到类路径下面classpath:/或者classpath:/config目录下面
1、application.properties
2、application.yml
可以通过这两种配置文件修改默认配置。
例如,
server.port=8282 //修改访问端口
server.servlet.context-path=/springboot03 //修改访问path
具体的一些配置项可以参考spring官方的文档
https://docs.spring.io/spring-boot/docs/2.1.6.RELEASE/reference/html/common-application-properties.html
b、yaml的用法
1、简介
专门用来写配置文件的语言,以数据为中心,简洁强大,比xml,properties文件更适合做配置文件。
yaml文件的后缀扩展名是.yaml或者.yml
2、语法规则
- 大小写敏感
- 使用空格缩进表示层级关系,不允许使用tab缩进
- 缩进的数量不固定,但是同级别的参数需要保持左对齐。
- #表示注释
- 示例:
server:servlet:context-path: /springboot03port: 8282
3、基本用法
YAMl文件支持如下三种数据结构:
- 1、字面量:单个的,不可再分的值
- 2、对象:键值对集合
- 3、数组:一直按次序排列的值
以上三种数据结构的用法: - 1、字面量:
数字,字符,布尔值等常量值。
age: 21str: helloname: "hello world" --//类似这种字符串含有空格或者其它特殊字符,则需要使用单双引号夸起来。name: "hello \n world" --//双引号:此时会做转义,作为普通字符输出,输出为:hello \n worldname: ‘hello \n world’ --//单引号:此时不会对特殊字符转义,\n会以换行输出。
- 2、对象,也成为映射map,包含属性和值
#写法1 换行写:student:name: zhangsanage: 21address: jiangsu
#写法2:行内写法student:  {name: zhangsan,age:  21,address:jiangsu}
- 3、数组,如List,set等
#写法1 一组短横线开头的行:studentname:- zhangsan- lisi- hanmeimei
#写法2 行内写法:studentname:  {zhangsan,lisi,hanmeimei}
c、属性值注入
通过加载配置文件,为类中的属性注入值。下面讲解下三种方式注入值:
1、使用@Value为属性注入值(spring原来的方法)
@Component
//@ConfigurationProperties(prefix =  "userinfo")
public class UserInfo {@Value("${userinfo.username}")private String username;@Value("${userinfo.age}")private Integer age;@Value("${userinfo.child}")private Boolean isChild;@Value("${userinfo.birthday}")private Date birthday;//@Value不支持复杂类型封装private Address address;@Value("${userinfo.list}")private List<String> list;//@Value不支持复杂类型封装private Map<String, Object> map;
2、使用application.properties为属性注入值
userinfo.username=lisi
userinfo.age=28
userinfo.child=false
userinfo.address.proviance=jiangsu
userinfo.address.city=nanjing
userinfo.address.postCode=029
userinfo.birthday=2019/06/12
userinfo.list=tom,lilei,wangteng
userinfo.map.1001=上海
userinfo.map..2001=常州
/*** 通过加载全局配置文件application.properties为此JAVABEAN注入属性值* @Component:将当前类添加到容器中* @ConfigurationProperties(prefix = "userInfo"):将全局配置文件application.properties中,名字叫做userInfo的对象和当前类中的属性进行绑定*/
@Component
@ConfigurationProperties(prefix =  "userinfo")
public class UserInfo {private String username;private Integer age;private Boolean isChild;private Date birthday;private Address address;private List<String> list;private Map<String, Object> map;
3、使用application.yml为属性注入值
userinfo:username: zhangsanage: 28birthday: 2019/09/28address:proviance: jiangsucity: nanjingpostCode: 025list:- lilei- hanmeimei- jackmap: {1001: 一年级,2001: 二年级}child: true
/*** 通过加载全局配置文件application.yml为此JAVABEAN注入属性值* @Component:将当前类添加到容器中* @ConfigurationProperties(prefix = "userInfo"):将全局配置文件application.yml中,名字叫做userInfo的对象和当前类中的属性进行绑定*/
@Component
@ConfigurationProperties(prefix =  "userinfo")
public class UserInfo {private String username;private Integer age;private Boolean isChild;private Date birthday;private Address address;private List<String> list;private Map<String, Object> map;
4、原来的spring属性注入值的方法@Value与springboot的@ConfigurationProperties属性注入值的方法的区别:
@Value只能一个个为属性注入值,而@ConfigurationProperties可以批量为属性注入值
@Value不支持复杂类型封装,而@ConfigurationProperties可以
后记:验证值是否注入成功的方法:在待测试的JAVABEAN类中实现toString方法,然后,使用单元测试类进行测试,如下,
//在UserInfo中实现toString()方法
@Overridepublic String toString() {return "UserInfo{" +"username='" + username + '\'' +", age=" + age +", isChild=" + isChild +", birthday=" + birthday +", address=" + address +", list=" + list +", map=" + map +'}';}
//打印下这个JAVABEAN类,运行下此单元测试即可
@RunWith(SpringRunner.class)
@SpringBootTest
public class Springboot03ConfigApplicationTests {@AutowiredUserInfo userinfo;@Testpublic void contextLoads() {System.out.println(userinfo);}
}
d、多环境配置
在开发环境,测试环境,生成环境都有不同的配置信息,例如,数据库信息等,如何实现这些不同环境下配置的切换?两种方法:
1、创建多个properties文件
2、定义多个yml文档块
方法1、创建多个properties文件
- a、创建在application.properties/yml同级目录下创建多个properties文件,文件命名必须符合application-xxx.properties格式,
例如,application-dev.properties //开发环境
application-test.properties //测试环境
application-prod.properties //生产环境 - b、在application.properties文件中指定要激活的配置文件。
#指定要激活的配置文件后缀
spring.profiles.active=prod //这里配置的值是application-xxx.properties名字后面的xxx的值
方法2、定义多个yml文档块
- a、定义多个文档块,文档块之间使用—(三个短横线分割)
#在第一个文档块指定要激活的配置
server:port: 8084
spring:profiles:**active: test**
---
spring:profiles: dev
server:port: 8085
---
spring:profiles: prod
server:port: 8086
---
spring:profiles: test
server:port: 8087
e、加载外部配置文件
前面提到过@ConfigurationProperties(prefix = “userInfo”):将全局配置文件application.yml/properties中,名字叫做userInfo的对象和当前类中的属性进行绑定,那么,如何从外部加载一个配置文件呢?
一、加载外部properties文件
- 1、创建一个外部配置文件,例如,userinfo.properties
userinfo.username=lisi
userinfo.age=28
userinfo.child=false
userinfo.address.proviance=jiangsu
userinfo.address.city=nanjing
userinfo.address.postCode=029
userinfo.birthday=2019/06/12
userinfo.list=tom,lilei,wangteng
userinfo.map.1001=上海
userinfo.map..2001=常州
- 2、使用@PropertySource指定要加载的外部配置文件
/*** 通过加载全局配置文件application.yml为此JAVABEAN注入属性值* @Component:将当前类添加到容器中* @ConfigurationProperties(prefix = "userInfo"):将全局配置文件application.yml中,名字叫做userInfo的对象和当前类中的属性进行绑定* @PropertySource({"classpath:userinfo.properties"}):加载外部配置文件*/
@Component
@PropertySource({"classpath:userinfo.properties"})
@ConfigurationProperties(prefix =  "userinfo")
public class UserInfo {
二、加载外部spring配置文件
- 1、定义一个外部的spring配置文件spring-config.xml
- 2、在主程序类中使用@ImportResource({“classpath:spring-config.xml”})加载外部的spring配置文件
/*** @ImportResource({"classpath:spring-config.xml"}):在主程序类中加载外部的spring配置文件*/
@ImportResource({"classpath:spring-config.xml"})
@SpringBootApplication
public class Springboot03ConfigApplication {
三、使用注解方式添加组件
推荐使用全注解的方式向容器中添加组件,使用@Configuration和@Bean
添加一个配置类
package com.nick.config;import com.nick.bean.Address;
import org.springframework.context.annotation.Bean;
import org.springframework.context.annotation.Configuration;/*** 配置类* @Configuration:标注在类上,表示是一个配置类,相当于以前的缩写的spring配置文件*/
@Configuration
public class SpringConfig {//@Bean标注在方法上,向容器中添加一个组件,将方法的返回值添加到容器中,方法名作为组件id@Beanpublic Address address() {Address address = new Address();address.setProviance("江西省");address.setCity("南昌");return address;}
}
f、springboot自动配置原理
- 1、执行过程
- SpringBoot应用启动时会加载主程序类@SpringBootApplication,@SpringBootApplication中开启了自动配置功能@EnableAutoConfiguration
- @EnableAutoConfiguration作用
扫描所有jar包类路径下的METAINF/spring.factories文件,获取到EnableAutoConfiguration对应的值,将
这些自动配置类添加容器中 - 通过这些自动配置类完成相应的配置功能
- 2、原理分析
以HttpEncodingAutoConfiguration为例:以前在web.xml配置CharacterEncodingFilter过滤器,
// 表示这是一个Spring配置类
@Configuration
// 启用HttpEncodingProperties类的ConfigurationProperties功能,通过配置文件为其属性注入值,并将
其添加到容器中
@EnableConfigurationProperties({HttpEncodingProperties.class})
// 如果当前应用是Web应用,则该配置类生效,否则不生效
@ConditionalOnWebApplication(
type = Type.SERVLET
)
// 如果当前应用中有CharacterEncodingFilter类,则该配置类生效,否则不生效
@ConditionalOnClass({CharacterEncodingFilter.class})
// 如果配置文件中有spring.http.encoding.enabled选项,则该配置项生效,否则不生效,默认已经设置为
True,所以默认生效
@ConditionalOnProperty(
prefix = "spring.http.encoding",
value = {"enabled"},
matchIfMissing = true
)
public class HttpEncodingAutoConfiguration {
private final HttpEncodingProperties properties;
// 将容器中HttpEncodingProperties注入
public HttpEncodingAutoConfiguration(HttpEncodingProperties properties) {
this.properties = properties;
}
// 将方法返回值添加到容器中
@Bean
// 如果容器中没有这个组件,则添加
@ConditionalOnMissingBean
public CharacterEncodingFilter characterEncodingFilter() {
CharacterEncodingFilter filter = new OrderedCharacterEncodingFilter();
filter.setEncoding(this.properties.getCharset().name());
filter.setForceRequestEncoding(this.properties.shouldForce(org.springframework.boot.aut
oconfigure.http.HttpEncodingProperties.Type.REQUEST));
filter.setForceResponseEncoding(this.properties.shouldForce(org.springframework.boot.au
toconfigure.http.HttpEncodingProperties.Type.RESPONSE));
return filter;
}
配置项如下,
spring.http.encoding.charset=gbk
spring.http.encoding.force=true
总结:
- SpringBoot启动时会加载大量的自动配置类(xxxAutoConfiguration) xxxProperties,类似上面e、加载外部配置文件中的添加配置类使用注解方式添加组件的方式一样。
- 通过这些自动配置类向容器中添加组件
- 通过这些组件来实现自动配置功能,简化
5、使用springboot开发web应用
1) 开发操作步骤
- a、创建springboot应用,添加对应的starter
- b、在配置文件中添加少量的配置
- c、编写业务代码
Web开发的自动配置类:WebMvcAutoConfiguration
2) 静态资源的映射
查看WebMvcAutoConfiguration类–>addResourceHandlers–>getStaticLocations–>staticLocations
静态资源的默认位置:
- “classpath:/METAINF/resources/”
- “classpath:/resources/”
- “classpath:/static/”
- “classpath:/public/”
修改如上静态资料的默认位置,方法如下,
# 指定静态资源的位置
spring.resources.static-locations=classpath:/static,classpath:/public
3) 欢迎页
查看WebMvcAutoConfiguration类–>getWelcomePage
代码如下,
String[] locations = getResourceLocations(this.resourceProperties.getStaticLocations());
......
private Resource getIndexHtml(String location) {return this.resourceLoader.getResource(location + "index.html");
}
可以看到springboot是从如下
静态资源的默认位置:
- “classpath:/METAINF/resources/”
- “classpath:/resources/”
- “classpath:/static/”
- “classpath:/public/”
获取欢迎页index.html的。
将index.html页面放到任意一个静态资源文件夹中即可访问
4) 访问图标及其收藏夹的图标
查看WebMvcAutoConfiguration–>内部类FaviconConfiguration–>faviconHandlerMapping
//通过favicon.ico指定图标
@Beanpublic SimpleUrlHandlerMapping faviconHandlerMapping() {SimpleUrlHandlerMapping mapping = new SimpleUrlHandlerMapping();mapping.setOrder(-2147483647);mapping.setUrlMap(Collections.singletonMap("**/favicon.ico", this.faviconRequestHandler()));return mapping;}
favicon.ico的位置是静态资源的默认位置,
- “classpath:/METAINF/resources/”
- “classpath:/resources/”
- “classpath:/static/”
- “classpath:/public/”
将favicon.ico放到任意一个静态资源文件夹中即可
备注:favicon.ico不可以放到上面目录的子文件夹中,否则访问不了。
4) springboot模板引擎
1、springboot模板引擎简介
目前,springboot项目,Java Web开发推荐使用模板引擎,不建议使用JSP页面。
- JSP缺点:本质上就是Servlet,需要后台编译,耗时,效率低
- 模板引擎:不需要编译,速度快。
常见的模板引擎:Freemarker、Velocity、Thymeleaf等
SpringBoot推荐使用Thymeleaf,且默认不支持JSP,因为JSP必须要打包war包才行
补充:目前主流Web开发更推荐采用前后端分离的形式,前端使用MVVM框架:Vue.js、Angular、React等。
2、springboot模板引擎Thymeleaf的使用方法
Thymeleaf的定义:
Thymeleaf是一种用于Web和独立环境的现代服务器端的Java模板引擎。
Thymeleaf的主要目标是将优雅的自然模板带到开发工作流程中,并将HTML在浏览器中正确显示,并且可以作为静态原型,让开发团队能更容易地协作。Thymeleaf能够处理HTML,XML,JavaScript,CSS甚至纯文本。
Thymeleaf使用Spring框架的模块,与许多常见的工具集成在一起,并且可以插入自己的功能,是现代HTML5 JVM Web开发的理想选择,尽管Thymeleaf还有更多其它的功能。
Thymeleaf建立在自然模板的概念之上,以不影响模板作为设计原型的方式将其逻辑注入到模板文件中。 这改善了设计沟通,弥合了前端设计和开发人员之间的理解偏差。
thymeleaf看下官方的解释,
https://www.thymeleaf.org/index.html
Thymeleaf is a modern server-side Java template engine for both web and standalone environments.
下面一起看下如何使用thymeleaf的:
- 1、首先,查看springboot官方文档,找下下thymeleaf使用的starter启动器,
https://docs.spring.io/spring-boot/docs/2.1.6.RELEASE/reference/html/using-boot-build-systems.html#using-boot-starter

springboot模板引擎使用spring-boot-starter-thymeleaf这个starter启动器。
#<dependency><groupId>org.springframework.boot</groupId><artifactId>spring-boot-starter-thymeleaf</artifactId><version>2.1.6.RELEASE</version></dependency>
- 2、在templates目录下创建html页面
templates目录下的HTML页面默认不能被直接访问,需要通过controller来访问,由thymeleaf来渲染,自动添加前缀和后缀。
首先,在templates目录下创建一个HTML页面:success.html
<!DOCTYPE html>
<html lang="en">
<head><meta charset="UTF-8"><title>Success Page</title>
</head>
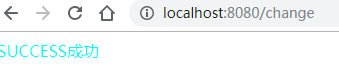
<body><a style="color: aqua;">SUCCESS成功</a>
</body>
</html>
接下来,创建一个TemplateController,
package com.nick.controller;import org.springframework.stereotype.Controller;
import org.springframework.web.bind.annotation.RequestMapping;@Controller
public class TemplateController {@RequestMapping("/sayhello")public String say(){System.out.println("begin to exec TemplateController.sayhello!");return "success";}
}
注意:这里一定要使用@Controller,不能使用@RestController,否则Thymeleaf不能拼前缀后缀!!
PS:thymeleaf后台业务逻辑直接返回模板页面的视图名,他会自动拼前缀后缀的,想下thymeleaf是如何自动拼前缀后缀的?
答:访问流程如下,
访问http://localhost:8087/sayhello接口->返回模板视图页面视图名–>ThymeleafAutoConfiguration–>@EnableConfigurationProperties({ThymeleafProperties.class}),ThymeleafProperties里面定义和前缀和后缀,如下源码:
@ConfigurationProperties(prefix = "spring.thymeleaf"
)
public class ThymeleafProperties {private static final Charset DEFAULT_ENCODING;public static final String DEFAULT_PREFIX = "classpath:/templates/";public static final String DEFAULT_SUFFIX = ".html";
最后,启动下主程序类,浏览器访问下http://localhost:8087/sayhello服务,如下Thymeleaf模板访问成功。

a) 接下来看下后台和页面是如何传值的?
先访问下thymeleaf官方网站下载下使用说明书
https://www.thymeleaf.org/doc/tutorials/3.0/usingthymeleaf.pdf
具体操作方法如下,
在xxxController中设置键值对,供后面的模板页面获取使用
model.addAttribute(“name”, “wangteng”);
package com.nick.controller;import org.springframework.stereotype.Controller;
import org.springframework.ui.Model;
import org.springframework.web.bind.annotation.RequestMapping;@Controller
public class TemplateController {@RequestMapping("/sayhello")public String say(Model model){model.addAttribute("name", "wangteng");System.out.println("begin to exec TemplateController.sayhello!");return "success";}
}
然后,在模板页面这么获取键值对的值,
- 1、导入导入thymeleaf的命名空间
<html lang="en" xmlns:th="http://www.thymeleaf.org">
- 2、使用th:text属性,设置标签中的文本,表达式${}可以获取模型中的数据
<h1 th:text="${name}"></h1>
完整的页面内容如下:
<!DOCTYPE html>
<!导入thymeleaf的命名空间>
<html lang="en" xmlns:th="http://www.thymeleaf.org">
<head><meta charset="UTF-8"><title>Success Page</title>
</head>
<body><a style="color: aqua;">SUCCESS成功</a><! 使用th:text属性,设置标签中的文本,表达式${}可以获取模型中的数据 ><h1 th:text="${name}"></h1>
</body>
</html>
b) 修改页面后,让其立即生效
由于thymeleaf默认启用了缓存,所以修改html页面并不会实时生效
# 禁用thymeleaf的缓存
spring.thymeleaf.cache=false
补充:还需要开启IDEA的自动编译,IDEA默认是不自动编译
Settting——>搜索Compiler——>Build Project Automatically
Help——>Find Action——>搜索Registry——>勾选compiler.automake.allow.when.app.running
3、thymeleaf语法规则
3.1 常用属性
- 1、th:text/th:utext
设置元素中的文本内容
th:text对特殊字符进行转义。
th:utext对特殊字符不进行转义。
示例如下,
在TemplateController 中设置一个属性值
model.addAttribute("byestr", "<a style='color: red;'>下次再见</a>");
如下内容,
package com.nick.controller;import org.springframework.stereotype.Controller;
import org.springframework.ui.Model;
import org.springframework.web.bind.annotation.RequestMapping;@Controller
public class TemplateController {@RequestMapping("/sayhello")public String hello(Model model){model.addAttribute("name", "wangteng");System.out.println("begin to exec TemplateController.hello!");return "success";}@RequestMapping("/saybye")public String bye(Model model){model.addAttribute("byestr", "<a style='color: red;'>下次再见</a>");System.out.println("begin to exec TemplateController.bye!");return "result";}
}
在templates目录下新增result.html页面,
分别使用th:text和th:utext获取上面设置的属性值byestr的值,如下内容,
<!DOCTYPE html>
<!导入thymeleaf的命名空间>
<html lang="en" xmlns:th="http://www.thymeleaf.org">
<head><meta charset="UTF-8"><title>Success Page</title>
</head>
<body><! 使用th:text/th:utext属性,设置标签中的文本,可以获取模型中的数据 ><h1 th:text="${byestr}"></h1><h1 th:utext="${byestr}"></h1>
</body>
</html>
重启下主程序类,访问下看下结果,
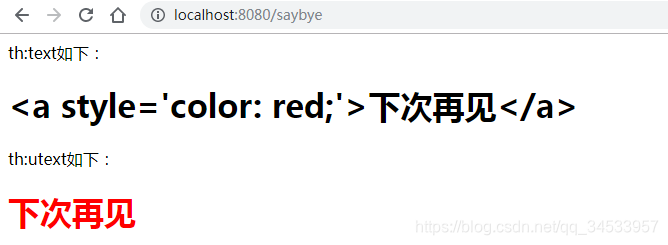
从结果可以看出th:utext对特殊字符不进行转义,直接编译解释了属性值里面的内容;而th:text对特殊字符进行转义,原样输出。
备注:
假如属性的值要和Html标签中的值同时显示,可以使用如下内联方式,
[[${ }]]对特殊字符进行转义。
[(${ })]对特殊字符不进行转义。
具体模板页面内容如下,
内联转义:
<!--内联转义[[${byestr}]]如下::-->
<h1>[[${byestr}]]wangteng</h1>
<!--内联不转义[(${byestr})]如下:-->
内联不转义
<h1>[(${byestr})]wangteng</h1>
刷新页面看下效果:
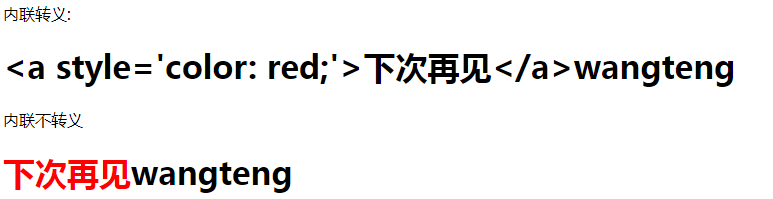
页面显示内容是属性值和Html页面标签的值连接起来的。
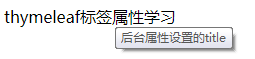
- 2、th:xxx(th:html)原生属性
用来替换指定的html原生属性的值
<a id="html中原来的id值" title="html中原来的title值" th:id="${aid}" th:title="${atitle}">thymeleaf标签属性学习</a>
如上a标签在html中设置了此a标签的id和title值,但是,同时可以使用th:html属性名的方式,从后台属性中获取值,那么,此时后台属性传递的值会覆盖Html中原来的标签中的值。
示例如下,
后台设置一个属性值model.addAttribute(“atitle”,“后台属性设置的title”);,用来覆盖模板页面上的原生html标签属性的值,
@RequestMapping("/saybye")public String bye(Model model){model.addAttribute("byestr", "<a style='color: red;'>下次再见</a>");model.addAttribute("aid","后台属性设置的id");model.addAttribute("atitle","后台属性设置的title");System.out.println("begin to exec TemplateController.bye!");return "result";}
在页面这么使用,
<!DOCTYPE html>
<!导入thymeleaf的命名空间>
<html lang="en" xmlns:th="http://www.thymeleaf.org">
<head><meta charset="UTF-8"><title>Success Page</title>
</head>
<body><h1>[(${byestr})]wangteng</h1><a id="html中原来的id值" title="html中原来的title值" th:id="${aid}" th:title="${atitle}">thymeleaf标签属性学习</a>
</body>
</html>
重启主程序类,访问下页面看下效果,把鼠标放上去可以看到title被替换为后台的属性值。
- 2、th:if、th:unless、th:switch、th:case
条件判断,类似于c:if
th:unless和th:if相反的功能。
例如,
<p th:if="${age} >= 18">成年人</p>
等同于
<p th:unless="${age} <18">成年人</p>
条件刚好相反
下面演示下th:switch、th:case的用法,先在后台controller中设置一个属性值username
@RequestMapping("/saybye")public String bye(Model model){model.addAttribute("username","manager");System.out.println("begin to exec TemplateController.bye!");return "result";}
在模板页面上这么使用th:switch、th:case,
<!DOCTYPE html>
<!导入thymeleaf的命名空间>
<html lang="en" xmlns:th="http://www.thymeleaf.org">
<head><meta charset="UTF-8"><title>Success Page</title>
</head>
<body><div th:switch="${username}"><p th:case="admin">User is an administrator</p><p th:case="manager">User is a manager</p><p th:case="*">other operatoer</p></div>
</body>
</html>
- 3、th:each
循环,类似于c:forEach
下面演示下th:each的用法,先在后台controller中设置一个属性值stuList
@RequestMapping("/saybye")public String bye(Model model){model.addAttribute("stuList", Arrays.asList("wangteng","hanmeimei","lilei"));System.out.println("begin to exec TemplateController.bye!");return "result";}
在模板页面上这么使用th:each
<!DOCTYPE html>
<!导入thymeleaf的命名空间>
<html lang="en" xmlns:th="http://www.thymeleaf.org">
<head><meta charset="UTF-8"><title>Success Page</title>
</head>
<body><ul><li th:each="stuName:${stuList}" th:text="${stuName}"></li></ul>
</body>
</html>
- 4、th:object、th:field
用于表单数据对象的绑定,将表单绑定到Controller的一个JavaBean参数,常与th:field一起使用需要和*{}选择表达式配合使用。
下面来演示下使用方法,页面上写一个form表单,绑定到userInfo对象,同时,提交到chanage方法
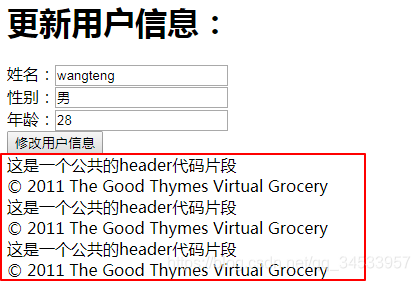
<h1>更新用户信息:</h1><form action="change" method="post" th:object="${userInfo}">姓名:<input type="text" th:field="${userInfo.username}" ><br>性别:<input type="text" th:field="${userInfo.sex}" ><br>年龄:<input type="text" th:field="${userInfo.age}" ><br><input type="submit" th:value="修改用户信息"></form>
接下来,在TemplateController中实现这个change接口,
@RequestMapping("change")public String change(@ModelAttribute("user") UserInfo user){System.out.println("TemplateController.change.userinfo=" + user);return "success";}
重新主程序,先从localhost:8080/saybye访问,此时会在result.html显示这个表单,
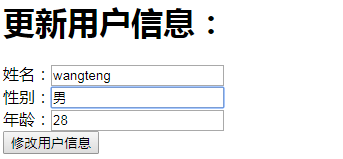
修改下上面输入框的内容,点击下面的按钮提交,提示成功,Url跳转到change服务接口
查看下后台打印了新更新的数据,
TemplateController.change.userinfo=UserInfo{username=‘hanmeimei’, age=28, sex=男}
- 5、th:fragment
声明代码片段,常用于页面头部和尾部的引入 - 6、th:include、th:insert、th:replace
引入代码片段,类似于jsp:include
三者的区别:需要通过F12查看源码才能看出来区别。 - th:include 保留自己的标签,不要th:frament的标签(Thymeleaf 3.0中不推荐使用)
- th:insert 保留自己的标签,保留th:frament的标签
- th:replace 不要自己的标签,保留th:frament的标签
上面两个属性的使用方法,一起看下下面的演示, - a 在templates目录下面创建一个include目录
- b 在include目录下面,创建header.html和footer.html,分别在这两个页面设置一个代码片段th:fragment,
header.html内容如下
<!DOCTYPE html>
<html lang="en" xmlns:th="http://www.thymeleaf.org">
<header th:fragment="headstr">这是一个公共的header代码片段</header>
</html>
footer.html内容如下,
<!DOCTYPE html>
<html lang="en" xmlns:th="http://www.thymeleaf.org">
<body>
<div th:fragment="copy">© 2011 The Good Thymes Virtual Grocery
</div>
</body>
</html>
然后,在result.html中引入这两个代码片段,
<!DOCTYPE html>
<!导入thymeleaf的命名空间>
<html lang="en" xmlns:th="http://www.thymeleaf.org">
<head><meta charset="UTF-8"><title>Success Page</title>
</head>
<body><div th:include="~{include/header :: headstr}"></div><div th:include="include/footer::copy"></div><div th:insert="include/header::headstr"></div><div th:insert="include/footer::copy"></div><div th:replace="include/header::headstr"></div><div th:replace="include/footer::copy"></div>
</body>
</html>
页面上可以正常显示这两个片段的内容,
3.2 thymeleaf表达式
- 1、${} 变量表达式
获取对象的属性、方法
使用内置的基本对象,如session
使用内置的工具对象,如#strings、#dates、#arrays、#lists、#maps等
示例如下,
<!DOCTYPE html>
<!导入thymeleaf的命名空间>
<html lang="en" xmlns:th="http://www.thymeleaf.org">
<head><meta charset="UTF-8"><title>Title</title>
</head>
<body><!-- 获取对象的属性和方法 --><div th:text="${user.username}"></div><div th:text="${user['age']}"></div><div th:text="${userList[2].username}"></div><div th:text="${userList.size()}"></div><div th:text="${userList.get(1).username}"></div><!-- 内置对象 session--><div th:text="${session.backurl}"></div><!-- 使用内置的工具对象--><div th:text="${#strings.startsWith(user.username, 'wang')}"></div><div th:text="${#dates.createToday()}"></div><div th:text="${#dates.format(session.startdate)}"></div><div th:text="${#arrays.toArray(userList)[0]}"></div><div th:text="${#lists.size(userList)}"></div><div th:text="${#maps.isEmpty(mapuser)}"></div>
</body>
</html>
- 2、*{}选择表达式(星号表达式)
需要和th:object配合使用,简化获取对象的属性
<!-- *{}选择表达式--><div th:object="${user}"><div th:text="*{username}"></div><div th:text="*{sex}"></div><div th:text="*{age}"></div></div>相当于<div th:text="${user.username}"></div>上面省略了user.,提取出来放到外层的th:object指定。
- 3、@{} url表达式
定义ur
<a href="" th:href="@{/querydetail(username=${user.username})}">查询指定用户的详情信息</a>
<script src="" th:src="@{/js/common.js}"></script>
- 4、运算符
eq gt le == != 三目运算符
单选题目:<input type="radio" th:checked="${mapuser.get(1001).getSex() eq 'male'}">男<input type="radio" th:checked="${mapuser.get(1001).getSex() eq 'female'}">女
6、springboot进阶
6.1 热部署
在pom.xml中添加SpringBoot提供的devtools依赖插件,即可实现热部署。
- 原理:实现监控classpath下文件的变化,如果发生变化则自动重启
- 配置:添加devtools依赖
<dependency><groupId>org.springframework.boot</groupId><artifactId>spring-boot-devtools</artifactId><version>2.1.6.RELEASE</version>
</dependency>
6.2 扩展默认的SpringMVC功能
以前在SpringMVC中通过如下代码实现视图跳转和拦截器:
<mvc:viewcontroller path="/showLogin" viewname="login"/>
<mvc:interceptors>
<mvc:interceptor>
<mvc:mapping path="/hello"/>
<bean class="com.itany.interceptor.HelloInterceptor"/>
</mvc:interceptor>
</mvc:interceptors>
SpringBoot自动配置默认并没有提供以上功能配置,需要自己扩展,使用WebMvcConfigure接口
templates目录下的模板页面无法直接访问,需要借助xxxController跳转才能访问到模板页面。
故,Spring MVC的模板页面无法直接访问,需要通过实现WebMvcConfigure接口来实现视图跳转和拦截器。
示例如下,
- 1、在templates目录下新增login.html模板页面
<!DOCTYPE html>
<html lang="en">
<head><meta charset="UTF-8"><title>Title</title>
</head>
<body><h1>欢迎来到springboot入门so easy系统</h1><form>用户名:<input type="text">密  码:<input type="password"><input type="submit" value="确认登录"></form>
</body>
</html>
- 2、新增自定义的拦截器HelloInterceptor
package com.nick.interceptor;import org.springframework.web.servlet.HandlerInterceptor;
import org.springframework.web.servlet.ModelAndView;import javax.servlet.http.HttpServletRequest;
import javax.servlet.http.HttpServletResponse;public class HelloInterceptor implements HandlerInterceptor {@Overridepublic boolean preHandle(HttpServletRequest request, HttpServletResponse response, Object handler) throws Exception {System.out.println("begin HelloInterceptor.preHandle");return true;}@Overridepublic void postHandle(HttpServletRequest request, HttpServletResponse response, Object handler, ModelAndView modelAndView) throws Exception {System.out.println("begin HelloInterceptor.postHandle!");}@Overridepublic void afterCompletion(HttpServletRequest request, HttpServletResponse response, Object handler, Exception ex) throws Exception {}
}
- 3、在com.nick.config目录下面创建ExctendMvcConfig配置类,实现WebMvcConfigurer 接口
package com.nick.config;
import com.nick.interceptor.HelloInterceptor;
import org.springframework.context.annotation.Configuration;
import org.springframework.web.servlet.config.annotation.InterceptorRegistry;
import org.springframework.web.servlet.config.annotation.ViewControllerRegistry;
import org.springframework.web.servlet.config.annotation.WebMvcConfigurer;/*** 扩展springmvc的功能* 1、使用@Configuration注解表示是一个配置类ExctendMvcConfig,实现WebMvcConfigurer 接口。* 2、实现这个WebMvcConfigurer接口* 3、根据需要实现相应的方法接即可* 备注:这个WebMvcConfigurer接口的所有方法都是还有jdk1.8的default修饰,不强制实现所有方法(jdk1.8的特性)*/
@Configuration
public class ExctendMvcConfig implements WebMvcConfigurer {/*** 添加ViewControllers* @param registry*/@Overridepublic void addViewControllers(ViewControllerRegistry registry) {//当访问/login接口的时候,跳转到login视图registry.addViewController("/login").setViewName("login");}@Overridepublic void addInterceptors(InterceptorRegistry registry) {registry.addInterceptor(new HelloInterceptor()).addPathPatterns("/login");}
}
- 4、重启主程序类,访问下http://localhost:8080/login,发现页面跳转了刚才新增的login.html模板页面。
6.3 全局异常处理
当程序出现异常时进行全局处理,SpringBoot默认的异常提示: Whitelabel Error Page
两种方式:
- 定义错误码页面
- 定义异常通知
6.3.1 定义错误码页面
创建 错误状态码.html 页面,放在templates/error目录中,当发生错误时会自动到该目录下查找对应的错误页
面
可以创建如 4xx.html 或 5xx.html 页面,用来匹配所有该类型的错误(会先进行精确匹配)
同时,错误页面上可以获取如下内置对象数据,
<h2>5xx错误</h2>
<h3>状态码:[[${status}]]</h3>
<h3>错误提示:[[${error}]]</h3>
<h3>异常消息:[[${message}]]</h3>
<h3>时间戳:[[${timestamp}]]</h3>
示例,在templates目录下新增error目录,在error目录下面新增404.html,内容如下,
<!DOCTYPE html>
<html lang="en">
<head><meta charset="UTF-8"><title>Title</title>
</head>
<body><h1>sorry, can not find the page, errorcode=404</h1>
</body>
</html>
此时,在页面上访问一个不存在的路径,页面提示就是跳转到404.html
6.3.2 定义异常通知
当出现异常特殊异常或者比较严重的异常的时候,除了想自定义错误页面,还有有一些业务逻辑,例如发送短信,邮件等通知,或者保存到数据库中等业务逻辑处理,这个时候就会用到本小节的内容了。
新增一个ExceptionAdvice类,注解为ControllerAdvice,可以只针对不同的异常进行相应的封装和指定错误页面,如下代码。
/*** 异常通知,处理全局异常。*/
@ControllerAdvice
public class ExceptionAdvice {
@ExceptionHandler(ArithmeticException.class)
public String arithmetic(Exception e){
System.out.println("警报,程序出现异常,发短信:"+e.getMessage());
return "error/5xx";
}
@ExceptionHandler(Exception.class)
public String exception(Exception e){
System.out.println("警报,程序出现异常,发邮件:"+e.getMessage());
return "error/5xx";
}
}
6.4 注册servlet组件
SpringBoot中默认内置了Servlet容器:Tomcat
- 问题:SpringBoot默认是以jar包的方式启动内置的Servlet容器,没有web.xml文件,如何注册Servlet三大组
件:Servlet、Filter、Listener? - 解决:通过自定义Servlet配置,使用ServletRegistrationBean、FilterRegistrationBean、
ListenerRegistrationBean - 操作步骤:
1、在com.nick.servlet目录下新增自定义的sevlet类ServletDemo,
package com.nick.servlet;import javax.servlet.ServletException;
import javax.servlet.http.HttpServlet;
import javax.servlet.http.HttpServletRequest;
import javax.servlet.http.HttpServletResponse;
import java.io.IOException;public class ServletDemo extends HttpServlet {@Overrideprotected void doGet(HttpServletRequest req, HttpServletResponse resp) throws ServletException, IOException {super.doGet(req, resp);}@Overrideprotected void doPost(HttpServletRequest req, HttpServletResponse resp) throws ServletException, IOException {super.doPost(req, resp);}
}
2、在com.nick.filter目录下新增自定义的filter类FilterDemo,
package com.nick.filter;import javax.servlet.*;
import java.io.IOException;public class FilterDemo implements Filter {@Overridepublic void init(FilterConfig filterConfig) throws ServletException {}@Overridepublic void doFilter(ServletRequest servletRequest, ServletResponse servletResponse, FilterChain filterChain) throws IOException, ServletException {System.out.println("doFilter...........");filterChain.doFilter(servletRequest,servletResponse);}@Overridepublic void destroy() {}
}
3、在com.nick.listener目录下新增自定义的listener类ListenerDemo,
package com.nick.listener;import javax.servlet.ServletContextEvent;
import javax.servlet.ServletContextListener;public class ListenerDemo implements ServletContextListener {@Overridepublic void contextInitialized(ServletContextEvent sce) {}@Overridepublic void contextDestroyed(ServletContextEvent sce) {}
}
4、在com.nick.config目录下新增自定义的配置类CustomServletConfig,
@Configuration
public class CustomServletConfig {// 注册Servlet@Beanpublic ServletRegistrationBean myServlet() {ServletRegistrationBean<ServletDemo> registrationBean = newServletRegistrationBean<>();registrationBean.setServlet(new ServletDemo());registrationBean.addUrlMappings("/servletDemo");return registrationBean;}// 注册Filter@Beanpublic FilterRegistrationBean myFilter(){FilterRegistrationBean<FilterDemo> registrationBean = newFilterRegistrationBean<>();registrationBean.setFilter(new FilterDemo());registrationBean.addUrlPatterns("/sayhello","/test1");return registrationBean;}// 注册Listener@Beanpublic ServletListenerRegistrationBean myListener(){ServletListenerRegistrationBean<ListenerDemo> registrationBean = newServletListenerRegistrationBean<>();registrationBean.setListener(new ListenerDemo());return registrationBean;}
}
至此自定义的注册servlet组件就完成了。
6.5 使用外部的Servlet容器
- 使用内置Servlet容器:将应用打成可执行的jar包,直接运行
优点:简单、方便
缺点:不支持JSP、可定制性差 - 使用外部Servlet容器:将应用打成war包,然后部署到外部的Tomcat
优点:支持JSP、可定制性强
6.5.1 如何使用外部的Servlet容器?
- 一、创一个springboot工程,打包方式选择war方式,
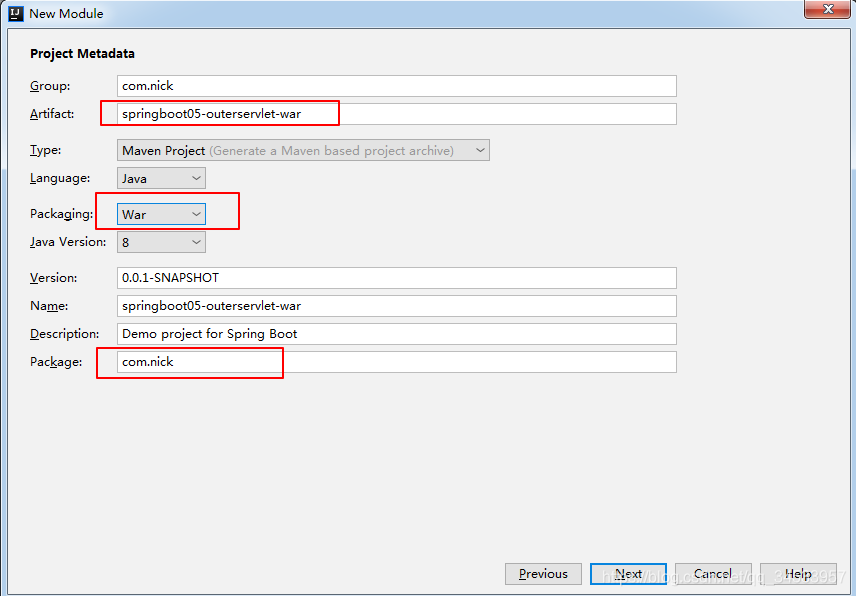
启动器仍然选择webstarter
和其它springboot工程有如下3个变化, - pom.xml变化
1、使用war方式打包
<packaging>war</packaging>
2、spring-boot-starter-tomcat的scope的值变化provided,这个意思是这个依赖不需要打包war包中去。
<dependency><groupId>org.springframework.boot</groupId><artifactId>spring-boot-starter-tomcat</artifactId><scope>provided</scope></dependency>
- JAVA类
1、com.nick目录下面多了一个ServletInitializer类,是SpringBootServletInitializer的子类。
package com.nick;import org.springframework.boot.builder.SpringApplicationBuilder;
import org.springframework.boot.web.servlet.support.SpringBootServletInitializer;/*** 要求:* 1.继承SpringBootServletInitializer类* 2.重写configure()方法* 3.调用SpringApplicationBuilder的sources()方法,传入SpringBoot应用的主程序类*/
public class ServletInitializer extends SpringBootServletInitializer {@Overrideprotected SpringApplicationBuilder configure(SpringApplicationBuilder application) {return application.sources(Springboot05OuterservletWarApplication.class);}
}
- 二、创建Web目录
Project Structure——>Modules——>Deployment Descriptors——>+

(web.xml的版本选择的3.0版本)
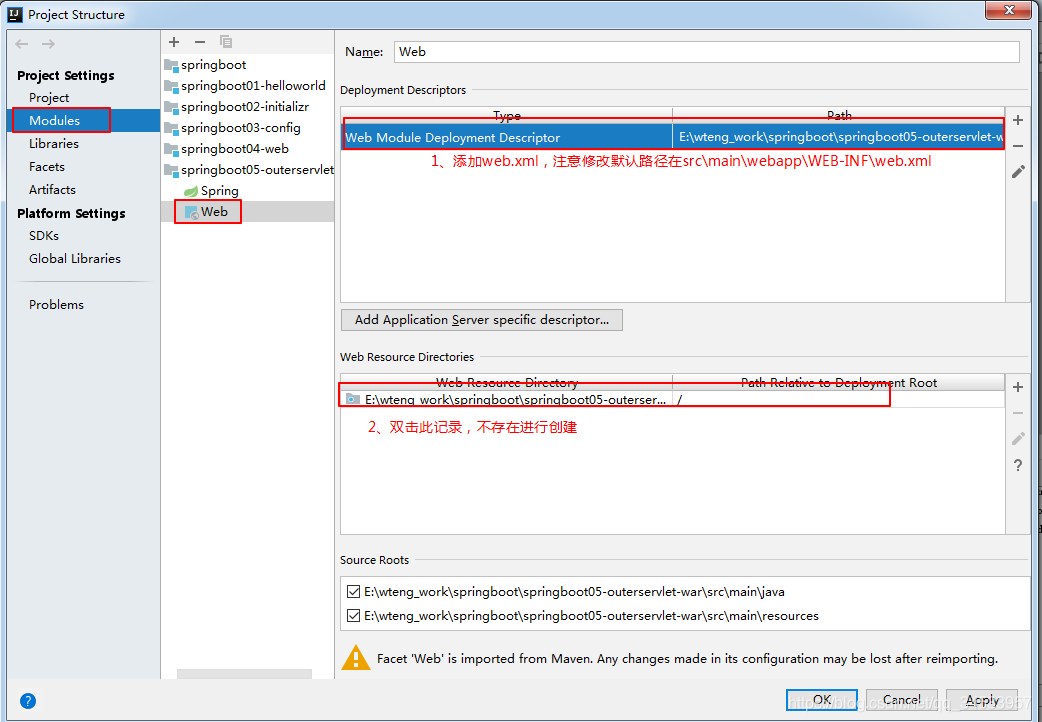
- 三、配置前缀和后缀
如果新增xxxController,默认会到templates目录下找模板页面的,这里jsp页面是放到WEB-INF目录下的,则,需要进行如下两个配置,
在application.properties文件中配置,
spring.mvc.view.prefix=/WEBINF/views/
spring.mvc.view.suffix=.jsp
- 四、配置Tomcat
-Tomcat 8.5及以上
把tomcat配置到IDEA中,
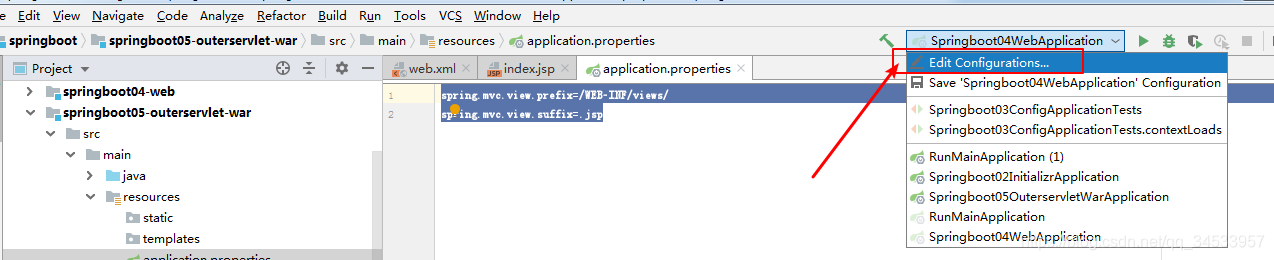
打开的创建,点击左上方的+加号按钮进行添加,
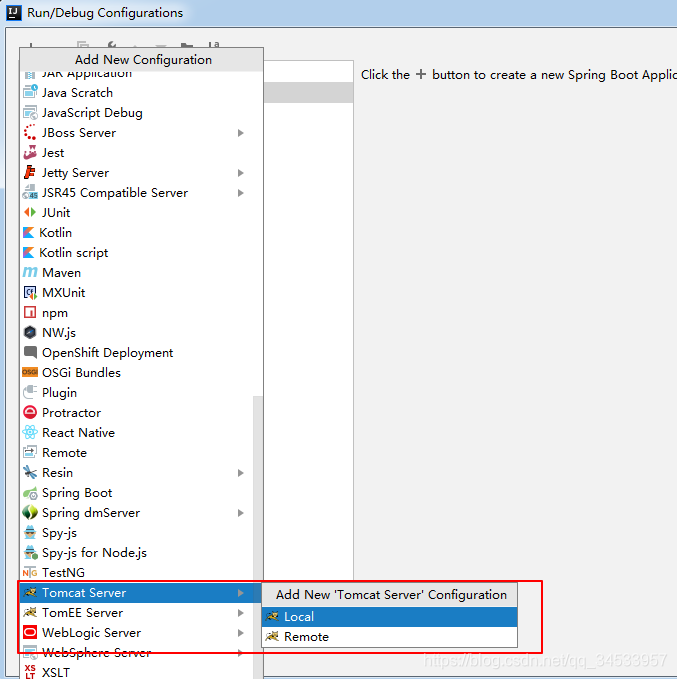
然后,根据向导配置下即可,这里就不详细展开了,有需要的网上百度下吧。
7、springboot整合其他技术
7.1 springboot整合JDBC
备注:此章节需要有个Mysql数据库,我这里是使用mysql的镜像部署的一个mysql数据库。
连接数据库需要选择对应的starter,例如,连接mysql要选择mysql drive对应的starter或者jdbc api的starter。
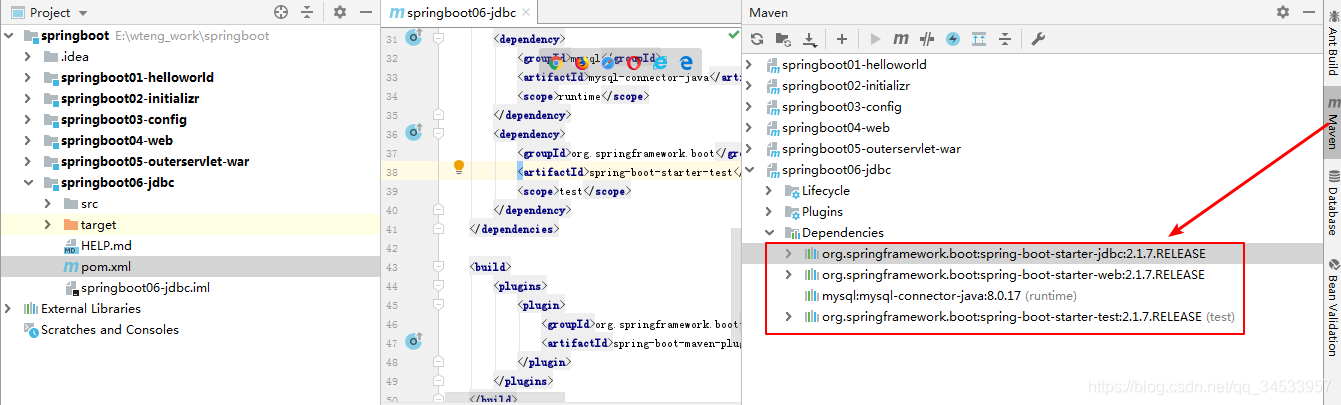
- 1、 创建一个工程,选择以下依赖:Web、MySQL、JDBC
点击如下图方向的Maven,查看下已添加的依赖关系已经加进来了。
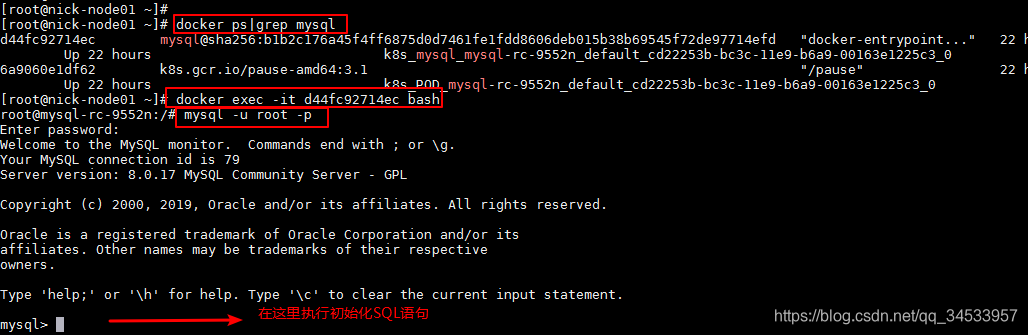
- 2、首先,初始化数据库
在resources目录下面创建一个database目录,然后创建一个initdb.sql文件存储SQL语句,内容如下,
create database springboot charset utf8;
use springboot;
create table spuserinfo(spid int primary key auto_increment,spname varchar(300) not null unique,paasword varchar(220),address varchar(500),age int
);insert into spuserinfo(spname,paasword,address,age) values('admin','123456','nanjing',24);
insert into spuserinfo(spname,paasword,address,age) values('hanmeimei','abc123','taizhou',32);
commit;
把上面的语句在mysql数据库中执行下,创建数据库,表,并插入初始数据。
- 3、配置数据库连接信息
打开application.properties文件,配置数据库连接信息
#配置数据库连接信息,下面的数据库信息请根据实际情况填写
spring.datasource.driver-class-name=com.mysql.jdbc.Driver
spring.datasource.url=jdbc:mysql://10.1.1.1:3306/springboot?useUnicode=true&characterEncoding=utf8
spring.datasource.username=root
spring.datasource.password=Admin@123
spring.datasource.type=org.apache.commons.dbcp.BasicDataSource
- 4、使用单元测试测试下数据库连接是否成功?
package com.nick;import ch.qos.logback.core.net.SyslogOutputStream;
import org.junit.Test;
import org.junit.runner.RunWith;
import org.springframework.beans.factory.annotation.Autowired;
import org.springframework.boot.test.context.SpringBootTest;
import org.springframework.test.context.junit4.SpringRunner;import javax.sql.DataSource;
import java.sql.Connection;
import java.sql.PreparedStatement;
import java.sql.ResultSet;
import java.sql.SQLException;@RunWith(SpringRunner.class)
@SpringBootTest
public class Springboot06JdbcApplicationTests {@Autowiredprivate DataSource dataSource;@Testpublic void contextLoads() throws SQLException {System.out.println("----------------------数据库连接成功");System.out.println(dataSource.getClass());System.out.println(dataSource.getConnection());String sql = "select address from spuserinfo where spname='hanmeimei'";String name = "";try {System.out.println("Connection连接:"+dataSource.getConnection());Connection conn = dataSource.getConnection();PreparedStatement ps = conn.prepareStatement(sql);ResultSet result = ps.executeQuery();if(result.next()){name = result.getString("address");}}catch (Exception e){e.printStackTrace();}System.out.println(name);}
}
测试结果可以正常从数据中获取数据。
- 5、下面来看下怎么配置数据库连接池参数?
在application.properties文件中配置如下连接池参数,
#配置连接池参数
spring.datasource.initialSize=15
spring.datasource.maxActive=80
spring.datasource.minIdle=5
spring.datasource.maxWait=50000
- 问题:此时debug下Springboot06JdbcApplicationTests可以发现,上面的连接池参数并未生效。
数据源的自动配置类是DataSourceAutoConfiguration,数据库信息的绑定关系是这样的,
DataSourceAutoConfiguration–>@EnableConfigurationProperties({DataSourceProperties.class})–>DataSourceProperties
通过查看DataSourceProperties,可以发现DataSourceProperties中并未有连接池这些参数属性,SpringBoot默认并不支持这些参数(DataSourceProperties)。 - 解决方法:自定义数据源配置类
在com.nick.config目录下新建数据源配置类DatabaseCustomConfig,
package com.nick.config;import org.apache.commons.dbcp.BasicDataSource;
import org.springframework.boot.context.properties.ConfigurationProperties;
import org.springframework.context.annotation.Bean;
import org.springframework.context.annotation.Configuration;import javax.sql.DataSource;@Configuration
public class DatabaseCustomConfig {@Bean// 从配置文件中读取spring.datasource属性,并注入给数据源的属性@ConfigurationProperties(prefix = "spring.datasource")public DataSource dataSource(){return new BasicDataSource();}}
此时再去debug下此时Springboot06JdbcApplicationTests可以发现,上面的连接池参数已经生效。
- 6、下面创建一个UserController 类使用JdbcTemplate操作数据库下数据库
package com.nick.controller;import org.springframework.beans.factory.annotation.Autowired;
import org.springframework.jdbc.core.JdbcTemplate;
import org.springframework.stereotype.Controller;
import org.springframework.web.bind.annotation.RequestMapping;
import org.springframework.web.bind.annotation.ResponseBody;import java.util.List;
import java.util.Map;@Controller
@RequestMapping("/user")
public class UserController {@Autowiredprivate JdbcTemplate jdbcTemplate;@RequestMapping("/findAll")@ResponseBodypublic String findAll(){StringBuffer result = new StringBuffer();List<Map<String, Object>> list = jdbcTemplate.queryForList("select spname from spuserinfo");for (Map<String, Object> stringObjectMap : list) {String spname = (String) stringObjectMap.get("spname");result.append(spname);}System.out.println(result);return result == null? "":result.toString();}
}
7.2 springboot整合myBatis
- 1、 创建一个工程,选择以下依赖:Web、MySQL、Mybatis
- 2、前面章节讲JDBC的时候,使用的是
<dependency><groupId>commons-dbcp</groupId><artifactId>commons-dbcp</artifactId><version>1.4</version></dependency>
这里换个连接池,试一下阿里的druid连接池
<!-- https://mvnrepository.com/artifact/com.alibaba/druid --><dependency><groupId>com.alibaba</groupId><artifactId>druid</artifactId><version>1.1.19</version></dependency>
关于这个druid连接池的概念和用法大家可以百度下。
- 3、数据库配置信息
因为内容比较多,这里使用application.yml文件进行配置数据库信息,
spring:datasource:driver-class-name: com.mysql.jdbc.Driverurl: jdbc:mysql://10.1.1.1:3306/springboot?useUnicode=true&characterEncoding=utf8username: rootpassword: Admin@123initialSize: 5maxActive: 100minIdle: 3maxWait: 50000#配置mybatis包的别名和mapper的位置
mybatis:type-aliases-package: com.nick.pojomapper-locations: classpath:mapper/*.xml
- 4、创建一个POJO实体类
这里创建的类里面的属性字段最好和Mysql数据库表的字段名称一致,
package com.nick.pojo;import java.io.Serializable;public class User implements Serializable {private Integer spid;private String spname;private  String password;public Integer getSpid() {return spid;}public void setSpid(Integer spid) {this.spid = spid;}public String getSpname() {return spname;}public void setSpname(String spname) {this.spname = spname;}public String getPassword() {return password;}public void setPassword(String password) {this.password = password;}
}
- 5、创建mapper接口
package com.nick.mapper;import com.nick.pojo.User;import java.util.List;/*** 接口*/
public interface UserMapper {public List<User> selectAll();public User queryById(int spid);public boolean save(User user);
}
- 6、创建usermapper.xml映射文件
这个xml文件的内容可以参阅官方的例子,http://www.mybatis.org/mybatis-3/configuration.html
<!DOCTYPE mapperPUBLIC "-//mybatis.org//DTD Mapper 3.0//EN""http://mybatis.org/dtd/mybatis-3-mapper.dtd"><mapper namespace="com.nick.mapper.UserMapper"><sql id="userColumn">spid,spname,password</sql><select id="selectAll" resultType="User">select <include refid="userColumn"/>from spuserinfo</select><select id="queryById" resultType="User">select <include refid="userColumn"/>from spuserinfowhere spid=#{spid}</select><insert id="save" parameterType="User" useGeneratedKeys="true" keyProperty="spid">insert into spuserinfo (spname, password) values (#{spname}, #{password})</insert>
</mapper>
备注:这个映射文件中的id要和mapper接口中的方法名保持一致。
- 7、创建UserService接口和实现类
- UserService.java
package com.nick.service;import com.nick.pojo.User;import java.util.List;public interface UserService {public List<User> selectAll();public User queryById(int spid);public boolean save(User user);
}
- UserServiceImpl.java
package com.nick.service;import com.nick.mapper.UserMapper;
import com.nick.pojo.User;
import org.springframework.beans.factory.annotation.Autowired;
import org.springframework.stereotype.Service;
import org.springframework.transaction.annotation.Propagation;
import org.springframework.transaction.annotation.Transactional;import java.util.List;@Service
@Transactional(propagation = Propagation.REQUIRED, rollbackFor = Exception.class)
public class UserServiceImpl implements UserService{@Autowiredprivate UserMapper userMapper;@Override@Transactional(propagation = Propagation.SUPPORTS, readOnly = true)public List<User> selectAll() {return userMapper.selectAll();}@Override@Transactional(propagation = Propagation.SUPPORTS, readOnly = true)public User queryById(int spid) {return userMapper.queryById(spid);}@Overridepublic boolean save(User user) {boolean re = userMapper.save(user);return re;}
}
- 8、创建mapperScan和自定义数据库连接池配置类
package com.nick.config;import com.alibaba.druid.pool.DruidDataSource;
import org.mybatis.spring.annotation.MapperScan;
import org.springframework.boot.context.properties.ConfigurationProperties;
import org.springframework.context.annotation.Bean;
import org.springframework.context.annotation.Configuration;import javax.crypto.interfaces.PBEKey;
import javax.sql.DataSource;@Configuration
//扫描mybatis的mapper接口所在的包
@MapperScan("com.nick.mapper")
public class CustomMybatisConfig {@Bean@ConfigurationProperties(prefix = "spring.datasource")public DataSource dataSource(){return new DruidDataSource();}}
- 9、创建UserController.java输出接口业务逻辑
package com.nick.controller;import com.nick.pojo.User;
import com.nick.service.UserService;
import org.springframework.beans.factory.annotation.Autowired;
import org.springframework.stereotype.Controller;
import org.springframework.web.bind.annotation.RequestMapping;
import org.springframework.web.bind.annotation.RestController;import java.util.ArrayList;
import java.util.List;@RestController
@RequestMapping("/user")
public class UserController {@Autowiredprivate UserService userService;@RequestMapping("/findAll")public List<User> findAll(){List<User> userList = userService.selectAll();return  userList;}@RequestMapping("/queryById")public User queryById(int spid){User user = userService.queryById(spid);return  user;}@RequestMapping("/add")public boolean add(User user){boolean result = userService.save(user);return  result;}
}
- 10、启动主程序类,测试结果
查询所有信息

按照spid查询

新增用户信息

7.3 配置pageHelper分页
- 1、添加pom依赖的启动器
<!-- https://mvnrepository.com/artifact/com.github.pagehelper/pagehelper-spring-boot-starter --><dependency><groupId>com.github.pagehelper</groupId><artifactId>pagehelper-spring-boot-starter</artifactId><version>1.2.5</version></dependency>
2、在application.yml配置分页使用的数据库类型
# 配置pageHelper分页
pagehelper:helper-dialect: mysql
3、在UserService和UserServiceImpl中添加分页接口
-->UserService.java
public PageInfo<User> findByPage(int pageNum, int pageSize);
-->UserServiceImpl.java@Overridepublic PageInfo<User> findByPage(int pageNum, int pageSize) {//使用pageHelper设置分页PageHelper.startPage(pageNum, pageSize);List<User> users = userMapper.selectAll();PageInfo<User> pageInfo = new PageInfo<>(users);return pageInfo;}
4、UserController中新增接口服务
@RequestMapping("/findbypage")public PageInfo findByPage(int pageNum){PageInfo<User> result = userService.findByPage(pageNum, 2);return result;}
5、重启主程序类,测试下

7.4 Springboot整合redis
- 1、创建一个工程,添加web,redis依赖starter
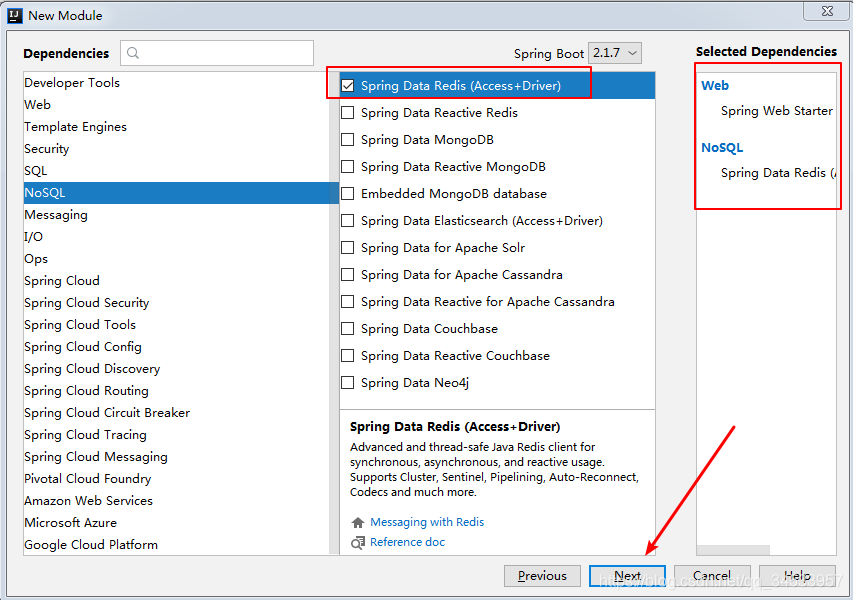
- 2、查看下pom.xml的内容
发现存在以下依赖关系,
<dependencies><dependency><groupId>org.springframework.boot</groupId><artifactId>spring-boot-starter-data-redis</artifactId></dependency><dependency><groupId>org.springframework.boot</groupId><artifactId>spring-boot-starter-web</artifactId></dependency><dependency><groupId>org.springframework.boot</groupId><artifactId>spring-boot-starter-test</artifactId><scope>test</scope></dependency></dependencies>
下面打开spring-boot-starter-data-redis启动器,springboot 2.x以上版本由原来的springboot 1.x版本的jedis客户端更新为lettuce客户端,
可以点击spring-boot-starter-data-redis启动器,在文件尾部可以看到如下内容,
<dependency><groupId>io.lettuce</groupId><artifactId>lettuce-core</artifactId><version>5.1.8.RELEASE</version><scope>compile</scope></dependency>
如果想使用jedis客户端,可以再pom.xml中使用exclusions去掉lettuce依赖,然后手动添加jedis客户端依赖,如下内容,
<!整合redis><dependency><groupId>org.springframework.boot</groupId><artifactId>springbootstarterdataredis</artifactId><!springboot2.o默认使用的redis客户端是lettuce><exclusions><exclusion><groupId>io.lettuce</groupId><artifactId>lettucecore</artifactId></exclusion></exclusions></dependency><!jedis><dependency><groupId>redis.clients</groupId><artifactId>jedis</artifactId></dependency>
我这里还是使用如下依赖,基于lettuce访问redis数据库,关于jedis访问redis数据库的方法,我后续再开博客讲解,
<dependency><groupId>org.springframework.boot</groupId><artifactId>spring-boot-starter-data-redis</artifactId></dependency>
- 3、配置redis信息
打开application.properties,添加如下内容,
#redis配置
spring.redis.host=10.1.1.1
spring.redis.port=6379
spring.redis.password=123456
spring.redis.database=0
spring.redis.jedis.pool.max-active=100
spring.redis.jedis.pool.max-idle=10
spring.redis.jedis.pool.min-idle=3
- 4、接下来访问下redis进行相关的操作
这里使用单元测试的形式直接调用现成的SpringDataRedis提供的工具:StringRedisTemplate、RedisTemplat
package com.nick;import org.junit.Test;
import org.junit.runner.RunWith;
import org.springframework.beans.factory.annotation.Autowired;
import org.springframework.boot.test.context.SpringBootTest;
import org.springframework.data.redis.core.*;
import org.springframework.test.context.junit4.SpringRunner;@RunWith(SpringRunner.class)
@SpringBootTest
public class Springboot09RedisApplicationTests {//直接使用现成的工具类进行访问redis数据库@Autowiredprivate StringRedisTemplate strredisTemplate;@Autowiredprivate RedisTemplate redisTemplate;/*** 使用StringRedisTemplate* redis的数据类型:String, list, set, zset,Hash*/@Testpublic void contextLoads() {//操作string对象的值ValueOperations<String, String> str = strredisTemplate.opsForValue();//添加一个string类型的redis对象str.set("username","admin");System.out.println(strredisTemplate.opsForValue().get("username"));//操作list集合的//ListOperations<String, String> list = redisTemplate.opsForList();//操作set集合的//SetOperations<String, String> set = redisTemplate.opsForSet();redisTemplate.opsForValue().set("sex", "female");System.out.println(redisTemplate.opsForValue().get("sex"));}
}
执行下此测试类,发现新增的string类型的redis对象已添加成功。
-----------------OVER------感谢大家的阅读访问,有问题请在评论区留言讨论!-------------------------
附录
课件源码地址:https://gitee.com/yeyuehongying/springboot.git
如若内容造成侵权/违法违规/事实不符,请联系编程学习网邮箱:809451989@qq.com进行投诉反馈,一经查实,立即删除!
相关文章
- SpringBoot笔记之入门教程
SpringBoot入门 一、SpringBoot简介 1.SpringBoot是什么? 产生背景:Spring开发变的越来越笨重,大量的XML文件,繁琐的配置,复杂的部署流程,整合第三方框架难度大等,导致开发效率低下 S…...
2024/4/21 7:28:41 - 孙红雷做双眼皮拆线最佳时间
...
2024/4/21 7:28:32 - 京淘项目Day-03
1 SpringBoot整合JSP 1.1 关于SpringBoot整合页面说明 说明:SpringBoot默认支持的页面是HTML页面.通过模板工具类进行数据的转化.(JAR包文件). 但是天生不支持整合JSP的机制,所以需要单独的配置. (war包项目) 1.2 调整IDE的new选项 勾选maven 1.3 新建web项目 2).将原有my…...
2024/5/2 23:21:18 - 京淘项目Day03
1 SpringBoot整合JSP 1.1 关于SpringBoot整合页面说明 说明:SpringBoot默认支持的页面是HTML页面.通过模板工具类进行数据的转化.(JAR包文件). 但是天生不支持整合JSP的机制,所以需要单独的配置. (war包项目) 1.2 调整IDE的new选项 勾选maven 1.2 新建web项目 2).将原有my…...
2024/4/21 7:28:30 - 京淘项目003
1 SpringBoot整合JSP 1.1 关于SpringBoot整合页面说明 说明:SpringBoot默认支持的页面是HTML页面.通过模板工具类进行数据的转化.(JAR包文件). 但是天生不支持整合JSP的机制,所以需要单独的配置. (war包项目) 1.2 调整IDE的new选项 勾选maven 1.2 新建web项目 1.3 添加jar…...
2024/4/21 7:28:29 - 割完双眼皮多长时间眼睛不涨
...
2024/4/21 7:28:28 - 品优购第四天
品优购 第4天 学习目标 目标1:实现SpringSecurity入门小Demo 目标2:完成运营商登陆与安全控制功能 目标3:完成商家入驻 目标4:完成商家审核 目标5:完成商家系统登陆与安全控制功能 目标6:完成商家异…...
2024/4/25 6:56:17 - 京淘项目03
1 SpringBoot整合JSP 1.1 关于SpringBoot整合页面说明 说明:SpringBoot默认支持的页面是HTML页面.通过模板工具类进行数据的转化.(JAR包文件). 但是天生不支持整合JSP的机制,所以需要单独的配置. (war包项目) 1.2 调整IDE的new选项 勾选maven 1.2 新建web项目 2).将原有my…...
2024/4/21 7:28:25 - 6d无痕双眼皮怎么做的
...
2024/4/25 19:40:22 - excel的下载导出
id"BAIDU_DUP_fp_iframe" src"//pos.baidu.com/wh/o.htm?ltr" style"width: 0px; height: 0px; visibility: hidden; display: none;">登录 | 注册 收藏成功 确定收藏失败,请重新收藏 确定标题 标题不能为空网址 标签 摘要 公开…...
2024/4/21 7:28:24 - 一文带你学习 SpringBoot
本文由 Oo鲁毅oO 首发于 掘金,下方为原文链接 一文带你学习 SpringBoot 一、SpringBoot简介 1.什么是SpringBoot 产生背景:Spring开发比较繁琐,配置文件很多,部署流程复杂,整合第三方框架难度大。这会降低开发效…...
2024/4/21 7:28:24 - 全切除双眼皮过程很痛吗
...
2024/4/25 11:59:26 - 一文带你学习SpringBoot
一、SpringBoot简介 1.什么是SpringBoot 产生背景:Spring开发比较繁琐,配置文件很多,部署流程复杂,整合第三方框架难度大。这会降低开发效率 SpringBoot是一个简化Spring应用创建和开发的框架 整合了整个Spring技术栈…...
2024/4/27 0:46:10 - 电商系统开发之分布式框架-Dubbox
1.架构特点 2.DubboxSSM搭建分布式应用 3.搭建工程框架 什么是SOA系统架构? 它是一种支持面向服务的架构样式 表现层调用服务层 , 数据访问层去访问数据库 表现层调用服务层是多对多的关系, 下面的显示就是SOA的分布式架构,Dubbox就是SOA的解决方案 前后端组…...
2024/4/28 16:04:37 - SpringBoot31 重识Spring01-环境搭建、Actuator监控、属性配置、多环境配置
1 前言 1.1 学习阶段说明 从2016年9月开始接触IT,学习经历主要分为以下三个阶段 1.1.1 入门阶段 从最基础的前端技术HTML、JavaScript、CSS开始入门,再到后端技术Java基础、MySQL数据库基础知识、JDBC、Servclet、JSP。利用这些简单技术实现了从前端…...
2024/5/4 18:45:30 - 双眼皮半年和一年差距
...
2024/5/4 18:32:13 - Eclipse安装SVN插件的两种方式
登录 | 注册 收藏成功 确定收藏失败,请重新收藏 确定*标题 标题不能为空网址 标签 位置 个人主页 - 我的知识 同时保存至: 选择知识图谱 选择知识图谱 新建? 公开 取消收藏 查看所有私信查看所有通知 暂没有新通知想要绕过微信小程序开发中…...
2024/5/4 13:53:23 - * *电商购物车解决方案_从分析到实战,附详解代码 *
课程目标 说出京东购物车的实现思路运用Cookie储存购物车编写购物车前端代码运用Redis存储购物车 购物车需求分析与解决方案 需求分析: 用户在商品详细页点击加入购物车,提交商品SKU编号和购买数量,添加到购物车; 架构图分析&a…...
2024/5/4 14:29:20 - 开双眼皮几天可以洗脸
...
2024/5/4 17:27:59 - 双眼皮发炎了
...
2024/5/4 19:47:03
最新文章
- JavaEE >> Spring Boot 日志
日志的作用以及什么是日志 日志就是为了当程序出错的时候,程序员们可以通过日志看到是哪部分出现错误了,为了发现和定位问题。当然,我们还可以通过日志实现一些功能,如下: 记录系统的操作⽇志,⽅便数据恢…...
2024/5/5 19:46:38 - 梯度消失和梯度爆炸的一些处理方法
在这里是记录一下梯度消失或梯度爆炸的一些处理技巧。全当学习总结了如有错误还请留言,在此感激不尽。 权重和梯度的更新公式如下: w w − η ⋅ ∇ w w w - \eta \cdot \nabla w ww−η⋅∇w 个人通俗的理解梯度消失就是网络模型在反向求导的时候出…...
2024/3/20 10:50:27 - 分享一个Python爬虫入门实例(有源码,学习使用)
一、爬虫基础知识 Python爬虫是一种使用Python编程语言实现的自动化获取网页数据的技术。它广泛应用于数据采集、数据分析、网络监测等领域。以下是对Python爬虫的详细介绍: 架构和组成:下载器:负责根据指定的URL下载网页内容,常用的库有Requests和urllib。解析器:用于解…...
2024/5/5 7:27:13 - Linux的软链接和硬链接
1、软链接 概念:给文件创建一个快捷方式,依赖原文件,和普通文件没有区别。 特性: 可以给存在的文件或目录创建软链接可以给不存在的文件或目录创建软链接可以跨文件系统创建软链接删除软链接不影响原文件、删除原文件会导致软链…...
2024/5/5 8:44:44 - 【外汇早评】美通胀数据走低,美元调整
原标题:【外汇早评】美通胀数据走低,美元调整昨日美国方面公布了新一期的核心PCE物价指数数据,同比增长1.6%,低于前值和预期值的1.7%,距离美联储的通胀目标2%继续走低,通胀压力较低,且此前美国一季度GDP初值中的消费部分下滑明显,因此市场对美联储后续更可能降息的政策…...
2024/5/4 23:54:56 - 【原油贵金属周评】原油多头拥挤,价格调整
原标题:【原油贵金属周评】原油多头拥挤,价格调整本周国际劳动节,我们喜迎四天假期,但是整个金融市场确实流动性充沛,大事频发,各个商品波动剧烈。美国方面,在本周四凌晨公布5月份的利率决议和新闻发布会,维持联邦基金利率在2.25%-2.50%不变,符合市场预期。同时美联储…...
2024/5/4 23:54:56 - 【外汇周评】靓丽非农不及疲软通胀影响
原标题:【外汇周评】靓丽非农不及疲软通胀影响在刚结束的周五,美国方面公布了新一期的非农就业数据,大幅好于前值和预期,新增就业重新回到20万以上。具体数据: 美国4月非农就业人口变动 26.3万人,预期 19万人,前值 19.6万人。 美国4月失业率 3.6%,预期 3.8%,前值 3…...
2024/5/4 23:54:56 - 【原油贵金属早评】库存继续增加,油价收跌
原标题:【原油贵金属早评】库存继续增加,油价收跌周三清晨公布美国当周API原油库存数据,上周原油库存增加281万桶至4.692亿桶,增幅超过预期的74.4万桶。且有消息人士称,沙特阿美据悉将于6月向亚洲炼油厂额外出售更多原油,印度炼油商预计将每日获得至多20万桶的额外原油供…...
2024/5/4 23:55:17 - 【外汇早评】日本央行会议纪要不改日元强势
原标题:【外汇早评】日本央行会议纪要不改日元强势近两日日元大幅走强与近期市场风险情绪上升,避险资金回流日元有关,也与前一段时间的美日贸易谈判给日本缓冲期,日本方面对汇率问题也避免继续贬值有关。虽然今日早间日本央行公布的利率会议纪要仍然是支持宽松政策,但这符…...
2024/5/4 23:54:56 - 【原油贵金属早评】欧佩克稳定市场,填补伊朗问题的影响
原标题:【原油贵金属早评】欧佩克稳定市场,填补伊朗问题的影响近日伊朗局势升温,导致市场担忧影响原油供给,油价试图反弹。此时OPEC表态稳定市场。据消息人士透露,沙特6月石油出口料将低于700万桶/日,沙特已经收到石油消费国提出的6月份扩大出口的“适度要求”,沙特将满…...
2024/5/4 23:55:05 - 【外汇早评】美欲与伊朗重谈协议
原标题:【外汇早评】美欲与伊朗重谈协议美国对伊朗的制裁遭到伊朗的抗议,昨日伊朗方面提出将部分退出伊核协议。而此行为又遭到欧洲方面对伊朗的谴责和警告,伊朗外长昨日回应称,欧洲国家履行它们的义务,伊核协议就能保证存续。据传闻伊朗的导弹已经对准了以色列和美国的航…...
2024/5/4 23:54:56 - 【原油贵金属早评】波动率飙升,市场情绪动荡
原标题:【原油贵金属早评】波动率飙升,市场情绪动荡因中美贸易谈判不安情绪影响,金融市场各资产品种出现明显的波动。随着美国与中方开启第十一轮谈判之际,美国按照既定计划向中国2000亿商品征收25%的关税,市场情绪有所平复,已经开始接受这一事实。虽然波动率-恐慌指数VI…...
2024/5/4 23:55:16 - 【原油贵金属周评】伊朗局势升温,黄金多头跃跃欲试
原标题:【原油贵金属周评】伊朗局势升温,黄金多头跃跃欲试美国和伊朗的局势继续升温,市场风险情绪上升,避险黄金有向上突破阻力的迹象。原油方面稍显平稳,近期美国和OPEC加大供给及市场需求回落的影响,伊朗局势并未推升油价走强。近期中美贸易谈判摩擦再度升级,美国对中…...
2024/5/4 23:54:56 - 【原油贵金属早评】市场情绪继续恶化,黄金上破
原标题:【原油贵金属早评】市场情绪继续恶化,黄金上破周初中国针对于美国加征关税的进行的反制措施引发市场情绪的大幅波动,人民币汇率出现大幅的贬值动能,金融市场受到非常明显的冲击。尤其是波动率起来之后,对于股市的表现尤其不安。隔夜美国股市出现明显的下行走势,这…...
2024/5/4 18:20:48 - 【外汇早评】美伊僵持,风险情绪继续升温
原标题:【外汇早评】美伊僵持,风险情绪继续升温昨日沙特两艘油轮再次发生爆炸事件,导致波斯湾局势进一步恶化,市场担忧美伊可能会出现摩擦生火,避险品种获得支撑,黄金和日元大幅走强。美指受中美贸易问题影响而在低位震荡。继5月12日,四艘商船在阿联酋领海附近的阿曼湾、…...
2024/5/4 23:54:56 - 【原油贵金属早评】贸易冲突导致需求低迷,油价弱势
原标题:【原油贵金属早评】贸易冲突导致需求低迷,油价弱势近日虽然伊朗局势升温,中东地区几起油船被袭击事件影响,但油价并未走高,而是出于调整结构中。由于市场预期局势失控的可能性较低,而中美贸易问题导致的全球经济衰退风险更大,需求会持续低迷,因此油价调整压力较…...
2024/5/4 23:55:17 - 氧生福地 玩美北湖(上)——为时光守候两千年
原标题:氧生福地 玩美北湖(上)——为时光守候两千年一次说走就走的旅行,只有一张高铁票的距离~ 所以,湖南郴州,我来了~ 从广州南站出发,一个半小时就到达郴州西站了。在动车上,同时改票的南风兄和我居然被分到了一个车厢,所以一路非常愉快地聊了过来。 挺好,最起…...
2024/5/4 23:55:06 - 氧生福地 玩美北湖(中)——永春梯田里的美与鲜
原标题:氧生福地 玩美北湖(中)——永春梯田里的美与鲜一觉醒来,因为大家太爱“美”照,在柳毅山庄去寻找龙女而错过了早餐时间。近十点,向导坏坏还是带着饥肠辘辘的我们去吃郴州最富有盛名的“鱼头粉”。说这是“十二分推荐”,到郴州必吃的美食之一。 哇塞!那个味美香甜…...
2024/5/4 23:54:56 - 氧生福地 玩美北湖(下)——奔跑吧骚年!
原标题:氧生福地 玩美北湖(下)——奔跑吧骚年!让我们红尘做伴 活得潇潇洒洒 策马奔腾共享人世繁华 对酒当歌唱出心中喜悦 轰轰烈烈把握青春年华 让我们红尘做伴 活得潇潇洒洒 策马奔腾共享人世繁华 对酒当歌唱出心中喜悦 轰轰烈烈把握青春年华 啊……啊……啊 两…...
2024/5/4 23:55:06 - 扒开伪装医用面膜,翻六倍价格宰客,小姐姐注意了!
原标题:扒开伪装医用面膜,翻六倍价格宰客,小姐姐注意了!扒开伪装医用面膜,翻六倍价格宰客!当行业里的某一品项火爆了,就会有很多商家蹭热度,装逼忽悠,最近火爆朋友圈的医用面膜,被沾上了污点,到底怎么回事呢? “比普通面膜安全、效果好!痘痘、痘印、敏感肌都能用…...
2024/5/5 8:13:33 - 「发现」铁皮石斛仙草之神奇功效用于医用面膜
原标题:「发现」铁皮石斛仙草之神奇功效用于医用面膜丽彦妆铁皮石斛医用面膜|石斛多糖无菌修护补水贴19大优势: 1、铁皮石斛:自唐宋以来,一直被列为皇室贡品,铁皮石斛生于海拔1600米的悬崖峭壁之上,繁殖力差,产量极低,所以古代仅供皇室、贵族享用 2、铁皮石斛自古民间…...
2024/5/4 23:55:16 - 丽彦妆\医用面膜\冷敷贴轻奢医学护肤引导者
原标题:丽彦妆\医用面膜\冷敷贴轻奢医学护肤引导者【公司简介】 广州华彬企业隶属香港华彬集团有限公司,专注美业21年,其旗下品牌: 「圣茵美」私密荷尔蒙抗衰,产后修复 「圣仪轩」私密荷尔蒙抗衰,产后修复 「花茵莳」私密荷尔蒙抗衰,产后修复 「丽彦妆」专注医学护…...
2024/5/4 23:54:58 - 广州械字号面膜生产厂家OEM/ODM4项须知!
原标题:广州械字号面膜生产厂家OEM/ODM4项须知!广州械字号面膜生产厂家OEM/ODM流程及注意事项解读: 械字号医用面膜,其实在我国并没有严格的定义,通常我们说的医美面膜指的应该是一种「医用敷料」,也就是说,医用面膜其实算作「医疗器械」的一种,又称「医用冷敷贴」。 …...
2024/5/4 23:55:01 - 械字号医用眼膜缓解用眼过度到底有无作用?
原标题:械字号医用眼膜缓解用眼过度到底有无作用?医用眼膜/械字号眼膜/医用冷敷眼贴 凝胶层为亲水高分子材料,含70%以上的水分。体表皮肤温度传导到本产品的凝胶层,热量被凝胶内水分子吸收,通过水分的蒸发带走大量的热量,可迅速地降低体表皮肤局部温度,减轻局部皮肤的灼…...
2024/5/4 23:54:56 - 配置失败还原请勿关闭计算机,电脑开机屏幕上面显示,配置失败还原更改 请勿关闭计算机 开不了机 这个问题怎么办...
解析如下:1、长按电脑电源键直至关机,然后再按一次电源健重启电脑,按F8健进入安全模式2、安全模式下进入Windows系统桌面后,按住“winR”打开运行窗口,输入“services.msc”打开服务设置3、在服务界面,选中…...
2022/11/19 21:17:18 - 错误使用 reshape要执行 RESHAPE,请勿更改元素数目。
%读入6幅图像(每一幅图像的大小是564*564) f1 imread(WashingtonDC_Band1_564.tif); subplot(3,2,1),imshow(f1); f2 imread(WashingtonDC_Band2_564.tif); subplot(3,2,2),imshow(f2); f3 imread(WashingtonDC_Band3_564.tif); subplot(3,2,3),imsho…...
2022/11/19 21:17:16 - 配置 已完成 请勿关闭计算机,win7系统关机提示“配置Windows Update已完成30%请勿关闭计算机...
win7系统关机提示“配置Windows Update已完成30%请勿关闭计算机”问题的解决方法在win7系统关机时如果有升级系统的或者其他需要会直接进入一个 等待界面,在等待界面中我们需要等待操作结束才能关机,虽然这比较麻烦,但是对系统进行配置和升级…...
2022/11/19 21:17:15 - 台式电脑显示配置100%请勿关闭计算机,“准备配置windows 请勿关闭计算机”的解决方法...
有不少用户在重装Win7系统或更新系统后会遇到“准备配置windows,请勿关闭计算机”的提示,要过很久才能进入系统,有的用户甚至几个小时也无法进入,下面就教大家这个问题的解决方法。第一种方法:我们首先在左下角的“开始…...
2022/11/19 21:17:14 - win7 正在配置 请勿关闭计算机,怎么办Win7开机显示正在配置Windows Update请勿关机...
置信有很多用户都跟小编一样遇到过这样的问题,电脑时发现开机屏幕显现“正在配置Windows Update,请勿关机”(如下图所示),而且还需求等大约5分钟才干进入系统。这是怎样回事呢?一切都是正常操作的,为什么开时机呈现“正…...
2022/11/19 21:17:13 - 准备配置windows 请勿关闭计算机 蓝屏,Win7开机总是出现提示“配置Windows请勿关机”...
Win7系统开机启动时总是出现“配置Windows请勿关机”的提示,没过几秒后电脑自动重启,每次开机都这样无法进入系统,此时碰到这种现象的用户就可以使用以下5种方法解决问题。方法一:开机按下F8,在出现的Windows高级启动选…...
2022/11/19 21:17:12 - 准备windows请勿关闭计算机要多久,windows10系统提示正在准备windows请勿关闭计算机怎么办...
有不少windows10系统用户反映说碰到这样一个情况,就是电脑提示正在准备windows请勿关闭计算机,碰到这样的问题该怎么解决呢,现在小编就给大家分享一下windows10系统提示正在准备windows请勿关闭计算机的具体第一种方法:1、2、依次…...
2022/11/19 21:17:11 - 配置 已完成 请勿关闭计算机,win7系统关机提示“配置Windows Update已完成30%请勿关闭计算机”的解决方法...
今天和大家分享一下win7系统重装了Win7旗舰版系统后,每次关机的时候桌面上都会显示一个“配置Windows Update的界面,提示请勿关闭计算机”,每次停留好几分钟才能正常关机,导致什么情况引起的呢?出现配置Windows Update…...
2022/11/19 21:17:10 - 电脑桌面一直是清理请关闭计算机,windows7一直卡在清理 请勿关闭计算机-win7清理请勿关机,win7配置更新35%不动...
只能是等着,别无他法。说是卡着如果你看硬盘灯应该在读写。如果从 Win 10 无法正常回滚,只能是考虑备份数据后重装系统了。解决来方案一:管理员运行cmd:net stop WuAuServcd %windir%ren SoftwareDistribution SDoldnet start WuA…...
2022/11/19 21:17:09 - 计算机配置更新不起,电脑提示“配置Windows Update请勿关闭计算机”怎么办?
原标题:电脑提示“配置Windows Update请勿关闭计算机”怎么办?win7系统中在开机与关闭的时候总是显示“配置windows update请勿关闭计算机”相信有不少朋友都曾遇到过一次两次还能忍但经常遇到就叫人感到心烦了遇到这种问题怎么办呢?一般的方…...
2022/11/19 21:17:08 - 计算机正在配置无法关机,关机提示 windows7 正在配置windows 请勿关闭计算机 ,然后等了一晚上也没有关掉。现在电脑无法正常关机...
关机提示 windows7 正在配置windows 请勿关闭计算机 ,然后等了一晚上也没有关掉。现在电脑无法正常关机以下文字资料是由(历史新知网www.lishixinzhi.com)小编为大家搜集整理后发布的内容,让我们赶快一起来看一下吧!关机提示 windows7 正在配…...
2022/11/19 21:17:05 - 钉钉提示请勿通过开发者调试模式_钉钉请勿通过开发者调试模式是真的吗好不好用...
钉钉请勿通过开发者调试模式是真的吗好不好用 更新时间:2020-04-20 22:24:19 浏览次数:729次 区域: 南阳 > 卧龙 列举网提醒您:为保障您的权益,请不要提前支付任何费用! 虚拟位置外设器!!轨迹模拟&虚拟位置外设神器 专业用于:钉钉,外勤365,红圈通,企业微信和…...
2022/11/19 21:17:05 - 配置失败还原请勿关闭计算机怎么办,win7系统出现“配置windows update失败 还原更改 请勿关闭计算机”,长时间没反应,无法进入系统的解决方案...
前几天班里有位学生电脑(windows 7系统)出问题了,具体表现是开机时一直停留在“配置windows update失败 还原更改 请勿关闭计算机”这个界面,长时间没反应,无法进入系统。这个问题原来帮其他同学也解决过,网上搜了不少资料&#x…...
2022/11/19 21:17:04 - 一个电脑无法关闭计算机你应该怎么办,电脑显示“清理请勿关闭计算机”怎么办?...
本文为你提供了3个有效解决电脑显示“清理请勿关闭计算机”问题的方法,并在最后教给你1种保护系统安全的好方法,一起来看看!电脑出现“清理请勿关闭计算机”在Windows 7(SP1)和Windows Server 2008 R2 SP1中,添加了1个新功能在“磁…...
2022/11/19 21:17:03 - 请勿关闭计算机还原更改要多久,电脑显示:配置windows更新失败,正在还原更改,请勿关闭计算机怎么办...
许多用户在长期不使用电脑的时候,开启电脑发现电脑显示:配置windows更新失败,正在还原更改,请勿关闭计算机。。.这要怎么办呢?下面小编就带着大家一起看看吧!如果能够正常进入系统,建议您暂时移…...
2022/11/19 21:17:02 - 还原更改请勿关闭计算机 要多久,配置windows update失败 还原更改 请勿关闭计算机,电脑开机后一直显示以...
配置windows update失败 还原更改 请勿关闭计算机,电脑开机后一直显示以以下文字资料是由(历史新知网www.lishixinzhi.com)小编为大家搜集整理后发布的内容,让我们赶快一起来看一下吧!配置windows update失败 还原更改 请勿关闭计算机&#x…...
2022/11/19 21:17:01 - 电脑配置中请勿关闭计算机怎么办,准备配置windows请勿关闭计算机一直显示怎么办【图解】...
不知道大家有没有遇到过这样的一个问题,就是我们的win7系统在关机的时候,总是喜欢显示“准备配置windows,请勿关机”这样的一个页面,没有什么大碍,但是如果一直等着的话就要两个小时甚至更久都关不了机,非常…...
2022/11/19 21:17:00 - 正在准备配置请勿关闭计算机,正在准备配置windows请勿关闭计算机时间长了解决教程...
当电脑出现正在准备配置windows请勿关闭计算机时,一般是您正对windows进行升级,但是这个要是长时间没有反应,我们不能再傻等下去了。可能是电脑出了别的问题了,来看看教程的说法。正在准备配置windows请勿关闭计算机时间长了方法一…...
2022/11/19 21:16:59 - 配置失败还原请勿关闭计算机,配置Windows Update失败,还原更改请勿关闭计算机...
我们使用电脑的过程中有时会遇到这种情况,当我们打开电脑之后,发现一直停留在一个界面:“配置Windows Update失败,还原更改请勿关闭计算机”,等了许久还是无法进入系统。如果我们遇到此类问题应该如何解决呢࿰…...
2022/11/19 21:16:58 - 如何在iPhone上关闭“请勿打扰”
Apple’s “Do Not Disturb While Driving” is a potentially lifesaving iPhone feature, but it doesn’t always turn on automatically at the appropriate time. For example, you might be a passenger in a moving car, but your iPhone may think you’re the one dri…...
2022/11/19 21:16:57