pytorch 生成模型_在pytorch上编写您的第一个生成对抗网络模型
pytorch 生成模型
Detailed instructions for constructing generative adversarial neural networks (GANs) using the example of two models implemented using the PyTorch deep learning framework.
使用通过PyTorch深度学习框架实现的两个模型的示例来构建生成对抗性神经网络(GAN)的详细说明。
Generative adversarial networks (abbreviated GAN) are neural networks that can generate images, music, speech, and texts similar to those that humans do. GANs have become an active research topic in recent years. Facebook AI Lab Director Yang Lekun called adversarial learning “the most exciting machine learning idea in the last 10 years.” Below we will explore how GANs work and create two models using the PyTorch deep learning framework.
生成对抗网络(简称GAN)是神经网络 ,可以生成与人类相似的图像,音乐,语音和文本。 GAN近年来已成为活跃的研究主题。 Facebook AI实验室总监Yang Lekun称对抗学习为“过去10年来最令人兴奋的机器学习理念”。 下面我们将探索GAN的工作原理,并使用PyTorch 深度学习框架创建两个模型。
什么是生成对抗网络? (What is a Generative Adversarial Network?)
A generative adversarial network (GAN) is a machine learning model that can simulate a given data distribution. The model was first proposed in a 2014 NeurIPS paper by deep learning expert Ian Goodfellow and colleagues.
生成对抗网络 (GAN)是一种可以模拟给定数据分布的机器学习模型。 该模型首次在提出一个 2014 的NeurIPS纸深度学习专家伊恩·古德费洛和同事。
GANs consist of two neural networks, one of which is trained to generate data, and the other is trained to distinguish simulated data from real data (hence the “adversarial” nature of the model). Generative adversarial networks show impressive results in terms of image and video generation:
GAN由两个神经网络组成,其中一个被训练生成数据,另一个被训练以区分模拟数据与真实数据(因此具有模型的“对抗性”性质)。 生成的对抗网络在图像和视频生成方面显示出令人印象深刻的结果:
transfer of styles (CycleGAN) — the transformation of one image in accordance with the style of other images (for example, paintings by a famous artist);
样式转移( CycleGAN )-根据其他图像的样式转换一个图像(例如,著名画家的绘画);
Human Face Generation (StyleGAN), realistic examples are available at This Person Does Not Exist.
人脸生成( StyleGAN ), 此人不存在时可以找到现实的示例。
GANs and other data-generating structures are called generative models as opposed to more widely studied discriminative models. Before diving into GANs, let’s look at the differences between the two types of models.
GAN和其他数据生成结构被称为生成模型,与更广泛研究的判别模型相反。 在探讨GAN之前,让我们看一下两种模型之间的差异。
判别式和生成式机器学习模型的比较 (Comparison of Discriminative and Generative Machine Learning models)
Discriminative models are used for most supervised learning problems for classification or regression. As an example of a classification problem, suppose you want to train a handwritten digit image recognition model. To do this, we can use a labeled dataset containing photographs of handwritten numbers to which the numbers themselves are correlated.
判别模型用于大多数监督学习问题的分类或回归 。 作为分类问题的示例,假设您想训练一个手写数字图像识别模型 。 为此,我们可以使用标记的数据集,其中包含与数字本身相关的手写数字的照片。
Training is reduced to setting the parameters of the model using a special algorithm that minimizes the loss function. The loss function is a criterion for the discrepancy between the true value of the estimated parameter and its expectation. After the learning phase, we can use the model to classify a new (previously not considered) handwritten digit image by matching the most likely digit to the input image.
使用一种特殊的算法将训练减少为设置模型的参数,该算法可使损失函数最小化 。 损失函数是估计参数的真实值与其期望之间差异的标准。 在学习阶段之后,我们可以使用模型通过将最可能的数字与输入图像进行匹配来对新的(以前未考虑的)手写数字图像进行分类。
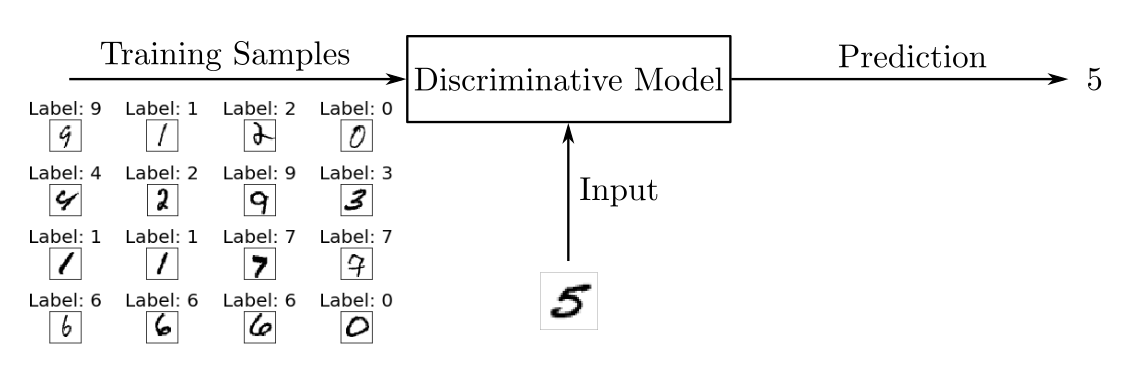
The discriminative model uses training data to find the boundaries between classes. The found boundaries are used to distinguish new inputs and predict their class. Mathematically, discriminative models study the conditional probability P (y | x) of an observation y for a given input x.
判别模型使用训练数据来查找班级之间的界限。 找到的边界用于区分新输入并预测其类别。 在数学上,判别模型研究给定输入x的观察值y的条件概率 P(y | x) 。
Discriminative models are not only neural networks but also logistic regression and support vector machine (SVM).
判别模型不仅是神经网络,而且是逻辑回归和支持向量机(SVM) 。
While discriminative models are used for supervised learning, generative models typically use a RAW data set, that is, may be seen as a form of unsupervised learning. So, using a dataset of handwritten numbers, you can train a generative model to generate new images.
尽管判别模型用于监督学习,但生成模型通常使用RAW数据集,也就是说,可以将其视为无监督学习的一种形式。 因此,使用手写数字数据集,您可以训练生成模型以生成新图像。
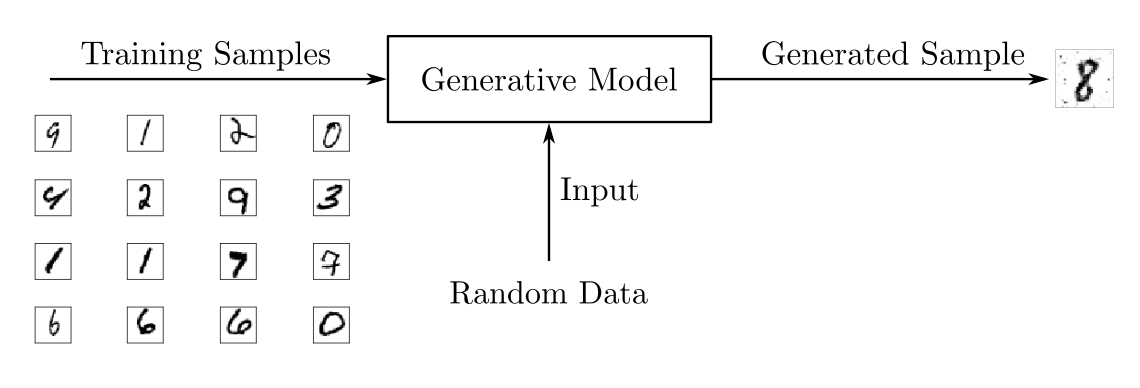
In contrast to discriminative models, generative models study the properties of the probability function P (x) of the input data 𝑥 . As a result, they do not generate a prediction, but a new object with properties akin to the training dataset.
与判别模型相反,生成模型研究输入数据the 的概率函数 P(x)的性质 。 结果,它们不生成预测,而是生成具有类似于训练数据集属性的新对象。
Besides GAN, there are other generative architectures:
除了GAN,还有其他生成架构:
Boltzmann machine
玻尔兹曼机
Autoencoder
自动编码器
Hidden Markov Model
隐马尔可夫模型
Models that predict the next word in a sequence, such as GPT-2
预测序列中下一个单词的模型,例如GPT-2
GANs have gained a lot of attention recently for their impressive results in visual content generation. Let’s dwell on the device of generative adversarial networks in more detail.
GAN最近在视觉内容生成方面取得了令人印象深刻的结果,因此备受关注。 让我们更详细地讨论生成对抗网络的设备。
生成对抗神经网络的架构 (The architecture of generative adversarial neural networks)
A generative adversarial network, as we have already understood, is not one network, but two: a generator and a discriminator. The role of the generator is to generate a dataset based on a real sample that resembles real data. The discriminator is trained to estimate the probability that the sample is obtained from real data and not provided by a generator. Two neural networks play cat and mouse: the generator tries to trick the discriminator, and the discriminator tries to better identify the generated samples.
正如我们已经了解的那样,生成对抗网络不是一个网络,而是两个:生成器和鉴别器。 生成器的作用是根据类似于真实数据的真实样本生成数据集。 鉴别器经过训练,可以估计从真实数据中获得样本,而不是由发生器提供样本的可能性。 有两个神经网络发挥作用:生成器试图欺骗鉴别器,鉴别器试图更好地识别生成的样本。
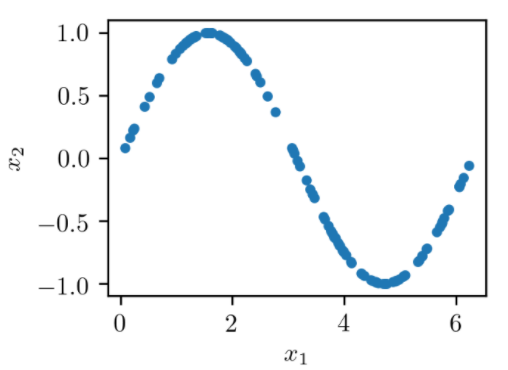
To understand how GAN training works, consider a toy example with a dataset consisting of two-dimensional samples (x1, x2), with x1 ranging from 0 to 2π and x2=sin(x1).
要了解GAN训练的工作原理,请考虑一个玩具示例,其中的数据集由二维样本(x1,x2)组成 , x1的范围是0到2π , x2 = sin(x1) 。
The general structure of the GAN for generating pairs (x̃1, x̃2) resembling points from a dataset is shown in the following figure.
下图显示了用于从数据集中生成相似点对(x̃1,x̃2)的GAN的一般结构。
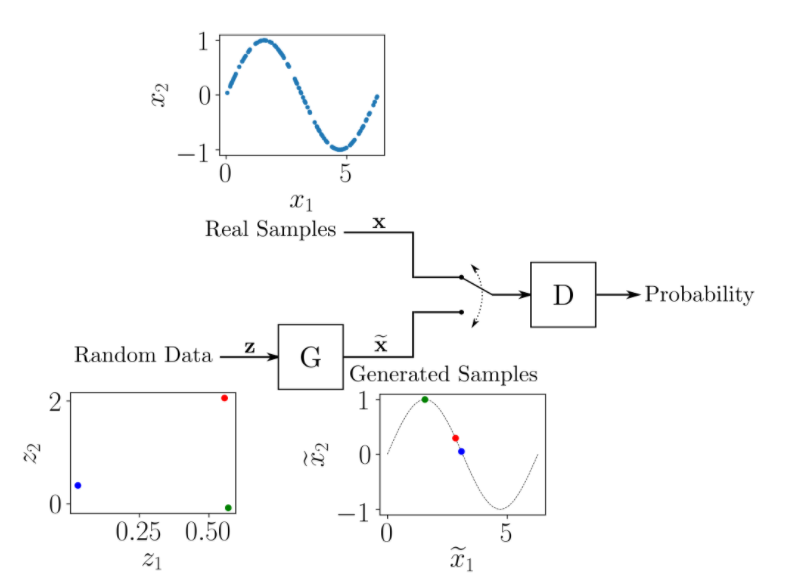
The generator receives as input pairs of random numbers (z1, z2), transforming them so that they resemble examples from a real sample. The structure of the neural network can be any, for example, a multilayer perceptron or a convolutional neural network. G G
生成器接收随机数对(z1,z2)作为输入,对其进行转换,使其类似于真实样本中的示例。 神经网络的结构可以是任何结构,例如多层感知器或卷积神经网络 。 G G
The discriminator inputs alternately samples from the training dataset and simulated samples provided by the generator. The role of the discriminator is to assess the likelihood that the input data belongs to a real dataset. That is, training is performed in such a way that it gives out, receiving a real sample, and for the generated sample. D G D 1 0
鉴别器交替输入训练数据集的样本和生成器提供的模拟样本。 鉴别器的作用是评估输入数据属于真实数据集的可能性。 即,以发出,接收真实样本并针对生成的样本的方式进行训练。 D G D 1 0
As in the case with the generator, you can choose any structure of the neural network, taking into account the sizes of the input and output data. In this example, the input is 2D and the output is a scalar ranging from 0 to 1. D
与生成器一样,您可以考虑输入和输出数据的大小来选择神经网络的任何结构。 在此示例中,输入为2D,输出为标量,范围为0到D
Mathematically, the GAN learning process consists of a minimax game of two players, in which it is adapted to minimize the error of the difference between the real and the generated sample, and adapted to maximize the probability of making an error. D G D
在数学上,GAN学习过程由两个玩家组成的极小极大游戏组成,其中,该学习过程适用于最小化真实样本与生成的样本之间的差异的误差,并且适用于最大化发生错误的可能性。 D G D
At each stage of training, the parameters of the models and are updated. To train, at each iteration, we mark a sample of real samples with ones and a sample of generated samples created with zeros. Thus, a normal supervised learning approach can be used to update the parameters as shown in the diagram. D G D G D
在训练的每个阶段,都会更新模型的参数。 为了进行训练,在每次迭代中,我们用1标记真实样本的样本,并用0标记生成的样本的样本。 因此,可以使用正常的监督学习方法来更新参数,如图所示。 D G D G D

For each batch of training data containing tagged real and generated samples, we update the set of model parameters D, minimizing the loss function. After the parameters are Dupdated, we train to Ggenerate better samples. The set of parameters is D"frozen" during the training of the generator.
对于每批包含标记的真实样本和生成样本的训练数据,我们更新模型参数D的集合,从而使损失函数最小化。 在参数D更新之后,我们训练G生成更好的样本。 该组参数是D发电机的训练中“雪藏”。
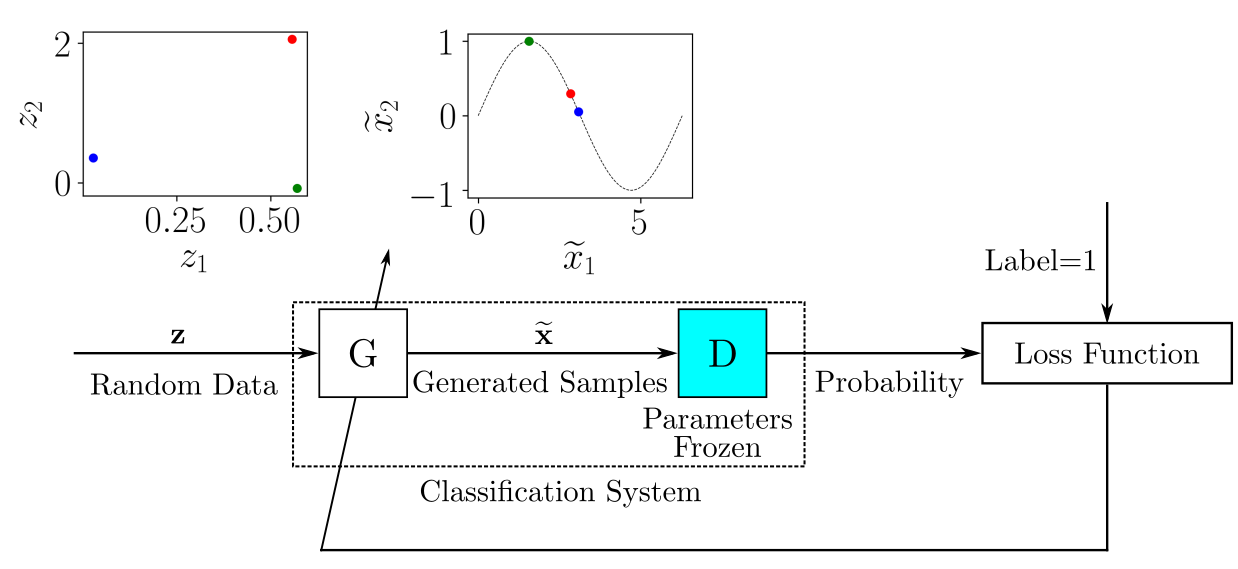
When it starts to generate samples so well that it is “fooled”, the output probability tends to one — it considers that all samples belong to the original sample. G D D
当它开始很好地生成样本以至于被“愚弄”时,输出概率趋向于一-它认为所有样本都属于原始样本。 G D D
Now that we know how GAN works, we are ready to implement our own neural network using PyTorch.
既然我们知道了GAN的工作原理,我们就可以使用PyTorch来实现我们自己的神经网络了。
您的第一个生成对抗网络 (Your first generative adversarial network)
As the first experiment with generative adversarial networks, we will implement the above example with a harmonic function. To work with the example, we will use the popular PyTorch library, which can be installed using the instructions. If you’re seriously interested in Data Science, you may have already used the Anaconda distribution and the conda package and environment management system . Note that the environment makes the installation process easier.
作为生成对抗网络的第一个实验,我们将使用谐波函数实现上述示例。 为了与例如工作中,我们将使用流行的PyTorch库,它可以使用安装说明 。 如果您对数据科学非常感兴趣,则可能已经使用了Anaconda发行版和conda软件包以及环境管理系统。 请注意,环境使安装过程更容易。
Installing PyTorch with, first create an environment and activate it: conda
安装PyTorch,首先创建一个环境并激活它: conda
$ conda create --name gan
$ conda activate gan
This creates an environment condanamed gan. Inside the created environment, you can install the necessary packages:
这将创建一个名为gan的环境conda 。 在创建的环境中,您可以安装必要的软件包:
$ conda install -c pytorch pytorch=1.4.0
$ conda install matplotlib jupyter
Since PyTorch is an actively developing environment, the API may change in new versions. Code examples have been verified for version 1.4.0.
由于PyTorch是一个积极开发的环境,因此API可能会在新版本中更改。 已经针对1.4.0版验证了代码示例。
We will use matplotlib to work with graphs.
我们将使用matplotlib处理图。
When using Jupyter Notebook, you need to register the environment so that you can create notebooks using this environment as a kernel. To do this, in the activated environment, run the following command: conda gan gan
使用Jupyter Notebook时,您需要注册环境,以便可以使用该环境作为内核来创建笔记本。 为此,请在激活的环境中运行以下命令: conda gan gan
$ python -m ipykernel install --user --name ganLet’s start by importing the required libraries:
让我们从导入所需的库开始:
import torch
from torch import nnimport math
import matplotlib.pyplot as plt
Here we are importing the PyTorch (torc) library. We import the component separately from the library for more compact handling. The built-in library is only needed to get the value of the constant, and the tool mentioned above is for building dependencies. nn math pi matplotlib
在这里,我们正在导入PyTorch( torc )库。 我们从库中单独导入组件,以进行更紧凑的处理。 仅需要内置库来获取常量的值,并且上面提到的工具用于构建依赖项。 nn math pi matplotlib
It is good practice to temporarily secure the random number generator so that the experiment can be replicated on another machine. To do this in PyTorch, run the following code:
优良作法是暂时保护随机数生成器,以便可以在另一台计算机上复制实验。 要在PyTorch中执行此操作,请运行以下代码:
torch.manual_seed(111)We use the 111 number to initialize the random number generator. We will need a generator to set the initial weights of the neural network. Despite the random nature of the experiment, its course will be reproducible.
我们使用111号来初始化随机数生成器。 我们将需要一个生成器来设置神经网络的初始权重。 尽管实验具有随机性,但其过程是可重现的。
为GAN训练准备数据 (Preparing data for GAN training)
The training set consists of pairs of numbers (x1, x2) — such that x2 corresponds to the sine value of x1 for x1 in the range from 0 to 2π. Training data can be obtained as follows:
训练集由数字对(x1,x2)组成 -使得x2对应于x1的x1的正弦值,范围从0到2π 。 培训数据可按以下方式获得:
train_data_length = 1024
train_data = torch.zeros((train_data_length, 2))
train_data[:, 0] = 2 * math.pi * torch.rand(train_data_length)
train_data[:, 1] = torch.sin(train_data[:, 0])
train_labels = torch.zeros(train_data_length)
train_set = [(train_data[i], train_labels[i]) for i in range(train_data_length)]
Here we compile a training dataset of 1024 pairs (x1, x2). Then we initialize with zeros — a matrix of 1024 rows and 2 columns. train_data
在这里,我们编译了1024对(x1,x2)的训练数据集。 然后,我们用零初始化-一个1024行2列的矩阵。 train_data
The first column is filled with random values in the range from 0 to 2π. We calculate the values of the second column as the sine of the first. train_data
第一列填充了0到2π范围内的随机值。 我们将第二列的值计算为第一列的正弦值。 train_data
We then formally need an array of labels, which we pass to the PyTorch data loader. Since the GAN implements unsupervised learning, the labels can be anything. train_labels
然后,我们正式需要一个标签数组,并将其传递给PyTorch数据加载器。 由于GAN实施无监督学习,因此标签可以是任何东西。 train_labels
Finally, we create a list of tuples from and. train_data train_labels train_set
最后,我们从和创建一个元组列表。 train_data train_labels train_set
Let’s display the data for training by plotting each point (x1, x2):
让我们通过绘制每个点(x1,x2)来显示训练数据:
plt.plot(train_data[:, 0], train_data[:, 1], ".")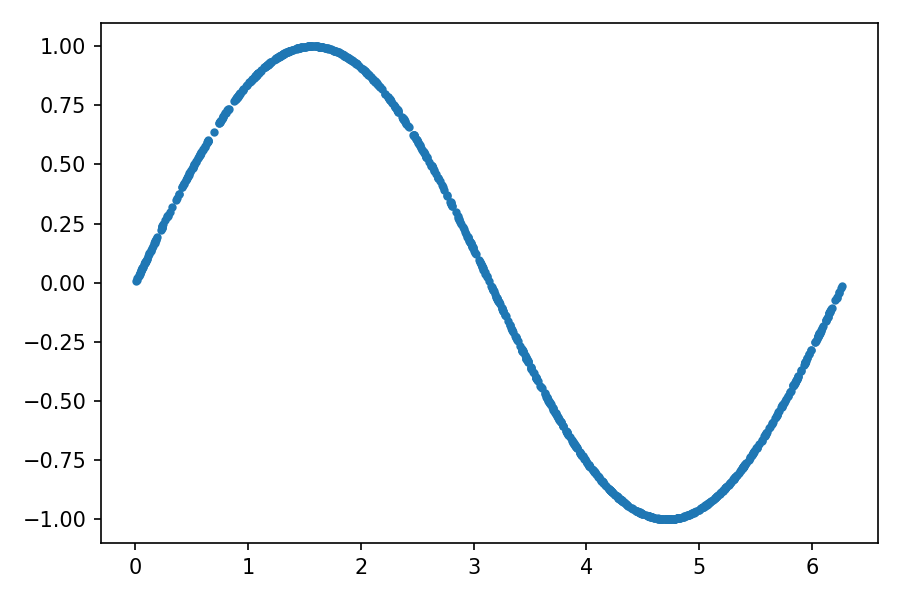
Let’s create a data loader named train_loaderthat will shuffle data from train_set, returning packets of 32 samples ( batch_size) used to train the neural network:
让我们创建一个名为train_loader的数据加载器,它将从train_set随机train_set数据,并返回用于训练神经网络的32个样本( batch_size )的数据包:
batch_size = 32
train_loader = torch.utils.data.DataLoader(train_set, batch_size=batch_size, shuffle=True)
The data is ready, now you need to create the discriminator and GAN neural networks.
数据已经准备就绪,现在您需要创建鉴别器和GAN神经网络。
GAN鉴别器实施 (GAN Discriminator Implementation)
In PyTorch, neural network models are represented by classes that inherit from a class. If you are new to OOP, the article “An Introduction to Object-Oriented Programming (OOP) in Python” will suffice to understand what is happening. nn.Module
在PyTorch中,神经网络模型由继承自类的类表示。 如果您不熟悉OOP,则文章“ Python中的面向对象编程(OOP)简介”将足以了解正在发生的事情。 nn.Module
The discriminator is a two-dimensional input and one-dimensional output model. It takes a sample from real data or from a generator and provides the probability that the sample is from real training data. The code below shows how to create a discriminator class.
鉴别器是二维输入和一维输出模型。 它从真实数据或生成器中获取样本,并提供样本来自真实训练数据的概率。 下面的代码显示了如何创建区分类。
class Discriminator(nn.Module):def __init__(self):super().__init__()self.model = nn.Sequential(nn.Linear(2, 256),nn.ReLU(),nn.Dropout(0.3),nn.Linear(256, 128),nn.ReLU(),nn.Dropout(0.3),nn.Linear(128, 64),nn.ReLU(),nn.Dropout(0.3),nn.Linear(64, 1),nn.Sigmoid())def forward(self, x):output = self.model(x)return outputA standard class method is used to build a neural network model . Inside this method, we first call to run the corresponding method of the inherited class . A multilayer perceptron is used as the architecture of the neural network . Its structure is specified in layers using . The model has the following characteristics: __init__() super().__init__() __init__() nn.Module nn.Sequential()
使用标准的类方法来建立神经网络模型。 在此方法内部,我们首先调用以运行继承的类的相应方法。 多层感知器被用作神经网络的体系结构。 使用分层指定其结构。 该模型具有以下特征: __init__() super().__init__() __init__() super().__init__() __init__() nn.Module nn.Sequential()
- two-dimensional entrance; 二维入口;
the first hidden layer consists of 256 neurons and has a ReLU activation function ;
第一隐蔽层256个包括神经元的,并且具有一个 RELU 激活功能 ;
in the subsequent layers, the number of neurons decreases to 128 and 64. The output has a sigmoidal activation function, which is characteristic of representing the probability (
Sigmoid);在随后的层中,神经元的数量减少到128和64。输出具有S型激活函数,该函数表示概率(
Sigmoid)。to avoid overfitting, after the first, second and third hidden layers, a part of the neurons is dropped (
Dropout).为了避免过度拟合,在第一,第二和第三隐藏层之后,将掉落一部分神经元(
Dropout)。
For the convenience of inference, a method is also created in the class. Here corresponds to the input of the model. In this implementation, the output is obtained by feeding the input into the model we have defined without preprocessing. forward() x x
为了方便推断,在类中还创建了一个方法。 这里对应于模型的输入。 在此实现中,通过将输入输入我们定义的模型而无需预处理即可获得输出。 forward() x x
After declaring the discriminator class, create an instance of it:
在声明了鉴别器类之后,创建它的一个实例:
discriminator = Discriminator()GAN生成器的实现 (GAN generator implementation)
In generative adversarial networks, a generator is a model that takes as input some sample from a space of hidden variables that resemble the data in the training set. In our case, this is a 2D input model that will receive random points (z1, z2), and a 2D output that produces points (x̃1, x̃2) that look like the points from the training data.
在生成对抗网络中,生成器是一个模型,该模型从类似于训练集中数据的隐藏变量空间中获取一些样本作为输入。 在我们的例子中,这是一个2D输入模型,它将接收随机点(z1,z2) ,并在一个2D输出中生成看起来像训练数据中的点的点(x̃1,x̃2) 。
The implementation is similar to what we wrote for the discriminator. First, you need to create a class that inherits from, then define the architecture of the neural network, and finally create an instance of the object : Generator nn.Module Generator
实现与我们为鉴别器编写的类似。 首先,您需要创建一个继承自的类,然后定义神经网络的体系结构,最后创建该对象的实例: Generator nn.Module Generator
class Generator(nn.Module):def __init__(self):super().__init__()self.model = nn.Sequential(nn.Linear(2, 16),nn.ReLU(),nn.Linear(16, 32),nn.ReLU(),nn.Linear(32, 2))def forward(self, x):output = self.model(x)return outputgenerator = Generator()The generator includes two hidden layers with 16 and 32 neurons with the ReLU activation function, and at the output a layer with two neurons with a linear activation function. Thus, the output will consist of two elements ranging from −∞ to + ∞ , which will represent (x̃1 , x̃2). That is, initially we do not impose any restrictions on the generator — it must “learn everything by itself.”
生成器包括两个具有ReLU激活功能的具有16和32个神经元的隐藏层,并在输出端包含一个具有线性激活功能的两个神经元的层。 因此,输出将包括从-∞到+∞的两个元素,它们表示(x̃1,x̃2) 。 也就是说,起初我们不对生成器施加任何限制-它必须“自己学习一切”。
Now that we have defined the models for the discriminator and generator, we are ready to start training.
既然我们已经为鉴别器和生成器定义了模型,我们就可以开始训练了。
训练GAN模型 (Train GAN Models)
Before training the models, you need to configure the parameters that will be used in the training process:
在训练模型之前,您需要配置将在训练过程中使用的参数:
lr = 0.001
num_epochs = 300
loss_function = nn.BCELoss()
What’s going on here:
这里发生了什么:
We set the learning rate, which we will use to adapt the network weights.
lr我们设置学习率,我们将使用它来调整网络权重。
lrWe set the number of epochs, which determines how many repetitions of the training process will be performed using the entire dataset.
num_epochs我们设置时期的数量,该时期确定使用整个数据集将执行多少次重复训练过程。
num_epochsTo the variable, we assign the function of the logistic loss function (binary cross-entropy). This is the loss function that we will use to train the models. It is suitable both for training a discriminator (its task is reduced to a binary classification) and for a generator since it feeds its output to the input of the discriminator.
loss_functionBCELoss()为变量分配逻辑损失函数 (二进制交叉熵)的函数 。 这是我们用来训练模型的损失函数。 它既适合于训练鉴别器(将其任务简化为二进制分类),也适合于生成器,因为它将其输出馈送到鉴别器的输入。
loss_functionBCELoss()
The rules for updating weights (training the model) in PyTorch are implemented in a module. We will use Adam’s stochastic gradient descent algorithm to train discriminator and generator models. To create optimizers, run the following code: torch.optim torch.optim
在PyTorch中更新权重(训练模型)的规则在模块中实现。 我们将使用亚当的随机梯度下降算法来训练鉴别器和生成器模型。 要创建优化器,请运行以下代码: torch.optim torch.optim
optimizer_discriminator = torch.optim.Adam(discriminator.parameters(), lr=lr)
optimizer_generator = torch.optim.Adam(generator.parameters(), lr=lr)
Finally, it is necessary to implement a training cycle in which samples of the training sample are fed to the model input, and their weights are updated, minimizing the loss function:
最后,有必要实施一个训练周期,在该训练周期中,将训练样本的样本馈送到模型输入,并更新其权重,以最小化损失函数:
for epoch in range(num_epochs):for n, (real_samples, _) in enumerate(train_loader):# Data for descriminator trainingreal_samples_labels = torch.ones((batch_size, 1))latent_space_samples = torch.randn((batch_size, 2))generated_samples = generator(latent_space_samples)generated_samples_labels = torch.zeros((batch_size, 1))all_samples = torch.cat((real_samples, generated_samples))all_samples_labels = torch.cat((real_samples_labels, generated_samples_labels))# Discriminator trainingdiscriminator.zero_grad()output_discriminator = discriminator(all_samples)loss_discriminator = loss_function(output_discriminator, all_samples_labels)loss_discriminator.backward()optimizer_discriminator.step()# Data for generator traininglatent_space_samples = torch.randn((batch_size, 2))# Generator traininggenerator.zero_grad()generated_samples = generator(latent_space_samples)output_discriminator_generated = discriminator(generated_samples)loss_generator = loss_function(output_discriminator_generated, real_samples_labels)loss_generator.backward()optimizer_generator.step()# Output value of loss functionif epoch % 10 == 0 and n == batch_size - 1:print(f"Epoch: {epoch} Loss D.: {loss_discriminator}")print(f"Epoch: {epoch} Loss G.: {loss_generator}")Here, at each training iteration, we update the discriminator and generator parameters. As is usually done for neural networks, the training process consists of two nested loops: the outer one for the training epochs, and the inner one for the packets within each epoch. In the inner loop, it all starts with preparing data for training the discriminator:
在这里,在每次训练迭代中,我们都会更新鉴别器和生成器参数。 就像神经网络通常所做的那样,训练过程包括两个嵌套循环:一个用于训练时期的外部循环,另一个用于在每个时期内的数据包的内部循环。 在内部循环中,一切都始于准备数据以训练鉴别器:
We get real samples of the current batch from the data loader and assign them to a variable. Note that the first dimension in the array dimension has the number of elements equal to. This is the standard way of organizing data in PyTorch, where each tensor row represents one sample from the package.
real_samplesbatch_size我们从数据加载器获取当前批次的真实样本,并将其分配给变量。 请注意,数组维度中的第一个维度的元素数量等于。 这是在PyTorch中组织数据的标准方法,其中每个张量行代表包装中的一个样品。
real_samplesbatch_sizeUse to create labels with a value of 1 for real samples and assign labels to a variable.
torch.ones()real_samples_labels用于为实际样本创建值为1的标签,并将标签分配给变量。
torch.ones()real_samples_labelsWe generate samples by storing random data, which we then pass to the generator for receiving. We use zeros for the labels of the generated samples, which we store in
latent_space_samplesgenerate_samplestorch.zeros()generate_samples_labels我们通过存储随机数据来生成样本,然后将其传递给生成器以进行接收。 我们使用零作为生成样本的标签,并将其存储在
latent_space_samplesgenerate_samplestorch.zeros()generate_samples_labelsIt remains to combine the real and generated samples and labels and save respectively in and
all_samplesall_samples_labels仍然需要合并实际样本和生成的样本和标签,并分别保存在
all_samples和all_samples_labels
In the next block, we train the discriminator:
在下一个步骤中,我们训练鉴别器:
In PyTorch, it is important to clear the gradient values at every step of the training. We do this using the method
zero_grad()在PyTorch中,重要的是在训练的每个步骤中清除梯度值。 我们使用
zero_grad()方法执行此操作We calculate the output of the discriminator using the training data
all_samples我们使用训练数据
all_samples计算鉴别器的输出Calculate the value of the loss function using the output at and labels
output_discriminatorall_samples_labels使用和处的输出计算损失函数的值,并标记
output_discriminatorall_samples_labelsCalculate the gradients to update the weights with
loss_discriminator.backward()计算梯度以使用
loss_discriminator.backward()更新权重Find the updated discriminator weights by calling
optimizer_discriminator.step()通过调用
optimizer_discriminator.step()查找更新的鉴别器权重We prepare the data for training the generator. We use two columns to match the 2D data at the generator input.
latent_space_samplesbatch_size我们准备数据来训练生成器。 我们使用两列来匹配生成器输入处的2D数据。
latent_space_samplesbatch_size
We train the generator:
我们训练发电机:
We clean up the gradients using the method.
zero_grad()我们使用该方法清理渐变。
zero_grad()We pass it on to the generator and save its output to
latent_space_samplesgenerate_samples我们将其传递给生成器,并将其输出保存到
latent_space_samplesgenerate_samplesWe pass the generator output to the discriminator and save its output, which will be used as the output of the entire model.
output_discriminator_generated我们将生成器的输出传递给鉴别器,并保存其输出,该输出将用作整个模型的输出。
output_discriminator_generatedCalculate the loss function using the output of the classification system stored in and labels equal to 1.
output_discriminator_generatedreal_samples_labels使用存储在所述分类系统的输出计算所述损失函数和标签等于1
output_discriminator_generatedreal_samples_labels- Calculating gradients and updating generator weights. Remember that when we train the generator, we are keeping the discriminator weights frozen. 计算梯度并更新发电机权重。 请记住,在训练发电机时,我们要保持鉴别器的重量冻结。
Finally, in the last lines of the loop, the values of the discriminator and generator loss functions are output at the end of every tenth epoch.
最后,在循环的最后几行中,在每个第十个周期的末尾输出鉴别器和发电机损耗函数的值。
检查GAN生成的样本 (Checking samples generated by GAN)
Generative adversarial networks are designed to generate data. Thus, after the training process is complete, we can call the generator to get new data:
生成对抗网络旨在生成数据。 因此,在训练过程完成之后,我们可以调用生成器以获取新数据:
latent_space_samples = torch.randn(100, 2)
generated_samples = generator(latent_space_samples)
Let’s plot the generated data and check how similar it is to the training data. Before plotting a graph for the generated samples, you need to apply a method detach()to get the necessary data from the PyTorch computational graph:
让我们绘制生成的数据,并检查它与训练数据的相似程度。 在为生成的样本绘制图形之前,您需要应用detach()方法从PyTorch计算图形中获取必要的数据:
generated_samples = generated_samples.detach()
plt.plot(generated_samples[:, 0], generated_samples[:, 1], ".")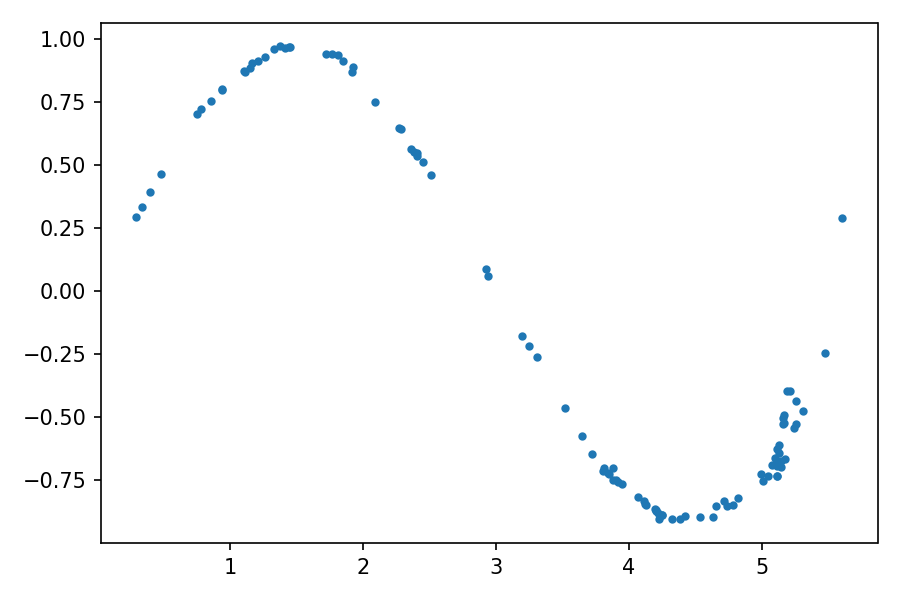
The distribution of the generated data is very similar to real data — the original sine. The animation of the evolution of learning can be viewed here .
生成的数据的分布与真实数据(原始正弦)非常相似。 学习演变的动画可以在这里查看 。
At the beginning of the training process, the distribution of the generated data is very different from the real data. But as it learns, the generator learns the real data distribution, as if adjusting to it.
在训练过程开始时,生成的数据的分布与实际数据有很大不同。 但是,随着学习,生成器将学习实际的数据分布,就像对其进行调整一样。
Now that we have implemented the first model of a generative adversarial network, we can move on to a more practical example of generating images.
现在,我们已经实现了生成对抗网络的第一个模型,我们可以继续进行生成图像的更实际示例。
带有GAN的手写数字生成器 (Handwritten Digit Generator with GAN)
In the following example, we will use GAN to generate images of handwritten numbers. To do this, we will train the models using the MNIST dataset of handwritten numbers. This standard dataset is included in the package torchvision
在下面的示例中,我们将使用GAN生成手写数字的图像。 为此,我们将使用MNIST手写数字数据集训练模型。 这个标准数据集包含在torchvision软件包中
First, in the activated environment, you need to install : gan torchvision
首先,在激活的环境中,您需要安装: gan torchvision
$ conda install -c pytorch torchvision=0.5.0Again, here we are specifying the specific version just like we did with PyTorch to ensure that the code examples run. torchvision
同样,在这里我们指定特定版本,就像我们使用PyTorch一样以确保代码示例运行。 torchvision
We start by importing the required libraries:
我们首先导入所需的库:
import torchvision
import torchvision.transforms as transformstorch.manual_seed(111)
In addition to the libraries that we imported earlier, we will also need to transform the information stored in image files. torchvision torchvision.transforms
除了我们先前导入的库之外,我们还需要转换存储在图像文件中的信息。 torchvision torchvision.transforms
Since the training set includes images in this example, the models will be more complex and the training will take significantly longer. When training in a central processing unit (CPU), one epoch will take about two minutes. It will take about 50 epochs to get an acceptable result, so the total training time using the processor is about 100 minutes.
由于在此示例中训练集包括图像,因此模型将更加复杂,并且训练将花费更长的时间。 在中央处理器( CPU )中进行训练时,一个历时大约需要2分钟。 获得可接受的结果大约需要50个纪元,因此使用处理器的总训练时间约为100分钟。
A graphics processing unit (GPU) can be used to reduce training time.
图形处理单元( GPU )可用于减少训练时间。
To make the code work regardless of the characteristics of the computer, let’s create an object that will point either to the central processor or (if available) to the graphics processor: device
为了使代码工作不管计算机的特性,让我们创建一个对象,要么指向中央处理器或(如果可用)到图形处理器: device
device = ""
if torch.cuda.is_available():device = torch.device("cuda")
else:device = torch.device("cpu")
The environment is configured, let’s prepare a dataset for training.
环境已配置,让我们准备训练数据集。
准备MNIST数据集 (Preparing the MNIST dataset)
The MNIST dataset consists of images of handwritten digits 0 through 9. The images are in grayscale and are 28 × 28 pixels in size. To use them with PyTorch, you need to do some transformations. To do this, we define the function used when loading data: transform
MNIST数据集由手写数字0到9的图像组成。图像为灰度图像 ,大小为28×28像素 。 要将它们与PyTorch一起使用,您需要进行一些转换。 为此,我们定义了加载数据时使用的函数: transform
transform = transforms.Compose([transforms.ToTensor(), transforms.Normalize((0.5,), (0.5,))])The function has two parts:
该功能分为两部分:
transforms.ToTensor()converts the data into a PyTorch tensor.transforms.ToTensor()将数据转换为PyTorch张量。transforms.Normalize()converts a range of tensor coefficients.transforms.Normalize()转换一系列张量系数。
The original coefficients are given by the function range from 0 to 1. Since the images have a black background, most of the coefficients are 0. transforms.ToTensor()
原始系数由0到1的函数范围给出。由于图像具有黑色背景,因此大多数系数为0。transforms.ToTensor transforms.ToTensor()
The function changes the range of coefficients to transforms.Normalize() [ - 1 , 1 ][−1,1] , subtracting 0.5 from the original odds and dividing the result by 0.5. The transformation reduces the number of elements in the input samples to zero. This helps in training the models.
该函数将系数的范围更改为transforms.Normalize() [-1,1] [-1,1] ,从原始几率中减去0.5,然后将结果除以0.5。 该变换将输入样本中的元素数量减少为零。 这有助于训练模型。
We can now load the training data by calling : torchvision.datasets.MNIST
现在,我们可以通过调用以下torchvision.datasets.MNIST加载训练数据: torchvision.datasets.MNIST
train_set = torchvision.datasets.MNIST(root=".", train=True, download=True, transform=transform)The argument ensures that the first time you run the code, the MNIST dataset will be loaded and saved in the current directory as specified in the argument. download = True root
该参数确保第一次运行代码时,MNIST数据集将按照参数指定的方式加载并保存在当前目录中。 download = True root
We created so that we can create a data loader as we did before: train_set
我们创建后可以像以前一样创建数据加载器: train_set
batch_size = 32
train_loader = torch.utils.data.DataLoader(train_set, batch_size=batch_size, shuffle=True)
Let’s use matplotlibfor the selective plotting of data. Well suited as a palette cmap = gray_r. The numbers will be displayed in black on a white background:
让我们使用matplotlib选择性绘制数据。 非常适合用作调色板cmap = gray_r 。 数字将在白色背景上以黑色显示:
real_samples, mnist_labels = next(iter(train_loader))
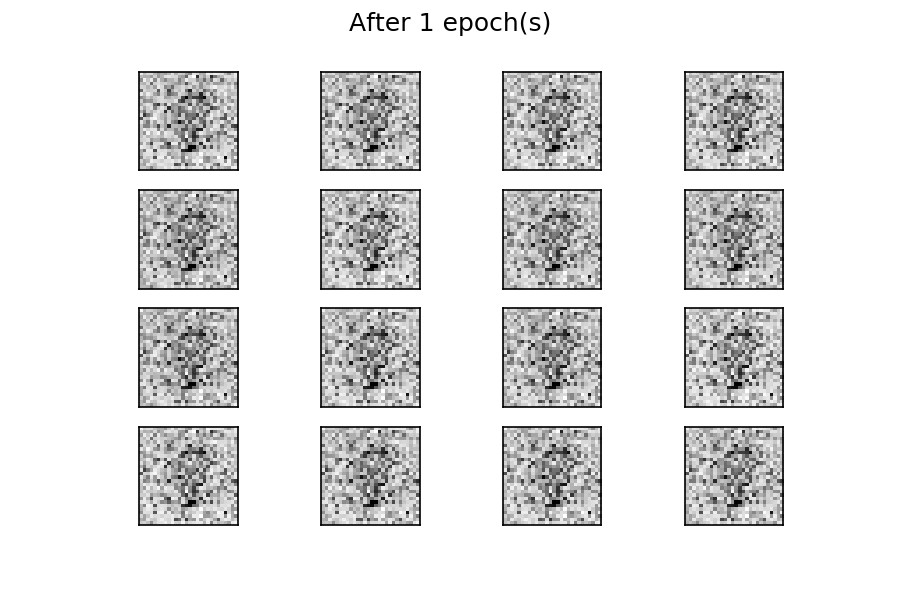
for i in range(16):ax = plt.subplot(4, 4, i + 1)plt.imshow(real_samples[i].reshape(28, 28), cmap="gray_r")plt.xticks([])plt.yticks([])As you can see, the dataset contains numbers with different handwriting. As the GAN learns the distribution of the data, it also generates numbers with different handwriting styles.
如您所见,数据集包含具有不同笔迹的数字。 GAN在学习数据分布时,还会生成具有不同笔迹样式的数字。
We have prepared training data, we can implement discriminator and generator models.
我们已经准备了训练数据,可以实现鉴别器和生成器模型。
鉴别器和生成器的实现 (Discriminator and generator implementation)
In this case, the discriminator is a multilayer perceptron neural network, which takes an image of 28 × 28 pixels and finds the probability that the image belongs to real training data.
在这种情况下,鉴别器是多层感知器神经网络,它拍摄28×28像素的图像,并找到该图像属于真实训练数据的概率。
class Discriminator(nn.Module):def __init__(self):super().__init__()self.model = nn.Sequential(nn.Linear(784, 1024),nn.ReLU(),nn.Dropout(0.3),nn.Linear(1024, 512),nn.ReLU(),nn.Dropout(0.3),nn.Linear(512, 256),nn.ReLU(),nn.Dropout(0.3),nn.Linear(256, 1),nn.Sigmoid(),)def forward(self, x):x = x.view(x.size(0), 784)output = self.model(x)return outputTo introduce the image coefficients into the perceptron neural network, it is necessary to vectorize them so that the neural network receives a vector consisting of 784 coefficients (28 × 28 = 784).
要将图像系数引入感知器神经网络,必须对其进行矢量化处理,以使神经网络接收包含784个系数( 28×28 = 784 )的向量。
Vectorization occurs in the first line of the method — the call transforms the form of the input tensor. Initial tensor form forward() x.view() 𝑥, where 32 is the batch size. After transformation, the form 32 × 1 × 28 × 28 𝑥x becomes equal, with each row representing the image coefficients of the training set. 32 × 784
向量化发生在方法的第一行中-调用将转换输入张量的形式。 初始张量形式forward() x.view() 𝑥 ,其中32是批处理大小。 转换后,形式为32 × 1 × 28 × 28 𝑥x变得相等,每一行代表训练集的图像系数。 32 × 784
To run a discriminator model using a GPU, you need to instantiate it and associate it with a device object using the method : to()
要使用GPU运行鉴别器模型,您需要实例化它并使用以下方法to()其与设备对象关联: to()
discriminator = Discriminator().to(device=device)The generator will create more complex data than the previous example. Therefore, it is necessary to increase the size of the input data used for initialization. Here we are using a 100-dimensional input and output with 784 coefficients. The result is organized as a 28x28 tensor representing the image.
生成器将创建比上一个示例更复杂的数据。 因此,有必要增加用于初始化的输入数据的大小。 在这里,我们使用具有784个系数的100维输入和输出。 结果组织为代表图像的28x28张量 。
class Generator(nn.Module):def __init__(self):super().__init__()self.model = nn.Sequential(nn.Linear(100, 256),nn.ReLU(),nn.Linear(256, 512),nn.ReLU(),nn.Linear(512, 1024),nn.ReLU(),nn.Linear(1024, 784),nn.Tanh(),)def forward(self, x):output = self.model(x)output = output.view(x.size(0), 1, 28, 28)return outputgenerator = Generator().to(device=device)The output coefficients must be in the range from -1 to 1. Therefore, at the output of the generator, we use a hyperbolic activation function. In the last line, we instantiate the generator and associate it with the device object. Tanh()
输出系数必须在-1到1的范围内。因此,在生成器的输出处,我们使用双曲线激活函数。 在最后一行,我们实例化了生成器并将其与设备对象相关联。 Tanh()
It remains only to train the model.
它仅用于训练模型。
模型训练 (Model training)
To train models, you need to define training parameters and optimizers:
要训练模型,您需要定义训练参数和优化器:
lr = 0.0001
num_epochs = 50
loss_function = nn.BCELoss()optimizer_discriminator = torch.optim.Adam(discriminator.parameters(), lr=lr)
optimizer_generator = torch.optim.Adam(generator.parameters(), lr=lr)
We are reducing the learning rate compared to the previous example. To shorten the training time, set the number of epochs to 50.
与前面的示例相比,我们正在降低学习率。 要缩短训练时间,请将纪元数设置为50。
The learning loop is similar to the one we used in the previous example:
学习循环类似于上一个示例中使用的循环:
for epoch in range(num_epochs):for n, (real_samples, mnist_labels) in enumerate(train_loader):# Data for discriminator trainingreal_samples = real_samples.to(device=device)real_samples_labels = torch.ones((batch_size, 1)).to(device=device)latent_space_samples = torch.randn((batch_size, 100)).to(device=device)generated_samples = generator(latent_space_samples)generated_samples_labels = torch.zeros((batch_size, 1)).to(device=device)all_samples = torch.cat((real_samples, generated_samples))all_samples_labels = torch.cat((real_samples_labels, generated_samples_labels))# Discriminator trainingdiscriminator.zero_grad()output_discriminator = discriminator(all_samples)loss_discriminator = loss_function(output_discriminator, all_samples_labels)loss_discriminator.backward()optimizer_discriminator.step()# Data for generator traininglatent_space_samples = torch.randn((batch_size, 100)).to(device=device)# Generator traininggenerator.zero_grad()generated_samples = generator(latent_space_samples)output_discriminator_generated = discriminator(generated_samples)loss_generator = loss_function(output_discriminator_generated, real_samples_labels)loss_generator.backward()optimizer_generator.step()# Output value of loss functionif n == batch_size - 1:print(f"Epoch: {epoch} Loss D.: {loss_discriminator}")print(f"Epoch: {epoch} Loss G.: {loss_generator}")检查生成的GAN样本 (Checking Generated GAN Samples)
Let’s generate some samples of “handwritten numbers”. To do this, we pass the generator an initiating set of random numbers:
让我们生成一些“手写数字”的样本。 为此,我们向生成器传递一组初始的随机数:
latent_space_samples = torch.randn(batch_size, 100).to(device=device)
generated_samples = generator(latent_space_samples)
To build the generated samples, you need to move the data back to the central processor, if it was processed on the GPU. To do this, just call the method cpu(). As before, before plotting the data, you need to call the method detach():
要构建生成的样本,您需要将数据移回中央处理器(如果已在GPU上处理过)。 为此,只需调用方法cpu() 。 和以前一样,在绘制数据之前,您需要调用detach()方法:
generated_samples = generated_samples.cpu().detach()for i in range(16):ax = plt.subplot(4, 4, i + 1)plt.imshow(generated_samples[i].reshape(28, 28), cmap="gray_r")plt.xticks([])plt.yticks([])The output should be numbers that resemble training data.
输出应为类似于训练数据的数字。

After fifty epochs of learning, there are several numbers, as if written by a human hand. Results can be improved with longer training times (with more epochs). As in the previous example, you can visualize the evolution of training by using a fixed tensor of the input and feeding it to the generator at the end of each epoch (animation of the evolution of training).
在学习了五十个纪元之后,有几个数字,就好像是人手所写的一样。 训练时间更长(时间越长),结果越好。 与前面的示例一样,您可以通过使用固定的输入张量并在每个纪元末尾将其馈送到生成器( 训练演变的动画 )来可视化训练的演变 。
At the beginning of the training process, the generated images are completely random. As it learns, the generator learns the distribution of real data, and after about twenty epochs some of the generated digit images already resemble real data.
在训练过程的开始,生成的图像是完全随机的。 在学习过程中,生成器学习了真实数据的分布,并且在大约二十个纪元后,一些生成的数字图像已经类似于真实数据。
结论 (Conclusion)
Congratulations! You have learned how to implement your own generative adversarial network. We first built a toy example to understand the structure of the GAN, and then looked at a network for generating images from the available sample data.
恭喜你! 您已经了解了如何实现自己的生成对抗网络。 我们首先构建了一个玩具示例来了解GAN的结构,然后查看了一个网络,该网络用于从可用的样本数据生成图像。
Despite the complexity of the GAN topic, machine learning frameworks like PyTorch make implementation very easy.
尽管GAN主题很复杂,但是像PyTorch这样的机器学习框架使实现非常容易。
翻译自: https://medium.com/dev-genius/write-your-first-generative-adversarial-network-model-on-pytorch-7dc0c7c892c7
pytorch 生成模型
如若内容造成侵权/违法违规/事实不符,请联系编程学习网邮箱:809451989@qq.com进行投诉反馈,一经查实,立即删除!
相关文章
- 深度学习在计算机视觉中的应用长篇综述
深度学习在计算机视觉中的应用长篇综述 前言 2012年ImageNet比赛,使深度学习在计算机视觉领域在全世界名声大震,由此人工智能的全球大爆发。第一个研究CNN的专家使Yann LeCun,现就职于Facebook和纽约大学。第一个CNN模型就是Yann LeCun发明…...
2024/4/27 18:34:23 - 内容 AI:建立统一的跨媒体多模态内容理解内核
转载:https://aijishu.com/a/1060000000089247 作者: 孙子荀 zixunsuntencent.com,腾讯 专家研究员 Jeff Dean 谈 2020 年机器学习趋势:多任务和多模式学习将成为突破口 2019 年下半年,CDG 广告、 CSIG 音视频&…...
2024/4/27 15:36:30 - 机器人工程本科专业课教学资源汇总(2018年暑假补充学习用)
手机应用软件:Robotics Engineering - Apps on Google Play This Robotics Engineering App provides the basic know-how on the foundations of robotics: modelling, planning and control. The App takes the user through a step-by step design process in t…...
2024/4/27 20:19:10 - NIPS2019 | 2019NIPS论文 | NeurIPS2019最新更新论文~持续更新| NIPS2019百度云下载
论文下载百度云链接:链接:https://pan.baidu.com/s/100OAXTIOTPoMjbi-dwOcxA 提取码:请关注【计算机视觉联盟】微信公众号,回复:NIPS2019 今天更新到2019年9月6号 目录 今天更新到2019年9月4号 Understanding the…...
2024/4/26 22:54:45 - 云计算的技术路线探讨
引言当前的“云计算”一词已经被神话,似乎快成了放之四海皆准的时髦真理,就好比当初言必称“希腊”一般,表面光芒四射,但实际上却无比教条、且越来越令人生厌。作为“云计算”的一个普通开发者和推广者,很有必要通过亲身实践,以正视听,希望能让后来者(云计算系统的开发…...
2024/4/27 18:59:54 - camvid数据集介绍_语义分割的数据集
背景语义分割指的是把图像中的每个像素都划分到某一个类别上。实现算法上,有传统时代的grab cut、ML时代的TextonForest、DL时代的FCN 、SegNet 、Dilated Convolutions 、DeepLab (v1 & v2)、RefineNet 、PSPNet 、Large Kernel Matters 、DeepLab v3等。当然了…...
2024/4/27 14:07:53 - [语义分割]训练deeplabv3(一):建立自己的数据集
[deeplabv3]:https://github.com/tensorflow/models/tree/master/research/deeplab [labelme]:https://github.com/wkentaro/labelme 简介 本博客主要介绍了,deeplabv3训练前的自己数据集准备工作: 即将用labelme标记的自己的语义分割数据集转化为deeplabv3训练支持的tfreco…...
2024/4/27 19:39:11 - 解决“OSError: [WinError 126] 找不到指定的模块”的问题 Win10
针对情景: Win10下运行py工程报错,最后一行为“OSError: [WinError 126] 找不到指定的模块”倒数第二端为Shapely相关函数的语句(如下图)PS:其他情景用该方法未必有效 问题原因: 由上图可见,倒…...
2024/4/27 19:25:12 - ImportError: DLL load failed: 页面文件太小,无法完成操作。
python代码训练神经网络时,报错:“ImportError: DLL load failed: 页面文件太小,无法完成操作。” 出现这个问题可能有两种情况。 ①不止在运行一个项目,另一个项目的python程序也在运行,关掉就可以了。 ②windows操作…...
2024/4/20 20:44:45 - ImportError: Could not find the DLL(s) 'msvcp140_1.dll'. 跑tensorflow时报错
解决思路是缺失dll文件,安装这个文件就可以。试过去网站下载dll,还是不行。有人说用腾讯电脑管家的dll文件修复功能,也不行。最后在这个网站找到了。 https://support.microsoft.com/zh-cn/help/2977003/the-latest-supported-visual-c-down…...
2024/4/20 20:44:43 - 列表取片操作易错点(list indices must be integers or slices, not tuple原因及解决方法)
list indices must be integers or slices, not tuple原因及解决方法 场景: 在对列表进行取数据时报错,报错代码: TypeError: list indices must be integers or slices, not tuple翻译: 列表索引必须是整数(取某一个…...
2024/4/20 20:44:42 - 【终极!!!】cannot connect to X server, couldnt connect to display
目前遇到了两种报这个错的情况: 情况一:本地在外网,通过SSH登录到内网服务器。运行代码, 报错: (1)cannot connect to X server (2)_tkinter.TclError: couldnt conn…...
2024/4/24 12:26:21 - VGG训练报错:Errors may have originated from an input operation.
利用自己做的数据集训练VGG时,出现报错信息: Errors may have originated from an input operation. Input Source operations connected to node conv0/Conv1/Conv2D: IteratorGetNext (defined at train_resnet.py:95) Input Source operations connected to node conv0/Co…...
2024/4/20 20:44:41 - 报错:module ffmpeg has no attribute input 解决方法
1、检查是否安装正确的包 kkroening/ffmpeg-python: Python bindings for FFmpeg - with complex filtering support (github.com) 这是官网,该包正确名称为ffmpeg-python,易与ffmpeg、python-ffmpeg混淆;使用以下命令进行重新安装…...
2024/4/23 0:51:03 - CodeMonkey流水账:字符串格式化or不格式化
需要记录/打印的文本内容中有格式化字符串 比如记录一句SQL里面有类似: someField like ‘ABC%’。 writeLog("someField like ABC%");下面的函数就会报错。 public static void writeLog(LogType type, String format, Object... args) throws TNUExce…...
2024/4/20 20:44:38 - tensorflowGPU版出现Failed to load the native TensorFlow问题
只要按 https://stackoverflow.com/questions/43942185/failed-to-load-the-native-tensorflow-runtime-python-3-5-2中所描述的安装一遍就可以解决了...
2024/4/20 20:44:37 - GitHub 上有哪些适合新手跟进的优质项目?
点击上方“迈微电子研发社”,选择“星标★”公众号 重磅干货,第一时间送达 看过我文章的社友们都知道,你再不使用GitHub,都不敢跟别人说自己是CS专业的。所以,它的重要性也就不再多言了,今天就分享给大家如…...
2024/4/20 20:44:36 - vue在npm run dev运行项目时出现npm ERR! code ELIFECYCLE问题解决方案
今天准备开始一个新项目,于是用vue-cli创建了一个项目,可是当npm run dev时报错: 解决方法: 第一步:npm uninstall webpack-dev-server 第二步:npm install webpack-dev-server2.9.1 第三步:npm…...
2024/4/20 20:44:35 - 拜见罗宾逊一家
Meet The Robinsons 我没有选那个 因为那个会让我起疙瘩 Then I didnt choose that one because it was gonna give me pimples, 于是我挑了另外一个比较恐怖的 so I choosed another scary one 因为根据我多年参加 万圣节前夕的经验 because, for all those years that I w…...
2024/4/20 20:44:34 - 普通话水平测试脸型软件,你明明长得挺漂亮,为什么拍照总是不上镜?
被叫天仙这么多年,完全担得起这个称号!但是作为一个明星,出道这么多年怎么可能没有一两张黑图呢(没错,黑照都是产于自己的微博)!这蜜汁角度。。。这魔幻打光。。。还有这堪比座机的画质。。。其实不只是天仙,Miya身边很…...
2024/4/20 20:44:33
最新文章
- 设计前后端系统以处理长时间运行的计算任务并提供缓存支持
后端设计 1. 任务队列 创建一个任务队列来存储提交的计算任务。 Component public class TaskQueue {private final Queue<CalculationTask> queue new LinkedList<>();public synchronized void addTask(CalculationTask task) {queue.add(task);}public sync…...
2024/4/27 20:30:20 - 梯度消失和梯度爆炸的一些处理方法
在这里是记录一下梯度消失或梯度爆炸的一些处理技巧。全当学习总结了如有错误还请留言,在此感激不尽。 权重和梯度的更新公式如下: w w − η ⋅ ∇ w w w - \eta \cdot \nabla w ww−η⋅∇w 个人通俗的理解梯度消失就是网络模型在反向求导的时候出…...
2024/3/20 10:50:27 - HarmonyOS 开发-一镜到底“页面转场”动画
介绍 本方案做的是页面点击卡片跳转到详情预览的转场动画效果 效果图预览 使用说明 点击首页卡片跳转到详情页,再点击进入路由页面按钮,进入新的路由页面 实现思路 首页使用了一种视觉上看起来像是组件的转场动画,这种转场动画通常是通过…...
2024/4/18 23:18:44 - Go语言map、slice、channel底层实现(go面试)
slice 切片是一个引用类型,其底层实现是一个结构体,包含以下字段: ptr:一个指向底层数组的指针,指针指向数组的第一个元素。 len:切片当前包含的元素数量。 cap:切片的容量,即底层…...
2024/4/24 19:38:16 - 论文阅读AI工具链
文献检索 可以利用智谱清言来生成合适的文献检索式,并根据需要不断调整。 谷歌学术 在Google Scholar中进行检索时,您可以使用类似的逻辑来构建您的搜索式,但是语法会有所不同。Google Scholar的搜索框接受普通的文本搜索,但是…...
2024/4/23 6:25:51 - 【外汇早评】美通胀数据走低,美元调整
原标题:【外汇早评】美通胀数据走低,美元调整昨日美国方面公布了新一期的核心PCE物价指数数据,同比增长1.6%,低于前值和预期值的1.7%,距离美联储的通胀目标2%继续走低,通胀压力较低,且此前美国一季度GDP初值中的消费部分下滑明显,因此市场对美联储后续更可能降息的政策…...
2024/4/26 18:09:39 - 【原油贵金属周评】原油多头拥挤,价格调整
原标题:【原油贵金属周评】原油多头拥挤,价格调整本周国际劳动节,我们喜迎四天假期,但是整个金融市场确实流动性充沛,大事频发,各个商品波动剧烈。美国方面,在本周四凌晨公布5月份的利率决议和新闻发布会,维持联邦基金利率在2.25%-2.50%不变,符合市场预期。同时美联储…...
2024/4/26 20:12:18 - 【外汇周评】靓丽非农不及疲软通胀影响
原标题:【外汇周评】靓丽非农不及疲软通胀影响在刚结束的周五,美国方面公布了新一期的非农就业数据,大幅好于前值和预期,新增就业重新回到20万以上。具体数据: 美国4月非农就业人口变动 26.3万人,预期 19万人,前值 19.6万人。 美国4月失业率 3.6%,预期 3.8%,前值 3…...
2024/4/26 23:05:52 - 【原油贵金属早评】库存继续增加,油价收跌
原标题:【原油贵金属早评】库存继续增加,油价收跌周三清晨公布美国当周API原油库存数据,上周原油库存增加281万桶至4.692亿桶,增幅超过预期的74.4万桶。且有消息人士称,沙特阿美据悉将于6月向亚洲炼油厂额外出售更多原油,印度炼油商预计将每日获得至多20万桶的额外原油供…...
2024/4/27 4:00:35 - 【外汇早评】日本央行会议纪要不改日元强势
原标题:【外汇早评】日本央行会议纪要不改日元强势近两日日元大幅走强与近期市场风险情绪上升,避险资金回流日元有关,也与前一段时间的美日贸易谈判给日本缓冲期,日本方面对汇率问题也避免继续贬值有关。虽然今日早间日本央行公布的利率会议纪要仍然是支持宽松政策,但这符…...
2024/4/27 17:58:04 - 【原油贵金属早评】欧佩克稳定市场,填补伊朗问题的影响
原标题:【原油贵金属早评】欧佩克稳定市场,填补伊朗问题的影响近日伊朗局势升温,导致市场担忧影响原油供给,油价试图反弹。此时OPEC表态稳定市场。据消息人士透露,沙特6月石油出口料将低于700万桶/日,沙特已经收到石油消费国提出的6月份扩大出口的“适度要求”,沙特将满…...
2024/4/27 14:22:49 - 【外汇早评】美欲与伊朗重谈协议
原标题:【外汇早评】美欲与伊朗重谈协议美国对伊朗的制裁遭到伊朗的抗议,昨日伊朗方面提出将部分退出伊核协议。而此行为又遭到欧洲方面对伊朗的谴责和警告,伊朗外长昨日回应称,欧洲国家履行它们的义务,伊核协议就能保证存续。据传闻伊朗的导弹已经对准了以色列和美国的航…...
2024/4/26 21:56:58 - 【原油贵金属早评】波动率飙升,市场情绪动荡
原标题:【原油贵金属早评】波动率飙升,市场情绪动荡因中美贸易谈判不安情绪影响,金融市场各资产品种出现明显的波动。随着美国与中方开启第十一轮谈判之际,美国按照既定计划向中国2000亿商品征收25%的关税,市场情绪有所平复,已经开始接受这一事实。虽然波动率-恐慌指数VI…...
2024/4/27 9:01:45 - 【原油贵金属周评】伊朗局势升温,黄金多头跃跃欲试
原标题:【原油贵金属周评】伊朗局势升温,黄金多头跃跃欲试美国和伊朗的局势继续升温,市场风险情绪上升,避险黄金有向上突破阻力的迹象。原油方面稍显平稳,近期美国和OPEC加大供给及市场需求回落的影响,伊朗局势并未推升油价走强。近期中美贸易谈判摩擦再度升级,美国对中…...
2024/4/27 17:59:30 - 【原油贵金属早评】市场情绪继续恶化,黄金上破
原标题:【原油贵金属早评】市场情绪继续恶化,黄金上破周初中国针对于美国加征关税的进行的反制措施引发市场情绪的大幅波动,人民币汇率出现大幅的贬值动能,金融市场受到非常明显的冲击。尤其是波动率起来之后,对于股市的表现尤其不安。隔夜美国股市出现明显的下行走势,这…...
2024/4/25 18:39:16 - 【外汇早评】美伊僵持,风险情绪继续升温
原标题:【外汇早评】美伊僵持,风险情绪继续升温昨日沙特两艘油轮再次发生爆炸事件,导致波斯湾局势进一步恶化,市场担忧美伊可能会出现摩擦生火,避险品种获得支撑,黄金和日元大幅走强。美指受中美贸易问题影响而在低位震荡。继5月12日,四艘商船在阿联酋领海附近的阿曼湾、…...
2024/4/25 18:39:16 - 【原油贵金属早评】贸易冲突导致需求低迷,油价弱势
原标题:【原油贵金属早评】贸易冲突导致需求低迷,油价弱势近日虽然伊朗局势升温,中东地区几起油船被袭击事件影响,但油价并未走高,而是出于调整结构中。由于市场预期局势失控的可能性较低,而中美贸易问题导致的全球经济衰退风险更大,需求会持续低迷,因此油价调整压力较…...
2024/4/26 19:03:37 - 氧生福地 玩美北湖(上)——为时光守候两千年
原标题:氧生福地 玩美北湖(上)——为时光守候两千年一次说走就走的旅行,只有一张高铁票的距离~ 所以,湖南郴州,我来了~ 从广州南站出发,一个半小时就到达郴州西站了。在动车上,同时改票的南风兄和我居然被分到了一个车厢,所以一路非常愉快地聊了过来。 挺好,最起…...
2024/4/26 22:01:59 - 氧生福地 玩美北湖(中)——永春梯田里的美与鲜
原标题:氧生福地 玩美北湖(中)——永春梯田里的美与鲜一觉醒来,因为大家太爱“美”照,在柳毅山庄去寻找龙女而错过了早餐时间。近十点,向导坏坏还是带着饥肠辘辘的我们去吃郴州最富有盛名的“鱼头粉”。说这是“十二分推荐”,到郴州必吃的美食之一。 哇塞!那个味美香甜…...
2024/4/25 18:39:14 - 氧生福地 玩美北湖(下)——奔跑吧骚年!
原标题:氧生福地 玩美北湖(下)——奔跑吧骚年!让我们红尘做伴 活得潇潇洒洒 策马奔腾共享人世繁华 对酒当歌唱出心中喜悦 轰轰烈烈把握青春年华 让我们红尘做伴 活得潇潇洒洒 策马奔腾共享人世繁华 对酒当歌唱出心中喜悦 轰轰烈烈把握青春年华 啊……啊……啊 两…...
2024/4/26 23:04:58 - 扒开伪装医用面膜,翻六倍价格宰客,小姐姐注意了!
原标题:扒开伪装医用面膜,翻六倍价格宰客,小姐姐注意了!扒开伪装医用面膜,翻六倍价格宰客!当行业里的某一品项火爆了,就会有很多商家蹭热度,装逼忽悠,最近火爆朋友圈的医用面膜,被沾上了污点,到底怎么回事呢? “比普通面膜安全、效果好!痘痘、痘印、敏感肌都能用…...
2024/4/25 2:10:52 - 「发现」铁皮石斛仙草之神奇功效用于医用面膜
原标题:「发现」铁皮石斛仙草之神奇功效用于医用面膜丽彦妆铁皮石斛医用面膜|石斛多糖无菌修护补水贴19大优势: 1、铁皮石斛:自唐宋以来,一直被列为皇室贡品,铁皮石斛生于海拔1600米的悬崖峭壁之上,繁殖力差,产量极低,所以古代仅供皇室、贵族享用 2、铁皮石斛自古民间…...
2024/4/25 18:39:00 - 丽彦妆\医用面膜\冷敷贴轻奢医学护肤引导者
原标题:丽彦妆\医用面膜\冷敷贴轻奢医学护肤引导者【公司简介】 广州华彬企业隶属香港华彬集团有限公司,专注美业21年,其旗下品牌: 「圣茵美」私密荷尔蒙抗衰,产后修复 「圣仪轩」私密荷尔蒙抗衰,产后修复 「花茵莳」私密荷尔蒙抗衰,产后修复 「丽彦妆」专注医学护…...
2024/4/26 19:46:12 - 广州械字号面膜生产厂家OEM/ODM4项须知!
原标题:广州械字号面膜生产厂家OEM/ODM4项须知!广州械字号面膜生产厂家OEM/ODM流程及注意事项解读: 械字号医用面膜,其实在我国并没有严格的定义,通常我们说的医美面膜指的应该是一种「医用敷料」,也就是说,医用面膜其实算作「医疗器械」的一种,又称「医用冷敷贴」。 …...
2024/4/27 11:43:08 - 械字号医用眼膜缓解用眼过度到底有无作用?
原标题:械字号医用眼膜缓解用眼过度到底有无作用?医用眼膜/械字号眼膜/医用冷敷眼贴 凝胶层为亲水高分子材料,含70%以上的水分。体表皮肤温度传导到本产品的凝胶层,热量被凝胶内水分子吸收,通过水分的蒸发带走大量的热量,可迅速地降低体表皮肤局部温度,减轻局部皮肤的灼…...
2024/4/27 8:32:30 - 配置失败还原请勿关闭计算机,电脑开机屏幕上面显示,配置失败还原更改 请勿关闭计算机 开不了机 这个问题怎么办...
解析如下:1、长按电脑电源键直至关机,然后再按一次电源健重启电脑,按F8健进入安全模式2、安全模式下进入Windows系统桌面后,按住“winR”打开运行窗口,输入“services.msc”打开服务设置3、在服务界面,选中…...
2022/11/19 21:17:18 - 错误使用 reshape要执行 RESHAPE,请勿更改元素数目。
%读入6幅图像(每一幅图像的大小是564*564) f1 imread(WashingtonDC_Band1_564.tif); subplot(3,2,1),imshow(f1); f2 imread(WashingtonDC_Band2_564.tif); subplot(3,2,2),imshow(f2); f3 imread(WashingtonDC_Band3_564.tif); subplot(3,2,3),imsho…...
2022/11/19 21:17:16 - 配置 已完成 请勿关闭计算机,win7系统关机提示“配置Windows Update已完成30%请勿关闭计算机...
win7系统关机提示“配置Windows Update已完成30%请勿关闭计算机”问题的解决方法在win7系统关机时如果有升级系统的或者其他需要会直接进入一个 等待界面,在等待界面中我们需要等待操作结束才能关机,虽然这比较麻烦,但是对系统进行配置和升级…...
2022/11/19 21:17:15 - 台式电脑显示配置100%请勿关闭计算机,“准备配置windows 请勿关闭计算机”的解决方法...
有不少用户在重装Win7系统或更新系统后会遇到“准备配置windows,请勿关闭计算机”的提示,要过很久才能进入系统,有的用户甚至几个小时也无法进入,下面就教大家这个问题的解决方法。第一种方法:我们首先在左下角的“开始…...
2022/11/19 21:17:14 - win7 正在配置 请勿关闭计算机,怎么办Win7开机显示正在配置Windows Update请勿关机...
置信有很多用户都跟小编一样遇到过这样的问题,电脑时发现开机屏幕显现“正在配置Windows Update,请勿关机”(如下图所示),而且还需求等大约5分钟才干进入系统。这是怎样回事呢?一切都是正常操作的,为什么开时机呈现“正…...
2022/11/19 21:17:13 - 准备配置windows 请勿关闭计算机 蓝屏,Win7开机总是出现提示“配置Windows请勿关机”...
Win7系统开机启动时总是出现“配置Windows请勿关机”的提示,没过几秒后电脑自动重启,每次开机都这样无法进入系统,此时碰到这种现象的用户就可以使用以下5种方法解决问题。方法一:开机按下F8,在出现的Windows高级启动选…...
2022/11/19 21:17:12 - 准备windows请勿关闭计算机要多久,windows10系统提示正在准备windows请勿关闭计算机怎么办...
有不少windows10系统用户反映说碰到这样一个情况,就是电脑提示正在准备windows请勿关闭计算机,碰到这样的问题该怎么解决呢,现在小编就给大家分享一下windows10系统提示正在准备windows请勿关闭计算机的具体第一种方法:1、2、依次…...
2022/11/19 21:17:11 - 配置 已完成 请勿关闭计算机,win7系统关机提示“配置Windows Update已完成30%请勿关闭计算机”的解决方法...
今天和大家分享一下win7系统重装了Win7旗舰版系统后,每次关机的时候桌面上都会显示一个“配置Windows Update的界面,提示请勿关闭计算机”,每次停留好几分钟才能正常关机,导致什么情况引起的呢?出现配置Windows Update…...
2022/11/19 21:17:10 - 电脑桌面一直是清理请关闭计算机,windows7一直卡在清理 请勿关闭计算机-win7清理请勿关机,win7配置更新35%不动...
只能是等着,别无他法。说是卡着如果你看硬盘灯应该在读写。如果从 Win 10 无法正常回滚,只能是考虑备份数据后重装系统了。解决来方案一:管理员运行cmd:net stop WuAuServcd %windir%ren SoftwareDistribution SDoldnet start WuA…...
2022/11/19 21:17:09 - 计算机配置更新不起,电脑提示“配置Windows Update请勿关闭计算机”怎么办?
原标题:电脑提示“配置Windows Update请勿关闭计算机”怎么办?win7系统中在开机与关闭的时候总是显示“配置windows update请勿关闭计算机”相信有不少朋友都曾遇到过一次两次还能忍但经常遇到就叫人感到心烦了遇到这种问题怎么办呢?一般的方…...
2022/11/19 21:17:08 - 计算机正在配置无法关机,关机提示 windows7 正在配置windows 请勿关闭计算机 ,然后等了一晚上也没有关掉。现在电脑无法正常关机...
关机提示 windows7 正在配置windows 请勿关闭计算机 ,然后等了一晚上也没有关掉。现在电脑无法正常关机以下文字资料是由(历史新知网www.lishixinzhi.com)小编为大家搜集整理后发布的内容,让我们赶快一起来看一下吧!关机提示 windows7 正在配…...
2022/11/19 21:17:05 - 钉钉提示请勿通过开发者调试模式_钉钉请勿通过开发者调试模式是真的吗好不好用...
钉钉请勿通过开发者调试模式是真的吗好不好用 更新时间:2020-04-20 22:24:19 浏览次数:729次 区域: 南阳 > 卧龙 列举网提醒您:为保障您的权益,请不要提前支付任何费用! 虚拟位置外设器!!轨迹模拟&虚拟位置外设神器 专业用于:钉钉,外勤365,红圈通,企业微信和…...
2022/11/19 21:17:05 - 配置失败还原请勿关闭计算机怎么办,win7系统出现“配置windows update失败 还原更改 请勿关闭计算机”,长时间没反应,无法进入系统的解决方案...
前几天班里有位学生电脑(windows 7系统)出问题了,具体表现是开机时一直停留在“配置windows update失败 还原更改 请勿关闭计算机”这个界面,长时间没反应,无法进入系统。这个问题原来帮其他同学也解决过,网上搜了不少资料&#x…...
2022/11/19 21:17:04 - 一个电脑无法关闭计算机你应该怎么办,电脑显示“清理请勿关闭计算机”怎么办?...
本文为你提供了3个有效解决电脑显示“清理请勿关闭计算机”问题的方法,并在最后教给你1种保护系统安全的好方法,一起来看看!电脑出现“清理请勿关闭计算机”在Windows 7(SP1)和Windows Server 2008 R2 SP1中,添加了1个新功能在“磁…...
2022/11/19 21:17:03 - 请勿关闭计算机还原更改要多久,电脑显示:配置windows更新失败,正在还原更改,请勿关闭计算机怎么办...
许多用户在长期不使用电脑的时候,开启电脑发现电脑显示:配置windows更新失败,正在还原更改,请勿关闭计算机。。.这要怎么办呢?下面小编就带着大家一起看看吧!如果能够正常进入系统,建议您暂时移…...
2022/11/19 21:17:02 - 还原更改请勿关闭计算机 要多久,配置windows update失败 还原更改 请勿关闭计算机,电脑开机后一直显示以...
配置windows update失败 还原更改 请勿关闭计算机,电脑开机后一直显示以以下文字资料是由(历史新知网www.lishixinzhi.com)小编为大家搜集整理后发布的内容,让我们赶快一起来看一下吧!配置windows update失败 还原更改 请勿关闭计算机&#x…...
2022/11/19 21:17:01 - 电脑配置中请勿关闭计算机怎么办,准备配置windows请勿关闭计算机一直显示怎么办【图解】...
不知道大家有没有遇到过这样的一个问题,就是我们的win7系统在关机的时候,总是喜欢显示“准备配置windows,请勿关机”这样的一个页面,没有什么大碍,但是如果一直等着的话就要两个小时甚至更久都关不了机,非常…...
2022/11/19 21:17:00 - 正在准备配置请勿关闭计算机,正在准备配置windows请勿关闭计算机时间长了解决教程...
当电脑出现正在准备配置windows请勿关闭计算机时,一般是您正对windows进行升级,但是这个要是长时间没有反应,我们不能再傻等下去了。可能是电脑出了别的问题了,来看看教程的说法。正在准备配置windows请勿关闭计算机时间长了方法一…...
2022/11/19 21:16:59 - 配置失败还原请勿关闭计算机,配置Windows Update失败,还原更改请勿关闭计算机...
我们使用电脑的过程中有时会遇到这种情况,当我们打开电脑之后,发现一直停留在一个界面:“配置Windows Update失败,还原更改请勿关闭计算机”,等了许久还是无法进入系统。如果我们遇到此类问题应该如何解决呢࿰…...
2022/11/19 21:16:58 - 如何在iPhone上关闭“请勿打扰”
Apple’s “Do Not Disturb While Driving” is a potentially lifesaving iPhone feature, but it doesn’t always turn on automatically at the appropriate time. For example, you might be a passenger in a moving car, but your iPhone may think you’re the one dri…...
2022/11/19 21:16:57