Presto Split 详解
文章目录
- Split加载
- TableScanNode中获取TableLayout
- ConnectorSplitManager通用接口
- 使用BackgroundHiveSplitLoader加载Splits
- loadSplits()加载splits
- loadPartition()加载partition
- 对于bucket table的处理逻辑
- 对于非bucket table的处理逻辑
- HiveSplitSource 通用接口向Coordinator交付Split
- ConnectorSplitSource通用接口
- HiveSplitSource的具体实现
- TaskExecutor
- TaskExecutor的启动和主要参数
- TaskExecutor的分时间片调度逻辑
- Split的处理逻辑和三种状态
- Split调度的优先级:
- 优先级的定义
- 优先级的计算
- level的计算:
- levelPriority的计算:
- 根据优先级取出SplitRunner执行
本文的Presto源码解析基于Facebook Presto 0.212
Posted in CSDN
Split加载
作为一种MPP处理引擎, Presto的splits加载和调度是并行进行的,也就是说,Coordinator一边加载Splits, 然后一边对已经加载的Splits进行调度。也就是说,Splits的加载和调度处于不同的线程中。
在用户提交了query,生成了query plan并且开始执行的时候,通过访问者模式来处理生成的执行计划树。如果是Scan Node,就根据这个Scan Node的信息,进行元数据读取操作和调度操作,我们可以看DistributedExecutionPlanner可以看到:
@Override
public Map<PlanNodeId, SplitSource> visitTableScan(TableScanNode node, Void context)
{// get dataSource for tableSplitSource splitSource = splitManager.getSplits(session,node.getLayout().get(),stageExecutionStrategy.isGroupedExecution(node.getId()) ? GROUPED_SCHEDULING : UNGROUPED_SCHEDULING);splitSources.add(splitSource);return ImmutableMap.of(node.getId(), splitSource);
}
具体的调用堆栈如截图所示:
[外链图片转存失败,源站可能有防盗链机制,建议将图片保存下来直接上传(img-lrMOpQyo-1603330096818)(https://raw.githubusercontent.com/VicoWu/leetcode/master/src/main/resources/images/presto/SplitLoaderCallStack.png)]
对于一个分区表,加载它的Splits的第一步,就是获取这张表的partition信息,有了partition信息,就可以逐个读取partiton目录从而获取这个partiton的splits信息。在 Presto中,获取这张表的partiton信息,是在上面堆栈截图的HiveSplitManager.getSplits()中进行的.
TableScanNode中获取TableLayout
在Presto中,把一张表的基本数据信息叫做TableLayout。所有的Connector都必须实现ConnectorTableLayoutHandle接口来定义自己的TableLayout. 这个接口没有任何方法和变量,因此是一个可以按照需要任意定义的接口
package com.facebook.presto.spi;public interface ConnectorTableLayoutHandle
{
}
对于Hive, 这个接口的实现类是HiveTableLayoutHandle。它定了并且使用了包括但是不仅仅包括以下信息。
private final SchemaTableName schemaTableName;
private final List<ColumnHandle> partitionColumns;
private final List<HivePartition> partitions;
private final TupleDomain<? extends ColumnHandle> compactEffectivePredicate;
private final TupleDomain<ColumnHandle> promisedPredicate;
private final Optional<HiveBucketHandle> bucketHandle;
private final Optional<HiveBucketFilter> bucketFilter;
可以看到,这些变量都是这张表的一些基本信息。那么,一张表的TableLayout是在什么时候获取的呢?它是在对用户的 query生成了执行计划树以后生成的。
[外链图片转存失败,源站可能有防盗链机制,建议将图片保存下来直接上传(img-yHJOLQOW-1603330096822)(https://raw.githubusercontent.com/VicoWu/leetcode/master/src/main/resources/images/presto/Presto-Table-Layout-Call-Stack.png)]
这里的bucketHandle和bucketFilter会用于在后面讲到的splits生成。
ConnectorSplitManager通用接口
ConnectorSplitManager是Presto SPI中的一个接口,它提供了一个接口方法getSplits(),用来给具体的Connector来实现接口:
public interface ConnectorSplitManager
{ConnectorSplitSource getSplits(ConnectorTransactionHandle transactionHandle,ConnectorSession session,ConnectorTableLayoutHandle layout,SplitSchedulingStrategy splitSchedulingStrategy);enum SplitSchedulingStrategy{UNGROUPED_SCHEDULING,GROUPED_SCHEDULING,}
}
对于Hive Connector,这个接口的实现类是HiveSplitManager. HiveSplitManager.getSplits()方法的主要功能是:
- 与HMS通信,先获取表的全部partition元数据,是一次性完成的 ;
- 对于每一个partition,读取partiton的splits信息,由于splits涉及到具体的HDFS文件,因此需要与HDFS通信,是通过多线程逐步完成,即边读取splits边进行splits的调度。这一步就是委托HiveSplitLoader进行的,是异步的。
我们来研究HiveSplitLoader的实现。
Iterable<HivePartitionMetadata> hivePartitions = getPartitionMetadata(metastore, table, tableName, partitions, bucketHandle.map(HiveBucketHandle::toBucketProperty));HiveSplitLoader hiveSplitLoader = new BackgroundHiveSplitLoader(table,hivePartitions,layout.getCompactEffectivePredicate(),createBucketSplitInfo(bucketHandle, bucketFilter),session,hdfsEnvironment,namenodeStats,directoryLister,executor,splitLoaderConcurrency,recursiveDfsWalkerEnabled);
从上图代码中可以看到,getPartitionMetadata()获取这张表的所有的partiton信息,其实是一个迭代器Iterable<HivePartitionMetadata>,有了这个partitions的迭代器,就可以交给BackgroundHiveSplitLoader来遍历所有的partiton,然后逐个partition加载所有的splits了。
所以,先忽略具体实现,Coordinator获取partition的步骤是:
使用BackgroundHiveSplitLoader加载Splits
@Override
public void start(HiveSplitSource splitSource)
{this.hiveSplitSource = splitSource;for (int i = 0; i < loaderConcurrency; i++) {ResumableTasks.submit(executor, new HiveSplitLoaderTask());}
}
可以看到,通过loaderConcurrency来确定并发逻辑,多个线程并发获取各个partition的具体splits信息。通过BackgroundHiveSplitLoader可以看到,通过配置hive.split-loader-concurrency 来配置并发度,默认是4, 意味着,默认情况下,对于每一个query,Coordinator会有4个线程负责不断获取这个Query里面所有的splits。每一个split loader 的线程叫做HiveSplitLoaderTask
private class HiveSplitLoaderTaskimplements ResumableTask
{@Overridepublic TaskStatus process(){while (true) {if (stopped) {return TaskStatus.finished();}ListenableFuture<?> future;taskExecutionLock.readLock().lock();try {future = loadSplits();}catch (Exception e) {//略}finally {taskExecutionLock.readLock().unlock();}invokeNoMoreSplitsIfNecessary();if (!future.isDone()) {return TaskStatus.continueOn(future);}}}
}
可以看到,HiveSplitLoaderTask 通过反复调用loadSplits()方法来不断加载splits。
loadSplits()加载splits
private ListenableFuture<?> loadSplits()throws IOException{//获取等待处理的split信息Iterator<InternalHiveSplit> splits = fileIterators.poll();if (splits == null) { //如果当前没有需要处理的splits//尝试获取一个新的partiton进行处理HivePartitionMetadata partition = partitions.poll();if (partition == null) {return COMPLETED_FUTURE;}//加载这个partition,即读取HDFS,将这个partition的文件转化成一个一个的splitreturn loadPartition(partition);}//开始遍历每一个splitswhile (splits.hasNext() && !stopped) {ListenableFuture<?> future = hiveSplitSource.addToQueue(splits.next());// 如果我们发现future 不是done的状态,证明hiveSplitSource出现了队列满等可能的异常,因此需要把这个splits重新放回fileIterators中//然后直接返回if (!future.isDone()) {fileIterators.addFirst(splits);return future;}}// No need to put the iterator back, since it's either empty or we've stoppedreturn COMPLETED_FUTURE;}
[外链图片转存失败,源站可能有防盗链机制,建议将图片保存下来直接上传(img-9DbwYtho-1603330096824)(https://raw.githubusercontent.com/VicoWu/leetcode/master/src/main/resources/images/presto/Presto Split Loader Diagram.jpeg)]
fileIterators是一个dequeue,这个dequeue里面的每一个元素是一个迭代器,从后面的代码可以看到,这个迭代器代表了一个partiton,通过遍历这个迭代器,就可以逐步获取这个partition里面的所有文件。也就是说,fileInterators是目前所有的partition的splits
loadSplits()方法的管理逻辑是:
尝试从fileIterators迭代器中获取一个splits迭代器,这个迭代器肯定是某个partiton对应的所有splits,即这个partiton后面的所有文件
- 如果发现
fileIterators是空的,那么说明当前所有的spilits已经被处理完毕,所以,需要检查是不是有新的partiton需要处理,因此,通过方法partitions.poll();从partiton迭代器中尝试获取一个partiton- 如果
partitions是空的,那么直接返回 - 如果partition不为空,那么就可以通过
loadPartition()来处理这个partition了,这里的处理,就是通过与HDFS通信,获取这个partiton对应的所有的splits,组成一个迭代器,存放到fileIterators中。
- 如果
- 如果
fileIterators不是空的,那么就取出其中的一个迭代器Iterator<InternalHiveSplit>,然后,遍历这个迭代器中的每个元素- 把这个Split加入到hiveSplitSource中
hiveSplitSource.addToQueue(splits.next());返回的Future不是done的状态,那么说明hiveSplitSource里面的队列可能出现了队列满的状态,因此此时立刻停止,然后再把这个迭代器放回到fileIterators中,这样,过一段时间,这个迭代器又会被其它的BackgroundHiveSplitLoader访问到(当然,也有可能还是自己访问到)
loadPartition()加载partition
通过上面讲解loadSplit()方法,Coordinator是先尝试加载splits, 当发现没有splits的时候,会尝试去获取一个新的partiton来加载这个partition的splist,当发现也没有新的partition的时候,说明任务已经全部结束了,当发现了新的partition,就会通过loadPartition()去加载新的partition,即,partition的加载时动态按需调用的,而不是预先就开始调用。
private ListenableFuture<?> loadPartition(HivePartitionMetadata partition)throws IOException
{String partitionName = partition.getHivePartition().getPartitionId();Properties schema = getPartitionSchema(table, partition.getPartition());List<HivePartitionKey> partitionKeys = getPartitionKeys(table, partition.getPartition());TupleDomain<HiveColumnHandle> effectivePredicate = (TupleDomain<HiveColumnHandle>) compactEffectivePredicate;Path path = new Path(getPartitionLocation(table, partition.getPartition()));Configuration configuration = hdfsEnvironment.getConfiguration(hdfsContext, path);InputFormat<?, ?> inputFormat = getInputFormat(configuration, schema, false);FileSystem fs = hdfsEnvironment.getFileSystem(hdfsContext, path);Optional<BucketConversion> bucketConversion = Optional.empty();boolean bucketConversionRequiresWorkerParticipation = false;if (partition.getPartition().isPresent()) {Optional<HiveBucketProperty> partitionBucketProperty = partition.getPartition().get().getStorage().getBucketProperty();if (tableBucketInfo.isPresent() && partitionBucketProperty.isPresent()) {int tableBucketCount = tableBucketInfo.get().getBucketCount();int partitionBucketCount = partitionBucketProperty.get().getBucketCount();// Validation was done in HiveSplitManager#getPartitionMetadata.// Here, it's just trying to see if its needs the BucketConversion.if (tableBucketCount != partitionBucketCount) {bucketConversion = Optional.of(new BucketConversion(tableBucketCount, partitionBucketCount, tableBucketInfo.get().getBucketColumns()));if (tableBucketCount > partitionBucketCount) {bucketConversionRequiresWorkerParticipation = true;}}}}InternalHiveSplitFactory splitFactory = new InternalHiveSplitFactory(fs,partitionName,inputFormat,schema,partitionKeys,effectivePredicate,partition.getColumnCoercions(),bucketConversionRequiresWorkerParticipation ? bucketConversion : Optional.empty(),isForceLocalScheduling(session));// To support custom input formats, we want to call getSplits()// on the input format to obtain file splits.if (shouldUseFileSplitsFromInputFormat(inputFormat)) {if (tableBucketInfo.isPresent()) {throw new PrestoException(NOT_SUPPORTED, "Presto cannot read bucketed partition in an input format with UseFileSplitsFromInputFormat annotation: " + inputFormat.getClass().getSimpleName());}JobConf jobConf = toJobConf(configuration);FileInputFormat.setInputPaths(jobConf, path);InputSplit[] splits = inputFormat.getSplits(jobConf, 0);return addSplitsToSource(splits, splitFactory);}// Bucketed partitions are fully loaded immediately since all files must be loaded to determine the file to bucket mappingif (tableBucketInfo.isPresent()) {return hiveSplitSource.addToQueue(getBucketedSplits(path, fs, splitFactory, tableBucketInfo.get(), bucketConversion));}boolean splittable = getHeaderCount(schema) == 0 && getFooterCount(schema) == 0;fileIterators.addLast(createInternalHiveSplitIterator(path, fs, splitFactory, splittable));return COMPLETED_FUTURE;
}
从上述代码可以看到,loadPartition()对于bucketed table进行了一些额外的处理。
对于bucket table的处理逻辑
对于hive bucket,可以参考以下文档:Wiki: Hive Bucketed Tables
从上述代码可以看到,如果是bucket表,那么就会调用getBucketedSplits()方法来生成对应的splits,如果不是bucket表,就调用createInternalHiveSplitIterator()来生成splits的迭代器。从代码
// Bucketed partitions are fully loaded immediately since all files must be loaded to determine the file to bucket mapping
if (tableBucketInfo.isPresent()) {return hiveSplitSource.addToQueue(getBucketedSplits(path, fs, splitFactory, tableBucketInfo.get(), bucketConversion));
}
可以看出,对于bucket table,所有的splits是一次性全部加到hiveSplitSource中, 而如果不是bucket 表,那么其实生成的是一个迭代器,可以逐步迭代。
我们来看getBucketedSplits()方法的具体实现:
private List<InternalHiveSplit> getBucketedSplits(Path path, FileSystem fileSystem, InternalHiveSplitFactory splitFactory, BucketSplitInfo bucketSplitInfo, Optional<BucketConversion> bucketConversion)
{int tableBucketCount = bucketSplitInfo.getBucketCount();int partitionBucketCount = bucketConversion.isPresent() ? bucketConversion.get().getPartitionBucketCount() : tableBucketCount;// list all files in the partitionArrayList<LocatedFileStatus> files = new ArrayList<>(partitionBucketCount);try {Iterators.addAll(files, new HiveFileIterator(path, fileSystem, directoryLister, namenodeStats, FAIL));}catch (NestedDirectoryNotAllowedException e) {// Fail here to be on the safe side. This seems to be the same as what Hive doesthrow new PrestoException(HIVE_INVALID_BUCKET_FILES,format("Hive table '%s' is corrupt. Found sub-directory in bucket directory for partition: %s",new SchemaTableName(table.getDatabaseName(), table.getTableName()),splitFactory.getPartitionName()));}// verify we found one file per bucketif (files.size() != partitionBucketCount) {throw new PrestoException(HIVE_INVALID_BUCKET_FILES,format("Hive table '%s' is corrupt. The number of files in the directory (%s) does not match the declared bucket count (%s) for partition: %s",new SchemaTableName(table.getDatabaseName(), table.getTableName()),files.size(),partitionBucketCount,splitFactory.getPartitionName()));}// Sort FileStatus objects (instead of, e.g., fileStatus.getPath().toString). This matches org.apache.hadoop.hive.ql.metadata.Table.getSortedPathsfiles.sort(null);// convert files internal splitsList<InternalHiveSplit> splitList = new ArrayList<>();for (int bucketNumber = 0; bucketNumber < Math.max(tableBucketCount, partitionBucketCount); bucketNumber++) {int partitionBucketNumber = bucketNumber % partitionBucketCount; // physicalint tableBucketNumber = bucketNumber % tableBucketCount; // logicalif (bucketSplitInfo.isBucketEnabled(tableBucketNumber)) {LocatedFileStatus file = files.get(partitionBucketNumber);splitFactory.createInternalHiveSplit(file, tableBucketNumber).ifPresent(splitList::add);}}return splitList;
}
对于非bucket table的处理逻辑
private Iterator<InternalHiveSplit> createInternalHiveSplitIterator(Path path, FileSystem fileSystem, InternalHiveSplitFactory splitFactory, boolean splittable)
{return Streams.stream(new HiveFileIterator(path, fileSystem, directoryLister, namenodeStats, recursiveDirWalkerEnabled ? RECURSE : IGNORED)).map(status -> splitFactory.createInternalHiveSplit(status, splittable)).filter(Optional::isPresent).map(Optional::get).iterator();
}
HiveSplitSource 通用接口向Coordinator交付Split
ConnectorSplitSource通用接口
当Presto通过SplitLoader加载了所有的split,就将这些splits交付给对应的ConnectorSplitSource的具体实现了。所有的Presto Connector都需要实现ConnectorSplitSource接口,通过接口的方式,Presto的核心代码不需要关心ConnectorSplitSources的具体实现是什么, 只需要根据接口提供的方法来获取对应的splits然后对splits进行调度就行了。这就是为什么Presto可以支持那么多的connector,因为它设计了一套通用的SPI,各个Connector只需要实现这套SPI就可以了。
public interface ConnectorSplitSourceextends Closeable
{CompletableFuture<ConnectorSplitBatch> getNextBatch(ConnectorPartitionHandle partitionHandle, int maxSize);@Overridevoid close();/*** Returns whether any more {@link ConnectorSplit} may be produced.** This method should only be called when there has been no invocation of getNextBatch,* or result Future of previous getNextBatch is done.* Calling this method at other time is not useful because the contract of such an invocation* will be inherently racy.*/boolean isFinished();
}
从上面的代码可以看到, ConnectorSplitSource提供了三个接口,即
-
获取下一个batch的splits 方法getNextBatch()
-
关闭这个source的方法close()
-
判断splits是否已经全部获取完毕的isFinished()方法
这三个接口非常直观,就是Presto用来从底层的具体实现来获取数据,并且,通过
getNextBatch()方法可以看到,是一次获取一批数据,而非逐条获取数据。
对于Hive Connection,ConnectorSplitSources对实现类是HiveSplitSource。
我们可以参考presto的官方文档获取关于Presto Connector的一些基本实现。
HiveSplitSource的具体实现
TaskExecutor
TaskExecutor的启动和主要参数
TaskExecutor在每一个Presto的worker node 启动的时候被构造,用来管理这个worker node上的所有的task的执行:
所有的worker节点的入口是ServerMainModule, 所有的Presto的workernode的main函数入口是CoordinatorMain, 通过注入的方式,每一个ServerMainModule启动的时候会启动一个单例的TaskExecutor:
binder.bind(TaskExecutor.class).in(Scopes.SINGLETON);
然后我们来看TaskExecutor的构造方法:
@Inject
public TaskExecutor(TaskManagerConfig config, MultilevelSplitQueue splitQueue)
{this(requireNonNull(config, "config is null").getMaxWorkerThreads(),config.getMinDrivers(),config.getMinDriversPerTask(),config.getMaxDriversPerTask(),splitQueue,Ticker.systemTicker());
}@VisibleForTesting
public TaskExecutor(int runnerThreads, int minDrivers, int minimumNumberOfDriversPerTask, int maximumNumberOfDriversPerTask, Ticker ticker)
{this(runnerThreads, minDrivers, minimumNumberOfDriversPerTask, maximumNumberOfDriversPerTask, new MultilevelSplitQueue(2), ticker);
}@VisibleForTesting
public TaskExecutor(int runnerThreads, int minDrivers, int minimumNumberOfDriversPerTask, int maximumNumberOfDriversPerTask, MultilevelSplitQueue splitQueue, Ticker ticker)
{checkArgument(runnerThreads > 0, "runnerThreads must be at least 1");checkArgument(minimumNumberOfDriversPerTask > 0, "minimumNumberOfDriversPerTask must be at least 1");checkArgument(maximumNumberOfDriversPerTask > 0, "maximumNumberOfDriversPerTask must be at least 1");checkArgument(minimumNumberOfDriversPerTask <= maximumNumberOfDriversPerTask, "minimumNumberOfDriversPerTask cannot be greater than maximumNumberOfDriversPerTask");// we manage thread pool size directly, so create an unlimited poolthis.executor = newCachedThreadPool(threadsNamed("task-processor-%s"));this.executorMBean = new ThreadPoolExecutorMBean((ThreadPoolExecutor) executor);this.runnerThreads = runnerThreads;this.ticker = requireNonNull(ticker, "ticker is null");this.minimumNumberOfDrivers = minDrivers;this.minimumNumberOfDriversPerTask = minimumNumberOfDriversPerTask;this.maximumNumberOfDriversPerTask = maximumNumberOfDriversPerTask;this.waitingSplits = requireNonNull(splitQueue, "splitQueue is null");this.tasks = new LinkedList<>();
}
可以看到,这个TaskExecutor会创建一个cached thread pool,一个线程池来管理这个worker上的所有的执行线程,然后逐个启动线程:
@PostConstruct
public synchronized void start()
{checkState(!closed, "TaskExecutor is closed");for (int i = 0; i < runnerThreads; i++) {addRunnerThread();}
}
private synchronized void addRunnerThread()
{try {executor.execute(new TaskRunner());}catch (RejectedExecutionException ignored) {}
}
TaskExecutor的分时间片调度逻辑
public ListenableFuture<?> processFor(Duration duration)
{checkLockNotHeld("Cannot process for a duration while holding the driver lock");requireNonNull(duration, "duration is null");// if the driver is blocked we don't need to continueSettableFuture<?> blockedFuture = driverBlockedFuture.get();if (!blockedFuture.isDone()) {return blockedFuture;}long maxRuntime = duration.roundTo(TimeUnit.NANOSECONDS);Optional<ListenableFuture<?>> result = tryWithLock(100, TimeUnit.MILLISECONDS, () -> {OperationTimer operationTimer = createTimer();driverContext.startProcessTimer();driverContext.getYieldSignal().setWithDelay(maxRuntime, driverContext.getYieldExecutor());try {long start = System.nanoTime();do {ListenableFuture<?> future = processInternal(operationTimer);// if future is not done, we will return directly, otherwise, we will loop until block the loopif (!future.isDone()) {return updateDriverBlockedFuture(future);}}while (System.nanoTime() - start < maxRuntime && !isFinishedInternal());}finally {driverContext.getYieldSignal().reset();driverContext.recordProcessed(operationTimer);}return NOT_BLOCKED;});return result.orElse(NOT_BLOCKED);
}
What does method updateDriverBlockedFuture() do?
private ListenableFuture<?> updateDriverBlockedFuture(ListenableFuture<?> sourceBlockedFuture)
{// driverBlockedFuture will be completed as soon as the sourceBlockedFuture is completed// or any of the operators gets a memory revocation requestSettableFuture<?> newDriverBlockedFuture = SettableFuture.create();driverBlockedFuture.set(newDriverBlockedFuture);sourceBlockedFuture.addListener(() -> newDriverBlockedFuture.set(null), directExecutor());// it's possible that memory revoking is requested for some operator// before we update driverBlockedFuture above and we don't want to miss that// notification, so we check to see whether that's the case before returning.boolean memoryRevokingRequested = activeOperators.stream().filter(operator -> !revokingOperators.containsKey(operator)) //remove the revoking operators.map(Operator::getOperatorContext).anyMatch(OperatorContext::isMemoryRevokingRequested); // the memory revoking is requestedif (memoryRevokingRequested) {newDriverBlockedFuture.set(null); //un block the future}return newDriverBlockedFuture;
}
Let’s check the code of DriverYieldSignal:
public synchronized void setWithDelay(long maxRunNanos, ScheduledExecutorService executor)
{checkState(yieldFuture == null, "there is an ongoing yield");checkState(!isSet(), "yield while driver was not running");this.runningSequence++;long expectedRunningSequence = this.runningSequence;yieldFuture = executor.schedule(() -> {synchronized (this) {if (expectedRunningSequence == runningSequence && yieldFuture != null) {yield.set(true);}}}, maxRunNanos, NANOSECONDS);
}public synchronized void reset()
{checkState(yieldFuture != null, "there is no ongoing yield");yield.set(false);yieldFuture.cancel(true);yieldFuture = null;
}
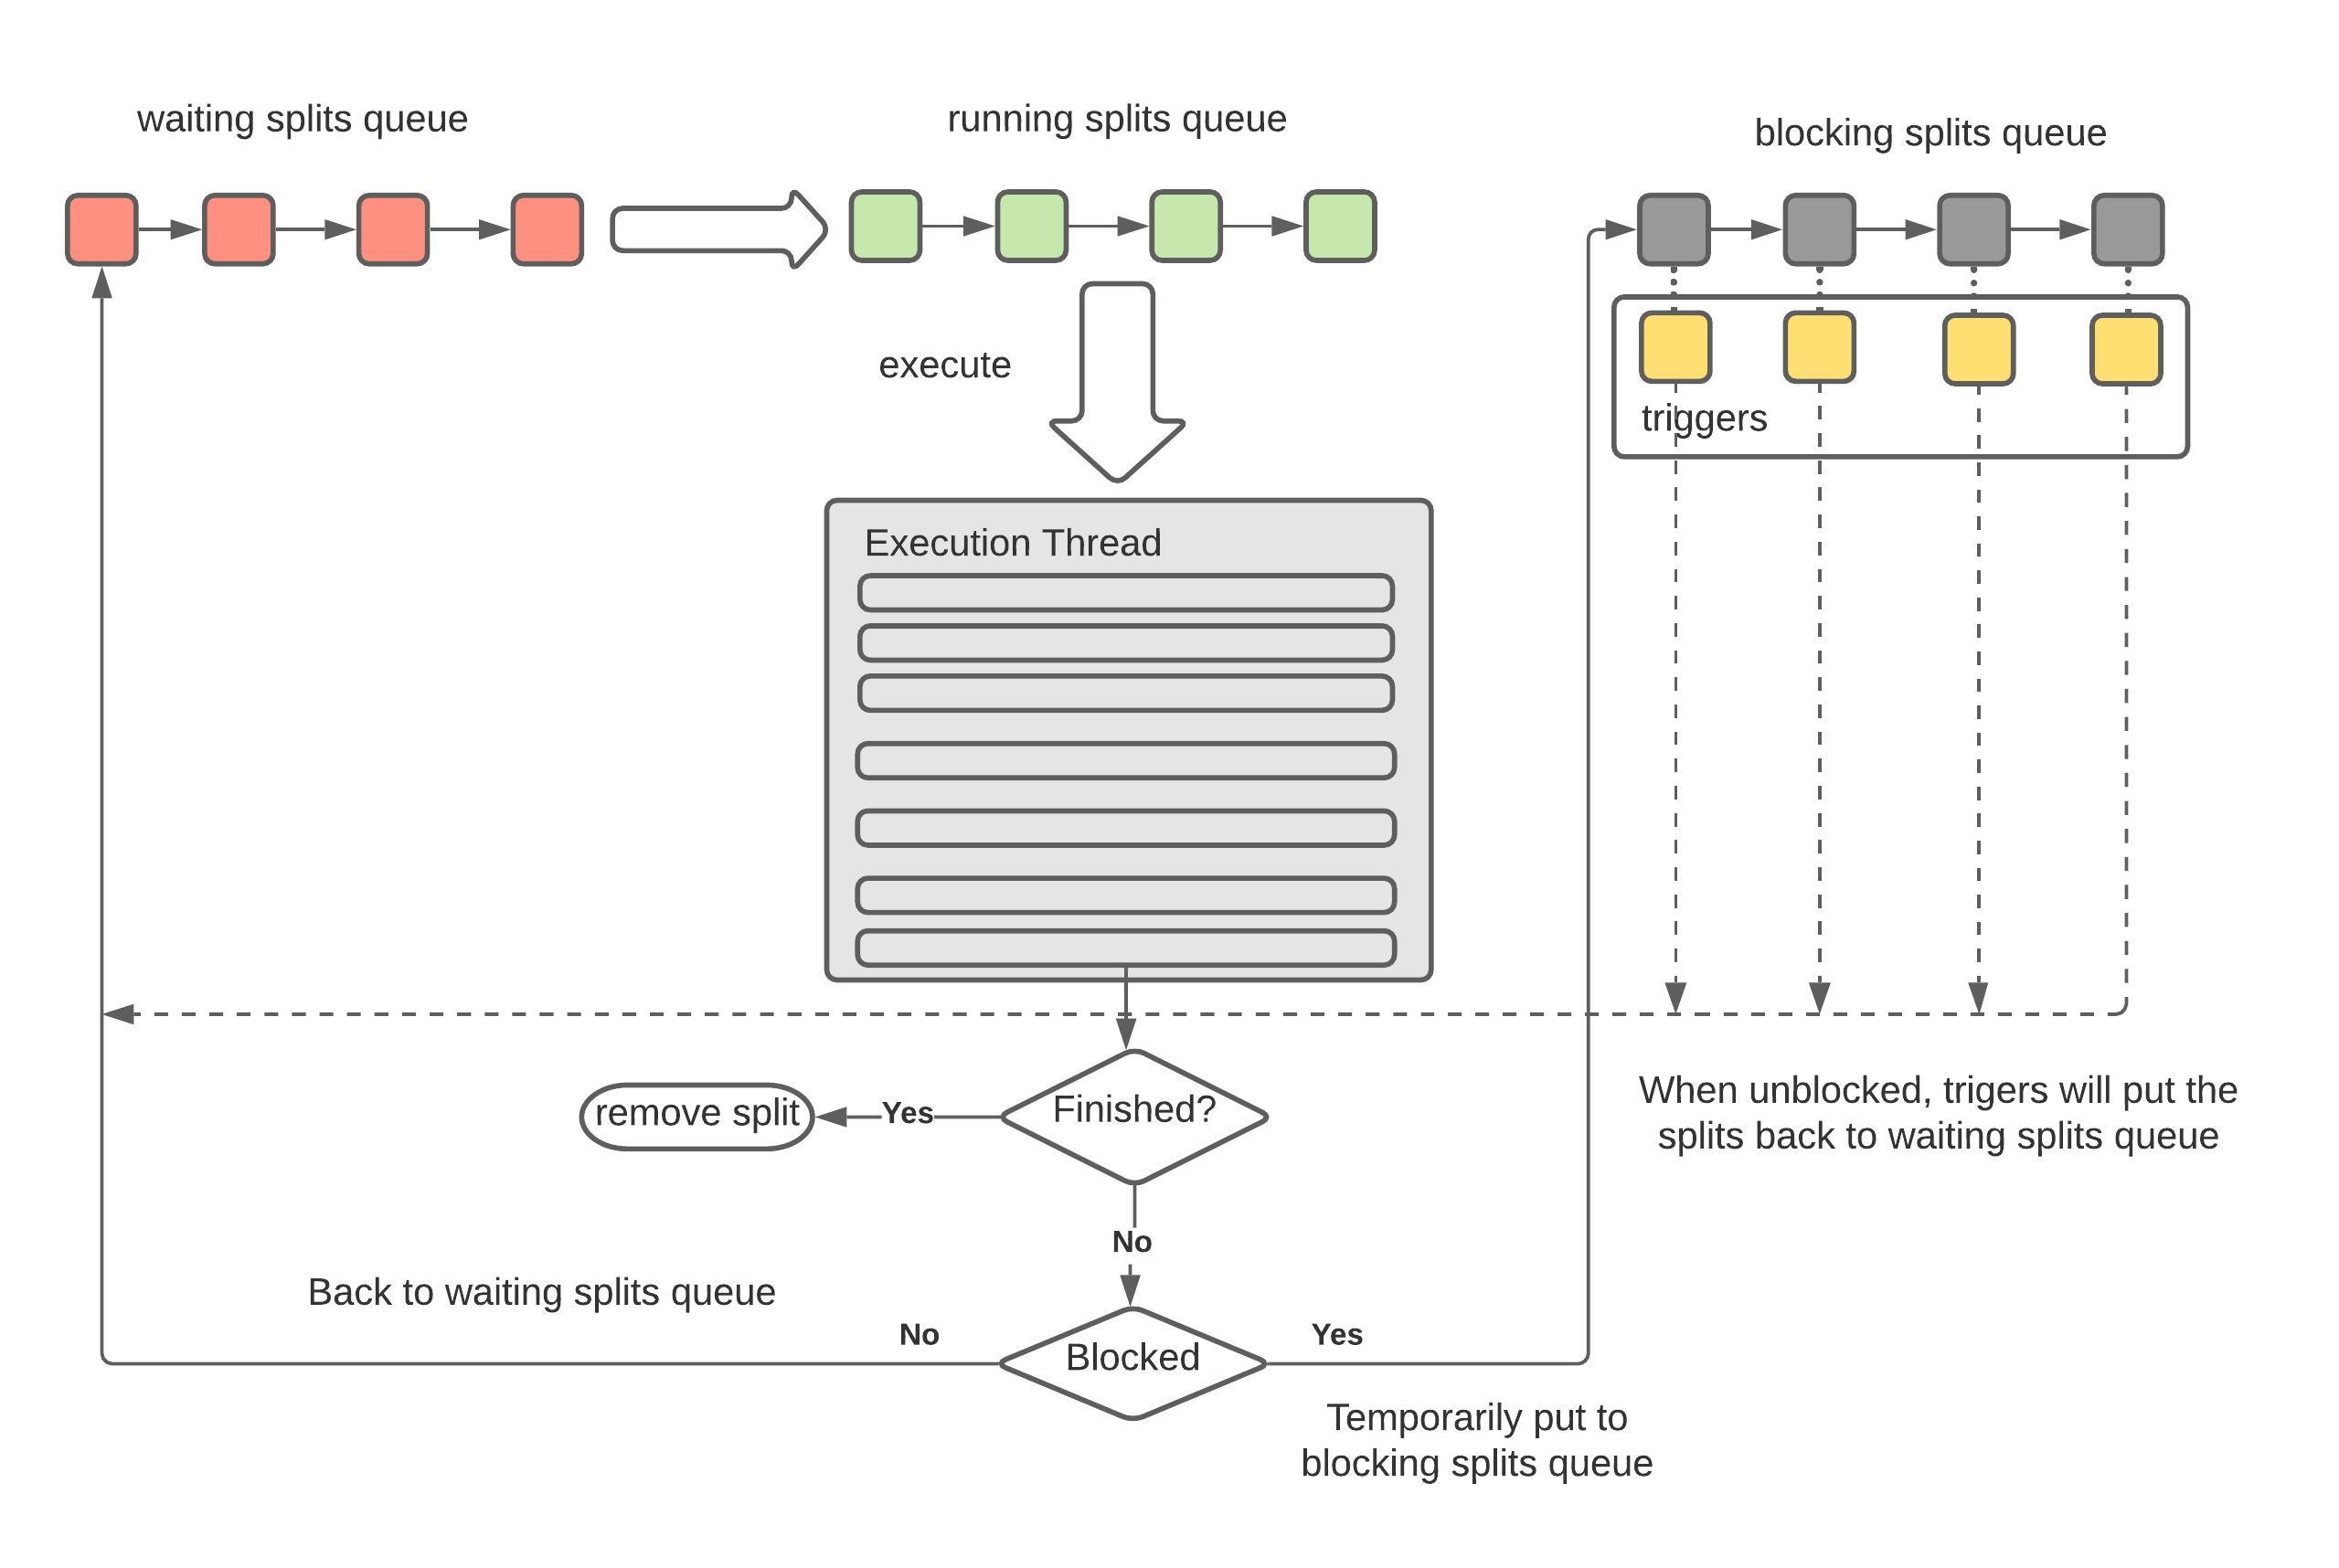
Split的处理逻辑和三种状态
在TaskExecutor勒中,定义了三种不同状态的split的集合:
/*** Splits waiting for a runner thread.*/
private final MultilevelSplitQueue waitingSplits;/*** Splits running on a thread.*/
private final Set<PrioritizedSplitRunner> runningSplits = newConcurrentHashSet();/*** Splits blocked by the driver.*/
private final Map<PrioritizedSplitRunner, Future<?>> blockedSplits = new ConcurrentHashMap<>();
从名字可以看到, TaskExecutor负责Split的轮流执行,由于Split的数量不可预知且大部分情况下都非常大,因此我们不可能为每一个Split启动对应的线程,唯一的方法就是采用操作系统的设计,创建有限的固定数量的线程,然后不同的SplitRunner按照时间片使用这些线程;
TaskHandle负责管理这个worker上所有的SplitRunner的生命周期,我们可以简单理解为,TaskHandle负责将需要执行的SplitRunner提交给TaskExecutor,TaskExecutor使用时间片共享的方式来执行这些SplitRunner直到结束:
下图是TaskHandle将Split交付给TaskExecutor的整个状态转换过程:
[TODO]https://www.lucidchart.com/documents/edit/ac59e316-4360-488f-ae3d-5eb709616dd9/0_0
private class TaskRunnerimplements Runnable
{private final long runnerId = NEXT_RUNNER_ID.getAndIncrement();@Overridepublic void run(){try (SetThreadName runnerName = new SetThreadName("SplitRunner-%s", runnerId)) {while (!closed && !Thread.currentThread().isInterrupted()) {// select next workerfinal PrioritizedSplitRunner split;split = waitingSplits.take();String threadId = split.getTaskHandle().getTaskId() + "-" + split.getSplitId();try (SetThreadName splitName = new SetThreadName(threadId)) {RunningSplitInfo splitInfo = new RunningSplitInfo(ticker.read(), threadId, Thread.currentThread());runningSplitInfos.add(splitInfo);runningSplits.add(split);ListenableFuture<?> blocked;try {//process()方法并不是真正开始执行split,而是返回一个future,即异步执行的一个句柄blocked = split.process(); }finally {runningSplitInfos.remove(splitInfo);runningSplits.remove(split);}if (split.isFinished()) {log.debug("%s is finished", split.getInfo());splitFinished(split);}else {if (blocked.isDone()) {waitingSplits.offer(split);}else {blockedSplits.put(split, blocked);blocked.addListener(() -> {blockedSplits.remove(split);// reset the level priority to prevent previously-blocked splits from starving existing splitssplit.resetLevelPriority();waitingSplits.offer(split);}, executor);}}}catch (Throwable t) {...splitFinished(split);}}}...}
}
我们从这段代码里面可以清晰看到split的不同状态的转换关系:
- finished splits: 意思是已经完全执行完毕的splits,即这个split对应的driver的状态已经是finished的
- waiting splits: 等待分配时间片的split
- blocked splist: splits没有执行完,但是时间片已经到了
所以,从以上代码可以看出:
- 如果
split.isFinished() == true,那就进行split的结束清理逻辑; - 否则,就有两种选择:
- 如果
blocked.isDone(),就是说这个时间片对应的future已经done(但是split并不一定处理完),那么这个split就放入到waitingSplits中等待下一个时间片到达然后继续执行 - 否则,说明future还没有结束(比如,这个future里面有一些operator正在做长时间的spilling 或者 unspilling 操作),这时候什么也做不了,因为我们不可能强行中断某些operator的执行,只能添加一个future,在它执行结束以后放到waitingSplits中;
- 如果
Split调度的优先级:
我们先来看优先级的定义,即明白优先级有哪些衡量指标,然后我们再探讨每一个SplitRunner的优先级是怎么计算得到的、是根据什么策略去更新以及更新以后怎么根据优先级来确定SplitRunner的调度顺序的。
优先级的定义
@Immutable
public final class Priority
{private final int level;private final long levelPriority;....
}
可以看到,优先级是由1. level 2. level内部的优先级来决定的。level决定了这个split被放到哪个queue里面执行,而levelPriority则是在相同的level里面,这些split的执行顺序。所以,这种优先级其实是两层优先级的策略。
优先级的计算
整个优先级的更新是在方法updatePriority()中进行
public Priority updatePriority(Priority oldPriority, long quantaNanos, long scheduledNanos){int oldLevel = oldPriority.getLevel();int newLevel = computeLevel(scheduledNanos);long levelContribution = Math.min(quantaNanos, LEVEL_CONTRIBUTION_CAP);if (oldLevel == newLevel) {addLevelTime(oldLevel, levelContribution);return new Priority(oldLevel, oldPriority.getLevelPriority() + quantaNanos);}long remainingLevelContribution = levelContribution;long remainingTaskTime = quantaNanos;// a task normally slowly accrues scheduled time in a level and then moves to the next, but// if the split had a particularly long quanta, accrue time to each level as if it had run// in that level up to the level limit.for (int currentLevel = oldLevel; currentLevel < newLevel; currentLevel++) {long timeAccruedToLevel = Math.min(SECONDS.toNanos(LEVEL_THRESHOLD_SECONDS[currentLevel + 1] - LEVEL_THRESHOLD_SECONDS[currentLevel]), remainingLevelContribution);addLevelTime(currentLevel, timeAccruedToLevel);remainingLevelContribution -= timeAccruedToLevel;remainingTaskTime -= timeAccruedToLevel;}addLevelTime(newLevel, remainingLevelContribution);long newLevelMinPriority = getLevelMinPriority(newLevel, scheduledNanos);return new Priority(newLevel, newLevelMinPriority + remainingTaskTime);}
对SplitRunner的优先级的管理,是在MultilevelSplitQueue中:
@ThreadSafe
public class MultilevelSplitQueue
{static final int[] LEVEL_THRESHOLD_SECONDS = {0, 1, 10, 60, 300};static final long LEVEL_CONTRIBUTION_CAP = SECONDS.toNanos(30);@GuardedBy("lock")private final List<PriorityQueue<PrioritizedSplitRunner>> levelWaitingSplits;private final AtomicLong[] levelScheduledTime = new AtomicLong[LEVEL_THRESHOLD_SECONDS.length];
levelWaitingSplits 用来存放不同的level的PrioritizedSplitRunner, 而levelScheduledTime存放了不同level的所有SplitRunner的调度时间;
level的计算:
level的衡量标准是这个SplitRunner的运行已经消耗掉这个Task的时间积累量,我们看computeLevel()方法:
static final int[] LEVEL_THRESHOLD_SECONDS = {0, 1, 10, 60, 300};
public static int computeLevel(long threadUsageNanos)
{long seconds = NANOSECONDS.toSeconds(threadUsageNanos);for (int i = 0; i < (LEVEL_THRESHOLD_SECONDS.length - 1); i++) {if (seconds < LEVEL_THRESHOLD_SECONDS[i + 1]) {return i;}}return LEVEL_THRESHOLD_SECONDS.length - 1;
}
可以看到,按照执行时间,分成了5个档次,0s-1s, 1s-10s, 10s-60s, 60s - 300s, 随着执行时间增加,通过已经消耗掉执行时间来获取level的数值,从0 到 4 一共五个level
levelPriority的计算:
根据优先级取出SplitRunner执行
由于在TaskRunner()中调用MultilevelSplitQueue.take()方法取出PrioritiesSplitRunner()执行,因此,这个take()方法就是根据Priority来决定SplitRunner的取出顺序,我们来看take()方法:
public PrioritizedSplitRunner take()throws InterruptedException{while (true) {lock.lockInterruptibly();try {PrioritizedSplitRunner result;while ((result = pollSplit()) == null) {notEmpty.await();}...}finally {lock.unlock();}}}
因此关键方法是pollSplit():
/*** Presto attempts to give each level a target amount of scheduled time, which is configurable* using levelTimeMultiplier.* <p>* This function selects the level that has the the lowest ratio of actual to the target time* with the objective of minimizing deviation from the target scheduled time. From this level,* we pick the split with the lowest priority.*/
@GuardedBy("lock")
private PrioritizedSplitRunner pollSplit()
{long targetScheduledTime = getLevel0TargetTime();double worstRatio = 1;int selectedLevel = -1;for (int level = 0; level < LEVEL_THRESHOLD_SECONDS.length; level++) {if (!levelWaitingSplits.get(level).isEmpty()) {long levelTime = levelScheduledTime[level].get();double ratio = levelTime == 0 ? 0 : targetScheduledTime / (1.0 * levelTime);if (selectedLevel == -1 || ratio > worstRatio) {worstRatio = ratio;selectedLevel = level;}}targetScheduledTime /= levelTimeMultiplier;}if (selectedLevel == -1) {return null;}PrioritizedSplitRunner result = levelWaitingSplits.get(selectedLevel).poll();checkState(result != null, "pollSplit cannot return null");return result;
}
pollSplit的调度逻辑是:
首先,每一个level,都有一个目标的总调度时间,然后这样的level,即这个level对应的已经使用的调度时间占总调度时间的比例最小。
waitSplit中存放的是一个实现了Comparable接口的PrioritizedSplitRunner, 从名字可以看到,这个PrioritizedSplitRunner由于实现了Comparable接口,因此TaskRunner.run()中从waitingSplit中取出SplitRunner执行的时候,就已经是按照优先级排列顺序取出的,那么,这个优先级是怎么定义的呢?我们看一下PrioritizedSplitRunner实现的compareTo方法:
@Override
public int compareTo(PrioritizedSplitRunner o)
{int result = Long.compare(priority.get().getLevelPriority(), o.getPriority().getLevelPriority());if (result != 0) {return result;}return Long.compare(workerId, o.workerId);
}
我们看一下PrioritizedSplitRunner的process()方法,可以看到,在每次一个SplitRunner(实际上的实现是DriverSplitRunner)调用完processFor(SPLIT_RUN_QUANTA)以后,这个SplitRunner的优先级都会被更新:
public ListenableFuture<?> process()
{try {long startNanos = ticker.read();....waitNanos.getAndAdd(startNanos - lastReady.get());CpuTimer timer = new CpuTimer();ListenableFuture<?> blocked = split.processFor(SPLIT_RUN_QUANTA);CpuTimer.CpuDuration elapsed = timer.elapsedTime();long quantaScheduledNanos = ticker.read() - startNanos;scheduledNanos.addAndGet(quantaScheduledNanos);//重新设置这个PrioritySplitRunner的优先级priority.set(taskHandle.addScheduledNanos(quantaScheduledNanos));.....return blocked;}catch (Throwable e) {finishedFuture.setException(e);throw e;}
}
从代码可以看到,优先级的设置是使用taskHandle.addScheduledNanos()来获取新的优先级;
TaskRunner的执行策略是不断从waitingSplit中取出SplitRunner来执行,但是只会执行一段时间(默认1s),然后当1s中的时间片结束,开始进行如下判断:
-
如果发现SplitRunner的状态已经结束,代表这个SplitRunner下面的所有的Split的执行都已经结束,开始运行splitFinished逻辑,结束逻辑主要包括:
-
运行时间统计: 对这个
SplitRunner的运行时间进行相关统计,比如等待时间,调度时间,cpu耗时等等 -
引用数据清理:由于
TaskHandle负责管理当前Task的所有的SplitRunner的生命周期,因此TaskHandle此时会负责清理掉这个SplitRunner的相关信息 -
调度新的Task:
TaskHandle会负责从自己的queuedSplit中取出新的SplitRunner(如果有的话), 对这个split执行startSplit操作;startSplit操作的主要内容,就是把这个SplitRunner放入到TaskExecutor.waitingSplit队列,等待自己的运行时间片:private synchronized void scheduleTaskIfNecessary(TaskHandle taskHandle){// if task has less than the minimum guaranteed splits running,// immediately schedule a new split for this task. This assures// that a task gets its fair amount of consideration (you have to// have splits to be considered for running on a thread).if (taskHandle.getRunningLeafSplits() < minimumNumberOfDriversPerTask) {PrioritizedSplitRunner split = taskHandle.pollNextSplit();if (split != null) {startSplit(split);splitQueuedTime.add(Duration.nanosSince(split.getCreatedNanos()));}}}private synchronized void startSplit(PrioritizedSplitRunner split){allSplits.add(split);waitingSplits.offer(split);}
-
这里的SplitRunner的实现是DriverSplitRunner, 这是DriverSplitRunner.processFor()方法,即创建所需的Driver实现, 然后,调用Driver.run()方法,在指定的时间片内处理这个DriverSplitRunner中的splits(有可能处理完,有可能处理不完),所以DriverSplitRunner.processFor()返回的并不是处理结果,而是一个类似获取结果的一个Future,名字叫做ListenableFuture
@Override
public ListenableFuture<?> processFor(Duration duration)
{Driver driver;synchronized (this) {// if close() was called before we get here, there's not point in even creating the driverif (closed) {return Futures.immediateFuture(null);}if (this.driver == null) {this.driver = driverSplitRunnerFactory.createDriver(driverContext, partitionedSplit);}driver = this.driver;}return driver.processFor(duration);
}
从类的名字可以看到,DriverSplitRunner用来管理Driver, 驱动Driver下面所有的
然后,针对这个split,创建对应的Driver, 并调用Driver的processFor():
public ListenableFuture<?> processFor(Duration duration)
{checkLockNotHeld("Can not process for a duration while holding the driver lock");requireNonNull(duration, "duration is null");// if the driver is blocked we don't need to continueSettableFuture<?> blockedFuture = driverBlockedFuture.get();if (!blockedFuture.isDone()) {return blockedFuture;}long maxRuntime = duration.roundTo(TimeUnit.NANOSECONDS);Optional<ListenableFuture<?>> result = tryWithLock(100, TimeUnit.MILLISECONDS, () -> {OperationTimer operationTimer = createTimer();driverContext.startProcessTimer();driverContext.getYieldSignal().setWithDelay(maxRuntime, driverContext.getYieldExecutor());try {long start = System.nanoTime();do {ListenableFuture<?> future = processInternal(operationTimer);if (!future.isDone()) {return updateDriverBlockedFuture(future);}}while (System.nanoTime() - start < maxRuntime && !isFinishedInternal());}finally {driverContext.getYieldSignal().reset();driverContext.recordProcessed(operationTimer);}return NOT_BLOCKED;});return result.orElse(NOT_BLOCKED);
}
从这段代码里面我们其实可以看到Presto是如何实现时间片控制的, 关键代码在这里:
driverContext.getYieldSignal().setWithDelay(maxRuntime, driverContext.getYieldExecutor());
public synchronized void setWithDelay(long maxRunNanos, ScheduledExecutorService executor)
{checkState(yieldFuture == null, "there is an ongoing yield");checkState(!isSet(), "yield while driver was not running");this.runningSequence++;long expectedRunningSequence = this.runningSequence;yieldFuture = executor.schedule(() -> {synchronized (this) {if (expectedRunningSequence == runningSequence && yieldFuture != null) {yield.set(true); //按照时间片设置delay,当时间片到期,设置yield标记位}}}, maxRunNanos, NANOSECONDS);
}
基本思想是,假如说,当前这个Driver获取了1s的时间片,那么, 我就设置一个delay为一秒的Future,即这个Future会在1s以后被调度,被调度的时候,把一个yield变量设置为true,然后,就是各个不同的Operator去自行check这个标记位,我们以ScanFilterAndProjectOperator为例:
private Page processPageSource()
{DriverYieldSignal yieldSignal = operatorContext.getDriverContext().getYieldSignal();if (!finishing && mergingOutput.needsInput() && !yieldSignal.isSet()) {Page page = pageSource.getNextPage();
可以看到,每一次取出一个page的时候,都会检查yieldSignal,如果被set了,那么就不会往下去取了,因为时间片已经用完了;
我们从Driver的变量可以看到,Driver其实是data source 和一系列Operator的组合, data source 的意思代表了一系列即将被顺序读取的split, operator代表了对这些split数据的处理过程,常见的Operator的实现有比如用来直接读取底层table的TableScanOperator, 用来进行跨stage的exchange操作的ExchangeOperator, 用来扫描表中的数据然后对数据进行过滤和字段投射的ScanFilterAndProjectOperator等等。我们可以通过全局搜索implements SourceOperator获取到接口SourceOperator的所有实现;
private static final Logger log = Logger.get(Driver.class);private final DriverContext driverContext;private final List<Operator> activeOperators;// this is present only for debugging@SuppressWarnings("unused")private final List<Operator> allOperators;private final Optional<SourceOperator> sourceOperator;private final Optional<DeleteOperator> deleteOperator;// This variable acts as a staging area. When new splits (encapsulated in TaskSource) are// provided to a Driver, the Driver will not process them right away. Instead, the splits are// added to this staging area. This staging area will be drained asynchronously. That's when// the new splits get processed.private final AtomicReference<TaskSource> pendingTaskSourceUpdates = new AtomicReference<>();private final Map<Operator, ListenableFuture<?>> revokingOperators = new HashMap<>();private final AtomicReference<State> state = new AtomicReference<>(State.ALIVE);private final DriverLock exclusiveLock = new DriverLock();@GuardedBy("exclusiveLock")private TaskSource currentTaskSource;
我们看一下TaskSource类的定义,可以知道一个TaskSource是一系列需要进行处理的Split集合:
public class TaskSource
{private final PlanNodeId planNodeId;private final Set<ScheduledSplit> splits;private final Set<Lifespan> noMoreSplitsForLifespan;private final boolean noMoreSplits;
Driver的核心方法是process() -> processInternal():
在processInternal()方法开始,会调用processNewSources()方法,用来获取将要进行处理的新的split集合,放到Driver的source里面:
@GuardedBy("exclusiveLock")
private ListenableFuture<?> processInternal(OperationTimer operationTimer)
{checkLockHeld("Lock must be held to call processInternal");handleMemoryRevoke();try {processNewSources();// If there is only one operator, finish it// Some operators (LookupJoinOperator and HashBuildOperator) are broken and requires finish to be called continuously// TODO remove the second par SPILLING_INPUTt of the if statement, when these operators are fixed// Note: finish should not be called on the natural source of the pipeline as this could cause the task to finish earlyif (!activeOperators.isEmpty() && activeOperators.size() != allOperators.size()) {Operator rootOperator = activeOperators.get(0);rootOperator.finish();rootOperator.getOperatorContext().recordFinish(operationTimer);}boolean movedPage = false;for (int i = 0; i < activeOperators.size() - 1 && !driverContext.isDone(); i++) {Operator current = activeOperators.get(i);Operator next = activeOperators.get(i + 1);// skip blocked operator and start to check the next operatorif (getBlockedFuture(current).isPresent()) {continue;}// if the current operator is not finished and next operator isn't blocked and needs input...if (!current.isFinished() && !getBlockedFuture(next).isPresent() && next.needsInput()) {// get an output page from current operatorPage page = current.getOutput();current.getOperatorContext().recordGetOutput(operationTimer, page);// if we got an output page, add it to the next operatorif (page != null && page.getPositionCount() != 0) {next.addInput(page);next.getOperatorContext().recordAddInput(operationTimer, page);movedPage = true;}if (current instanceof SourceOperator) {movedPage = true;}}// if current operator is finished...if (current.isFinished()) {// let next operator know there will be no more datanext.finish();next.getOperatorContext().recordFinish(operationTimer);}}for (int index = activeOperators.size() - 1; index >= 0; index--) {if (activeOperators.get(index).isFinished()) {// close and remove this operator and all source operatorsList<Operator> finishedOperators = this.activeOperators.subList(0, index + 1);Throwable throwable = closeAndDestroyOperators(finishedOperators);finishedOperators.clear();if (throwable != null) {throwIfUnchecked(throwable);throw new RuntimeException(throwable);}// Finish the next operator, which is now the first operator.if (!activeOperators.isEmpty()) {Operator newRootOperator = activeOperators.get(0);newRootOperator.finish();newRootOperator.getOperatorContext().recordFinish(operationTimer);}break;}}// if we did not move any pages, check if we are blockedif (!movedPage) {List<Operator> blockedOperators = new ArrayList<>();List<ListenableFuture<?>> blockedFutures = new ArrayList<>();for (Operator operator : activeOperators) {Optional<ListenableFuture<?>> blocked = getBlockedFuture(operator);if (blocked.isPresent()) {blockedOperators.add(operator);blockedFutures.add(blocked.get());}}if (!blockedFutures.isEmpty()) {// unblock when the first future is completeListenableFuture<?> blocked = firstFinishedFuture(blockedFutures);// driver records serial blocked timedriverContext.recordBlocked(blocked);// each blocked operator is responsible for blocking the execution// until one of the operators can continuefor (Operator operator : blockedOperators) {operator.getOperatorContext().recordBlocked(blocked);}return blocked;}}return NOT_BLOCKED;}catch (Throwable t) {......}
}
How to decide whether or not an operator is blocked or not?
private Optional<ListenableFuture<?>> getBlockedFuture(Operator operator)
{ListenableFuture<?> blocked = revokingOperators.get(operator);if (blocked != null) {// We mark operator as blocked regardless of blocked.isDone(), because finishMemoryRevoke has not been called yet.return Optional.of(blocked);}blocked = operator.isBlocked();if (!blocked.isDone()) {return Optional.of(blocked);}blocked = operator.getOperatorContext().isWaitingForMemory();if (!blocked.isDone()) {return Optional.of(blocked);}blocked = operator.getOperatorContext().isWaitingForRevocableMemory();if (!blocked.isDone()) {return Optional.of(blocked);}return Optional.empty();
}
- As long as the operator instance is in the list of
revokingOperators, we think it is in the blocked status. Please notice that although this operator is in therevokingOperators, but maybe the memory revoking has been finished already, but the corresponding driver has not yet check whether or not it has been finished, so it still exists inrevokingOperators - As long as the
Operator.isBlocked(), we think it is in the blocked status. This depends on the dedicated implements of methodisBlocked() - As long as the operator is waiting for memory, or waiting for revocable memory, we think the operator instance is in blocked status
当TaskRunner的线程选出对应的SplitRunner的process
每一个Driver实际上属于一个Pipeline, 然后Pipeline属于task, task属于stage
如若内容造成侵权/违法违规/事实不符,请联系编程学习网邮箱:809451989@qq.com进行投诉反馈,一经查实,立即删除!
相关文章
- 解读陌陌注册就显示账号异常什么情况
比如注册或是登录检测识别包括你手机是否ROOT,yue狱,参数识别包括 imei1、imei2、mac、meid、sn、WiFimac、码等等!安卓的操作系统,苹果的版本,1P地址,昵称,年龄,手机参数。以上讲解…...
2024/4/28 21:34:25 - 软件测试与质量概述
什么是软件测试? 从五个方面来阐述软件测试: 根本目的:确保被测系统符合用户需求基本手段:设计测试用例执行方式:手工/自动化测试策略:动态运行/静态审阅通用流程:设计、计划、实施、评估 …...
2024/4/28 20:19:12 - 2020-10-22图像处理常用边缘检测算子总结
不同图像灰度不同,边界处一般会有明显的边缘,利用此特征可以分割图像。需要说明的是:边缘和物体间的边界并不等同,边缘指的是图像中像素的值有突变的地方,而物体间的边界指的是现实场景中的存在于物体之间的边界。有可…...
2024/4/28 19:50:43 - 1.6582
1.6582 机械钢:1.6582 一、1.6582主要特征: 1.6582是一种低合金钢,由镍,铬和钼组成。所有这些都有助于增强高强度和淬火能力。淬火的结果是54-59 HRC,并且由于其回火脆性而可用于高温任务。1.6582级钢在淬火和回火的…...
2024/4/28 19:29:46 - 《算法竞赛进阶指南》
91. 最短Hamilton路径 该题为状压dp,先说状态转移方程再解释 dp[x][y]表示到达y这个点后状态为x的最小路程。 那么设i为起点,j为起点i的状态,k为终点; 那么转移方程为dp[j|(1<<k)][k]min(dp[j|(1<<k)][k],dp[j][i]a[i][k]); j|(…...
2024/4/28 17:36:42 - java.lang.NoClassDefFoundError: Could not initialize class com.ibm.icu.impl.NormalizerImpl
环境:jdk1.8、maven3.0.4、icu4j 2.6.1 异常信息: Caused by: org.jasypt.exceptions.EncryptionInitializationException: java.lang.NoClassDefFoundError: Could not initialize class com.ibm.icu.impl.NormalizerImplat org.jasypt.encryption.pb…...
2024/4/28 16:56:37 - Java如何停止一个正在运行的线程
Java中如何停止一个正在运行的线程 1、使用退出标志,使线程正常退出,也就是当run方法完成后线程终止。 2、使用stop方法强行终止,但是不推荐这个方法,因为stop和suspend及resume一样都是过期作废的 方法。 3、使用interrupt方法中…...
2024/4/27 23:51:18 - 大带宽适用于那些行业
现在很多机房都在推出比较大的带宽,有些客户看到这些很心动,都在问能不能也选择这样的带宽。 今天我们就来说说大带宽适用于什么行业? 带宽,这个词在当今社会生活中听取的越来越多,随着互联网时代的到来,…...
2024/4/9 4:18:32 - 用不同的库实现模拟登陆知乎!
对应目标网站:https://www.zhihu.com/hot 首先当然是打开我们的知乎官网,然后登陆以后如下图所示: 按下F12,点击Network项,找到对应的hot打开,找到cookie项,复制一下。如下图所示: …...
2024/4/28 3:29:33 - 激光焊锡机怎么样才不烧基板?【由力自动化】
激光烧基板 首先我们要知道激光焊是利用高能量密度的激光束作为热源的一种高效精密焊接方法。从这里我们可以了解到激光焊锡机烧基板的一部分原因。 问题一:高能量局部快速加热导致焊点铜箔热胀变形,焊点铜箔与基板分离。 解决方法:第一段…...
2024/4/9 4:18:31 - 华为ICT认证是什么意思?
华为ICT认证是什么意思?网络工程师们都知道华为认证,其实华为ICT认证其实就可以理解为华为认证。在跟大家介绍华为认证之前,上海腾科教育先带大家了解一下什么是ICT。 ICT是信息、通信和技术三个英文单词的词头组合(Information Communicatio…...
2024/4/28 13:20:53 - Chrome的evernote clipper插件无法登录(点击“继续”没有效果)
1. 按照其他博客说的,先把语言选项的中文置顶 2. 将油猴Tempermonkey的插件关掉(或者类似的都要关掉),重新加载一下即可登录 ※...
2024/4/28 11:54:51 - 应用于心血管健康检测仪的光纤压力传感器
心血管功能检测仪,仪器基于脉压法原理,根据建立起来的理论为基础,对模型进行分室网络分析,用线性相关算法推导出一系列计算公式。这些公式经过非线性补偿和临床经验参数修正,便能获得一组反映心脏功能、血管状况、血液…...
2024/4/28 9:42:23 - 金融科技发展布局之服务渠道建设
金融科技重塑服务渠道 线上渠道,银行持续丰富手机银行功能,优化用户使用体验,使手机银行从单纯的功能平台向服务平台转变; 线下渠道,银行加速智能柜台、智能网点建设,提高服务效率,探索新的服…...
2024/4/9 4:18:26 - linux基础操作手册
Linux 终端命令格式 目标 了解终端命令格式知道如何查阅终端命令帮助信息 01. 终端命令格式 command [-options] [parameter]说明: command:命令名,相应功能的英文单词或单词的缩写[-options]:选项,可用来对命令进…...
2024/4/28 13:59:27 - 如何在 Flutter 项目中实现操作引导
作者:何凯俊github 不要冒然评价我,你只知道我的名字,却不知道我的故事,你只是听闻我做了什么,却不知我经历过什么。 俗话说得好,产品有三宝,弹窗浮层加引导。 上图截图自我司 App 晓黑板中的口…...
2024/4/9 4:18:24 - 安搭Share解读数字人民币真面目
随着科技的发展以及市场的需求,数字人民币开启了多种体验模式,随之进入大众的视野,露出真面目的数字人民币到底包含哪些方面呢,今天安搭Share来为大家解读下。 1.数字货币并不等于区块链 法定数字货币不是数字加密资产,…...
2024/4/9 4:18:23 - go每日新闻--2020-10-21
go中文网每日资讯--2020-10-21 一、Go语言中文网 何时使用 Rust 和何时使用 Golang? 卧槽!一道关于 json 和 slice 的题难倒了 80% 的人 Go 已经开始大爆发了 ?专注于 Go 职场、招聘和求职 二、亚军进化史 Go技术日报(2020-10-20)三、 五分选…...
2024/4/17 7:18:19 - 信息安全数学基础--同余--欧拉函数、欧拉定理、费马小定理
信息安全数学基础--同余--欧拉函数、欧拉定理、费马小定理欧拉函数本身,其实就是一个简单描述与元素互素个数的函数,但是它涉及、以及由它推出的定理(欧拉定理、费马小定理)很重要。...
2024/4/9 3:56:41 - 页锁+死锁+集群+雪崩+负载等-支付宝高级Java现场面试37题:
支付宝现场三面面试题目,文末有福利:阿里经典面试88题目答案 01 支付宝一面 介绍一下自己。项目参与的核心设计有哪些ArrayList和LinkedList底层HashMap及线程安全的ConcurrentHashMap,以及各自优劣势Java如何实现线程安全Synchronized和Lock哪个更好…...
2024/4/17 7:18:24
最新文章
- 二极管钳位型三电平SVPWM(羊角波)闭环系统simulink建模与仿真
整理了二极管钳位型三电平SVPWM(羊角波)闭环系统simulink建模与仿真模型,附赠参考资料。 在二极管钳位型三电平SVPWM中,通过控制逆变器的开关器件(IGBT)的导通和关断,将输入的直流电压转换为三…...
2024/4/28 21:54:07 - 梯度消失和梯度爆炸的一些处理方法
在这里是记录一下梯度消失或梯度爆炸的一些处理技巧。全当学习总结了如有错误还请留言,在此感激不尽。 权重和梯度的更新公式如下: w w − η ⋅ ∇ w w w - \eta \cdot \nabla w ww−η⋅∇w 个人通俗的理解梯度消失就是网络模型在反向求导的时候出…...
2024/3/20 10:50:27 - [Spring Cloud] gateway全局异常捕捉统一返回值
文章目录 处理转发失败的情况全局参数同一返回格式操作消息对象AjaxResult返回值状态描述对象AjaxStatus返回值枚举接口层StatusCode 全局异常处理器自定义通用异常定一个自定义异常覆盖默认的异常处理自定义异常处理工具 在上一篇章时我们有了一个简单的gateway网关 [Spring C…...
2024/4/23 6:25:55 - Vue3学习笔记+报错记录
文章目录 1.创建Vue3.0工程1.1使用vue-cli创建1.2 使用vite创建工程1.3.分析Vue3工程结构 2.常用Composition2.1 拉开序幕的setup2.2 ref函数_处理基本类型2.3 ref函数_处理对象类型2.4 ref函数使用总结 1.创建Vue3.0工程 1.1使用vue-cli创建 查看vue/cli版本,确保…...
2024/4/25 2:10:28 - 416. 分割等和子集问题(动态规划)
题目 题解 class Solution:def canPartition(self, nums: List[int]) -> bool:# badcaseif not nums:return True# 不能被2整除if sum(nums) % 2 ! 0:return False# 状态定义:dp[i][j]表示当背包容量为j,用前i个物品是否正好可以将背包填满ÿ…...
2024/4/28 4:04:40 - 【Java】ExcelWriter自适应宽度工具类(支持中文)
工具类 import org.apache.poi.ss.usermodel.Cell; import org.apache.poi.ss.usermodel.CellType; import org.apache.poi.ss.usermodel.Row; import org.apache.poi.ss.usermodel.Sheet;/*** Excel工具类** author xiaoming* date 2023/11/17 10:40*/ public class ExcelUti…...
2024/4/28 12:01:04 - Spring cloud负载均衡@LoadBalanced LoadBalancerClient
LoadBalance vs Ribbon 由于Spring cloud2020之后移除了Ribbon,直接使用Spring Cloud LoadBalancer作为客户端负载均衡组件,我们讨论Spring负载均衡以Spring Cloud2020之后版本为主,学习Spring Cloud LoadBalance,暂不讨论Ribbon…...
2024/4/28 16:34:55 - TSINGSEE青犀AI智能分析+视频监控工业园区周界安全防范方案
一、背景需求分析 在工业产业园、化工园或生产制造园区中,周界防范意义重大,对园区的安全起到重要的作用。常规的安防方式是采用人员巡查,人力投入成本大而且效率低。周界一旦被破坏或入侵,会影响园区人员和资产安全,…...
2024/4/28 18:31:47 - VB.net WebBrowser网页元素抓取分析方法
在用WebBrowser编程实现网页操作自动化时,常要分析网页Html,例如网页在加载数据时,常会显示“系统处理中,请稍候..”,我们需要在数据加载完成后才能继续下一步操作,如何抓取这个信息的网页html元素变化&…...
2024/4/28 12:01:03 - 【Objective-C】Objective-C汇总
方法定义 参考:https://www.yiibai.com/objective_c/objective_c_functions.html Objective-C编程语言中方法定义的一般形式如下 - (return_type) method_name:( argumentType1 )argumentName1 joiningArgument2:( argumentType2 )argumentName2 ... joiningArgu…...
2024/4/28 12:01:03 - 【洛谷算法题】P5713-洛谷团队系统【入门2分支结构】
👨💻博客主页:花无缺 欢迎 点赞👍 收藏⭐ 留言📝 加关注✅! 本文由 花无缺 原创 收录于专栏 【洛谷算法题】 文章目录 【洛谷算法题】P5713-洛谷团队系统【入门2分支结构】🌏题目描述🌏输入格…...
2024/4/28 12:01:03 - 【ES6.0】- 扩展运算符(...)
【ES6.0】- 扩展运算符... 文章目录 【ES6.0】- 扩展运算符...一、概述二、拷贝数组对象三、合并操作四、参数传递五、数组去重六、字符串转字符数组七、NodeList转数组八、解构变量九、打印日志十、总结 一、概述 **扩展运算符(...)**允许一个表达式在期望多个参数࿰…...
2024/4/28 16:07:14 - 摩根看好的前智能硬件头部品牌双11交易数据极度异常!——是模式创新还是饮鸩止渴?
文 | 螳螂观察 作者 | 李燃 双11狂欢已落下帷幕,各大品牌纷纷晒出优异的成绩单,摩根士丹利投资的智能硬件头部品牌凯迪仕也不例外。然而有爆料称,在自媒体平台发布霸榜各大榜单喜讯的凯迪仕智能锁,多个平台数据都表现出极度异常…...
2024/4/27 21:08:20 - Go语言常用命令详解(二)
文章目录 前言常用命令go bug示例参数说明 go doc示例参数说明 go env示例 go fix示例 go fmt示例 go generate示例 总结写在最后 前言 接着上一篇继续介绍Go语言的常用命令 常用命令 以下是一些常用的Go命令,这些命令可以帮助您在Go开发中进行编译、测试、运行和…...
2024/4/28 9:00:42 - 用欧拉路径判断图同构推出reverse合法性:1116T4
http://cplusoj.com/d/senior/p/SS231116D 假设我们要把 a a a 变成 b b b,我们在 a i a_i ai 和 a i 1 a_{i1} ai1 之间连边, b b b 同理,则 a a a 能变成 b b b 的充要条件是两图 A , B A,B A,B 同构。 必要性显然࿰…...
2024/4/27 18:40:35 - 【NGINX--1】基础知识
1、在 Debian/Ubuntu 上安装 NGINX 在 Debian 或 Ubuntu 机器上安装 NGINX 开源版。 更新已配置源的软件包信息,并安装一些有助于配置官方 NGINX 软件包仓库的软件包: apt-get update apt install -y curl gnupg2 ca-certificates lsb-release debian-…...
2024/4/28 4:14:21 - Hive默认分割符、存储格式与数据压缩
目录 1、Hive默认分割符2、Hive存储格式3、Hive数据压缩 1、Hive默认分割符 Hive创建表时指定的行受限(ROW FORMAT)配置标准HQL为: ... ROW FORMAT DELIMITED FIELDS TERMINATED BY \u0001 COLLECTION ITEMS TERMINATED BY , MAP KEYS TERMI…...
2024/4/27 13:52:15 - 【论文阅读】MAG:一种用于航天器遥测数据中有效异常检测的新方法
文章目录 摘要1 引言2 问题描述3 拟议框架4 所提出方法的细节A.数据预处理B.变量相关分析C.MAG模型D.异常分数 5 实验A.数据集和性能指标B.实验设置与平台C.结果和比较 6 结论 摘要 异常检测是保证航天器稳定性的关键。在航天器运行过程中,传感器和控制器产生大量周…...
2024/4/27 13:38:13 - --max-old-space-size=8192报错
vue项目运行时,如果经常运行慢,崩溃停止服务,报如下错误 FATAL ERROR: CALL_AND_RETRY_LAST Allocation failed - JavaScript heap out of memory 因为在 Node 中,通过JavaScript使用内存时只能使用部分内存(64位系统&…...
2024/4/28 12:00:58 - 基于深度学习的恶意软件检测
恶意软件是指恶意软件犯罪者用来感染个人计算机或整个组织的网络的软件。 它利用目标系统漏洞,例如可以被劫持的合法软件(例如浏览器或 Web 应用程序插件)中的错误。 恶意软件渗透可能会造成灾难性的后果,包括数据被盗、勒索或网…...
2024/4/28 12:00:58 - JS原型对象prototype
让我简单的为大家介绍一下原型对象prototype吧! 使用原型实现方法共享 1.构造函数通过原型分配的函数是所有对象所 共享的。 2.JavaScript 规定,每一个构造函数都有一个 prototype 属性,指向另一个对象,所以我们也称为原型对象…...
2024/4/27 22:51:49 - C++中只能有一个实例的单例类
C中只能有一个实例的单例类 前面讨论的 President 类很不错,但存在一个缺陷:无法禁止通过实例化多个对象来创建多名总统: President One, Two, Three; 由于复制构造函数是私有的,其中每个对象都是不可复制的,但您的目…...
2024/4/28 7:31:46 - python django 小程序图书借阅源码
开发工具: PyCharm,mysql5.7,微信开发者工具 技术说明: python django html 小程序 功能介绍: 用户端: 登录注册(含授权登录) 首页显示搜索图书,轮播图࿰…...
2024/4/28 8:32:05 - 电子学会C/C++编程等级考试2022年03月(一级)真题解析
C/C++等级考试(1~8级)全部真题・点这里 第1题:双精度浮点数的输入输出 输入一个双精度浮点数,保留8位小数,输出这个浮点数。 时间限制:1000 内存限制:65536输入 只有一行,一个双精度浮点数。输出 一行,保留8位小数的浮点数。样例输入 3.1415926535798932样例输出 3.1…...
2024/4/27 20:28:35 - 配置失败还原请勿关闭计算机,电脑开机屏幕上面显示,配置失败还原更改 请勿关闭计算机 开不了机 这个问题怎么办...
解析如下:1、长按电脑电源键直至关机,然后再按一次电源健重启电脑,按F8健进入安全模式2、安全模式下进入Windows系统桌面后,按住“winR”打开运行窗口,输入“services.msc”打开服务设置3、在服务界面,选中…...
2022/11/19 21:17:18 - 错误使用 reshape要执行 RESHAPE,请勿更改元素数目。
%读入6幅图像(每一幅图像的大小是564*564) f1 imread(WashingtonDC_Band1_564.tif); subplot(3,2,1),imshow(f1); f2 imread(WashingtonDC_Band2_564.tif); subplot(3,2,2),imshow(f2); f3 imread(WashingtonDC_Band3_564.tif); subplot(3,2,3),imsho…...
2022/11/19 21:17:16 - 配置 已完成 请勿关闭计算机,win7系统关机提示“配置Windows Update已完成30%请勿关闭计算机...
win7系统关机提示“配置Windows Update已完成30%请勿关闭计算机”问题的解决方法在win7系统关机时如果有升级系统的或者其他需要会直接进入一个 等待界面,在等待界面中我们需要等待操作结束才能关机,虽然这比较麻烦,但是对系统进行配置和升级…...
2022/11/19 21:17:15 - 台式电脑显示配置100%请勿关闭计算机,“准备配置windows 请勿关闭计算机”的解决方法...
有不少用户在重装Win7系统或更新系统后会遇到“准备配置windows,请勿关闭计算机”的提示,要过很久才能进入系统,有的用户甚至几个小时也无法进入,下面就教大家这个问题的解决方法。第一种方法:我们首先在左下角的“开始…...
2022/11/19 21:17:14 - win7 正在配置 请勿关闭计算机,怎么办Win7开机显示正在配置Windows Update请勿关机...
置信有很多用户都跟小编一样遇到过这样的问题,电脑时发现开机屏幕显现“正在配置Windows Update,请勿关机”(如下图所示),而且还需求等大约5分钟才干进入系统。这是怎样回事呢?一切都是正常操作的,为什么开时机呈现“正…...
2022/11/19 21:17:13 - 准备配置windows 请勿关闭计算机 蓝屏,Win7开机总是出现提示“配置Windows请勿关机”...
Win7系统开机启动时总是出现“配置Windows请勿关机”的提示,没过几秒后电脑自动重启,每次开机都这样无法进入系统,此时碰到这种现象的用户就可以使用以下5种方法解决问题。方法一:开机按下F8,在出现的Windows高级启动选…...
2022/11/19 21:17:12 - 准备windows请勿关闭计算机要多久,windows10系统提示正在准备windows请勿关闭计算机怎么办...
有不少windows10系统用户反映说碰到这样一个情况,就是电脑提示正在准备windows请勿关闭计算机,碰到这样的问题该怎么解决呢,现在小编就给大家分享一下windows10系统提示正在准备windows请勿关闭计算机的具体第一种方法:1、2、依次…...
2022/11/19 21:17:11 - 配置 已完成 请勿关闭计算机,win7系统关机提示“配置Windows Update已完成30%请勿关闭计算机”的解决方法...
今天和大家分享一下win7系统重装了Win7旗舰版系统后,每次关机的时候桌面上都会显示一个“配置Windows Update的界面,提示请勿关闭计算机”,每次停留好几分钟才能正常关机,导致什么情况引起的呢?出现配置Windows Update…...
2022/11/19 21:17:10 - 电脑桌面一直是清理请关闭计算机,windows7一直卡在清理 请勿关闭计算机-win7清理请勿关机,win7配置更新35%不动...
只能是等着,别无他法。说是卡着如果你看硬盘灯应该在读写。如果从 Win 10 无法正常回滚,只能是考虑备份数据后重装系统了。解决来方案一:管理员运行cmd:net stop WuAuServcd %windir%ren SoftwareDistribution SDoldnet start WuA…...
2022/11/19 21:17:09 - 计算机配置更新不起,电脑提示“配置Windows Update请勿关闭计算机”怎么办?
原标题:电脑提示“配置Windows Update请勿关闭计算机”怎么办?win7系统中在开机与关闭的时候总是显示“配置windows update请勿关闭计算机”相信有不少朋友都曾遇到过一次两次还能忍但经常遇到就叫人感到心烦了遇到这种问题怎么办呢?一般的方…...
2022/11/19 21:17:08 - 计算机正在配置无法关机,关机提示 windows7 正在配置windows 请勿关闭计算机 ,然后等了一晚上也没有关掉。现在电脑无法正常关机...
关机提示 windows7 正在配置windows 请勿关闭计算机 ,然后等了一晚上也没有关掉。现在电脑无法正常关机以下文字资料是由(历史新知网www.lishixinzhi.com)小编为大家搜集整理后发布的内容,让我们赶快一起来看一下吧!关机提示 windows7 正在配…...
2022/11/19 21:17:05 - 钉钉提示请勿通过开发者调试模式_钉钉请勿通过开发者调试模式是真的吗好不好用...
钉钉请勿通过开发者调试模式是真的吗好不好用 更新时间:2020-04-20 22:24:19 浏览次数:729次 区域: 南阳 > 卧龙 列举网提醒您:为保障您的权益,请不要提前支付任何费用! 虚拟位置外设器!!轨迹模拟&虚拟位置外设神器 专业用于:钉钉,外勤365,红圈通,企业微信和…...
2022/11/19 21:17:05 - 配置失败还原请勿关闭计算机怎么办,win7系统出现“配置windows update失败 还原更改 请勿关闭计算机”,长时间没反应,无法进入系统的解决方案...
前几天班里有位学生电脑(windows 7系统)出问题了,具体表现是开机时一直停留在“配置windows update失败 还原更改 请勿关闭计算机”这个界面,长时间没反应,无法进入系统。这个问题原来帮其他同学也解决过,网上搜了不少资料&#x…...
2022/11/19 21:17:04 - 一个电脑无法关闭计算机你应该怎么办,电脑显示“清理请勿关闭计算机”怎么办?...
本文为你提供了3个有效解决电脑显示“清理请勿关闭计算机”问题的方法,并在最后教给你1种保护系统安全的好方法,一起来看看!电脑出现“清理请勿关闭计算机”在Windows 7(SP1)和Windows Server 2008 R2 SP1中,添加了1个新功能在“磁…...
2022/11/19 21:17:03 - 请勿关闭计算机还原更改要多久,电脑显示:配置windows更新失败,正在还原更改,请勿关闭计算机怎么办...
许多用户在长期不使用电脑的时候,开启电脑发现电脑显示:配置windows更新失败,正在还原更改,请勿关闭计算机。。.这要怎么办呢?下面小编就带着大家一起看看吧!如果能够正常进入系统,建议您暂时移…...
2022/11/19 21:17:02 - 还原更改请勿关闭计算机 要多久,配置windows update失败 还原更改 请勿关闭计算机,电脑开机后一直显示以...
配置windows update失败 还原更改 请勿关闭计算机,电脑开机后一直显示以以下文字资料是由(历史新知网www.lishixinzhi.com)小编为大家搜集整理后发布的内容,让我们赶快一起来看一下吧!配置windows update失败 还原更改 请勿关闭计算机&#x…...
2022/11/19 21:17:01 - 电脑配置中请勿关闭计算机怎么办,准备配置windows请勿关闭计算机一直显示怎么办【图解】...
不知道大家有没有遇到过这样的一个问题,就是我们的win7系统在关机的时候,总是喜欢显示“准备配置windows,请勿关机”这样的一个页面,没有什么大碍,但是如果一直等着的话就要两个小时甚至更久都关不了机,非常…...
2022/11/19 21:17:00 - 正在准备配置请勿关闭计算机,正在准备配置windows请勿关闭计算机时间长了解决教程...
当电脑出现正在准备配置windows请勿关闭计算机时,一般是您正对windows进行升级,但是这个要是长时间没有反应,我们不能再傻等下去了。可能是电脑出了别的问题了,来看看教程的说法。正在准备配置windows请勿关闭计算机时间长了方法一…...
2022/11/19 21:16:59 - 配置失败还原请勿关闭计算机,配置Windows Update失败,还原更改请勿关闭计算机...
我们使用电脑的过程中有时会遇到这种情况,当我们打开电脑之后,发现一直停留在一个界面:“配置Windows Update失败,还原更改请勿关闭计算机”,等了许久还是无法进入系统。如果我们遇到此类问题应该如何解决呢࿰…...
2022/11/19 21:16:58 - 如何在iPhone上关闭“请勿打扰”
Apple’s “Do Not Disturb While Driving” is a potentially lifesaving iPhone feature, but it doesn’t always turn on automatically at the appropriate time. For example, you might be a passenger in a moving car, but your iPhone may think you’re the one dri…...
2022/11/19 21:16:57