java 知识点 22(springboot、Spring Boot Starter、MyBatis、jdbc、druid连接池、Dubbo进程通信框架、Zookeeper分布式服务)
文章目录
- 1、Spring Boot Starter
- 1.1、自己封装一个Starter
- 1.2、使用自己封装的Starter
- 1.3、元数据的配置
- 1.3.1、 元数据的配置 详解(了解就可以)
- 2、maven报错记录
- 3、springboot + MyBatis
- 3.1、新建数据库 和 实体类
- 3.2、配置mybatis
- 4、springboot + JDBC + Druid
- 4.1、springboot + JDBC
- 4.2、JDBCTemplate
- 4.3、springboot + Druid
- 5、SpringBoot + Dubbo + Zookeeper
- 5.1、Window下安装zookeeper
- 5.2、Window下安装dubbo-admin
- 5.3 、SpringBoot + Dubbo + zookeeper
1、Spring Boot Starter
Spring Boot Starter是什么?
Spring Boot Starter就是封装了一定功能的模块,能够提供给springboot项目使用。
这里我们新建一个spring boot项目,实现一个简单的 “说hello谁谁”这样的功能,然后打包到maven本地仓库,供另一个项目中作为依赖使用
1.1、自己封装一个Starter
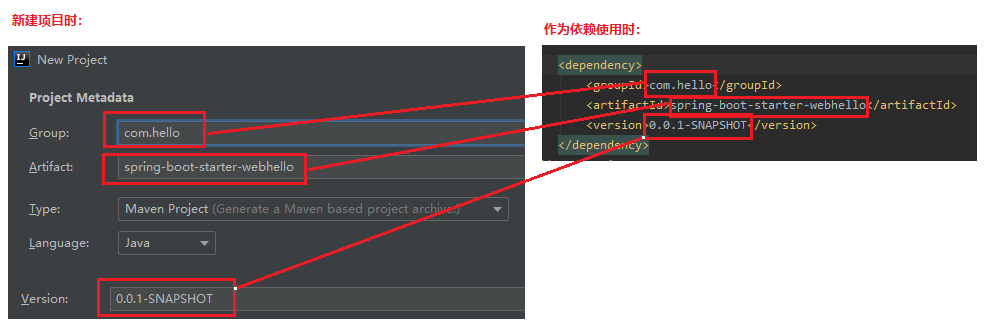
新建spring boot项目,起名spring-boot-starter-webhello
官方命名格式为: spring-boot-starter-{name}
新建项目时注意,这三个地方一一对应,需要记住
根据我们这个Starter项目需求,创建以下目录、删除不需要的目录
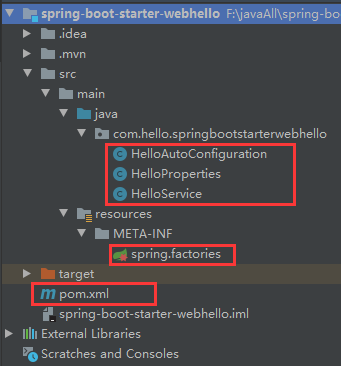
HelloAutoConfiguration.java
package com.hello.springbootstarterwebhello;import org.springframework.boot.autoconfigure.condition.ConditionalOnWebApplication;
import org.springframework.boot.context.properties.EnableConfigurationProperties;
import org.springframework.context.annotation.ComponentScan;
import org.springframework.context.annotation.Configuration;
import org.springframework.context.annotation.Import;//定义为配置类
@Configuration//在web工程条件下成立
@ConditionalOnWebApplication//启用HelloProperties配置功能,并加入到IOC容器中
@EnableConfigurationProperties({HelloProperties.class})//导入HelloService组
@Import(HelloService.class)
@ComponentScan
public class HelloAutoConfiguration {
}
HelloProperties.java
package com.hello.springbootstarterwebhello;import org.springframework.boot.context.properties.ConfigurationProperties;@ConfigurationProperties(prefix = "hello")
public class HelloProperties {/*** 打招呼的内容,默认为“World!”*/private String msg = "World!";public String getMsg() {return msg;}public void setMsg(String msg) {this.msg = msg;}
}
HelloService.java
package com.hello.springbootstarterwebhello;import org.springframework.beans.factory.annotation.Autowired;
import org.springframework.stereotype.Service;@Service
public class HelloService {@Autowiredprivate HelloProperties helloProperties;public HelloService(HelloProperties helloProperties) {this.helloProperties = helloProperties;}public String sayHello(String name) {return "来自 自定义Starter:你好 " + name + " " + helloProperties.getMsg();}
}
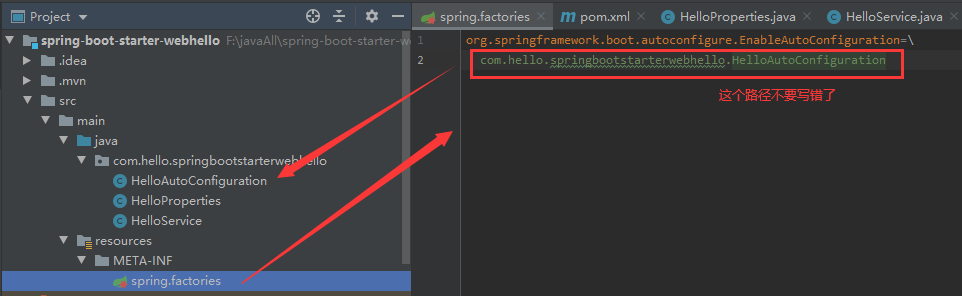
spring.factories
org.springframework.boot.autoconfigure.EnableAutoConfiguration=\com.haha.springbootstarterwebhello.HelloAutoConfiguration
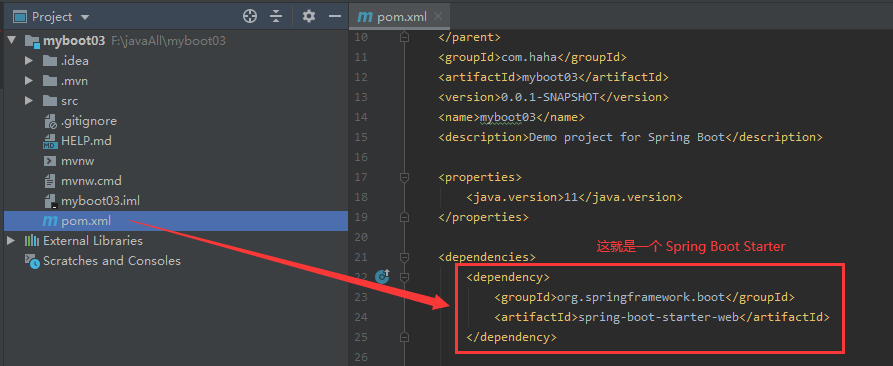
pom.xml
<?xml version="1.0" encoding="UTF-8"?>
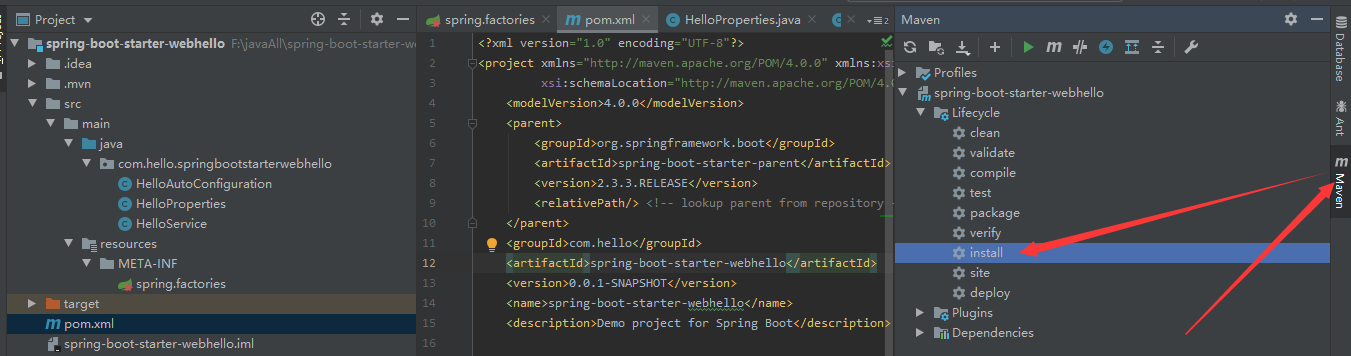
<project xmlns="http://maven.apache.org/POM/4.0.0" xmlns:xsi="http://www.w3.org/2001/XMLSchema-instance"xsi:schemaLocation="http://maven.apache.org/POM/4.0.0 https://maven.apache.org/xsd/maven-4.0.0.xsd"><modelVersion>4.0.0</modelVersion><parent><groupId>org.springframework.boot</groupId><artifactId>spring-boot-starter-parent</artifactId><version>2.3.3.RELEASE</version><relativePath/> <!-- lookup parent from repository --></parent><groupId>com.hello</groupId><artifactId>spring-boot-starter-webhello</artifactId><version>0.0.1-SNAPSHOT</version><name>spring-boot-starter-webhello</name><description>Demo project for Spring Boot</description><properties><java.version>11</java.version></properties><dependencies><dependency><groupId>org.springframework.boot</groupId><artifactId>spring-boot-starter-web</artifactId></dependency></dependencies>
</project>
我们在pom.xml只导入了spring-boot-starter-web这一个依赖,其他的都是不需要的。
之后我们只需要点击install就可以安装到本地仓库了(如图)
这里我们之封装了一个简单的功能。
也可以封装更多更复杂的功能
1.2、使用自己封装的Starter
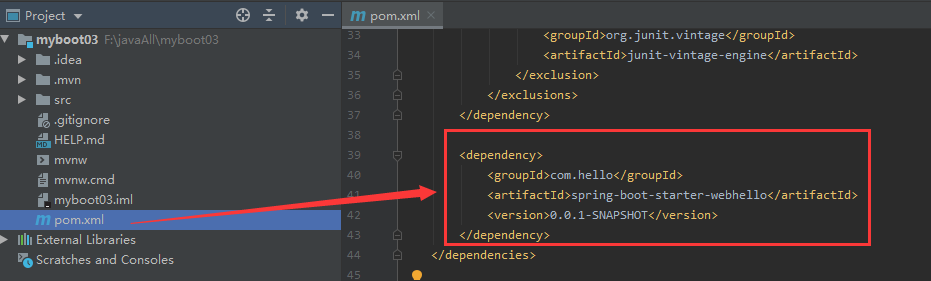
新建一个spring boot项目,然后在项目中导入我们自己的Starter
<dependency><groupId>com.hello</groupId><artifactId>spring-boot-starter-webhello</artifactId><version>0.0.1-SNAPSHOT</version></dependency>
使用spring-boot-starter-hello的sayHello功能
新建HelloController.java
package com.haha.myboot003;import com.hello.springbootstarterwebhello.HelloService;
import org.springframework.beans.factory.annotation.Autowired;
import org.springframework.web.bind.annotation.RequestMapping;
import org.springframework.web.bind.annotation.ResponseBody;
import org.springframework.web.bind.annotation.RestController;@RestController
public class HelloController {@AutowiredHelloService helloService;@RequestMapping(value = "/sayHello")@ResponseBodypublic String sayHello(String name){System.out.println(helloService.sayHello(name));return helloService.sayHello(name);}}
访问http://localhost:8080/sayHello?name=zhangshan
浏览器打印:来自 自定义Starter:Hello zhangshan World!
在application.properties文件中配置属性:hello.msg = 你好!
重启项目,再次刷新访问,浏览器响应:来自 自定义Starter:Hello zhangshan 你好!
出现 Could not autowire. No beans of ‘xxxx’ type found这个错误解决方案
https://www.cnblogs.com/expiator/p/8991545.html
运行时出现java.lang.IllegalStateException: Unable to read meta-data for class xxx 异常
解决:首先考虑starter的配置文件是否写错,使得找不到class文件
1.3、元数据的配置
在application.properties中配置hello.msg属性时,你会发现并没有提示你有关该配置的信息。接下来实现这个功能,如图
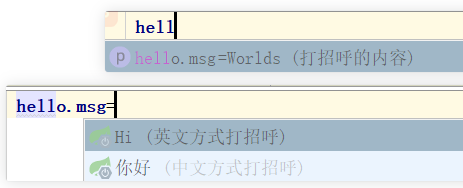
在spring-boot-starter-webhello中新建META-INF/spring-configuration-metadata.json文件
{"hints":[{"name":"hello.msg","values":[{"value":"你好","description":"中文方式打招呼"},{"value":"Hi","description":"英文方式打招呼"}]}],"groups":[{"sourceType": "com.example.springbootstarterhello.HelloProperties","name": "hello","type": "com.example.springbootstarterhello.HelloProperties"}],"properties":[{"sourceType": "com.example.springbootstarterhello.HelloProperties","name": "hello.msg","type": "java.lang.String","description": "打招呼的内容","defaultValue": "Worlds"}]
}
重新打包install,在就可以使用了
1.3.1、 元数据的配置 详解(了解就可以)
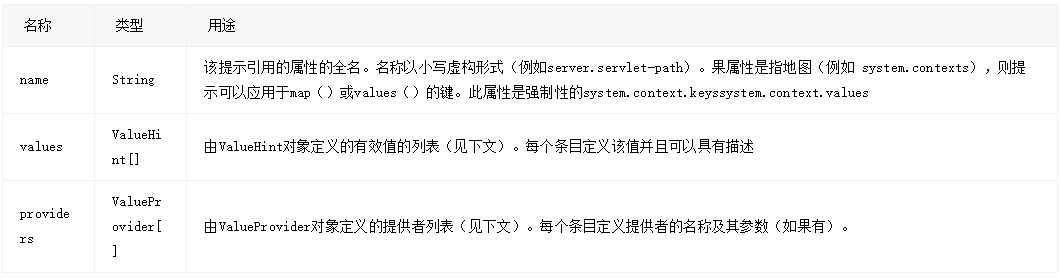
如上的spring-configuration-metadata.json包含了三个对象groups、properties、hints。
以下是详细配置:
groups
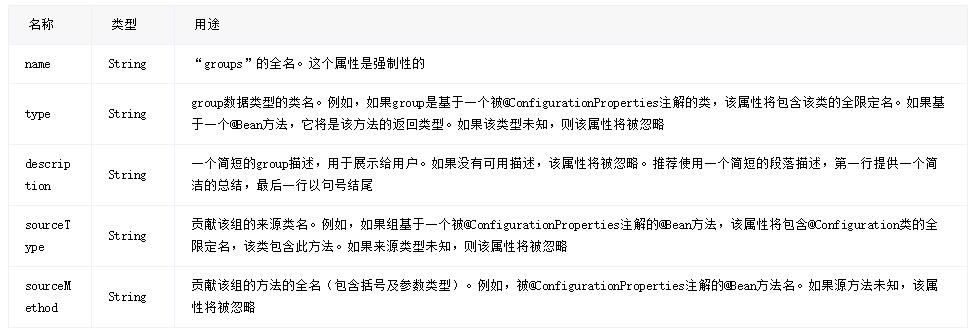
properties
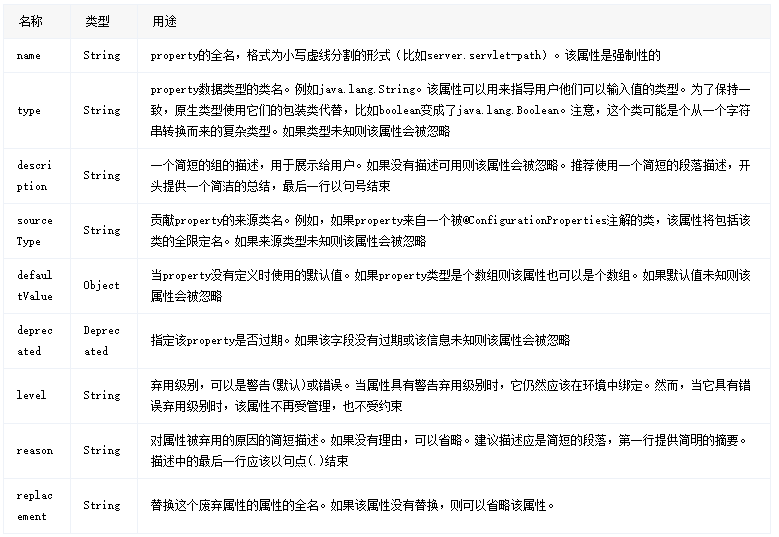
hints
2、maven报错记录
报错信息
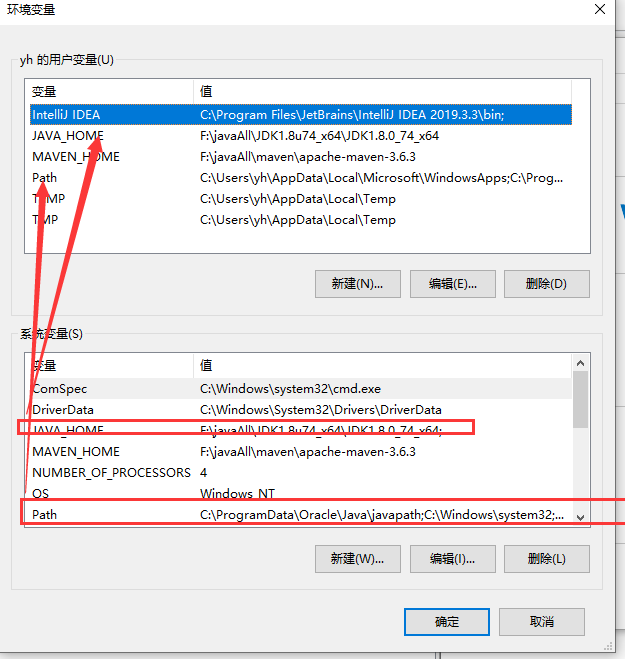
JAVA_HOME should point to a jdk not a jre
解决办法
应该是win10才会出现这个问题
在环境变量里,把java的环境变量配置往用户变量里也写一份
3、springboot + MyBatis
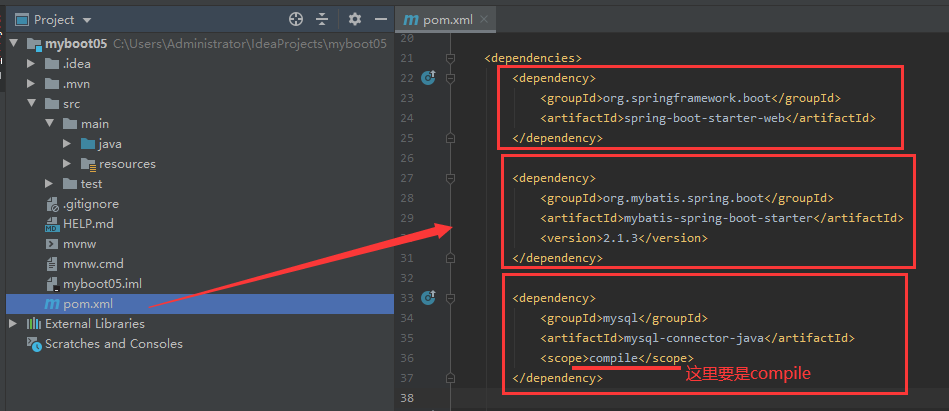
新建项目myboot05,这次我们再新建项目时就将依赖勾选
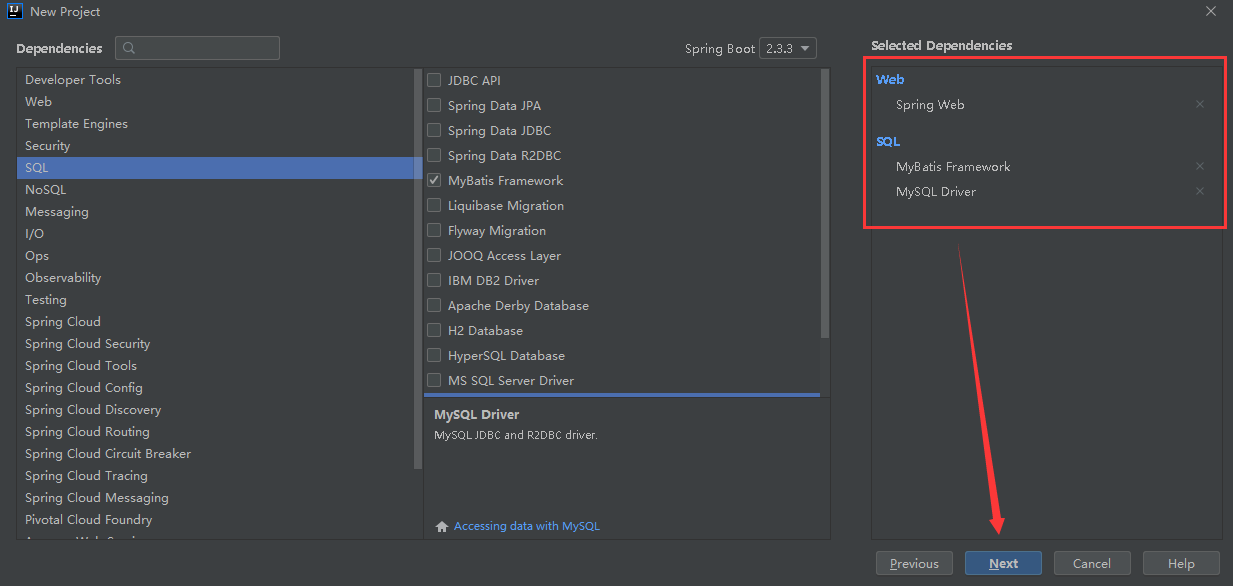
新建完成再在pom里面检查一下是不是有这三个依赖(注意mysql的依赖要是compile)
3.1、新建数据库 和 实体类
新建数据库webtest,里面新建表user
CREATE DATABASE webtest;use webtest;DROP TABLE IF EXISTS `user`;
CREATE TABLE `user` (`id` int(11) NOT NULL,`name` varchar(30) NOT NULL,`pwd` varchar(50) NOT NULL,PRIMARY KEY (`id`)
) ENGINE=InnoDB DEFAULT CHARSET=utf8mb4;INSERT INTO `user` VALUES ('1', 'zs', '123');
INSERT INTO `user` VALUES ('2', 'ls', '111');
INSERT INTO `user` VALUES ('3', 'wmz', '000');
新建实体类User.java
idea快捷键alt+j:选中同一个单词
package com.haha.myboot05.pojo;import java.io.Serializable;public class User implements Serializable {private int id;private String name;private String pwd;public User() {}public User(int id, String name, String pwd) {this.id = id;this.name = name;this.pwd = pwd;}public int getId() {return id;}public void setId(int id) {this.id = id;}public String getName() {return name;}public void setName(String name) {this.name = name;}public String getPwd() {return pwd;}public void setPwd(String pwd) {this.pwd = pwd;}
}

3.2、配置mybatis
application.properties配置文件代码如下:
这里注意mysql数据库名、账号、密码
spring.datasource.url=jdbc:mysql://localhost:3306/webtest?characterEncoding=utf-8&useSSL=true&serverTimezone=GMT
spring.datasource.username=root
spring.datasource.password=root123
spring.datasource.driver-class-name= com.mysql.cj.jdbc.Drivermybatis.config-location=classpath:config/mybatis-config.xml
mybatis.mapper-locations=classpath:mapper/*.xml
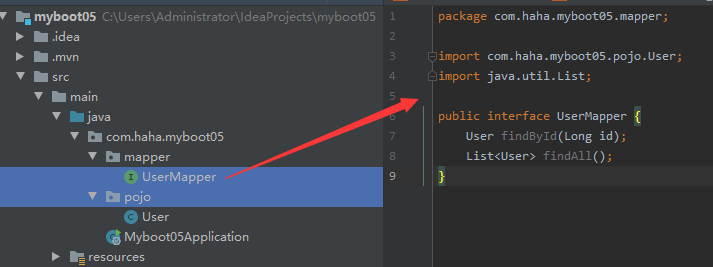
新建一个UserMapper接口,里面写findById、findAll方法
import com.haha.myboot05.pojo.User;
import java.util.List;public interface UserMapper {User findById(Long id);List<User> findAll();
}
在resources文件夹下建立config文件夹,并创建mybatis-config.xml,代码如下:
package name="要扫描的实体类包路径“
<?xml version="1.0" encoding="UTF-8" ?>
<!DOCTYPE configurationPUBLIC "-//mybatis.org//DTD Config 3.0//EN""http://mybatis.org/dtd/mybatis-3-config.dtd">
<configuration><typeAliases><package name="com.haha.myboot05.pojo"/></typeAliases><!--<mappers>--><!--</mappers>-->
</configuration>
在resources文件夹下建立mapper文件夹,并创建UserMapper.xml,代码如下:
mapper namespace="mapper类全名”
type="实体类全名“
<?xml version="1.0" encoding="UTF-8" ?>
<!DOCTYPE mapperPUBLIC "-//mybatis.org//DTD Mapper 3.0//EN""http://mybatis.org/dtd/mybatis-3-mapper.dtd">
<mapper namespace="com.haha.myboot05.mapper.UserMapper"><resultMap id="BaseResultMap" type="com.haha.myboot05.pojo.User" ><result column="id" property="id" /><result column="name" property="name" /><result column="password" property="password" /></resultMap><select id="findById" resultMap="BaseResultMap">select * from user where id = #{id}</select><select id="findAll" resultMap="BaseResultMap">select * from user</select>
</mapper>
建立controller包,并在该包下建立UserController类
import com.haha.myboot05.mapper.UserMapper;
import com.haha.myboot05.pojo.User;
import org.springframework.web.bind.annotation.GetMapping;
import org.springframework.web.bind.annotation.RequestMapping;
import org.springframework.web.bind.annotation.RequestParam;
import org.springframework.web.bind.annotation.RestController;import javax.annotation.Resource;@RestController
@RequestMapping("/user")
public class UserController {@Resourceprivate UserMapper userMapper;@GetMappingpublic User findUser(@RequestParam(value = "id") Long id){return userMapper.findById(id);}
}
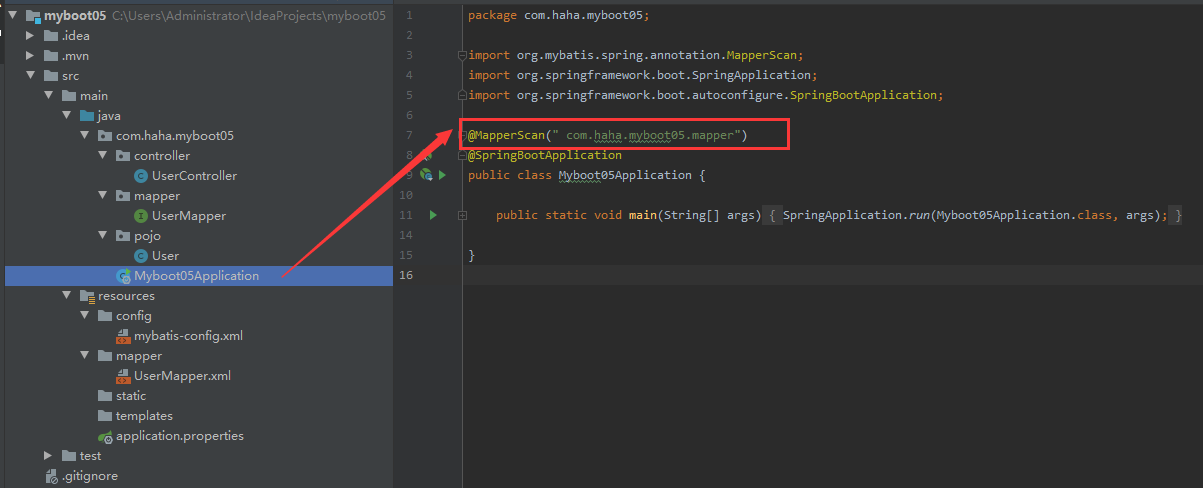
在启动类上面加入扫描的注解
@MapperScan(" com.haha.myboot05.mapper")
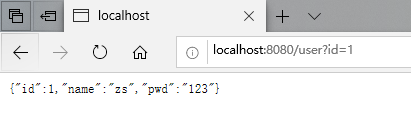
运行项目,在浏览器访问http://localhost:8080/user?id=1
4、springboot + JDBC + Druid
JDBC: Java数据库连接 工具
Druid:数据库连接池,负责分配、管理和释放数据库连接
Druid 是阿里巴巴开源平台上一个数据库连接池实现,结合了 C3P0、DBCP 等 DB 池的优点,同时加入了日志监控。
4.1、springboot + JDBC
加入jdbc、mysql依赖
<dependency><groupId>org.springframework.boot</groupId><artifactId>spring-boot-starter-jdbc</artifactId>
</dependency>
<dependency><groupId>mysql</groupId><artifactId>mysql-connector-java</artifactId><scope>runtime</scope>
</dependency>
application.yaml配置
spring:datasource:username: rootpassword: root123url: jdbc:mysql://localhost:3306/webtest?serverTimezone=UTC&useUnicode=true&characterEncoding=utf-8driver-class-name: com.mysql.cj.jdbc.Driver
注意上面的配置中 账号、密码、数据库名,改成自己的。
对应的数据库一定要是存在的,不然后面会报错.
然后在测试类里面就可以直接使用了
我们输出一下数据源看看
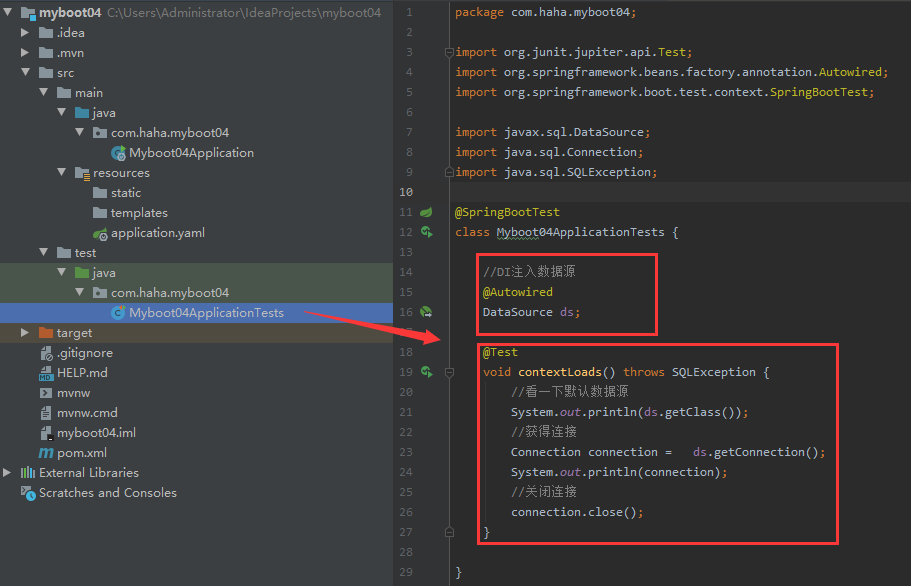
import org.junit.jupiter.api.Test;
import org.springframework.beans.factory.annotation.Autowired;
import org.springframework.boot.test.context.SpringBootTest;import javax.sql.DataSource;
import java.sql.Connection;
import java.sql.SQLException;@SpringBootTest
class Myboot04ApplicationTests {//DI注入数据源@AutowiredDataSource ds;@Testvoid contextLoads() throws SQLException {//看一下默认数据源System.out.println(ds.getClass());//获得连接Connection connection =   ds.getConnection();System.out.println(connection);//关闭连接connection.close();}}
运行结果
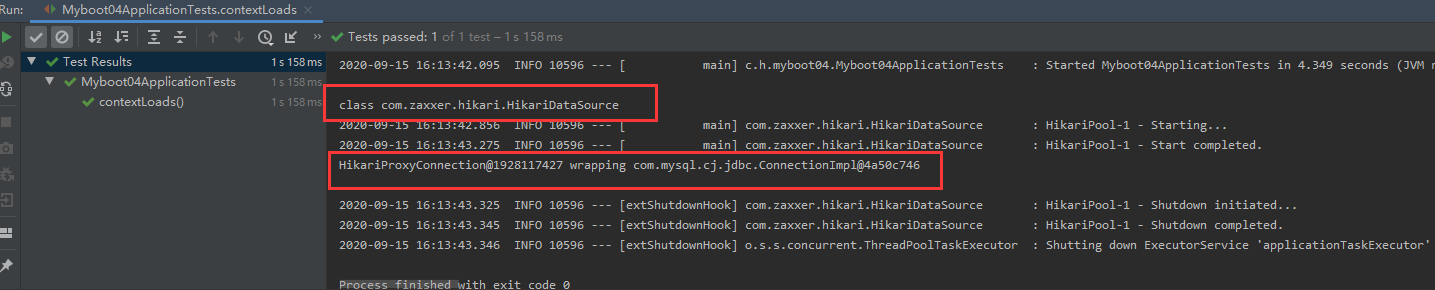
可以看到数据源为HikariDataSource
HikariDataSource 号称 Java WEB 当前速度最快的数据源
4.2、JDBCTemplate
JdbcTemplate是Spring 对原生的JDBC 做的轻量级封装。
JdbcTemplate主要提供以下几类方法:
| JdbcTemplate方法 | 用途 |
|---|---|
| execute | 执行任何SQL语句 |
| update | 执行新增、修改、删除等语句 |
| batchUpdate | 执行批处理相关语句 |
| query、queryForXXX | 执行查询相关语句 |
| call | 执行存储过程、函数相关语句 |
增删改查:
编写一个Controller,注入 jdbcTemplate,编写测试方法进行访问测试
import org.springframework.beans.factory.annotation.Autowired;
import org.springframework.jdbc.core.JdbcTemplate;
import org.springframework.web.bind.annotation.GetMapping;
import org.springframework.web.bind.annotation.PathVariable;
import org.springframework.web.bind.annotation.RequestMapping;
import org.springframework.web.bind.annotation.RestController;import java.util.Date;
import java.util.List;
import java.util.Map;@RestController
@RequestMapping("/jdbc")
public class JdbcController {/*** Spring Boot 默认提供了数据源,默认提供了 org.springframework.jdbc.core.JdbcTemplate* JdbcTemplate 中会自己注入数据源,用于简化 JDBC操作* 还能避免一些常见的错误,使用起来也不用再自己来关闭数据库连接*/@AutowiredJdbcTemplate jdbcTemplate;//查询employee表中所有数据//List 中的1个 Map 对应数据库的 1行数据//Map 中的 key 对应数据库的字段名,value 对应数据库的字段值@GetMapping("/list")public List<Map<String, Object>> userList(){String sql = "select * from employee";List<Map<String, Object>> maps = jdbcTemplate.queryForList(sql);return maps;}//新增一个用户@GetMapping("/add")public String addUser(){//插入语句,注意时间问题String sql = "insert into employee(last_name, email,gender,department,birth)" +" values ('zhangsan','*********@qq.com',1,101,'"+ new Date().toLocaleString() +"')";jdbcTemplate.update(sql);//查询return "addOk";}//修改用户信息@GetMapping("/update/{id}")public String updateUser(@PathVariable("id") int id){//插入语句String sql = "update employee set last_name=?,email=? where id="+id;//数据Object[] objects = new Object[2];objects[0] = "lisi";objects[1] = "*******@sina.com";jdbcTemplate.update(sql,objects);//查询return "updateOk";}//删除用户@GetMapping("/delete/{id}")public String delUser(@PathVariable("id") int id){//插入语句String sql = "delete from employee where id=?";jdbcTemplate.update(sql,id);//查询return "deleteOk";}}
4.3、springboot + Druid
上一章中用到的jdbc、mysql、web依赖也是必须要的
导入依赖
<dependency><groupId>com.alibaba</groupId><artifactId>druid</artifactId><version>1.1.21</version>
</dependency>
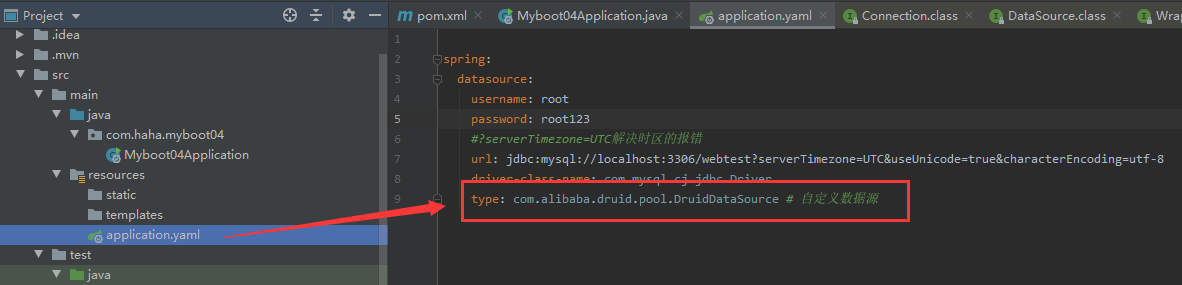
springboot + jdbc ,Spring Boot 2.0 以上默认使用 com.zaxxer.hikari.HikariDataSource 数据源,
这里我们可以 通过 spring.datasource.type 指定数据源
type: com.alibaba.druid.pool.DruidDataSource # 自定义数据源
还是像上一章那样,输出一下数据源试试
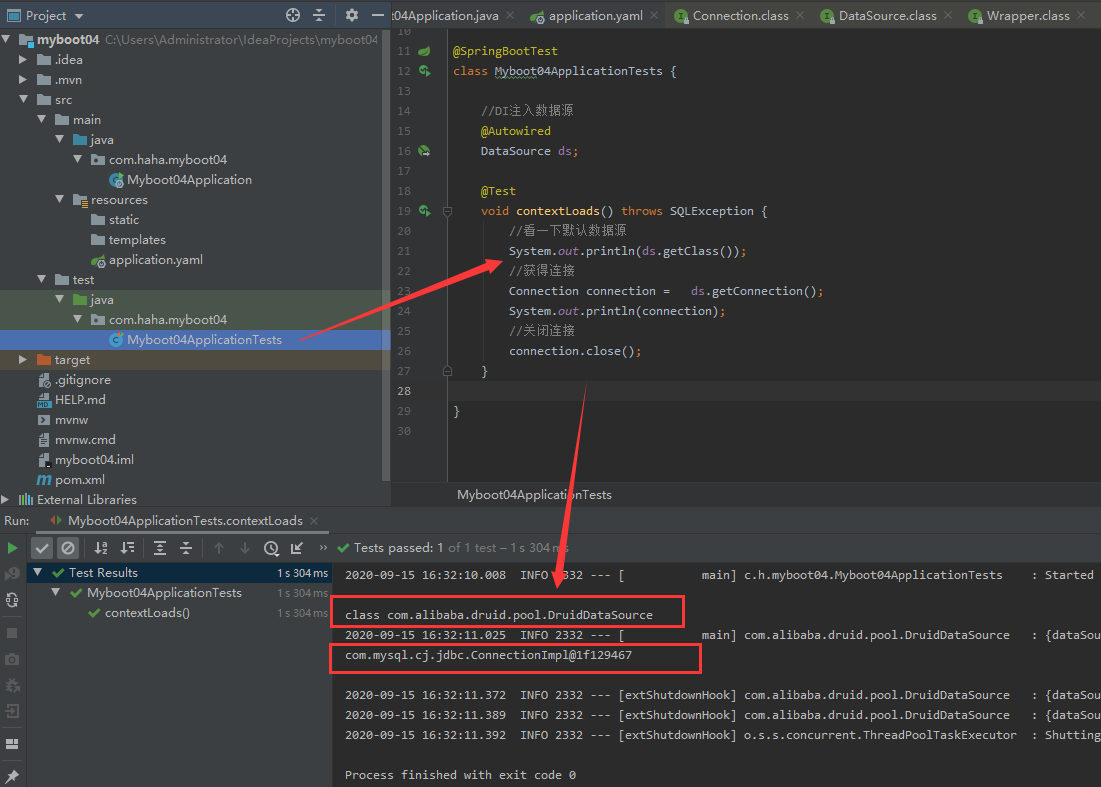
切换数据源成功了。接下来可以配置初始化大小、最大连接数、等待时间、最小连接数 等设置项。
spring:datasource:username: rootpassword: root123#?serverTimezone=UTC解决时区的报错url: jdbc:mysql://localhost:3306/webtast?serverTimezone=UTC&useUnicode=true&characterEncoding=utf-8driver-class-name: com.mysql.cj.jdbc.Drivertype: com.alibaba.druid.pool.DruidDataSource#Spring Boot 默认是不注入这些属性值的,需要自己绑定#druid 数据源专有配置initialSize: 5minIdle: 5maxActive: 20maxWait: 60000timeBetweenEvictionRunsMillis: 60000minEvictableIdleTimeMillis: 300000validationQuery: SELECT 1 FROM DUALtestWhileIdle: truetestOnBorrow: falsetestOnReturn: falsepoolPreparedStatements: true#配置监控统计拦截的filters,stat:监控统计、log4j:日志记录、wall:防御sql注入filters: stat,wall,log4jmaxPoolPreparedStatementPerConnectionSize: 20useGlobalDataSourceStat: trueconnectionProperties: druid.stat.mergeSql=true;druid.stat.slowSqlMillis=500
如上配置需要导入log4j依赖
<dependency><groupId>log4j</groupId><artifactId>log4j</artifactId><version>1.2.17</version>
</dependency>
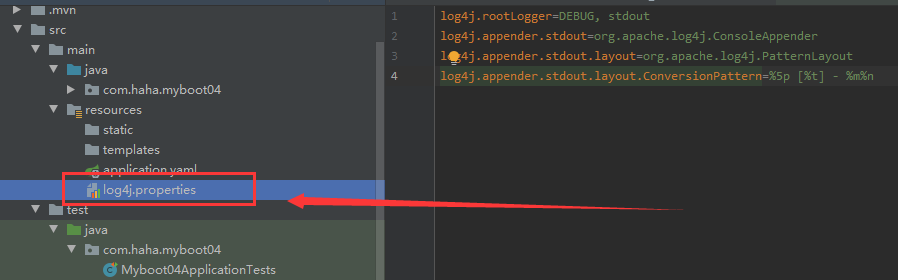
运行log4j需要加人这个配置文件log4j.properties
log4j.rootLogger=DEBUG, stdout
log4j.appender.stdout=org.apache.log4j.ConsoleAppender
log4j.appender.stdout.layout=org.apache.log4j.PatternLayout
log4j.appender.stdout.layout.ConversionPattern=%5p [%t] - %m%n
新建配置类DruidConfig.java
import com.alibaba.druid.pool.DruidDataSource;
import org.springframework.boot.context.properties.ConfigurationProperties;
import org.springframework.context.annotation.Bean;
import org.springframework.context.annotation.Configuration;import javax.sql.DataSource;@Configuration
public class DruidConfig {@ConfigurationProperties(prefix = "spring.datasource")@Beanpublic DataSource druidDataSource() {return new DruidDataSource();}
}
这个配置类的作用是
将自定义的 Druid数据源添加到容器中,不再让 Spring Boot 自动创建
绑定全局配置文件中的 druid 数据源属性到 com.alibaba.druid.pool.DruidDataSource从而让它们生效@ConfigurationProperties(prefix = "spring.datasource")的作用:
全局配置文件中前缀为 spring.datasource的属性值注入到 com.alibaba.druid.pool.DruidDataSource 的同名参数中
测试一下获取最大连接数
DruidDataSource druidDataSource = (DruidDataSource) dataSource;System.out.println("druidDataSource 数据源最大连接数:" + druidDataSource.getMaxActive());System.out.println("druidDataSource 数据源初始化连接数:" + druidDataSource.getInitialSize());
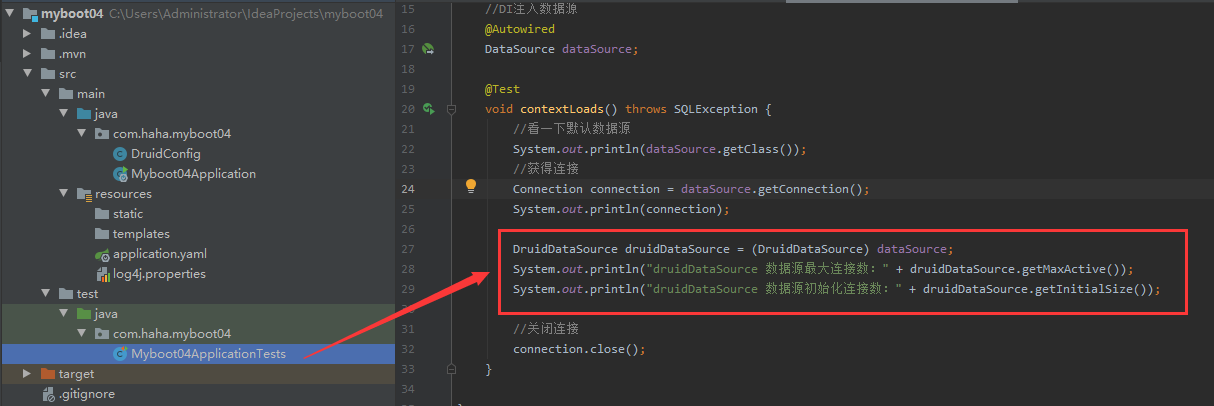
运行结果

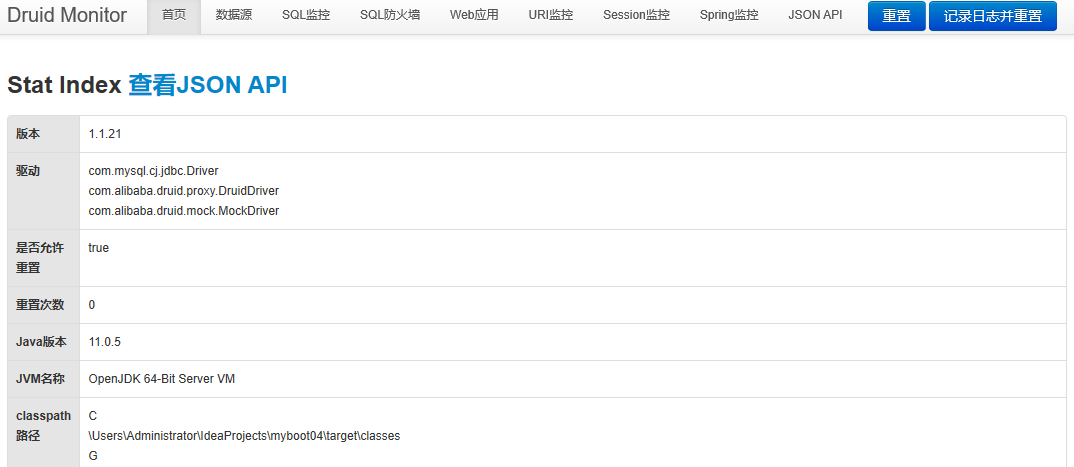
Druid 数据源具有监控的功能,并提供了一个 web 界面方便用户查看
在DruidConfig.java添加如下方法
//配置 Druid 监控管理后台的Servlet;
//内置 Servlet 容器时没有web.xml文件,所以使用 Spring Boot 的注册 Servlet 方式
@Bean
public ServletRegistrationBean statViewServlet() {ServletRegistrationBean bean = new ServletRegistrationBean(new StatViewServlet(), "/druid/*");// 这些参数可以在 com.alibaba.druid.support.http.StatViewServlet // 的父类 com.alibaba.druid.support.http.ResourceServlet 中找到Map<String, String> initParams = new HashMap<>();initParams.put("loginUsername", "admin"); //后台管理界面的登录账号initParams.put("loginPassword", "123456"); //后台管理界面的登录密码//后台允许谁可以访问//initParams.put("allow", "localhost"):表示只有本机可以访问//initParams.put("allow", ""):为空或者为null时,表示允许所有访问initParams.put("allow", "");//deny:Druid 后台拒绝谁访问//initParams.put("kuangshen", "192.168.1.20");表示禁止此ip访问//设置初始化参数bean.setInitParameters(initParams);return bean;
}
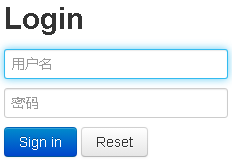
之后运行,访问http://localhost:8080/druid/login.html
还可以配置 Druid web 监控 filter 过滤器,在DruidConfig.java添加如下方法
//配置 Druid 监控 之  web 监控的 filter
//WebStatFilter:用于配置Web和Druid数据源之间的管理关联监控统计
@Bean
public FilterRegistrationBean webStatFilter() {FilterRegistrationBean bean = new FilterRegistrationBean();bean.setFilter(new WebStatFilter());//exclusions:设置哪些请求进行过滤排除掉,从而不进行统计Map<String, String> initParams = new HashMap<>();initParams.put("exclusions", "*.js,*.css,/druid/*,/jdbc/*");bean.setInitParameters(initParams);//"/*" 表示过滤所有请求bean.setUrlPatterns(Arrays.asList("/*"));return bean;
}
如下是访问截图:
5、SpringBoot + Dubbo + Zookeeper
什么是分布式系统?
分布式系统是若干独立计算机的集合,这些计算机对于用户来说就像单个相关系统
什么RPC?
是一种远程过程调用的思想,也就是一种进程间通信方式的思想。
举例:两台服务器A,B,一个应用部署在A服务器上,想要调用B服务器上应用提供的函数/方法,是不能直接调用的。RPC可以让他们互相调用。
什么是Dubbo?
是一款高性能、轻量级的开源Java RPC框架,提供了三大核心能力:面向接口的远程方法调用,智能容错和负载均衡,以及服务自动注册和发现。
dubbo官网 http://dubbo.apache.org/zh-cn/index.html
什么是ZooKeeper?
是一个分布式的,开放源码的分布式应用程序协调服务。我们用ZooKeeper来管理Dubbo中一些配置来实现服务。
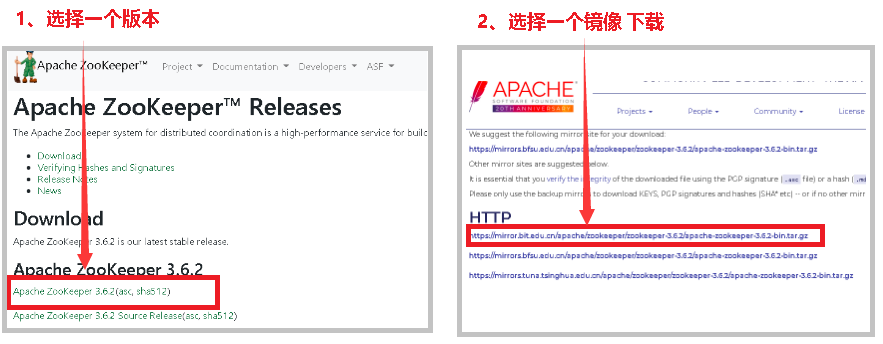
5.1、Window下安装zookeeper
下载地址:https://zookeeper.apache.org/releases.html
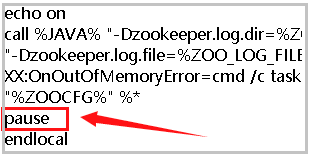
下载完解压,找到/bin/zkServer.cmd
在endlocal前一排加个pause。保存。
找到/conf/zoo_sample.cfg,复制一份,改名zoo.cfg
zoo.cfg就是我们的配置文件了,暂时先不改里面的内容
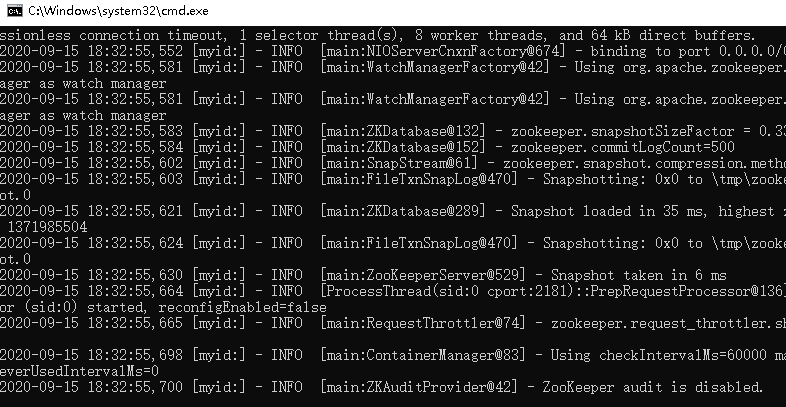
运行zkServer.cmd试试
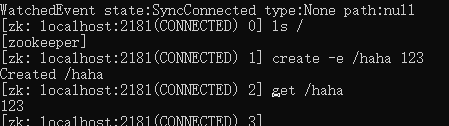
再运行zkCli.cmd
输入以下指令
ls / :列出zookeeper根下保存的所有节点
create –e /haha 123:创建一个haha节点,值为123
get /haha:获取/haha节点的值
5.2、Window下安装dubbo-admin
下载地址:https://github.com/apache/dubbo-admin/archive/master.zip
下载完解压,把它放在zookeeper同目录下

之后就可以打包dubbo-admin了。
打包之前核对一下zookeeper地址
1、先找到zookeeper里的zoo.cfg,里面的clientPort=2181的就是zookeeper的端口号
2、这个端口号需要和dubbo-admin\src\main\resources \application.properties里的dubbo.registry.address=zookeeper://127.0.0.1:2181一致
首先保持zookeeper的服务处于开启状态。
也就是zkServer.cmd一直开着
然后在dubbo-admin-master目录下,打开一个新的cmd
打包dubbo-admin
mvn clean package -Dmaven.test.skip=true
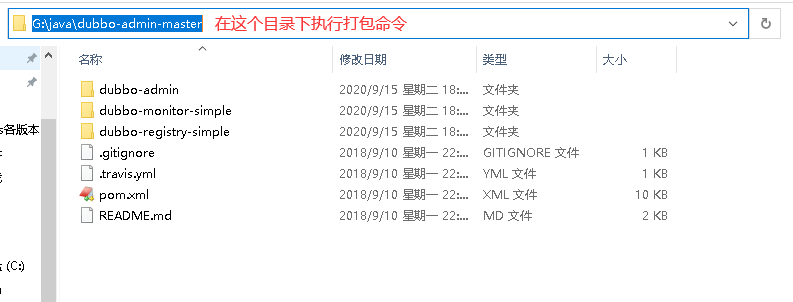
等待执行完成

执行 dubbo-admin\target 下的dubbo-admin-0.0.1-SNAPSHOT.jar
java -jar dubbo-admin-0.0.1-SNAPSHOT.jar
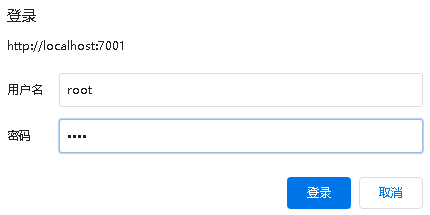
执行完毕,访问:http://localhost:7001/
默认账号root,密码root

到此安装完成
接下来仍然保持 Dubbo 和 zookeeper运行
5.3 、SpringBoot + Dubbo + zookeeper
我们现在要实现两个板块间相互通信:
用卖票举例:
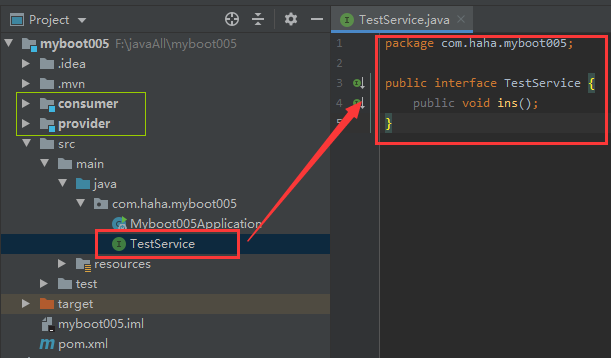
先创建一个主项目,然后里面创建两个板块:Provider提供服务者、Consumer服务消费者。
1、先在主项目中创建一个接口,这个接口两个项目都要调用。
2、为两个模块provider、consumer添加相同的依赖
<?xml version="1.0" encoding="UTF-8"?>
<project xmlns="http://maven.apache.org/POM/4.0.0" xmlns:xsi="http://www.w3.org/2001/XMLSchema-instance"xsi:schemaLocation="http://maven.apache.org/POM/4.0.0 https://maven.apache.org/xsd/maven-4.0.0.xsd"><modelVersion>4.0.0</modelVersion><parent><groupId>org.springframework.boot</groupId><artifactId>spring-boot-starter-parent</artifactId><version>2.3.3.RELEASE</version><relativePath/> <!-- lookup parent from repository --></parent><groupId>com.haha</groupId><artifactId>provider</artifactId><version>0.0.1-SNAPSHOT</version><name>provider</name><description>Demo project for Spring Boot</description><properties><java.version>11</java.version></properties><dependencies><dependency><groupId>org.springframework.boot</groupId><artifactId>spring-boot-starter</artifactId></dependency><dependency><groupId>org.springframework.boot</groupId><artifactId>spring-boot-starter-test</artifactId><scope>test</scope><exclusions><exclusion><groupId>org.junit.vintage</groupId><artifactId>junit-vintage-engine</artifactId></exclusion></exclusions></dependency><dependency><groupId>com.haha</groupId><artifactId>myboot005</artifactId><version>0.0.1-SNAPSHOT</version></dependency><dependency><groupId>org.springframework.boot</groupId><artifactId>spring-boot-starter-web</artifactId></dependency><dependency><groupId>org.springframework.boot</groupId><artifactId>spring-boot-starter-test</artifactId><scope>test</scope></dependency><dependency><groupId>org.apache.dubbo</groupId><artifactId>dubbo-spring-boot-starter</artifactId><version>2.7.3</version><exclusions><exclusion><groupId>org.slf4j</groupId><artifactId>slf4j-log4j12</artifactId></exclusion></exclusions></dependency><dependency><groupId>org.apache.dubbo</groupId><artifactId>dubbo</artifactId><version>2.7.3</version></dependency><dependency><groupId>org.apache.curator</groupId><artifactId>curator-framework</artifactId><version>4.0.1</version></dependency><dependency><groupId>org.apache.curator</groupId><artifactId>curator-recipes</artifactId><version>2.8.0</version></dependency><dependency><groupId>org.apache.zookeeper</groupId><artifactId>zookeeper</artifactId><version>3.4.13</version><type>pom</type><exclusions><exclusion><groupId>org.slf4j</groupId><artifactId>slf4j-log4j12</artifactId></exclusion></exclusions></dependency><dependency><groupId>com.101tec</groupId><artifactId>zkclient</artifactId><version>0.10</version></dependency></dependencies><build><plugins><plugin><groupId>org.springframework.boot</groupId><artifactId>spring-boot-maven-plugin</artifactId></plugin></plugins></build>
</project>
需要注意的是,其中这个依赖是主项目。
和你自己建的主项目对应就可以
<dependency><groupId>com.haha</groupId><artifactId>myboot005</artifactId><version>0.0.1-SNAPSHOT</version></dependency>
3、服务提供者provider
配置文件
server.port=8081
#spring项目名
spring.application.name=dubbo_auto_configuration_provider_demo
#Dubbo provider configuration
dubbo.application.name=dubbo_provider
dubbo.registry.protocol=zookeeper
dubbo.registry.address=zookeeper://127.0.0.1:2181
dubbo.protocol.name=dubbo
dubbo.protocol.port=20880
#扫描注解包通过该设置将服务注册到zookeeper
dubbo.scan.base-packages=com.haha.provider.service
提供一个服务TestServiceImpl
package com.haha.provider.service;import com.haha.myboot005.TestService;
import org.apache.dubbo.config.annotation.Service;@Service(version = "1.0.0",interfaceClass = TestService.class)
public class TestServiceImpl implements TestService {@Overridepublic void ins() {System.out.println("这是我提供的服务");}
}
4、服务消费者consumer
配置文件
#避免端口冲突
server.port=8082
#dubbo configuration
dubbo.application.name=dubbo_consumer
dubbo.registry.protocol=zookeeper
dubbo.registry.address=zookeeper://127.0.0.1:2181
消费服务
package com.haha.consumer.controller;import com.haha.myboot005.TestService;
import org.apache.dubbo.config.annotation.Reference;
import org.springframework.web.bind.annotation.RequestMapping;
import org.springframework.web.bind.annotation.RestController;@RestController
public class TestController {@Reference(version = "1.0.0")private TestService testServiceImpl;@RequestMapping("/ins")public String ins(){testServiceImpl.ins();return "ins";}}
然后将两个项目分别启动,这时浏览器访问http://localhost:8082/ins
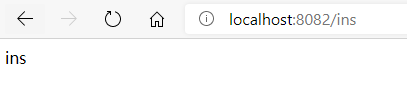
再看看控制器后台

运行成功
两个不同的应用实现了数据通信
如若内容造成侵权/违法违规/事实不符,请联系编程学习网邮箱:809451989@qq.com进行投诉反馈,一经查实,立即删除!
相关文章
- 通过经纬度获取区域信息
今天公司下发任务,其中有个需求,就是通过经纬度获取区域相关信息,然后自己在网上找了大量资料,并尝试都没有成功,所以自己决定写一个工具类,工具类已写好,代码如下: package com.cxy…...
2024/5/3 22:46:19 - [Datamining][FinancialRiskControl] Task01:赛题理解
竞赛采用AUC作为评价指标。AUC(Area Under Curve)被定义为 ROC曲线 下与坐标轴围成的面积。 分类算法常见的评估指标如下: 1、混淆矩阵(Confuse Matrix) (1)若一个实例是正类,并且…...
2024/4/21 21:20:57 - HTML 三十三 颜色名
本页提供了被大多数浏览器支持的颜色名。 提示:仅有 16 种颜色名被 W3C 的 HTML 4.0 标准支持,它们是:aqua、black、blue、fuchsia、gray、green、lime、maroon、navy、olive、purple、red、silver、teal、white、yellow。 如果使用其它颜色…...
2024/5/4 12:07:41 - JAVA系列:&和&&的区别
如果sucess是false,&后面的依然会执行,而&&后面不会执行 return_true...true return_true...false return_true...true return_true...false...
2024/4/24 4:18:40 - spark大数据分析:spark Struct Strreaming(26)数据输出结果分析(待续)
文章目录输出模式使用场景Append模式Complete输出模式Update模式基于File Sink基于Kafka Sink 以Streaming方式输出数据基于Kafka Sink 以Batch方式输出数据基于Console sink输出数据基于Memory SinkForeach SinkForeachBatch Sink输出模式使用场景 Append模式 默认输出模式,…...
2024/5/3 3:24:13 - HTML 三十四 文档类型
HTML <!DOCTYPE> <!DOCTYPE> 声明帮助浏览器正确地显示网页。 <!DOCTYPE> 声明 Web 世界中存在许多不同的文档。只有了解文档的类型,浏览器才能正确地显示文档。 HTML 也有多个不同的版本,只有完全明白页面中使用的确切 HTML 版本…...
2024/4/21 21:20:53 - 系统详细设计说明书
人力资源管理系统 详细设计说明书 Version 3.0 文档编号 TTS*** 2014-06-24 文档历史 版本 标题 内容 作者 时间 1编写目的 明确业务背景、业务范围、基本业务逻辑和业务框架,期…...
2024/5/3 22:07:52 - es启动、停止 kibana启动 、ui界面、分词
es启动命令 /opt/module/elasticsearch-6.3.1/bin/elasticsearch kibana启动命令 /opt/module/kibana/bin/kibana ui界面 ip:5601 http://192.168.138.103:5601/ es 停止命令 ps -ef|grep /opt/module/elasticsearch-6.3.1 |grep -v grep|awk {print $2}|xargs kill …...
2024/4/26 11:44:35 - [Leetcode]N皇后II-Python递归回溯
[Leetcode]N皇后II Leetcode-N皇后II 题目描述 n 皇后问题研究的是如何将 n 个皇后放置在 nn 的棋盘上,并且使皇后彼此之间不能相互攻击。 上图为 8 皇后问题的一种解法。 给定一个整数 n,返回 n 皇后不同的解决方案的数量。 示例: 输入: 4 输出: …...
2024/4/21 21:20:49 - Go速成无压力【十五】:并发 (Goroutines)
文章目录(一)Goroutines(二)Channels(三)管道的范围与关闭(四)Select(五)Default Selection(一)Goroutines Goroutines是Go运行时的轻…...
2024/5/2 1:47:25 - 10、Jmeter结合fiddler查看响应结果
1、首先我们打开fiddler,我们知道fiddler默认端口是8888,我们确定一下fiddler过滤器是未勾选的 2、我们再Jmeter中右键HTTP请求,然后选择Advanced,填好代理服务 3清除之前结果,点Start,运行测试,看看fidd…...
2024/4/21 21:20:48 - 食谱——鸡蛋饼
1、原料 面粉鸡蛋油、盐、味精西红柿、生菜、火腿、等其他你想放的 2、做法 有多种方法 一种是:面粉和成面团,然后擀成饼状,起锅烧油,放入煎至一面金黄,翻身打上鸡蛋,撒点盐味精,等当前这面也…...
2024/4/21 21:20:46 - 宝可梦数据分析--阿里云天池Python训练营
1 学习地址 https://tianchi.aliyun.com/specials/promotion/aicamppython 2 学习内容 2.1 数据分析基本介绍 宝可梦数据分析-平民最强宝可梦选择方案 数据时代的到来刷新了人们探索未知的方式,从基础能源建设到航天航空工程。在关都地区真新镇大木研究所一直孜…...
2024/5/3 23:21:16 - LeetCode_No.26 删除排序数组中的重复项
题目: 删除排序数组中的重复项: 给定一个排序数组,你需要在 原地 删除重复出现的元素,使得每个元素只出现一次,返回移除后数组的新长度。 不要使用额外的数组空间,你必须在 原地 修改输入数组 并在使用 …...
2024/4/24 20:15:22 - 【JDK8】JDK8 新特性 - 新的时间和日期 API(LocalDate、LocalDateTime、Instant、Duration、Period、ZoneId)
JDK 8 由一个新增的特性就是引入了新的时间和日期 API,可以更方便的处理日期和时间。 LocalDate LocalDate 类用来表示一个具体的日期,但不包含具体时间,可以使用 LocalDate 的静态方法 of() 来创建一个实例。LocalDate 也包含一些方法用来…...
2024/5/2 23:29:41 - 在虚拟机上搭建自己的 git 服务器并创建 git 仓库
GitHub,Gitee 想来大家都用过,我们的代码就是托管在这些平台上的。因此,你可能好奇为什么我们不自己大家一个 git 服务器呢?下面,就开始教大家如何一步步搭建自己的 git 服务器(试验成功的那一刻还是很让人…...
2024/5/4 2:42:24 - Datawhale-Task01
再次从零开始吧 一、数据 赛题以预测用户贷款是否违约为任务,数据集报名后可见并可下载,该数据来自某信贷平台的贷款记录,总数据量超过120w,包含47列变量信息,其中15列为匿名变量。为了保证比赛的公平性,…...
2024/4/21 21:20:09 - MySQL实战45讲系列学习笔记(一)
MySQL实战45讲系列学习笔记(一) 最近在极客时间上学习林晓斌老师的MySQL实战45讲,过程所做笔记与思维导图,有兴趣可以一起交流学习。话不多说先上思维导图 1、数据库建立连接的过程比较复杂,数据库当中的长连接&#…...
2024/4/21 21:20:44 - 竞赛-贷款违约预测-01 赛题理解
Object: 赛题理解 Key Result: 理解赛题数据和目标清楚评分体系。理解赛题的解题思路。 1. 赛题数据和目标 比赛地址:https://tianchi.aliyun.com/competition/entrance/531830/information 1.1赛题数据 sample_submit.csv 两列,id,isDefa…...
2024/4/21 21:20:43 - datawhale金融风控day1:赛题理解
1.2.1赛题概况 比赛要求参赛选手根据给定的数据集,建立模型,预测金融风险。 赛题以预测金融风险为任务,数据集报名后可见到下载,该数据来自某信贷平台的贷款记录,总数据量超过120w,包含47列变量信息&#…...
2024/4/21 21:20:42
最新文章
- C#面:解释一下 UDDI、WSDL 的意义及其作用
UUDI: UDDI(Universal Description, Discovery, and Integration)和WSDL(Web Services Description Language)是两个与C#相关的重要概念,它们在Web服务开发中起着关键的作用。 UDD…...
2024/5/4 18:23:10 - 梯度消失和梯度爆炸的一些处理方法
在这里是记录一下梯度消失或梯度爆炸的一些处理技巧。全当学习总结了如有错误还请留言,在此感激不尽。 权重和梯度的更新公式如下: w w − η ⋅ ∇ w w w - \eta \cdot \nabla w ww−η⋅∇w 个人通俗的理解梯度消失就是网络模型在反向求导的时候出…...
2024/3/20 10:50:27 - 流域生态系统水-碳-氮耦合过程模拟
流域是一个相对独立的自然地理单元,它是以水系为纽带,将系统内各自然地理要素连结成一个不可分割的整体。碳和氮是陆地生态系统中最重要的两种化学元素,而在流域系统内,水-碳-氮是相互联动、不可分割的耦合体。随着流域内人类活动…...
2024/5/4 7:28:09 - 不重复数字
map就感觉很舒服 题目描述 给定 n 个数,要求把其中重复的去掉,只保留第一次出现的数。 输入格式 本题有多组数据。 第一行一个整数 T,表示数据组数。 对于每组数据: 第一行一个整数 n。 第二行 n 个数,表示给定的数。…...
2024/5/2 5:09:07 - 416. 分割等和子集问题(动态规划)
题目 题解 class Solution:def canPartition(self, nums: List[int]) -> bool:# badcaseif not nums:return True# 不能被2整除if sum(nums) % 2 ! 0:return False# 状态定义:dp[i][j]表示当背包容量为j,用前i个物品是否正好可以将背包填满ÿ…...
2024/5/4 12:05:22 - 【Java】ExcelWriter自适应宽度工具类(支持中文)
工具类 import org.apache.poi.ss.usermodel.Cell; import org.apache.poi.ss.usermodel.CellType; import org.apache.poi.ss.usermodel.Row; import org.apache.poi.ss.usermodel.Sheet;/*** Excel工具类** author xiaoming* date 2023/11/17 10:40*/ public class ExcelUti…...
2024/5/4 11:23:32 - Spring cloud负载均衡@LoadBalanced LoadBalancerClient
LoadBalance vs Ribbon 由于Spring cloud2020之后移除了Ribbon,直接使用Spring Cloud LoadBalancer作为客户端负载均衡组件,我们讨论Spring负载均衡以Spring Cloud2020之后版本为主,学习Spring Cloud LoadBalance,暂不讨论Ribbon…...
2024/5/4 14:46:16 - TSINGSEE青犀AI智能分析+视频监控工业园区周界安全防范方案
一、背景需求分析 在工业产业园、化工园或生产制造园区中,周界防范意义重大,对园区的安全起到重要的作用。常规的安防方式是采用人员巡查,人力投入成本大而且效率低。周界一旦被破坏或入侵,会影响园区人员和资产安全,…...
2024/5/3 16:00:51 - VB.net WebBrowser网页元素抓取分析方法
在用WebBrowser编程实现网页操作自动化时,常要分析网页Html,例如网页在加载数据时,常会显示“系统处理中,请稍候..”,我们需要在数据加载完成后才能继续下一步操作,如何抓取这个信息的网页html元素变化&…...
2024/5/4 12:10:13 - 【Objective-C】Objective-C汇总
方法定义 参考:https://www.yiibai.com/objective_c/objective_c_functions.html Objective-C编程语言中方法定义的一般形式如下 - (return_type) method_name:( argumentType1 )argumentName1 joiningArgument2:( argumentType2 )argumentName2 ... joiningArgu…...
2024/5/3 21:22:01 - 【洛谷算法题】P5713-洛谷团队系统【入门2分支结构】
👨💻博客主页:花无缺 欢迎 点赞👍 收藏⭐ 留言📝 加关注✅! 本文由 花无缺 原创 收录于专栏 【洛谷算法题】 文章目录 【洛谷算法题】P5713-洛谷团队系统【入门2分支结构】🌏题目描述🌏输入格…...
2024/5/3 23:17:01 - 【ES6.0】- 扩展运算符(...)
【ES6.0】- 扩展运算符... 文章目录 【ES6.0】- 扩展运算符...一、概述二、拷贝数组对象三、合并操作四、参数传递五、数组去重六、字符串转字符数组七、NodeList转数组八、解构变量九、打印日志十、总结 一、概述 **扩展运算符(...)**允许一个表达式在期望多个参数࿰…...
2024/5/4 14:46:12 - 摩根看好的前智能硬件头部品牌双11交易数据极度异常!——是模式创新还是饮鸩止渴?
文 | 螳螂观察 作者 | 李燃 双11狂欢已落下帷幕,各大品牌纷纷晒出优异的成绩单,摩根士丹利投资的智能硬件头部品牌凯迪仕也不例外。然而有爆料称,在自媒体平台发布霸榜各大榜单喜讯的凯迪仕智能锁,多个平台数据都表现出极度异常…...
2024/5/4 14:46:11 - Go语言常用命令详解(二)
文章目录 前言常用命令go bug示例参数说明 go doc示例参数说明 go env示例 go fix示例 go fmt示例 go generate示例 总结写在最后 前言 接着上一篇继续介绍Go语言的常用命令 常用命令 以下是一些常用的Go命令,这些命令可以帮助您在Go开发中进行编译、测试、运行和…...
2024/5/4 14:46:11 - 用欧拉路径判断图同构推出reverse合法性:1116T4
http://cplusoj.com/d/senior/p/SS231116D 假设我们要把 a a a 变成 b b b,我们在 a i a_i ai 和 a i 1 a_{i1} ai1 之间连边, b b b 同理,则 a a a 能变成 b b b 的充要条件是两图 A , B A,B A,B 同构。 必要性显然࿰…...
2024/5/4 2:14:16 - 【NGINX--1】基础知识
1、在 Debian/Ubuntu 上安装 NGINX 在 Debian 或 Ubuntu 机器上安装 NGINX 开源版。 更新已配置源的软件包信息,并安装一些有助于配置官方 NGINX 软件包仓库的软件包: apt-get update apt install -y curl gnupg2 ca-certificates lsb-release debian-…...
2024/5/3 16:23:03 - Hive默认分割符、存储格式与数据压缩
目录 1、Hive默认分割符2、Hive存储格式3、Hive数据压缩 1、Hive默认分割符 Hive创建表时指定的行受限(ROW FORMAT)配置标准HQL为: ... ROW FORMAT DELIMITED FIELDS TERMINATED BY \u0001 COLLECTION ITEMS TERMINATED BY , MAP KEYS TERMI…...
2024/5/4 12:39:12 - 【论文阅读】MAG:一种用于航天器遥测数据中有效异常检测的新方法
文章目录 摘要1 引言2 问题描述3 拟议框架4 所提出方法的细节A.数据预处理B.变量相关分析C.MAG模型D.异常分数 5 实验A.数据集和性能指标B.实验设置与平台C.结果和比较 6 结论 摘要 异常检测是保证航天器稳定性的关键。在航天器运行过程中,传感器和控制器产生大量周…...
2024/5/4 13:16:06 - --max-old-space-size=8192报错
vue项目运行时,如果经常运行慢,崩溃停止服务,报如下错误 FATAL ERROR: CALL_AND_RETRY_LAST Allocation failed - JavaScript heap out of memory 因为在 Node 中,通过JavaScript使用内存时只能使用部分内存(64位系统&…...
2024/5/4 16:48:41 - 基于深度学习的恶意软件检测
恶意软件是指恶意软件犯罪者用来感染个人计算机或整个组织的网络的软件。 它利用目标系统漏洞,例如可以被劫持的合法软件(例如浏览器或 Web 应用程序插件)中的错误。 恶意软件渗透可能会造成灾难性的后果,包括数据被盗、勒索或网…...
2024/5/4 14:46:05 - JS原型对象prototype
让我简单的为大家介绍一下原型对象prototype吧! 使用原型实现方法共享 1.构造函数通过原型分配的函数是所有对象所 共享的。 2.JavaScript 规定,每一个构造函数都有一个 prototype 属性,指向另一个对象,所以我们也称为原型对象…...
2024/5/4 2:00:16 - C++中只能有一个实例的单例类
C中只能有一个实例的单例类 前面讨论的 President 类很不错,但存在一个缺陷:无法禁止通过实例化多个对象来创建多名总统: President One, Two, Three; 由于复制构造函数是私有的,其中每个对象都是不可复制的,但您的目…...
2024/5/3 22:03:11 - python django 小程序图书借阅源码
开发工具: PyCharm,mysql5.7,微信开发者工具 技术说明: python django html 小程序 功能介绍: 用户端: 登录注册(含授权登录) 首页显示搜索图书,轮播图࿰…...
2024/5/4 9:07:39 - 电子学会C/C++编程等级考试2022年03月(一级)真题解析
C/C++等级考试(1~8级)全部真题・点这里 第1题:双精度浮点数的输入输出 输入一个双精度浮点数,保留8位小数,输出这个浮点数。 时间限制:1000 内存限制:65536输入 只有一行,一个双精度浮点数。输出 一行,保留8位小数的浮点数。样例输入 3.1415926535798932样例输出 3.1…...
2024/5/4 14:46:02 - 配置失败还原请勿关闭计算机,电脑开机屏幕上面显示,配置失败还原更改 请勿关闭计算机 开不了机 这个问题怎么办...
解析如下:1、长按电脑电源键直至关机,然后再按一次电源健重启电脑,按F8健进入安全模式2、安全模式下进入Windows系统桌面后,按住“winR”打开运行窗口,输入“services.msc”打开服务设置3、在服务界面,选中…...
2022/11/19 21:17:18 - 错误使用 reshape要执行 RESHAPE,请勿更改元素数目。
%读入6幅图像(每一幅图像的大小是564*564) f1 imread(WashingtonDC_Band1_564.tif); subplot(3,2,1),imshow(f1); f2 imread(WashingtonDC_Band2_564.tif); subplot(3,2,2),imshow(f2); f3 imread(WashingtonDC_Band3_564.tif); subplot(3,2,3),imsho…...
2022/11/19 21:17:16 - 配置 已完成 请勿关闭计算机,win7系统关机提示“配置Windows Update已完成30%请勿关闭计算机...
win7系统关机提示“配置Windows Update已完成30%请勿关闭计算机”问题的解决方法在win7系统关机时如果有升级系统的或者其他需要会直接进入一个 等待界面,在等待界面中我们需要等待操作结束才能关机,虽然这比较麻烦,但是对系统进行配置和升级…...
2022/11/19 21:17:15 - 台式电脑显示配置100%请勿关闭计算机,“准备配置windows 请勿关闭计算机”的解决方法...
有不少用户在重装Win7系统或更新系统后会遇到“准备配置windows,请勿关闭计算机”的提示,要过很久才能进入系统,有的用户甚至几个小时也无法进入,下面就教大家这个问题的解决方法。第一种方法:我们首先在左下角的“开始…...
2022/11/19 21:17:14 - win7 正在配置 请勿关闭计算机,怎么办Win7开机显示正在配置Windows Update请勿关机...
置信有很多用户都跟小编一样遇到过这样的问题,电脑时发现开机屏幕显现“正在配置Windows Update,请勿关机”(如下图所示),而且还需求等大约5分钟才干进入系统。这是怎样回事呢?一切都是正常操作的,为什么开时机呈现“正…...
2022/11/19 21:17:13 - 准备配置windows 请勿关闭计算机 蓝屏,Win7开机总是出现提示“配置Windows请勿关机”...
Win7系统开机启动时总是出现“配置Windows请勿关机”的提示,没过几秒后电脑自动重启,每次开机都这样无法进入系统,此时碰到这种现象的用户就可以使用以下5种方法解决问题。方法一:开机按下F8,在出现的Windows高级启动选…...
2022/11/19 21:17:12 - 准备windows请勿关闭计算机要多久,windows10系统提示正在准备windows请勿关闭计算机怎么办...
有不少windows10系统用户反映说碰到这样一个情况,就是电脑提示正在准备windows请勿关闭计算机,碰到这样的问题该怎么解决呢,现在小编就给大家分享一下windows10系统提示正在准备windows请勿关闭计算机的具体第一种方法:1、2、依次…...
2022/11/19 21:17:11 - 配置 已完成 请勿关闭计算机,win7系统关机提示“配置Windows Update已完成30%请勿关闭计算机”的解决方法...
今天和大家分享一下win7系统重装了Win7旗舰版系统后,每次关机的时候桌面上都会显示一个“配置Windows Update的界面,提示请勿关闭计算机”,每次停留好几分钟才能正常关机,导致什么情况引起的呢?出现配置Windows Update…...
2022/11/19 21:17:10 - 电脑桌面一直是清理请关闭计算机,windows7一直卡在清理 请勿关闭计算机-win7清理请勿关机,win7配置更新35%不动...
只能是等着,别无他法。说是卡着如果你看硬盘灯应该在读写。如果从 Win 10 无法正常回滚,只能是考虑备份数据后重装系统了。解决来方案一:管理员运行cmd:net stop WuAuServcd %windir%ren SoftwareDistribution SDoldnet start WuA…...
2022/11/19 21:17:09 - 计算机配置更新不起,电脑提示“配置Windows Update请勿关闭计算机”怎么办?
原标题:电脑提示“配置Windows Update请勿关闭计算机”怎么办?win7系统中在开机与关闭的时候总是显示“配置windows update请勿关闭计算机”相信有不少朋友都曾遇到过一次两次还能忍但经常遇到就叫人感到心烦了遇到这种问题怎么办呢?一般的方…...
2022/11/19 21:17:08 - 计算机正在配置无法关机,关机提示 windows7 正在配置windows 请勿关闭计算机 ,然后等了一晚上也没有关掉。现在电脑无法正常关机...
关机提示 windows7 正在配置windows 请勿关闭计算机 ,然后等了一晚上也没有关掉。现在电脑无法正常关机以下文字资料是由(历史新知网www.lishixinzhi.com)小编为大家搜集整理后发布的内容,让我们赶快一起来看一下吧!关机提示 windows7 正在配…...
2022/11/19 21:17:05 - 钉钉提示请勿通过开发者调试模式_钉钉请勿通过开发者调试模式是真的吗好不好用...
钉钉请勿通过开发者调试模式是真的吗好不好用 更新时间:2020-04-20 22:24:19 浏览次数:729次 区域: 南阳 > 卧龙 列举网提醒您:为保障您的权益,请不要提前支付任何费用! 虚拟位置外设器!!轨迹模拟&虚拟位置外设神器 专业用于:钉钉,外勤365,红圈通,企业微信和…...
2022/11/19 21:17:05 - 配置失败还原请勿关闭计算机怎么办,win7系统出现“配置windows update失败 还原更改 请勿关闭计算机”,长时间没反应,无法进入系统的解决方案...
前几天班里有位学生电脑(windows 7系统)出问题了,具体表现是开机时一直停留在“配置windows update失败 还原更改 请勿关闭计算机”这个界面,长时间没反应,无法进入系统。这个问题原来帮其他同学也解决过,网上搜了不少资料&#x…...
2022/11/19 21:17:04 - 一个电脑无法关闭计算机你应该怎么办,电脑显示“清理请勿关闭计算机”怎么办?...
本文为你提供了3个有效解决电脑显示“清理请勿关闭计算机”问题的方法,并在最后教给你1种保护系统安全的好方法,一起来看看!电脑出现“清理请勿关闭计算机”在Windows 7(SP1)和Windows Server 2008 R2 SP1中,添加了1个新功能在“磁…...
2022/11/19 21:17:03 - 请勿关闭计算机还原更改要多久,电脑显示:配置windows更新失败,正在还原更改,请勿关闭计算机怎么办...
许多用户在长期不使用电脑的时候,开启电脑发现电脑显示:配置windows更新失败,正在还原更改,请勿关闭计算机。。.这要怎么办呢?下面小编就带着大家一起看看吧!如果能够正常进入系统,建议您暂时移…...
2022/11/19 21:17:02 - 还原更改请勿关闭计算机 要多久,配置windows update失败 还原更改 请勿关闭计算机,电脑开机后一直显示以...
配置windows update失败 还原更改 请勿关闭计算机,电脑开机后一直显示以以下文字资料是由(历史新知网www.lishixinzhi.com)小编为大家搜集整理后发布的内容,让我们赶快一起来看一下吧!配置windows update失败 还原更改 请勿关闭计算机&#x…...
2022/11/19 21:17:01 - 电脑配置中请勿关闭计算机怎么办,准备配置windows请勿关闭计算机一直显示怎么办【图解】...
不知道大家有没有遇到过这样的一个问题,就是我们的win7系统在关机的时候,总是喜欢显示“准备配置windows,请勿关机”这样的一个页面,没有什么大碍,但是如果一直等着的话就要两个小时甚至更久都关不了机,非常…...
2022/11/19 21:17:00 - 正在准备配置请勿关闭计算机,正在准备配置windows请勿关闭计算机时间长了解决教程...
当电脑出现正在准备配置windows请勿关闭计算机时,一般是您正对windows进行升级,但是这个要是长时间没有反应,我们不能再傻等下去了。可能是电脑出了别的问题了,来看看教程的说法。正在准备配置windows请勿关闭计算机时间长了方法一…...
2022/11/19 21:16:59 - 配置失败还原请勿关闭计算机,配置Windows Update失败,还原更改请勿关闭计算机...
我们使用电脑的过程中有时会遇到这种情况,当我们打开电脑之后,发现一直停留在一个界面:“配置Windows Update失败,还原更改请勿关闭计算机”,等了许久还是无法进入系统。如果我们遇到此类问题应该如何解决呢࿰…...
2022/11/19 21:16:58 - 如何在iPhone上关闭“请勿打扰”
Apple’s “Do Not Disturb While Driving” is a potentially lifesaving iPhone feature, but it doesn’t always turn on automatically at the appropriate time. For example, you might be a passenger in a moving car, but your iPhone may think you’re the one dri…...
2022/11/19 21:16:57