Mybatis基础模块讲解与强化核心原理
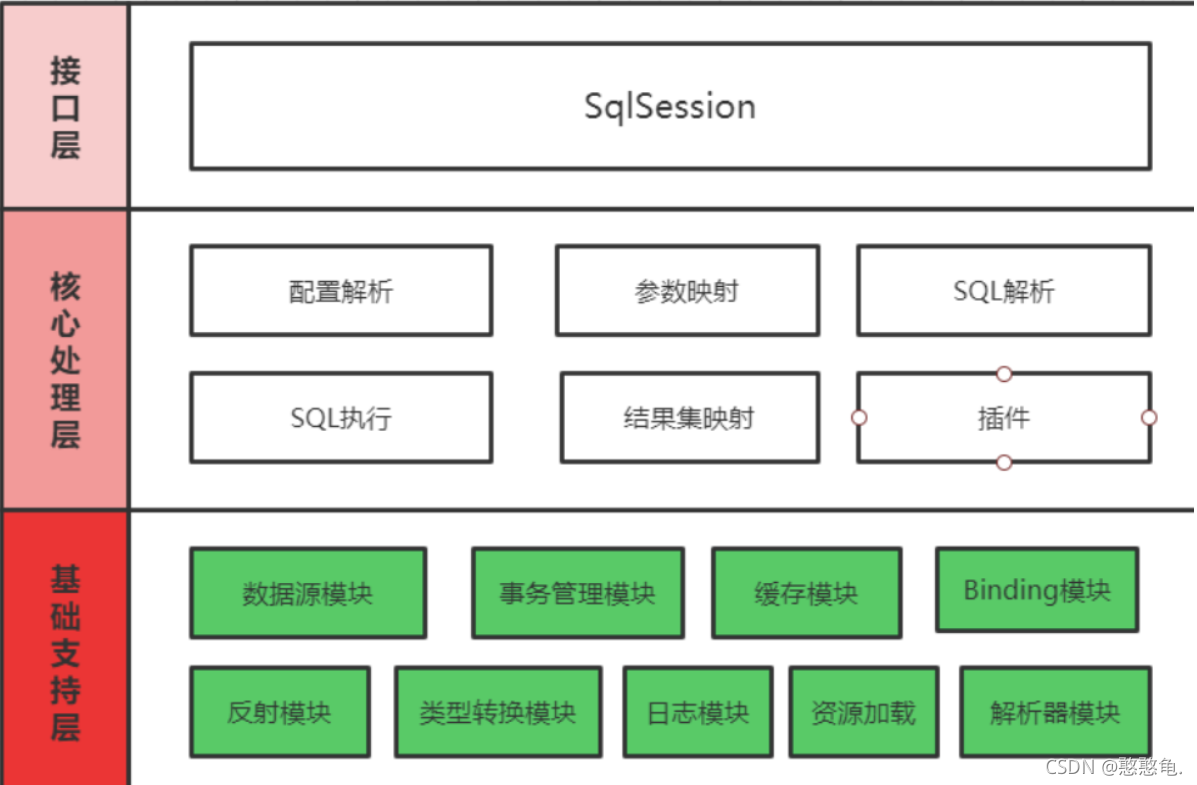
基础支持层
基础支持层位于MyBatis整体架构的最底层,支撑着MyBatis的核心处理层,是整个框架的基石。基础支持层中封装了多个较为通用的、独立的模块。不仅仅为MyBatis提供基础支撑,也可以在合适的场景中直接复用。
反射模块
MyBatis在进行参数处理、结果集映射等操作时会使用到大量的反射操作,Java中的反射功能虽然强大,但是代码编写起来比较复杂且容易出错,为了简化反射操作的相关代码,MyBatis提供了专门的反射模块,该模块位于org.apache.ibatis.reflection包下,它对常见的反射操作做了进一步的封装,提供了更加简洁方便的反射API。
1. Reflector
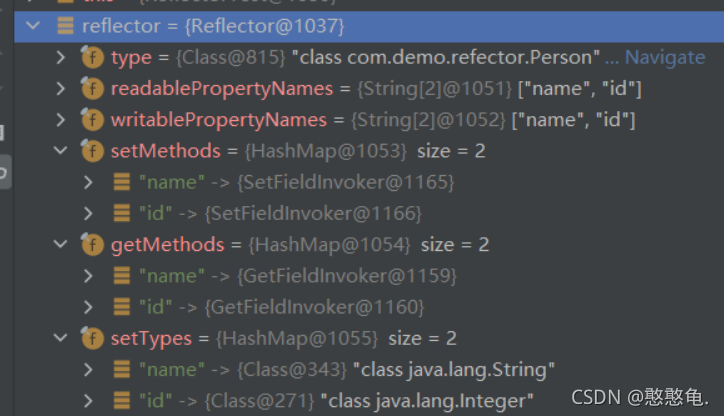
Reflector是反射模块的基础,每个Reflector对象都对应一个类,在Reflector中缓存了反射需要使用的类的元信息。
1.1 属性
首先来看下Reflector中提供的相关属性的含义:
// 对应的Class 类型 1
private final Class<?> type;
// 可读属性的名称集合 可读属性就是存在 getter方法的属性,初始值为null
private final String[] readablePropertyNames;
// 可写属性的名称集合 可写属性就是存在 setter方法的属性,初始值为null
private final String[] writablePropertyNames;
// 记录了属性相应的setter方法,key是属性名称,value是Invoker方法
// 他是对setter方法对应Method对象的封装
private final Map<String, Invoker> setMethods = new HashMap<>();
// 属性相应的getter方法
private final Map<String, Invoker> getMethods = new HashMap<>();
// 记录了相应setter方法的参数类型,key是属性名称 value是setter方法的参数类型
private final Map<String, Class<?>> setTypes = new HashMap<>();
// 和上面的对应
private final Map<String, Class<?>> getTypes = new HashMap<>();
// 记录了默认的构造方法
private Constructor<?> defaultConstructor;// 记录了所有属性名称的集合
private Map<String, String> caseInsensitivePropertyMap = new HashMap<>();
1.2 构造方法
在Reflector的构造器中会完成相关的属性的初始化操作:
// 解析指定的Class类型 并填充上述的集合信息
public Reflector(Class<?> clazz) {type = clazz; // 初始化 type字段addDefaultConstructor(clazz);// 设置默认的构造方法addGetMethods(clazz);// 获取getter方法addSetMethods(clazz); // 获取setter方法addFields(clazz); // 处理没有getter/setter方法的字段// 初始化 可读属性名称集合readablePropertyNames = getMethods.keySet().toArray(new String[0]);// 初始化 可写属性名称集合writablePropertyNames = setMethods.keySet().toArray(new String[0]);// caseInsensitivePropertyMap记录了所有的可读和可写属性的名称 也就是记录了所有的属性名称for (String propName : readablePropertyNames) {// 属性名称转大写caseInsensitivePropertyMap.put(propName.toUpperCase(Locale.ENGLISH), propName);}for (String propName : writablePropertyNames) {// 属性名称转大写caseInsensitivePropertyMap.put(propName.toUpperCase(Locale.ENGLISH), propName);}
}
反射我们也可以在项目中我们直接拿来使用,定义一个普通的Bean对象。
public class Person {private Integer id;private String name;public Person(Integer id) {this.id = id;}public Person(Integer id, String name) {this.id = id;this.name = name;}
}
测试:
Reflector reflector = new Reflector(Person.class);
1.3 公共的API方法
然后我们可以看看Reflector中提供的公共的API方法:
| 方法名称 | 作用 |
|---|---|
| getType | 获取Reflector表示的Class |
| getDefaultConstructor | 获取默认的构造器 |
| hasDefaultConstructor | 判断是否有默认的构造器 |
| getSetInvoker | 根据属性名称获取对应的Invoker 对象 |
| getGetInvoker | 根据属性名称获取对应的Invoker对象 |
| getSetterType | 获取属性对应的类型 比如:String name; // getSetterType(“name”) --> java.lang.String |
| getGetterType | 与上面是对应的 |
| getGetablePropertyNames | 获取所有的可读属性名称的集合 |
| getSetablePropertyNames | 获取所有的可写属性名称的集合 |
| hasSetter | 判断是否具有某个可写的属性 |
| hasGetter | 判断是否具有某个可读的属性 |
| findPropertyName | 根据名称查找属性 |
了解了Reflector对象的基本信息后我们需要如何来获取Reflector对象呢?在MyBatis中给我们提供了一个ReflectorFactory工厂对象。所以我们先来简单了解下ReflectorFactory对象,当然你也可以直接new 出来,像上面的案例一样。
2. ReflectorFactory
ReflectorFactory接口主要实现了对Reflector对象的创建和缓存。
2.1 接口的定义
public interface ReflectorFactory {// 检测该ReflectorFactory是否缓存了Reflector对象boolean isClassCacheEnabled();// 设置是否缓存Reflector对象void setClassCacheEnabled(boolean classCacheEnabled);// 创建指定了Class的Reflector对象Reflector findForClass(Class<?> type);
}
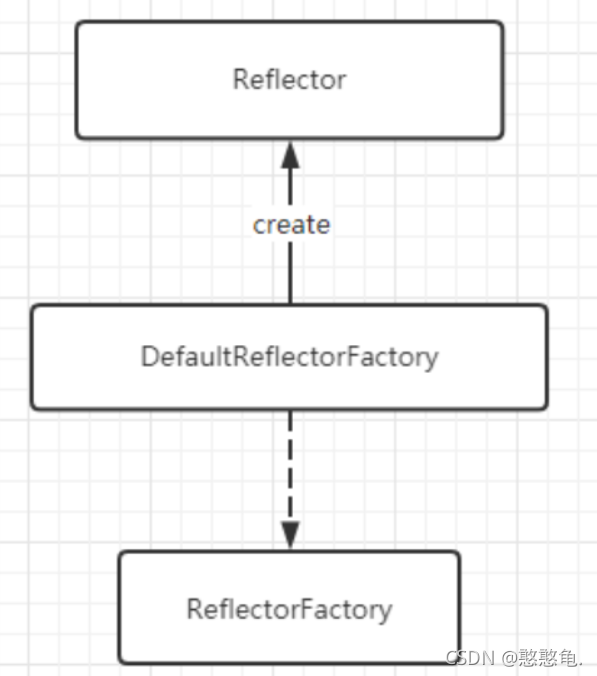
2.2 DefaultReflectorFactory
MyBatis只为该接口提供了DefaultReflectorFactory这一个实现类。他与Reflector的关系如下:
DefaultReflectorFactory中的实现,代码比较简单,我们直接贴出来:
public class DefaultReflectorFactory implements ReflectorFactory {private boolean classCacheEnabled = true;// 实现对 Reflector 对象的缓存private final ConcurrentMap<Class<?>, Reflector> reflectorMap = new ConcurrentHashMap<>();public DefaultReflectorFactory() {}@Overridepublic boolean isClassCacheEnabled() {return classCacheEnabled;}@Overridepublic void setClassCacheEnabled(boolean classCacheEnabled) {this.classCacheEnabled = classCacheEnabled;}@Overridepublic Reflector findForClass(Class<?> type) {if (classCacheEnabled) {// 开启缓存// synchronized (type) removed see issue #461return reflectorMap.computeIfAbsent(type, Reflector::new);} else {// 没有开启缓存就直接创建return new Reflector(type);}}}
2.3 基本使用
通过上面的介绍,我们可以具体的来使用下,加深对其的理解,先准备一个JavaBean。
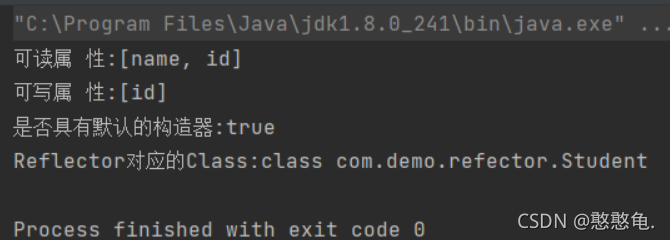
public class Student {public Integer getId() {System.out.println("读物id");return 6;}public void setId(Integer id) {System.out.println("写入id:" + id);}public String getName() {return "张三";}}
这个Bean我们做了简单的处理。
@Test
public void test02() {ReflectorFactory factory = new DefaultReflectorFactory();Reflector reflector = factory.findForClass(Student.class);System.out.println("可读属 性:"+Arrays.toString(reflector.getGetablePropertyNames())); System.out.println("可写属 性:"+Arrays.toString(reflector.getSetablePropertyNames())); System.out.println("是否具有默认的构造器:" + reflector.hasDefaultConstructor()); System.out.println("Reflector对应的Class:" + reflector.getType());
}
3. Invoker
针对于Class中Field和Method的调用,在MyBatis中封装了Invoker对象来统一处理(有使用到适配器模式)。
3.1 接口说明
public interface Invoker {// 执行Field或者MethodObject invoke(Object target, Object[] args) throws IllegalAccessException, InvocationTargetException;// 返回属性相应的类型Class<?> getType();
}
该接口有对应的三个实现:
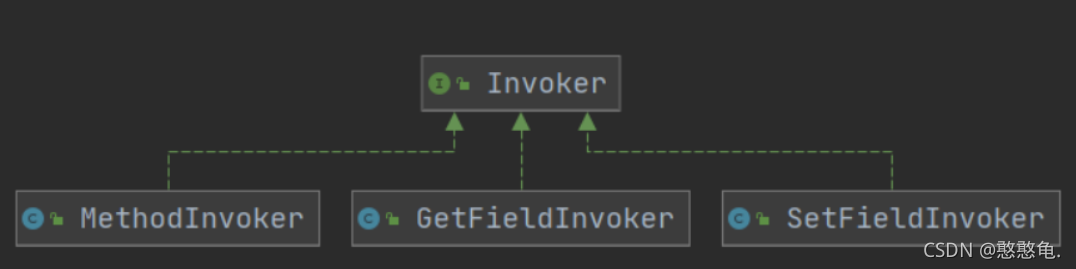
3.2 基本使用
@Test
public void test03() throws Exception {ReflectorFactory factory = new DefaultReflectorFactory();Reflector reflector = factory.findForClass(Student.class);//获取构造器, 生成对应的对象Object o = reflector.getDefaultConstructor().newInstance();MethodInvoker invoker = (MethodInvoker) reflector.getSetInvoker("id");invoker.invoke(o, new Object[]{999});//读取Invoker invoker1 = reflector.getGetInvoker("id");invoker1.invoke(o, null);}
4. MetaClass
在Reflector中可以针对普通的属性操作,但是如果出现了比较复杂的属性,比如 private Person person; 这种,我们要查找的表达式 person.userName。针对这种表达式的处理,这时就可以通过MetaClass来处理了。我们来看看主要的属性和构造方法:
// 缓存 Reflector
private final ReflectorFactory reflectorFactory;
// 创建 MetaClass时 会指定一个Class reflector会记录该类的相关信息
private final Reflector reflector;private MetaClass(Class<?> type, ReflectorFactory reflectorFactory) {this.reflectorFactory = reflectorFactory;this.reflector = reflectorFactory.findForClass(type);
}
效果演示,准备Bean对象:
public class RichType {private RichType richType;private String richField;private String richProperty;private Map richMap = new HashMap();private List richList = new ArrayList() {{add("bar");}};public RichType getRichType() {return richType;}public void setRichType(RichType richType) {this.richType = richType;}public String getRichProperty() {return richProperty;}public void setRichProperty(String richProperty) {this.richProperty = richProperty;}public List getRichList() {return richList;}public void setRichList(List richList) {this.richList = richList;}public Map getRichMap() {return richMap;}public void setRichMap(Map richMap) {this.richMap = richMap;}
}
测试:
@Test
public void test04() throws Exception {ReflectorFactory reflectorFactory = new DefaultReflectorFactory();MetaClass meta = MetaClass.forClass(RichType.class, reflectorFactory);System.out.println(meta.hasGetter("richField"));System.out.println(meta.hasGetter("richProperty"));System.out.println(meta.hasGetter("richList"));System.out.println(meta.hasGetter("richMap"));System.out.println(meta.hasGetter("richList[0]"));System.out.println(meta.hasGetter("richType"));System.out.println(meta.hasGetter("richType.richField"));System.out.println(meta.hasGetter("richType.richProperty"));System.out.println(meta.hasGetter("richType.richList"));System.out.println(meta.hasGetter("richType.richMap"));System.out.println(meta.hasGetter("richType.richList[0]")); // findProperty 只能处理 . 的表达式System.out.println(meta.findProperty("richType.richProperty"));System.out.println(meta.findProperty("richType.richProperty1"));System.out.println(meta.findProperty("richList[0]"));System.out.println(Arrays.toString(meta.getGetterNames()));
}
5. MetaObject
我们可以通过MetaObject对象解析复杂的表达式来对提供的对象进行操作。具体的通过案例来演示会更直观些。
@Test
public void shouldGetAndSetField() {RichType rich = new RichType();MetaObject meta = SystemMetaObject.forObject(rich);meta.setValue("richField", "foo");System.out.println(meta.getValue("richField"));
}@Test
public void shouldGetAndSetNestedField() {RichType rich = new RichType();MetaObject meta = SystemMetaObject.forObject(rich);meta.setValue("richType.richField", "foo");System.out.println(meta.getValue("richType.richField"));
}@Test
public void shouldGetAndSetMapPairUsingArraySyntax() {RichType rich = new RichType();MetaObject meta = SystemMetaObject.forObject(rich);meta.setValue("richMap[key]", "foo");System.out.println(meta.getValue("richMap[key]"));
}
以上三个方法的输出结果都是 foo
6. 反射模块应用
然后我们来看下在MyBatis的核心处理层中的实际应用。
6.1 SqlSessionFactory
在创建SqlSessionFactory操作的时候会完成Configuration对象的创建,而在Configuration中默认定义的ReflectorFactory的实现就是DefaultReflectorFactory对象。
然后在解析全局配置文件的代码中,给用户提供了ReflectorFactory的扩展,也就是我们在全局配置文件中可以通过标签来使用我们自定义的ReflectorFactory。
6.2 SqlSession
无相关操作
6.3 Mapper
无相关操作
6.4 执行SQL
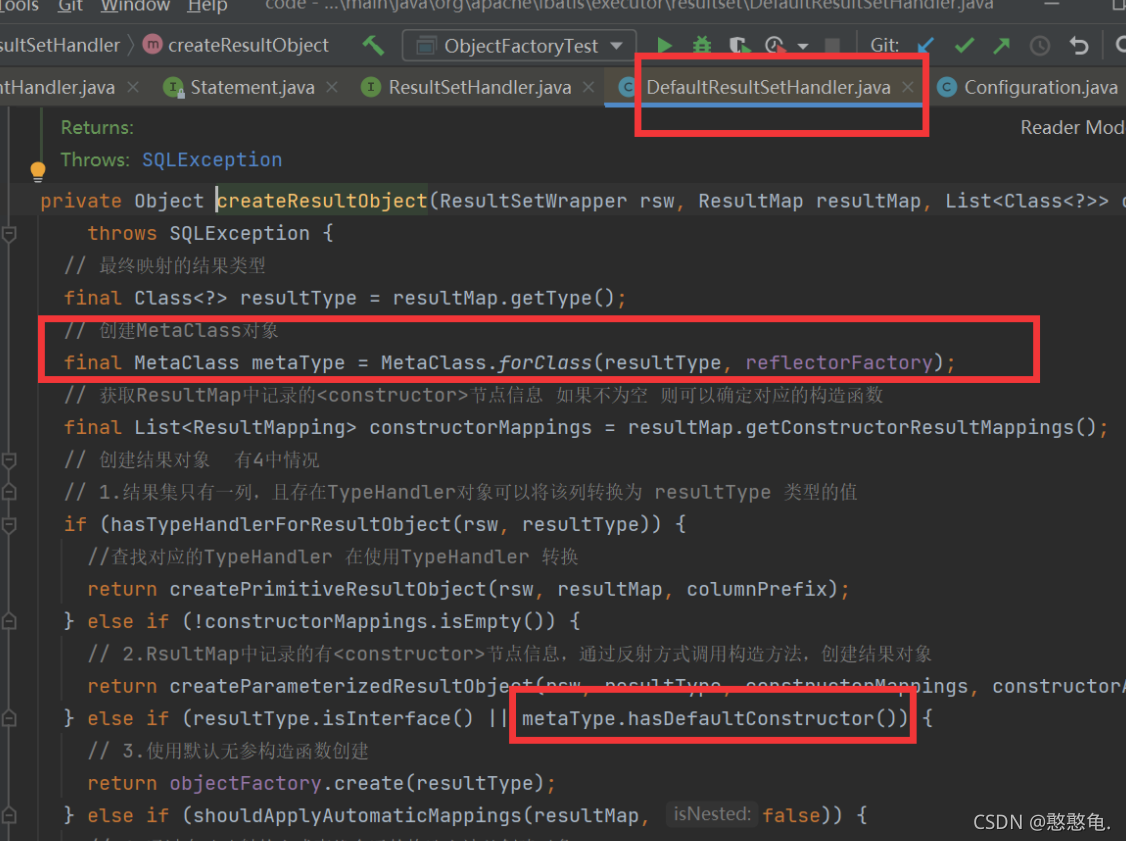
在Statement获取结果集后,在做结果集映射的使用有使用到,在DefaultResultSetHandler的createResultObject方法中。
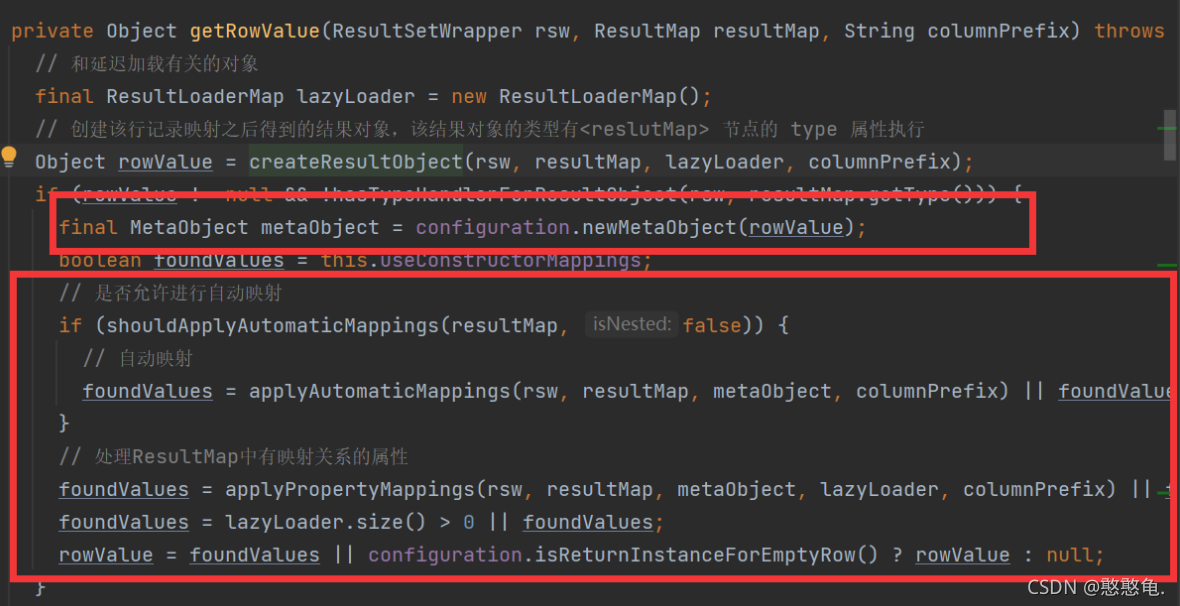
然后在DefaultResultSetHandler的getRowValue方法中在做自动映射的时候:
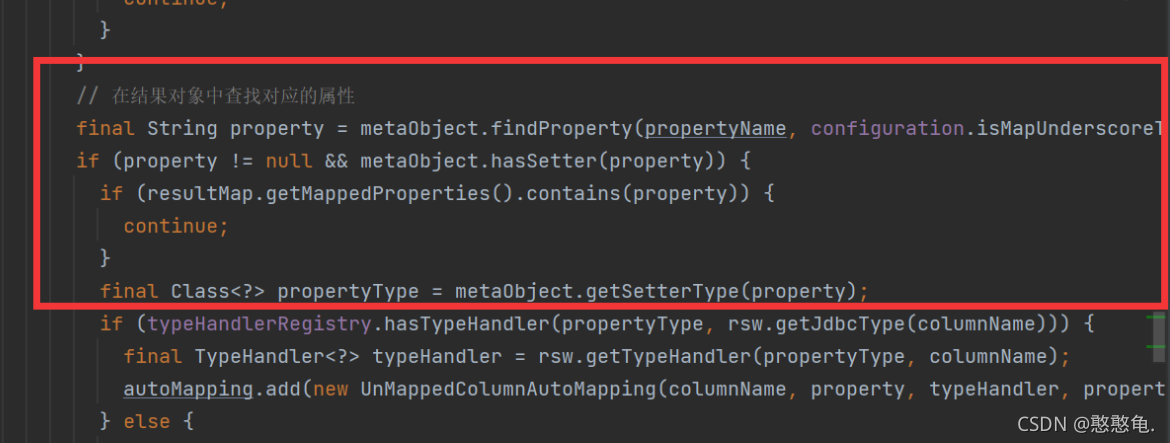
继续跟踪,在createAutomaticMappings方法中:
当然还有很多其他的地方在使用反射模块来完成的相关操作,这些可自行查阅。
类型转换模块
String sql = "SELECT id,user_name,real_name,password,age,d_id from t_user where id = ? and user_name = ?";
ps = conn.prepareStatement(sql);
ps.setInt(1,2);
ps.setString(2,"张三");
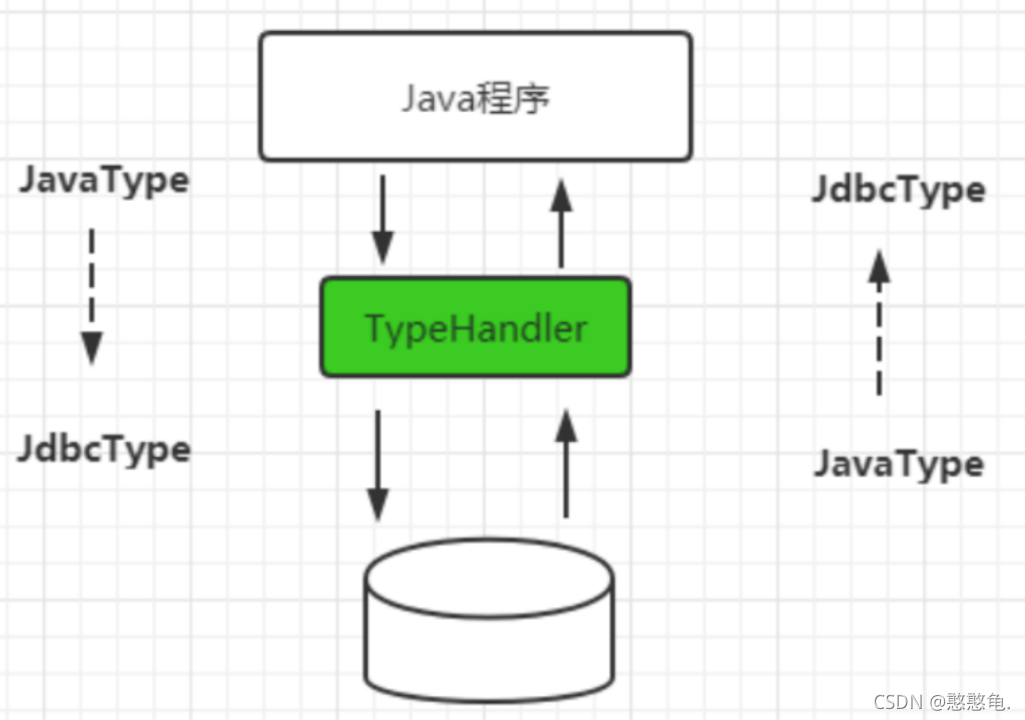
MyBatis是一个持久层框架ORM框架,实现数据库中数据和Java对象中的属性的双向映射,那么不可避免的就会碰到类型转换的问题,在PreparedStatement为SQL语句绑定参数时,需要从Java类型转换为JDBC类型,而从结果集中获取数据时,则需要从JDBC类型转换为Java类型,所以我们来看下在MyBatis中是如何实现类型的转换的。
1. TypeHandler
MyBatis中的所有的类型转换器都继承了TypeHandler接口,在TypeHandler中定义了类型转换器的最基本的功能。
public interface TypeHandler<T> {/*** 负责将Java类型转换为JDBC的类型* @param ps* @param i* @param parameter* @param jdbcType* @throws SQLException*/void setParameter(PreparedStatement ps, int i, T parameter, JdbcType jdbcType) throws SQLException;/*** 从ResultSet中获取数据时会调用此方法,会将数据由JdbcType转换为Java类型* @param columnName Colunm name, when configuration <code>useColumnLabel</code> is <code>false</code>*/T getResult(ResultSet rs, String columnName) throws SQLException;T getResult(ResultSet rs, int columnIndex) throws SQLException;T getResult(CallableStatement cs, int columnIndex) throws SQLException;}
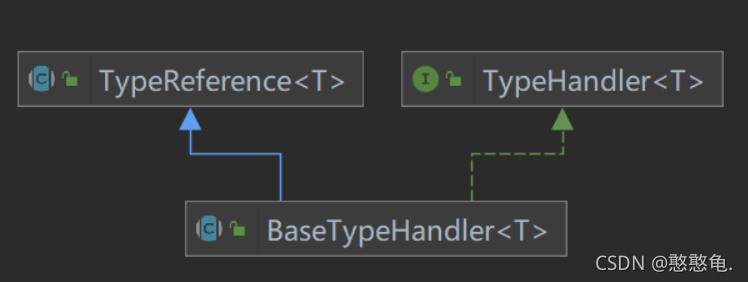
2. BaseTypeHandler
为了方便用户自定义TypeHandler的实现,在MyBatis中提供了BaseTypeHandler这个抽象类,它实现了TypeHandler接口,并继承了TypeReference类。
在BaseTypeHandler中的实现方法中实现了对null的处理,非空的处理是交给各个子类去实现的。这个在代码中很清楚的体现了出来。
3. TypeHandler实现类
TypeHandler的实现类比较多,而且实现也都比较简单。
以Integer为例:
public class IntegerTypeHandler extends BaseTypeHandler<Integer> {@Overridepublic void setNonNullParameter(PreparedStatement ps, int i, Integer parameter, JdbcType jdbcType)throws SQLException {ps.setInt(i, parameter); // 实现参数的绑定}@Overridepublic Integer getNullableResult(ResultSet rs, String columnName)throws SQLException {int result = rs.getInt(columnName); // 获取指定列的值return result == 0 && rs.wasNull() ? null : result;}@Overridepublic Integer getNullableResult(ResultSet rs, int columnIndex)throws SQLException {int result = rs.getInt(columnIndex); // 获取指定列的值return result == 0 && rs.wasNull() ? null : result;}@Overridepublic Integer getNullableResult(CallableStatement cs, int columnIndex)throws SQLException {int result = cs.getInt(columnIndex); // 获取指定列的值return result == 0 && cs.wasNull() ? null : result;}
}
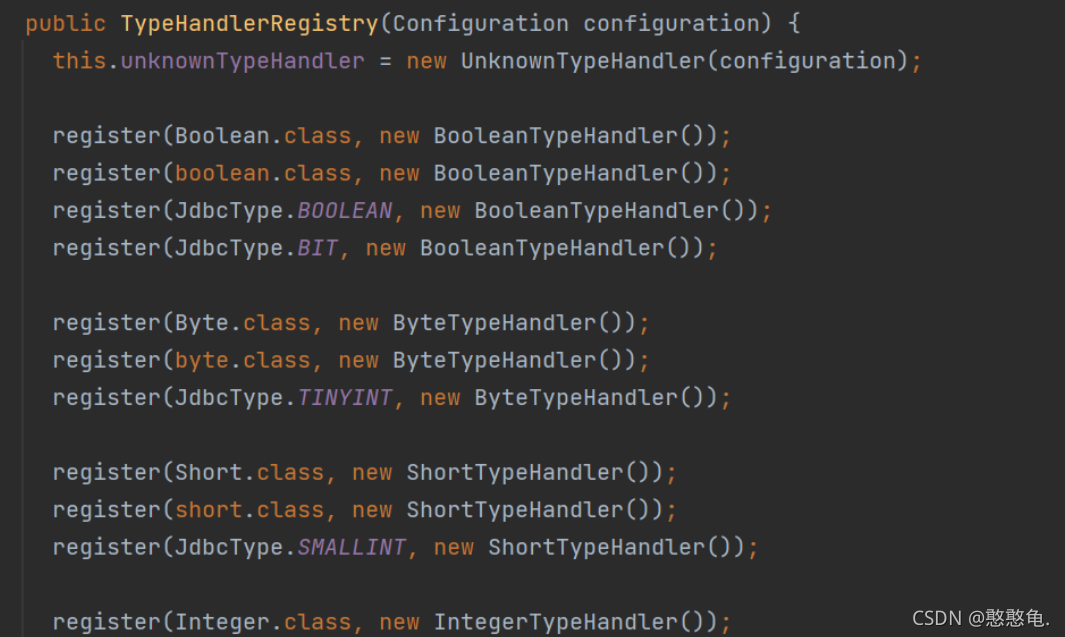
4. TypeHandlerRegistry
通过前面的介绍我们发现在MyBatis中给我们提供的具体的类型转换器实在是太多了,那么在实际的使用时我们是如何知道使用哪个转换器类处理的呢?实际上再MyBatis中是将所有的TypeHandler都保存注册在了TypeHandlerRegistry中的。首先注意声明的相关属性:(在解析配置文件的时候会找到)
// 记录JdbcType和TypeHandle的对应关系
private final Map<JdbcType, TypeHandler<?>>  jdbcTypeHandlerMap = new EnumMap<>(JdbcType.class);
// 记录Java类型向指定的JdbcType转换时需要使用到的TypeHandle
private final Map<Type, Map<JdbcType, TypeHandler<?>>> typeHandlerMap = new ConcurrentHashMap<>();
private final TypeHandler<Object> unknownTypeHandler;
// 记录全部的TypeHandle类型及对应的TypeHandle对象
private final Map<Class<?>, TypeHandler<?>> allTypeHandlersMap = new HashMap<>();// 空TypeHandle的标识
private static final Map<JdbcType, TypeHandler<?>> NULL_TYPE_HANDLER_MAP = Collections.emptyMap();
然后在器构造方法中完成了系统提供的TypeHandler的注册:
代码太长,请自行查阅。注意的是register()方法, 关键几个实现如下:
private <T> void register(Type javaType, TypeHandler<? extends T> typeHandler) {// 获取@MappedJdbcTypes注解MappedJdbcTypes mappedJdbcTypes = typeHandler.getClass().getAnnotation(MappedJdbcTypes.class);if (mappedJdbcTypes != null) {// 遍历获取注解中指定的 JdbcType 类型for (JdbcType handledJdbcType : mappedJdbcTypes.value()) {// 调用下一个重载的方法register(javaType, handledJdbcType, typeHandler);}if (mappedJdbcTypes.includeNullJdbcType()) {// JdbcType类型为空的情况register(javaType, null, typeHandler);}} else {register(javaType, null, typeHandler);}
}private void register(Type javaType, JdbcType jdbcType, TypeHandler<?> handler) {if (javaType != null) {// 如果不为空// 从 TypeHandle集合中根据Java类型来获取对应的集合Map<JdbcType, TypeHandler<?>> map = typeHandlerMap.get(javaType);if (map == null || map == NULL_TYPE_HANDLER_MAP) {// 如果没有就创建一个新的map = new HashMap<>();}// 把对应的jdbc类型和处理器添加到map集合中map.put(jdbcType, handler);// 然后将 java类型和上面的map集合保存到TypeHandle的容器中typeHandlerMap.put(javaType, map);}// 同时也把这个处理器添加到了 保存有所有处理器的容器中allTypeHandlersMap.put(handler.getClass(), handler);}
有注册的方法,当然也有从注册器中获取TypeHandler的方法,getTypeHandler方法,这个方法也有多个重载的方法,这里重载的方法最终都会执行的方法是。
/*** 根据对应的Java类型和Jdbc类型来查找对应的TypeHandle*/
private <T> TypeHandler<T> getTypeHandler(Type type, JdbcType jdbcType) {if (ParamMap.class.equals(type)) {return null;}// 根据Java类型获取对应的 Jdbc类型和TypeHandle的集合容器Map<JdbcType, TypeHandler<?>> jdbcHandlerMap = getJdbcHandlerMap(type);TypeHandler<?> handler = null;if (jdbcHandlerMap != null) {// 根据Jdbc类型获取对应的 处理器handler = jdbcHandlerMap.get(jdbcType);if (handler == null) {// 获取null对应的处理器handler = jdbcHandlerMap.get(null);}if (handler == null) {// #591handler = pickSoleHandler(jdbcHandlerMap);}}// type drives generics herereturn (TypeHandler<T>) handler;
}
当然除了使用系统提供的TypeHandler以外,我们还可以创建我们自己的TypeHandler了,之前的项目中有提及过。
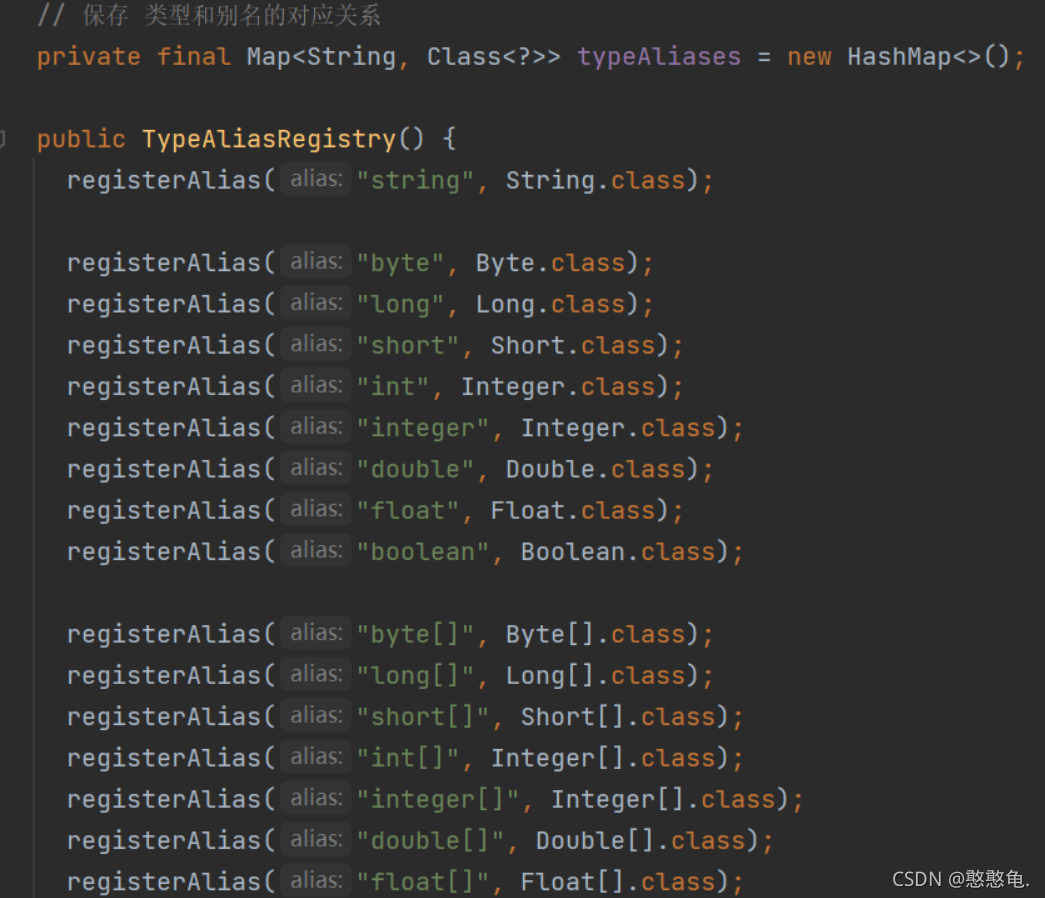
5. TypeAliasRegistry
我们在MyBatis的应用的时候会经常用到别名,这能大大简化我们的代码,其实在MyBatis中是通过。TypeAliasRegistry类管理的。首先在构造方法中会注入系统常见类型的别名。初始化configuration时候会使用该注册器。
注册的方法逻辑也比较简单:
public void registerAlias(String alias, Class<?> value) {if (alias == null) {throw new TypeException("The parameter alias cannot be null");}// issue #748 别名统一转换为小写String key = alias.toLowerCase(Locale.ENGLISH);if (typeAliases.containsKey(key) && typeAliases.get(key) != null && !typeAliases.get(key).equals(value)) {throw new TypeException("The alias '" + alias + "' is already mapped to the value '" + typeAliases.get(key).getName() + "'.");}// 将 别名 和 类型 添加到 Map 集合中typeAliases.put(key, value);
}
那么我们在实际使用时通过package指定别名路径和通过@Alisa注解来指定别名的操作是如何实现的呢?也在TypeAliasRegistry中有实现:
/*** 根据 packagename 来指定* @param packageName* @param superType*/
public void registerAliases(String packageName, Class<?> superType) {ResolverUtil<Class<?>> resolverUtil = new ResolverUtil<>();resolverUtil.find(new ResolverUtil.IsA(superType), packageName);Set<Class<? extends Class<?>>> typeSet = resolverUtil.getClasses();for (Class<?> type : typeSet) {// Ignore inner classes and interfaces (including package-info.java)// Skip also inner classes. See issue #6if (!type.isAnonymousClass() && !type.isInterface() && !type.isMemberClass()) {registerAlias(type);}}
}/*** 扫描 @Alias注解* @param type*/
public void registerAlias(Class<?> type) {String alias = type.getSimpleName();// 扫描 @Alias注解Alias aliasAnnotation = type.getAnnotation(Alias.class);if (aliasAnnotation != null) {// 获取注解中定义的别名名称alias = aliasAnnotation.value();}registerAlias(alias, type);
}
6. TypeHandler的应用
6.1 SqlSessionFactory
在构建SqlSessionFactory时,在Configuration对象实例化的时候在成员变量中完成了TypeHandlerRegistry和TypeAliasRegistry的实例化。

在TypeHandlerRegistry的构造方法中完成了常用类型的TypeHandler的注册;在TypeAliasRegistry中完成了常用Java类型别名的注册;在Configuration的构造方法中会为各种常用的类型向TypeAliasRegistry中注册类型别名数据。(可参看上方截图。)
以上步骤完成了TypeHandlerRegistry和TypeAliasRegistry的初始化操作。
然后在解析全局配置文件时会通过解析标签和标签,可以注册我们添加的别名和TypeHandler。
具体解析的两个方法很简单,大家打开源码查看一下就清楚了。
因为我们在全局配置文件中指定了对应的别名,那么我们在映射文件中就可以简写我们的类型了,这样在解析映射文件时,我们同样也是需要做别名的处理的。在XMLStatementBuilder中:
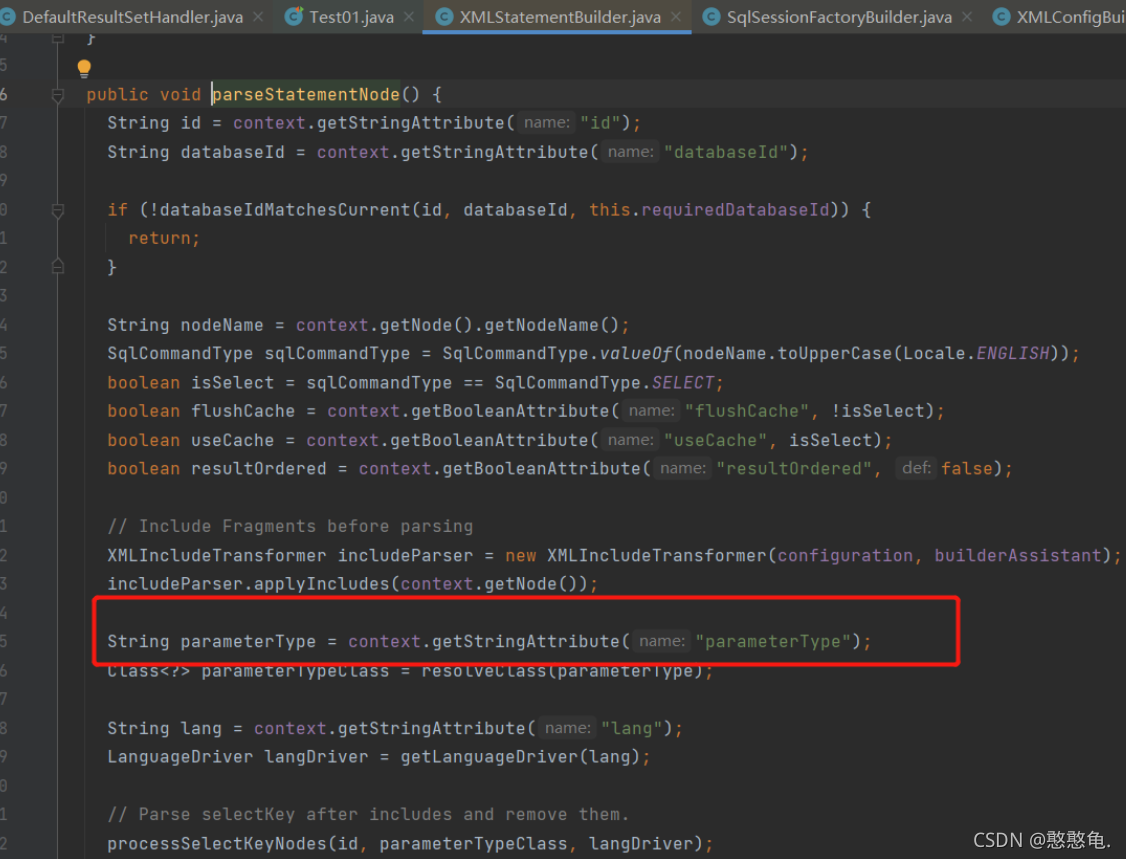
这个parameterType就可以是我们定义的别名,然后在 resolveClass中就会做对应的处理:
protected <T> Class<? extends T> resolveClass(String alias) {if (alias == null) {return null;}try {return resolveAlias(alias);} catch (Exception e) {throw new BuilderException("Error resolving class. Cause: " + e, e);}
}
6.2 执行SQL语句
TypeHandler类型处理器使用比较多的地方应该是在给SQL语句中参数绑定值和查询结果和对象中属性映射的地方用到的比较多。
我们首先进入DefaultParameterHandler中看看参数是如何处理的:
@Override
public void setParameters(PreparedStatement ps) {ErrorContext.instance().activity("setting parameters").object(mappedStatement.getParameterMap().getId());List<ParameterMapping> parameterMappings = boundSql.getParameterMappings();if (parameterMappings != null) {for (int i = 0; i < parameterMappings.size(); i++) {ParameterMapping parameterMapping = parameterMappings.get(i);if (parameterMapping.getMode() != ParameterMode.OUT) {Object value;String propertyName = parameterMapping.getProperty();if (boundSql.hasAdditionalParameter(propertyName)) { // issue #448 ask first for additional paramsvalue = boundSql.getAdditionalParameter(propertyName);} else if (parameterObject == null) {value = null;} else if (typeHandlerRegistry.hasTypeHandler(parameterObject.getClass())) {value = parameterObject;} else {MetaObject metaObject = configuration.newMetaObject(parameterObject);value = metaObject.getValue(propertyName);}TypeHandler typeHandler = parameterMapping.getTypeHandler();JdbcType jdbcType = parameterMapping.getJdbcType();if (value == null && jdbcType == null) {jdbcType = configuration.getJdbcTypeForNull();}try {typeHandler.setParameter(ps, i + 1, value, jdbcType);} catch (TypeException | SQLException e) {throw new TypeException("Could not set parameters for mapping: " + parameterMapping + ". Cause: " + e, e);}}}}
}
然后进入到DefaultResultSetHandler中的getRowValue方法:

然后再进入applyAutomaticMappings方法中查看:

根据对应的TypeHandler返回对应类型的值。
日志模块
首先日志在我们开发过程中占据了一个非常重要的地位,是开发和运维管理之间的桥梁,在Java中的日志框架也非常多,Log4j,Log4j2,Apache Commons Log,java.util.logging,slf4j等,这些工具对外的接口也都不尽相同,为了统一这些工具,MyBatis定义了一套统一的日志接口供上层使用。首先大家对于适配器模式要了解下哦。
1. LOG
Log接口中定义了四种日志级别,相比较其他的日志框架的多种日志级别显得非常的精简,但也能够满足大多数常见的使用了。位于源码logging包中。
public interface Log {boolean isDebugEnabled();boolean isTraceEnabled();void error(String s, Throwable e);void error(String s);void debug(String s);void trace(String s);void warn(String s);}
2. LogFactory
LogFactory工厂类负责创建日志组件适配器:
static {// 按序加载对应的日志组件,从上往下加载,上面的成功了,下面的就不会在加载了/*** tryImplementation(LogFactory::useSlf4jLogging); 等价于* tryImplementation(new Runnable(){*   void run(){*     useSlf4jLogging();*   }* })*/tryImplementation(LogFactory::useSlf4jLogging);tryImplementation(LogFactory::useCommonsLogging);tryImplementation(LogFactory::useLog4J2Logging);tryImplementation(LogFactory::useLog4JLogging);tryImplementation(LogFactory::useJdkLogging);tryImplementation(LogFactory::useNoLogging);
}
在LogFactory类加载时会执行其静态代码块,其逻辑是按序加载并实例化对应日志组件的适配器,然后使用LogFactory.logConstructor这个静态字段,记录当前使用的第三方日志组件的适配器。具体代码如下,每个方法都比较简单就不一一赘述了。
3. 日志应用
那么在MyBatis系统启动的时候日志框架是如何选择的呢?首先我们在全局配置文件中我们可以设置对应的日志类型选择。
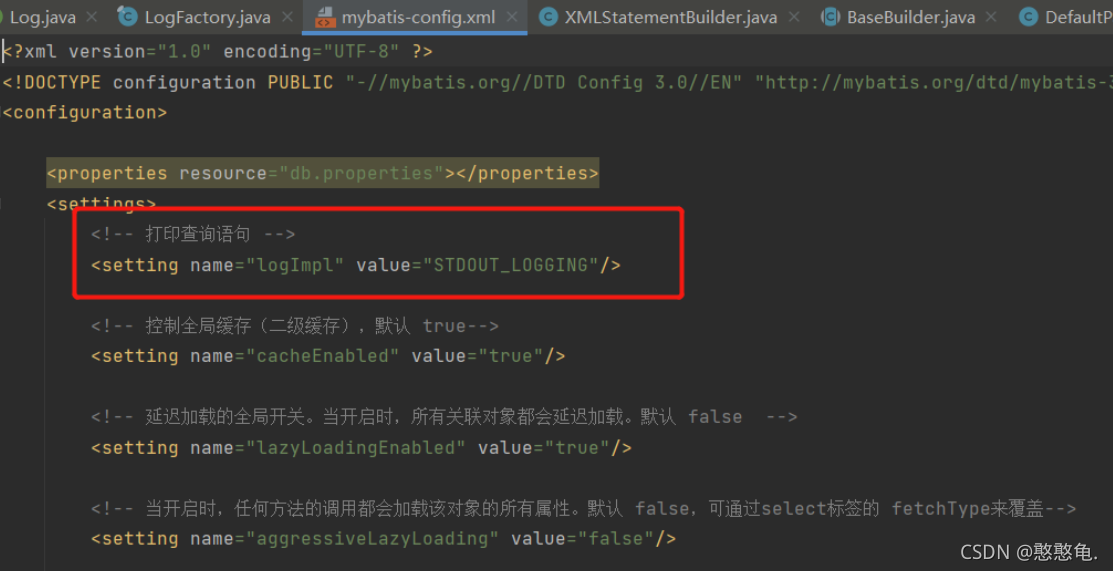
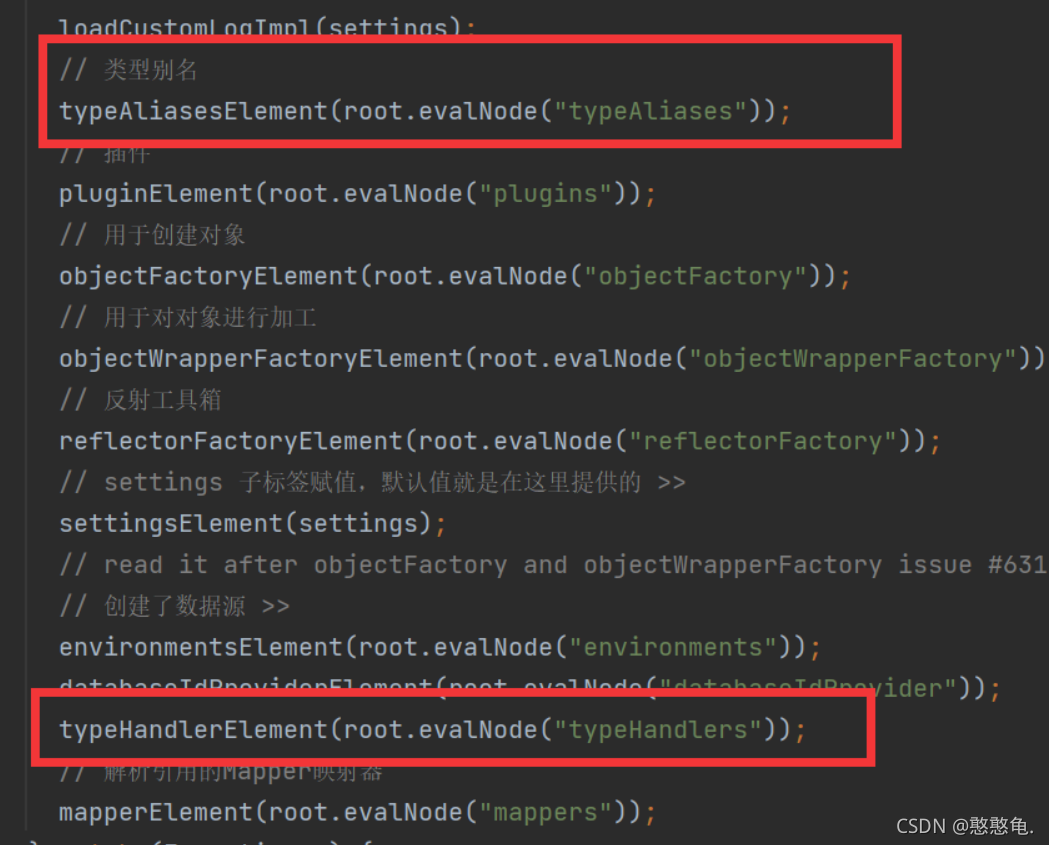
这个"STDOUT_LOGGING"是怎么来的呢?在Configuration的构造方法中其实是设置的各个日志实现的别名的。

然后在解析全局配置文件的时候就会处理日志的设置:
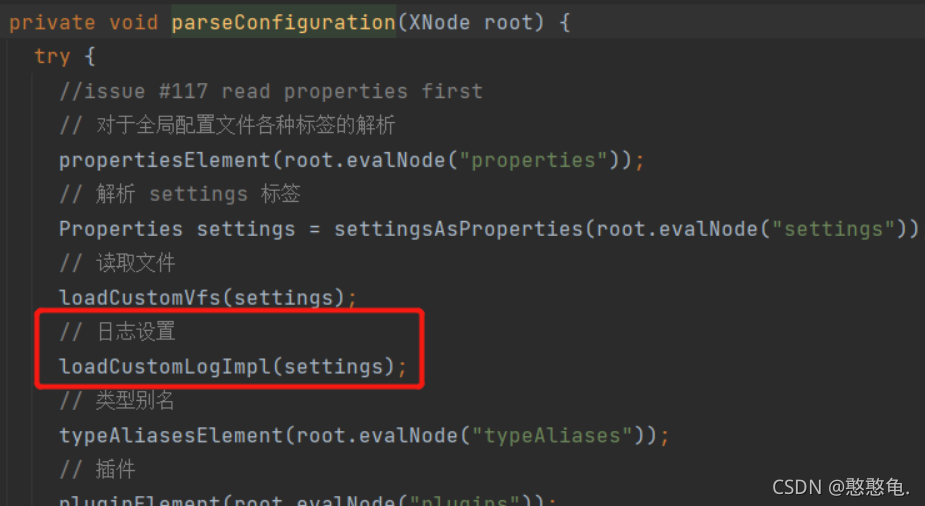
进入方法:
private void loadCustomLogImpl(Properties props) {// 获取 logImpl设置的 日志 类型Class<? extends Log> logImpl = resolveClass(props.getProperty("logImpl"));// 设置日志configuration.setLogImpl(logImpl);
}
进入setLogImpl方法中:
public void setLogImpl(Class<? extends Log> logImpl) {if (logImpl != null) {this.logImpl = logImpl; // 记录日志的类型// 设置 适配选择LogFactory.useCustomLogging(this.logImpl);}
}
再进入useCustomLogging方法:
public static synchronized void useCustomLogging(Class<? extends Log> clazz) {setImplementation(clazz);
}
private static void setImplementation(Class<? extends Log> implClass) {try {// 获取指定适配器的构造方法Constructor<? extends Log> candidate = implClass.getConstructor(String.class);// 实例化适配器Log log = candidate.newInstance(LogFactory.class.getName());if (log.isDebugEnabled()) {log.debug("Logging initialized using '" + implClass + "' adapter.");}// 初始化 logConstructor 字段logConstructor = candidate;} catch (Throwable t) {throw new LogException("Error setting Log implementation.  Cause: " + t, t);}
}
这就关联上了我们前面在LogFactory中看到的代码,启动测试方法看到的日志也和源码中的对应上来了,还有就是我们自己设置的会覆盖掉默认的sl4j日志框架的配置。

4. JDBC日志
当我们开启了 STDOUT的日志管理后,当我们执行SQL操作时我们发现在控制台中可以打印出相关的日志信息。
那这些日志信息是怎么打印出来的呢?原来在MyBatis中的日志模块中包含了一个jdbc包,它并不是将日志信息通过jdbc操作保存到数据库中,而是通过JDK动态代理的方式,将JDBC操作通过指定的日志框架打印出来。下面我们就来看看它是如何实现的。
4.1 BaseJdbcLogger
BaseJdbcLogger是一个抽象类,它是jdbc包下其他Logger的父类。继承关系如下:

从图中我们也可以看到4个实现都实现了InvocationHandler接口。属性含义如下:
// 记录 PreparedStatement 接口中定义的常用的set*() 方法
protected static final Set<String> SET_METHODS;
// 记录了 Statement 接口和 PreparedStatement 接口中与执行SQL语句有关的方法
protected static final Set<String> EXECUTE_METHODS = new HashSet<>();// 记录了PreparedStatement.set*() 方法设置的键值对
private final Map<Object, Object> columnMap = new HashMap<>();
// 记录了PreparedStatement.set*() 方法设置的键 key
private final List<Object> columnNames = new ArrayList<>();
// 记录了PreparedStatement.set*() 方法设置的值 Value
private final List<Object> columnValues = new ArrayList<>();protected final Log statementLog;// 用于日志输出的Log对象
protected final int queryStack;  // 记录了SQL的层数,用于格式化输出SQL
4.2 ConnectionLogger
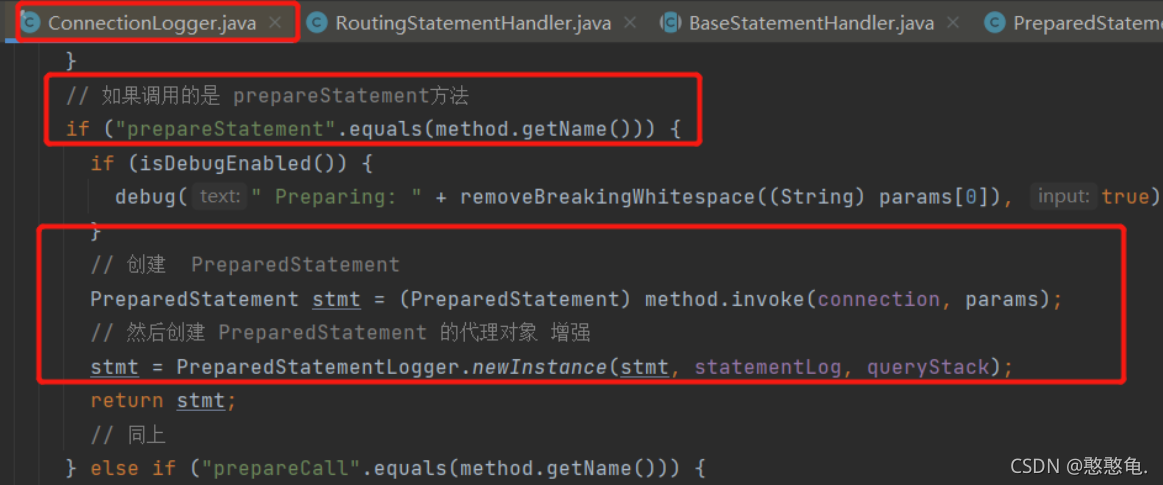
ConnectionLogger的作用是记录数据库连接相关的日志信息,在实现中是创建了一个Connection的代理对象,在每次Connection操作的前后我们都可以实现日志的操作。
public final class ConnectionLogger extends BaseJdbcLogger implements InvocationHandler {// 真正的Connection对象private final Connection connection;private ConnectionLogger(Connection conn, Log statementLog, int queryStack) {super(statementLog, queryStack);this.connection = conn;}@Overridepublic Object invoke(Object proxy, Method method, Object[] params)throws Throwable {try {// 如果是调用从Object继承过来的方法,就直接调用 toString,hashCode,equals等if (Object.class.equals(method.getDeclaringClass())) {return method.invoke(this, params);}// 如果调用的是 prepareStatement方法if ("prepareStatement".equals(method.getName())) {if (isDebugEnabled()) {debug(" Preparing: " + removeBreakingWhitespace((String) params[0]), true);}// 创建 PreparedStatementPreparedStatement stmt = (PreparedStatement) method.invoke(connection, params);// 然后创建 PreparedStatement 的代理对象 增强stmt = PreparedStatementLogger.newInstance(stmt, statementLog, queryStack);return stmt;// 同上} else if ("prepareCall".equals(method.getName())) {if (isDebugEnabled()) {debug(" Preparing: " + removeBreakingWhitespace((String) params[0]), true);}PreparedStatement stmt = (PreparedStatement) method.invoke(connection, params);stmt = PreparedStatementLogger.newInstance(stmt, statementLog, queryStack);return stmt;// 同上} else if ("createStatement".equals(method.getName())) {Statement stmt = (Statement) method.invoke(connection, params);stmt = StatementLogger.newInstance(stmt, statementLog, queryStack);return stmt;} else {return method.invoke(connection, params);}} catch (Throwable t) {throw ExceptionUtil.unwrapThrowable(t);}}/*** Creates a logging version of a connection.** @param conn - the original connection* @return - the connection with logging*/public static Connection newInstance(Connection conn, Log statementLog, int queryStack) {InvocationHandler handler = new ConnectionLogger(conn, statementLog, queryStack);ClassLoader cl = Connection.class.getClassLoader();// 创建了 Connection的 代理对象 目的是 增强 Connection对象 给他添加了日志功能return (Connection) Proxy.newProxyInstance(cl, new Class[]{Connection.class}, handler);}/*** return the wrapped connection.** @return the connection*/public Connection getConnection() {return connection;}}
其他几个xxxxLogger的实现和ConnectionLogger几乎是一样的就不在次赘述了,请自行观看。
4.3 应用实现
在实际处理的时候,日志模块是如何工作的?
在我们要执行SQL语句前需要获取Statement对象,而Statement对象是通过Connection获取的,所以我们在SimpleExecutor中就可以看到相关的代码。
private Statement prepareStatement(StatementHandler handler, Log statementLog) throws SQLException {Statement stmt;Connection connection = getConnection(statementLog);// 获取 Statement 对象stmt = handler.prepare(connection, transaction.getTimeout());// 为 Statement 设置参数handler.parameterize(stmt);return stmt;
}
先进入如到getConnection方法中:
protected Connection getConnection(Log statementLog) throws SQLException {Connection connection = transaction.getConnection();if (statementLog.isDebugEnabled()) {// 创建Connection的日志代理对象return ConnectionLogger.newInstance(connection, statementLog, queryStack);} else {return connection;}
}
在进入到handler.prepare方法中:
@Override
protected Statement instantiateStatement(Connection connection) throws SQLException {String sql = boundSql.getSql();if (mappedStatement.getKeyGenerator() instanceof Jdbc3KeyGenerator) {String[] keyColumnNames = mappedStatement.getKeyColumns();if (keyColumnNames == null) {return connection.prepareStatement(sql, PreparedStatement.RETURN_GENERATED_KEYS);} else {// 在执行 prepareStatement 方法的时候会进入进入到ConnectionLogger的invoker方法中return connection.prepareStatement(sql, keyColumnNames);}} else if (mappedStatement.getResultSetType() == ResultSetType.DEFAULT) {return connection.prepareStatement(sql);} else {return connection.prepareStatement(sql, mappedStatement.getResultSetType().getValue(), ResultSet.CONCUR_READ_ONLY);}
}
在执行sql语句的时候:
@Override
public <E> List<E> query(Statement statement, ResultHandler resultHandler) throws SQLException {PreparedStatement ps = (PreparedStatement) statement;// 到了JDBC的流程ps.execute();// 处理结果集return resultSetHandler.handleResultSets(ps);
}
如果是查询操作,后面的ResultSet结果集操作,其他是也通过ResultSetLogger来处理的,前面的清楚了,后面的就很容易的。
binding模块
接下来我们看看在org.apache.ibatis.binding包下给我们提供的Binding模块,这个模块在我们前面使用过。
// 3.根据SqlSessionFactory对象获取SqlSession对象
SqlSession sqlSession = factory.openSession();
// 4.通过SqlSession中提供的 API方法来操作数据库
UserMapper mapper = sqlSession.getMapper(UserMapper.class);
1. MapperRegistry
通过名称我们可以看出这显然是一个注册中心,这个注册中是用来保存MapperProxyFactory对象的,所以这个注册器中提供的功能肯定是围绕MapperProxyFactory的添加和获取操作,我们来看看具体的代码逻辑。
成员变量:
private final Configuration config;
// 记录 Mapper 接口和 MapperProxyFactory 之间的关系
private final Map<Class<?>, MapperProxyFactory<?>> knownMappers = new HashMap<>();
addMapper方法:
public <T> void addMapper(Class<T> type) {if (type.isInterface()) { // 检测 type 是否为接口if (hasMapper(type)) { // 检测是否已经加装过该接口throw new BindingException("Type " + type + " is already known to the MapperRegistry.");}boolean loadCompleted = false;try {// !Map<Class<?>, MapperProxyFactory<?>> 存放的是接口类型,和对应的工厂类的关系knownMappers.put(type, new MapperProxyFactory<>(type));// It's important that the type is added before the parser is run// otherwise the binding may automatically be attempted by the// mapper parser. If the type is already known, it won't try.// 注册了接口之后,根据接口,开始解析所有方法上的注解,例如 @Select >>MapperAnnotationBuilder parser = new MapperAnnotationBuilder(config, type);parser.parse();loadCompleted = true;} finally {if (!loadCompleted) {knownMappers.remove(type);}}}
}
getMapper方法:
/*** 获取Mapper接口对应的代理对象*/
public <T> T getMapper(Class<T> type, SqlSession sqlSession) {// 获取Mapper接口对应的 MapperProxyFactory 对象final MapperProxyFactory<T> mapperProxyFactory = (MapperProxyFactory<T>) knownMappers.get(type);if (mapperProxyFactory == null) {throw new BindingException("Type " + type + " is not known to the MapperRegistry.");}try {return mapperProxyFactory.newInstance(sqlSession);} catch (Exception e) {throw new BindingException("Error getting mapper instance. Cause: " + e, e);}
}
通过这个方法本质上获取的就是Mapper接口的代理对象。
2. MapperProxyFactory
MapperProxyFactory是一个工厂对象,专门负责创建MapperProxy对象。其中核心字段的含义和功能如下:
/*** MapperProxyFactory 可以创建 mapperInterface 接口的代理对象
* 创建的代理对象要实现的接口 */
private final Class<T> mapperInterface;
// 缓存
private final Map<Method, MapperMethodInvoker> methodCache = new ConcurrentHashMap<>();
//
.... /*** 创建实现了 mapperInterface 接口的代理对象 */protected T newInstance(MapperProxy<T> mapperProxy) { // 1:类加载器:2:被代理类实现的接口、3:实现了 InvocationHandler 的触发管理类 return (T) Proxy.newProxyInstance(mapperInterface.getClassLoader(), new Class[] { mapperInterface }, mapperProxy);
}
public T newInstance(SqlSession sqlSession) { final MapperProxy<T> mapperProxy = new MapperProxy<>(sqlSession, mapperInterface, methodCache); return newInstance(mapperProxy);
}
3. MapperProxy
通过MapperProxyFactory创建的MapperProxy是Mapper接口的代理对象,实现了InvocationHandler接口,通过前面讲解的动态代理模式,那么这部分的内容就很简单了。
private final SqlSession sqlSession; // 记录关联的 SqlSession对象
private final Class<T> mapperInterface; // Mapper接口对应的Class对象
// 用于缓存MapperMethod对象,key是Mapper接口方法对应的Method对象,value是对应的MapperMethod对象。‘
// MapperMethod对象会完成参数转换以及SQL语句的执行
// 注意:MapperMethod中并不会记录任何状态信息,可以在多线程间共享
private final Map<Method, MapperMethodInvoker> methodCache;
MapperProxy.invoke() 方法是代理对象执行的主要逻辑,实现如下:
@Override
public Object invoke(Object proxy, Method method, Object[] args) throws Throwable {try {// toString hashCode equals getClass等方法,无需走到执行SQL的流程if (Object.class.equals(method.getDeclaringClass())) {return method.invoke(this, args);} else {// 提升获取 mapperMethod 的效率,到 MapperMethodInvoker(内部接口) 的 invoke// 普通方法会走到 PlainMethodInvoker(内部类) 的 invokereturn cachedInvoker(method).invoke(proxy, method, args, sqlSession);}} catch (Throwable t) {throw ExceptionUtil.unwrapThrowable(t);}
}
然后在cachedInvoker中主要负责维护methodCache这个缓存集合:
private MapperMethodInvoker cachedInvoker(Method method) throws Throwable {try {// Java8 中 Map 的方法,根据 key 获取值,如果值是 null,则把后面Object 的值赋给 key// 如果获取不到,就创建// 获取的是 MapperMethodInvoker(接口) 对象,只有一个invoke方法// 根据method 去methodCache中获取 如果返回空 则用第二个参数填充return methodCache.computeIfAbsent(method, m -> {if (m.isDefault()) {// 接口的默认方法(Java8),只要实现接口都会继承接口的默认方法,例如 List.sort()try {if (privateLookupInMethod == null) {return new DefaultMethodInvoker(getMethodHandleJava8(method));} else {return new DefaultMethodInvoker(getMethodHandleJava9(method));}} catch (IllegalAccessException | InstantiationException | InvocationTargetException| NoSuchMethodException e) {throw new RuntimeException(e);}} else {// 创建了一个 MapperMethodreturn new PlainMethodInvoker(new MapperMethod(mapperInterface, method, sqlSession.getConfiguration()));}});} catch (RuntimeException re) {Throwable cause = re.getCause();throw cause == null ? re : cause;}
}
4. MapperMethod
MapperMethod中封装了Mapper接口中对应方法的信息,以及SQL语句的信息,我们可以把MapperMethod看成是配置文件中定义的SQL语句和Mapper接口的桥梁。

属性和构造方法:
// statement id (例如:com.gupaoedu.mapper.BlogMapper.selectBlogById) 和 SQL 类型
private final SqlCommand command;
// 方法签名,主要是返回值的类型
private final MethodSignature method;public MapperMethod(Class<?> mapperInterface, Method method, Configuration config) {this.command = new SqlCommand(config, mapperInterface, method);this.method = new MethodSignature(config, mapperInterface, method);
}
4.1 SqlCommand
SqlCommand是MapperMethod中定义的内部类,记录了SQL语句名称以及对应的类型(UNKNOWN,INSERT,UPDATE,DELETE,SELECT,FLUSH):
public static class SqlCommand {private final String name; // SQL语句的的名称private final SqlCommandType type; // SQL 语句的类型public SqlCommand(Configuration configuration, Class<?> mapperInterface, Method method) {// 获取方法名称final String methodName = method.getName();final Class<?> declaringClass = method.getDeclaringClass();MappedStatement ms = resolveMappedStatement(mapperInterface, methodName, declaringClass,configuration);if (ms == null) {if (method.getAnnotation(Flush.class) != null) {name = null;type = SqlCommandType.FLUSH;} else {throw new BindingException("Invalid bound statement (not found): "+ mapperInterface.getName() + "." + methodName);}} else {name = ms.getId();type = ms.getSqlCommandType();if (type == SqlCommandType.UNKNOWN) {throw new BindingException("Unknown execution method for: " + name);}}}public String getName() {return name;}public SqlCommandType getType() {return type;}private MappedStatement resolveMappedStatement(Class<?> mapperInterface, String methodName,Class<?> declaringClass, Configuration configuration) {// statementId = Mapper接口全路径 + 方法名称 比如:com.gupaoedu.mapper.UserMapperString statementId = mapperInterface.getName() + "." + methodName;if (configuration.hasStatement(statementId)) {// 检查是否有该名称的SQL语句return configuration.getMappedStatement(statementId);} else if (mapperInterface.equals(declaringClass)) {return null;}// 如果Mapper接口还有父类 就递归处理for (Class<?> superInterface : mapperInterface.getInterfaces()) {if (declaringClass.isAssignableFrom(superInterface)) {MappedStatement ms = resolveMappedStatement(superInterface, methodName,declaringClass, configuration);if (ms != null) {return ms;}}}return null;}
}
4.2 MethodSignature
MethodSignature也是MapperMethod的内部类,在其中封装了Mapper接口中定义的方法相关信息。
private final boolean returnsMany; // 判断返回是否为 Collection类型或者数组类型
private final boolean returnsMap; // 返回值是否为 Map类型
private final boolean returnsVoid; // 返回值类型是否为 void
private final boolean returnsCursor; // 返回值类型是否为 Cursor 类型
private final boolean returnsOptional; // 返回值类型是否为 Optional 类型
private final Class<?> returnType; // 返回值类型
private final String mapKey; // 如果返回值类型为 Map  则 mapKey 记录了作为 key的 列名
private final Integer resultHandlerIndex; // 用来标记该方法参数列表中 ResultHandler 类型参数的位置
private final Integer rowBoundsIndex; // 用来标记该方法参数列表中 rowBounds 类型参数的位置
private final ParamNameResolver paramNameResolver; // 该方法对应的 ParamNameResolver 对象
构造方法中完成了相关信息分初始化操作:
public MethodSignature(Configuration configuration, Class<?> mapperInterface, Method method) {// 获取接口方法的返回类型Type resolvedReturnType = TypeParameterResolver.resolveReturnType(method, mapperInterface);if (resolvedReturnType instanceof Class<?>) {this.returnType = (Class<?>) resolvedReturnType;} else if (resolvedReturnType instanceof ParameterizedType) {this.returnType = (Class<?>) ((ParameterizedType) resolvedReturnType).getRawType();} else {this.returnType = method.getReturnType();}this.returnsVoid = void.class.equals(this.returnType);this.returnsMany = configuration.getObjectFactory().isCollection(this.returnType) || this.returnType.isArray();this.returnsCursor = Cursor.class.equals(this.returnType);this.returnsOptional = Optional.class.equals(this.returnType);this.mapKey = getMapKey(method);this.returnsMap = this.mapKey != null;// getUniqueParamIndex 查找指定类型的参数在 参数列表中的位置this.rowBoundsIndex = getUniqueParamIndex(method, RowBounds.class);this.resultHandlerIndex = getUniqueParamIndex(method, ResultHandler.class);this.paramNameResolver = new ParamNameResolver(configuration, method);
}
getUniqueParamIndex的主要作用是 查找指定类型的参数在参数列表中的位置:
private Integer getUniqueParamIndex(Method method, Class<?> paramType) {Integer index = null;// 获取对应方法的参数列表final Class<?>[] argTypes = method.getParameterTypes();// 遍历for (int i = 0; i < argTypes.length; i++) {// 判断是否是需要查找的类型if (paramType.isAssignableFrom(argTypes[i])) {// 记录对应类型在参数列表中的位置if (index == null) {index = i;} else {// RowBounds 和 ResultHandler 类型的参数只能有一个,不能重复出现throw new BindingException(method.getName() + " cannot have multiple " + paramType.getSimpleName() + " parameters");}}}return index;
}
4.3 execute
最后我们需要来看下再MapperMethod中最核心的方法execute方法,这个方法完成了数据库操作:
public Object execute(SqlSession sqlSession, Object[] args) {Object result;switch (command.getType()) { // 根据SQL语句的类型调用SqlSession对应的方法case INSERT: {// 通过 ParamNameResolver 处理args[] 数组 将用户传入的实参和指定参数名称关联起来Object param = method.convertArgsToSqlCommandParam(args);// sqlSession.insert(command.getName(), param) 调用SqlSession的insert方法// rowCountResult 方法会根据 method 字段中记录的方法的返回值类型对结果进行转换result = rowCountResult(sqlSession.insert(command.getName(), param));break;}case UPDATE: {Object param = method.convertArgsToSqlCommandParam(args);result = rowCountResult(sqlSession.update(command.getName(), param));break;}case DELETE: {Object param = method.convertArgsToSqlCommandParam(args);result = rowCountResult(sqlSession.delete(command.getName(), param));break;}case SELECT:if (method.returnsVoid() && method.hasResultHandler()) {// 返回值为空 且 ResultSet通过 ResultHandler处理的方法executeWithResultHandler(sqlSession, args);result = null;} else if (method.returnsMany()) {result = executeForMany(sqlSession, args);} else if (method.returnsMap()) {result = executeForMap(sqlSession, args);} else if (method.returnsCursor()) {result = executeForCursor(sqlSession, args);} else {// 返回值为 单一对象的方法Object param = method.convertArgsToSqlCommandParam(args);// 普通 select 语句的执行入口 >>result = sqlSession.selectOne(command.getName(), param);if (method.returnsOptional()&& (result == null || !method.getReturnType().equals(result.getClass()))) {result = Optional.ofNullable(result);}}break;case FLUSH:result = sqlSession.flushStatements();break;default:throw new BindingException("Unknown execution method for: " + command.getName());}if (result == null && method.getReturnType().isPrimitive() && !method.returnsVoid()) {throw new BindingException("Mapper method '" + command.getName()+ " attempted to return null from a method with a primitive return type (" + method.getReturnType() + ").");}return result;
}
在这个方法中所对应一些分支方法都还是比较简单的,在之前核心模块已经走过selectone的方法,其他可自行查阅。
4.4 核心流程串联
首先我们看看在系统具体操作过程中解析器模块在哪些地方发挥了作用:
首先在映射文件加载解析的位置。
public void parse() {// 总体上做了两件事情,对于语句的注册和接口的注册if (!configuration.isResourceLoaded(resource)) {// 1、具体增删改查标签的解析。// 一个标签一个MappedStatement。 >>configurationElement(parser.evalNode("/mapper"));configuration.addLoadedResource(resource);// 2、把namespace(接口类型)和工厂类绑定起来,放到一个map。// 一个namespace 一个 MapperProxyFactory >>bindMapperForNamespace();}parsePendingResultMaps();parsePendingCacheRefs();parsePendingStatements();
}
在bindMapperForNamespace中会完成Mapper接口的注册并调用前面介绍过的addMapper方法。
然后就是在我们执行。
// 4.通过SqlSession中提供的 API方法来操作数据库
UserMapper mapper = sqlSession.getMapper(UserMapper.class);
List<User> list = mapper.selectUserList();
这两行代码的内部逻辑,首先看下getMapper方法:
@Override
public <T> T getMapper(Class<T> type) {return configuration.getMapper(type, this);
}
public <T> T getMapper(Class<T> type, SqlSession sqlSession) { // mapperRegistry中注册的有Mapper的相关信息 在解析映射文件时 调用过addMapper方法 return mapperRegistry.getMapper(type, sqlSession);
}
然后就是从MapperRegistry中获取对应的MapperProxyFactory对象。
/*** 获取Mapper接口对应的代理对象*/
public <T> T getMapper(Class<T> type, SqlSession sqlSession) {// 获取Mapper接口对应的 MapperProxyFactory 对象final MapperProxyFactory<T> mapperProxyFactory = (MapperProxyFactory<T>) knownMappers.get(type);if (mapperProxyFactory == null) {throw new BindingException("Type " + type + " is not known to the MapperRegistry.");}try {return mapperProxyFactory.newInstance(sqlSession);} catch (Exception e) {throw new BindingException("Error getting mapper instance. Cause: " + e, e);}
}
然后根据MapperProxyFactory对象获取Mapper接口对应的代理对象。
/*** 创建实现了 mapperInterface 接口的代理对象*/
protected T newInstance(MapperProxy<T> mapperProxy) {// 1:类加载器:2:被代理类实现的接口、3:实现了 InvocationHandler 的触发管理类return (T) Proxy.newProxyInstance(mapperInterface.getClassLoader(), new Class[] { mapperInterface }, mapperProxy);
}public T newInstance(SqlSession sqlSession) {final MapperProxy<T> mapperProxy = new MapperProxy<>(sqlSession, mapperInterface, methodCache);return newInstance(mapperProxy);
}
时序图:
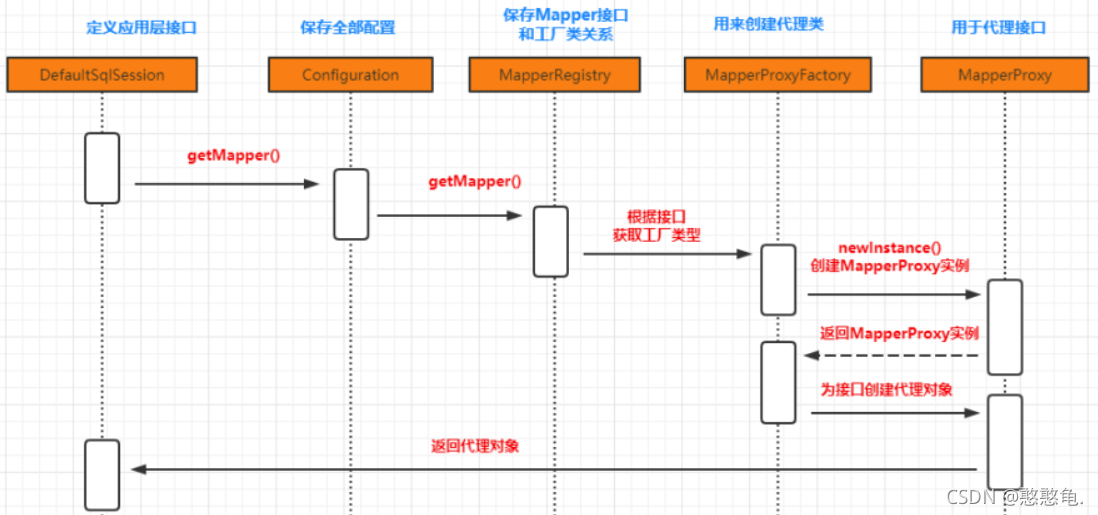
然后我们再来看下调用代理对象中的方法执行的顺序:
List<User> list = mapper.selectUserList();
会进入MapperProxy的Invoker方法中:
@Override
public Object invoke(Object proxy, Method method, Object[] args) throws Throwable {try {// toString hashCode equals getClass等方法,无需走到执行SQL的流程if (Object.class.equals(method.getDeclaringClass())) {return method.invoke(this, args);} else {// 提升获取 mapperMethod 的效率,到 MapperMethodInvoker(内部接口) 的 invoke// 普通方法会走到 PlainMethodInvoker(内部类) 的 invokereturn cachedInvoker(method).invoke(proxy, method, args, sqlSession);}} catch (Throwable t) {throw ExceptionUtil.unwrapThrowable(t);}
}
然后进入PlainMethodInvoker中的invoke方法:
@Override
public Object invoke(Object proxy, Method method, Object[] args, SqlSession sqlSession) throws Throwable {// SQL执行的真正起点return mapperMethod.execute(sqlSession, args);
}
然后会进入到 MapperMethod的execute方法中:
public Object execute(SqlSession sqlSession, Object[] args) {Object result;switch (command.getType()) { // 根据SQL语句的类型调用SqlSession对应的方法case INSERT: {// 通过 ParamNameResolver 处理args[] 数组 将用户传入的实参和指定参数名称关联起来Object param = method.convertArgsToSqlCommandParam(args);// sqlSession.insert(command.getName(), param) 调用SqlSession的insert方法// rowCountResult 方法会根据 method 字段中记录的方法的返回值类型对结果进行转换result = rowCountResult(sqlSession.insert(command.getName(), param));break;}case UPDATE: {Object param = method.convertArgsToSqlCommandParam(args);result = rowCountResult(sqlSession.update(command.getName(), param));break;}case DELETE: {Object param = method.convertArgsToSqlCommandParam(args);result = rowCountResult(sqlSession.delete(command.getName(), param));break;}case SELECT:if (method.returnsVoid() && method.hasResultHandler()) {// 返回值为空 且 ResultSet通过 ResultHandler处理的方法executeWithResultHandler(sqlSession, args);result = null;} else if (method.returnsMany()) {result = executeForMany(sqlSession, args);} else if (method.returnsMap()) {result = executeForMap(sqlSession, args);} else if (method.returnsCursor()) {result = executeForCursor(sqlSession, args);} else {// 返回值为 单一对象的方法Object param = method.convertArgsToSqlCommandParam(args);// 普通 select 语句的执行入口 >>result = sqlSession.selectOne(command.getName(), param);if (method.returnsOptional()&& (result == null || !method.getReturnType().equals(result.getClass()))) {result = Optional.ofNullable(result);}}break;case FLUSH:result = sqlSession.flushStatements();break;default:throw new BindingException("Unknown execution method for: " + command.getName());}if (result == null && method.getReturnType().isPrimitive() && !method.returnsVoid()) {throw new BindingException("Mapper method '" + command.getName()+ " attempted to return null from a method with a primitive return type (" + method.getReturnType() + ").");}return result;
}
之后就会根据对应的SQL类型而调用SqlSession中对应的方法来执行操作。
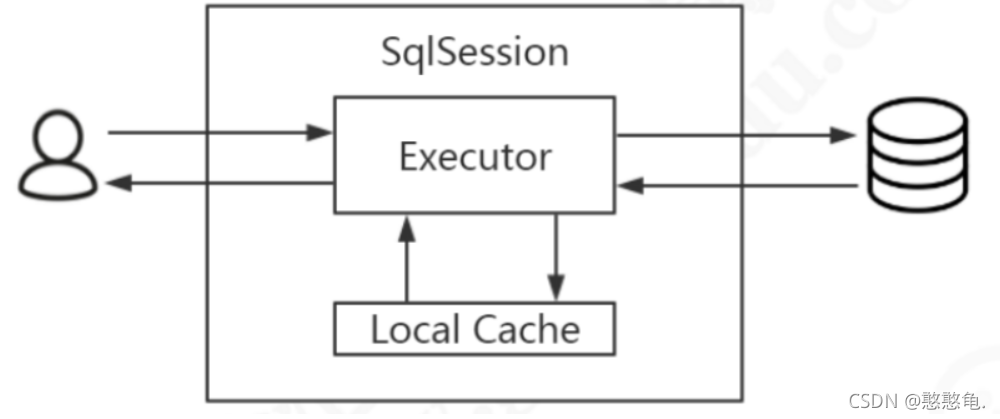
缓存模块
MyBatis作为一个强大的持久层框架,缓存是其必不可少的功能之一,Mybatis中的缓存分为一级缓存和二级缓存。但本质上是一样的,都是使用Cache接口实现的。缓存位于 org.apache.ibatis.cache包下。
通过查看源码结构我们能够发现Cache其实使用到了装饰器模式来实现缓存的处理。首先大家需要先回顾下装饰器模式的相关内容哦。我们先来看看Cache中的基础类的API。
// 煎饼加鸡蛋加香肠
“装饰者模式(Decorator Pattern)是指在不改变原有对象的基础之上,将功能附加到对象上,提供了比 继承更有弹性的替代方案(扩展原有对象的功能)。”

1. Cache接口
Cache接口是缓存模块中最核心的接口,它定义了所有缓存的基本行为,Cache接口的定义如下:
public interface Cache {/*** 缓存对象的 ID* @return The identifier of this cache*/String getId();/*** 向缓存中添加数据,一般情况下 key是CacheKey value是查询结果* @param key Can be any object but usually it is a {@link CacheKey}* @param value The result of a select.*/void putObject(Object key, Object value);/*** 根据指定的key,在缓存中查找对应的结果对象* @param key The key* @return The object stored in the cache.*/Object getObject(Object key);/*** As of 3.3.0 this method is only called during a rollback* for any previous value that was missing in the cache.* This lets any blocking cache to release the lock that* may have previously put on the key.* A blocking cache puts a lock when a value is null* and releases it when the value is back again.* This way other threads will wait for the value to be* available instead of hitting the database.* 删除key对应的缓存数据** @param key The key* @return Not used*/Object removeObject(Object key);/*** Clears this cache instance.* 清空缓存*/void clear();/*** Optional. This method is not called by the core.* 缓存的个数。* @return The number of elements stored in the cache (not its capacity).*/int getSize();/*** Optional. As of 3.2.6 this method is no longer called by the core.* <p>* Any locking needed by the cache must be provided internally by the cache provider.* 获取读写锁* @return A ReadWriteLock*/default ReadWriteLock getReadWriteLock() {return null;}}
Cache接口的实现类很多,但是大部分都是装饰器,只有PerpetualCache提供了Cache接口的基本实现。
2. PerpetualCache
PerpetualCache在缓存模块中扮演了ConcreteComponent的角色,其实现比较简单,底层使用HashMap记录缓存项,具体的实现如下:
public class PerpetualCache implements Cache {private final String id; // Cache 对象的唯一标识// 用于记录缓存的Map对象private final Map<Object, Object> cache = new HashMap<>();public PerpetualCache(String id) {this.id = id;}@Overridepublic String getId() {return id;}@Overridepublic int getSize() {return cache.size();}@Overridepublic void putObject(Object key, Object value) {cache.put(key, value);}@Overridepublic Object getObject(Object key) {return cache.get(key);}@Overridepublic Object removeObject(Object key) {return cache.remove(key);}@Overridepublic void clear() {cache.clear();}@Overridepublic boolean equals(Object o) {if (getId() == null) {throw new CacheException("Cache instances require an ID.");}if (this == o) {return true;}if (!(o instanceof Cache)) {return false;}Cache otherCache = (Cache) o;// 只关心IDreturn getId().equals(otherCache.getId());}@Overridepublic int hashCode() {if (getId() == null) {throw new CacheException("Cache instances require an ID.");}// 只关心IDreturn getId().hashCode();}}
然后我们可以来看看cache.decorators包下提供的装饰器。他们都实现了Cache接口。这些装饰器都在PerpetualCache的基础上提供了一些额外的功能,通过多个组合实现一些特殊的需求。
3. BlockingCache
通过名称我们能看出来是一个阻塞同步的缓存,它保证只有一个线程到缓存中查找指定的key对应的数据。
public class BlockingCache implements Cache {private long timeout; // 阻塞超时时长private final Cache delegate; // 被装饰的底层 Cache 对象// 每个key 都有对象的 ReentrantLock 对象private final ConcurrentHashMap<Object, ReentrantLock> locks;public BlockingCache(Cache delegate) {// 被装饰的 Cache 对象this.delegate = delegate;this.locks = new ConcurrentHashMap<>();}@Overridepublic String getId() {return delegate.getId();}@Overridepublic int getSize() {return delegate.getSize();}@Overridepublic void putObject(Object key, Object value) {try {// 执行 被装饰的 Cache 中的方法delegate.putObject(key, value);} finally {// 释放锁releaseLock(key);}}@Overridepublic Object getObject(Object key) {acquireLock(key); // 获取锁Object value = delegate.getObject(key); // 获取缓存数据if (value != null) { // 有数据就释放掉锁,否则继续持有锁releaseLock(key);}return value;}@Overridepublic Object removeObject(Object key) {// despite of its name, this method is called only to release locksreleaseLock(key);return null;}@Overridepublic void clear() {delegate.clear();}private ReentrantLock getLockForKey(Object key) {return locks.computeIfAbsent(key, k -> new ReentrantLock());}private void acquireLock(Object key) {Lock lock = getLockForKey(key);if (timeout > 0) {try {boolean acquired = lock.tryLock(timeout, TimeUnit.MILLISECONDS);if (!acquired) {throw new CacheException("Couldn't get a lock in " + timeout + " for the key " +  key + " at the cache " + delegate.getId());}} catch (InterruptedException e) {throw new CacheException("Got interrupted while trying to acquire lock for key " + key, e);}} else {lock.lock();}}private void releaseLock(Object key) {ReentrantLock lock = locks.get(key);if (lock.isHeldByCurrentThread()) {lock.unlock();}}public long getTimeout() {return timeout;}public void setTimeout(long timeout) {this.timeout = timeout;}
}
通过源码我们能够发现,BlockingCache本质上就是在我们操作缓存数据的前后通过ReentrantLock对象来实现了加锁和解锁操作。其他的具体实现类,大家可以自行查阅。
| 缓存实现类 | 描述 | 作用 | 装饰条件 |
|---|---|---|---|
| 基本缓存 | 缓存基本实现类 | 默认是PerpetualCache,也可以 自定义比如RedisCache、 EhCache等,具备基本功能的缓存类 | 无 |
| LruCache | LRU 策略的缓存 | 当缓存到达上限时候,删除最近最少使用的缓存(Least Recently Use) | eviction=“LRU”(默认) |
| FifoCache | FIFO 策略的缓存 | 当缓存到达上限时候,删除最先入队的缓存 | eviction=“LRU”(默认) |
| SoftCacheWeakCache | 带清理策略的缓存 | 通过JVM的软引用和弱引用来实现 缓存,当JVM内存不足时,会自动 清理掉这些缓存,基于 SoftReference和WeakReference | eviction="SOFT"eviction=“WEAK” |
| LoggingCache | 带日志功能的缓存 | 比如:输出缓存命中率 | 基本 |
| SynchronizedCache | 同步缓存 | 基于synchronized关键字实现, 解决并发问题 | 基本 |
| BlockingCache | 阻塞缓存 | 通过在get/put方式中加锁,保证 只有一个线程操作缓存,基于 Java重入锁实现 | blocking=true |
| SerializedCache | 支持序列化的缓存 | 将对象序列化以后存到缓存中, 取出时反序列化 | readOnly=false(默认) |
| ScheduledCache | 定时调度的缓存 | 在进行get/put/remove/getSize 等操作前,判断缓存时间是否超 过了设置的最长缓存时间(默认 是一小时),如果是则清空缓存-- 即每隔一段时间清空一次缓存 | flushInterval不为空 |
| TransactionalCache | 事务缓存 | 在二级缓存中使用,可一次存入多个缓存,移除多个缓存 | 在TransactionalCacheManager 中用Map维护对应关系 |
4. 缓存的应用
4.1 缓存对应的初始化
在Configuration初始化的时候会为我们的各种Cache实现注册对应的别名:

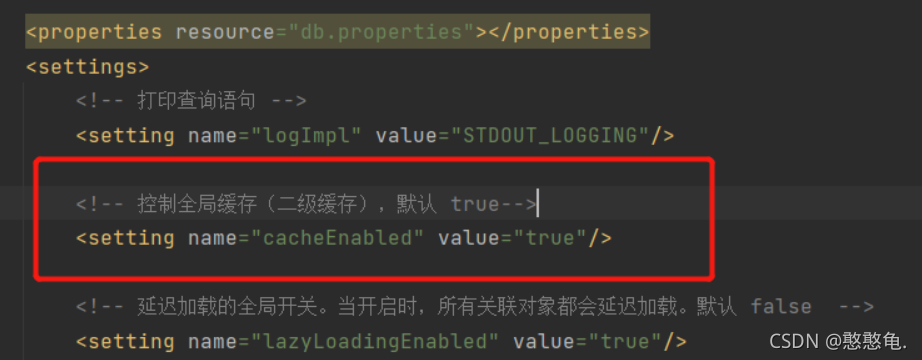
在解析settings标签的时候,设置的默认值有如下:
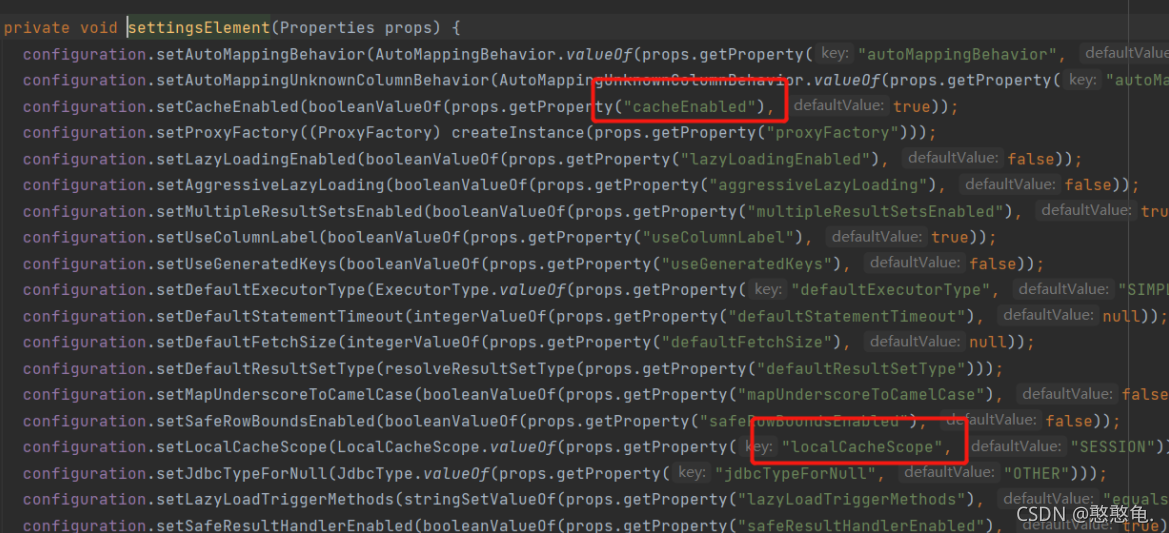
cacheEnabled默认为true,localCacheScope默认为 SESSION。
在解析映射文件的时候会解析我们相关的cache标签:
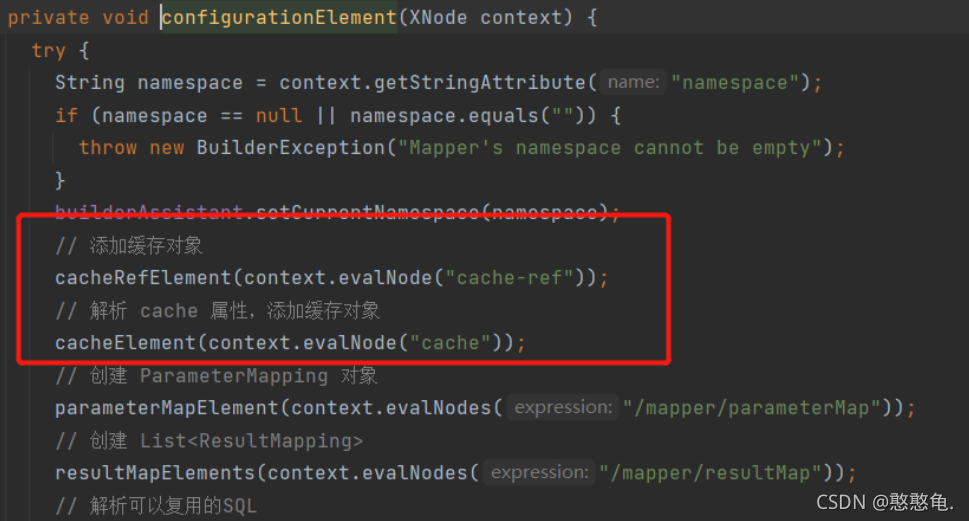
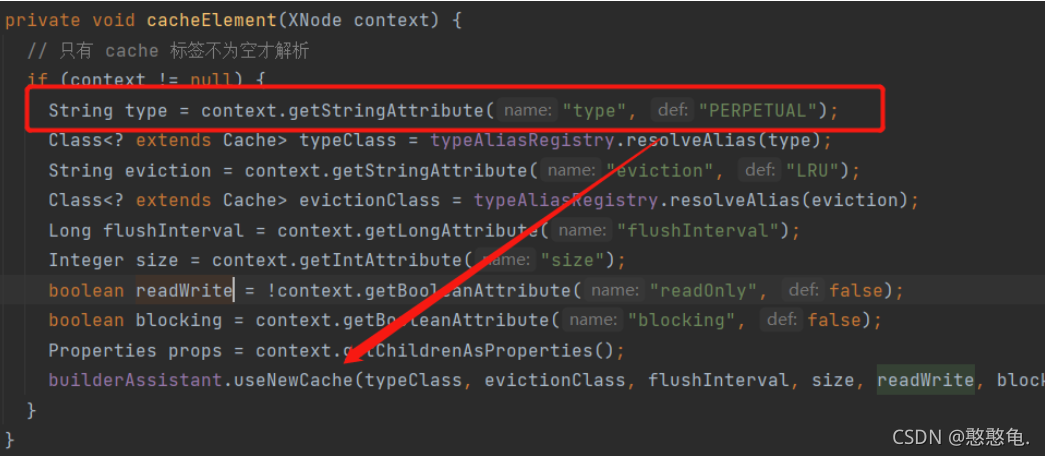
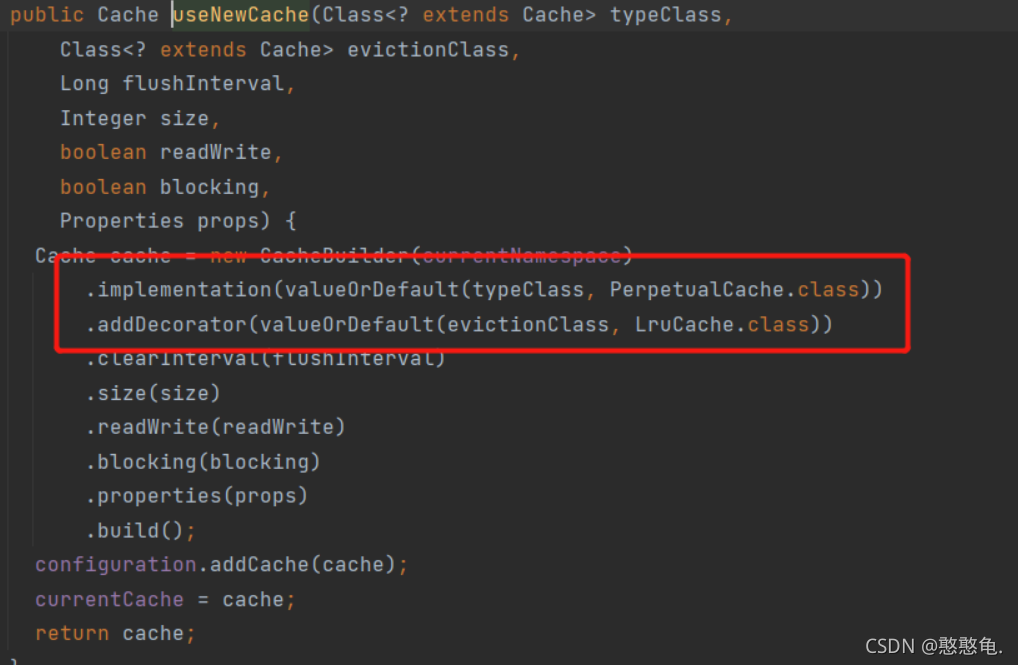
然后解析映射文件的cache标签后会在Configuration对象中添加对应的数据在:
private void cacheElement(XNode context) {// 只有 cache 标签不为空才解析if (context != null) {String type = context.getStringAttribute("type", "PERPETUAL");Class<? extends Cache> typeClass = typeAliasRegistry.resolveAlias(type);String eviction = context.getStringAttribute("eviction", "LRU");Class<? extends Cache> evictionClass = typeAliasRegistry.resolveAlias(eviction);Long flushInterval = context.getLongAttribute("flushInterval");Integer size = context.getIntAttribute("size");boolean readWrite = !context.getBooleanAttribute("readOnly", false);boolean blocking = context.getBooleanAttribute("blocking", false);Properties props = context.getChildrenAsProperties();builderAssistant.useNewCache(typeClass, evictionClass, flushInterval, size, readWrite, blocking, props);}
}
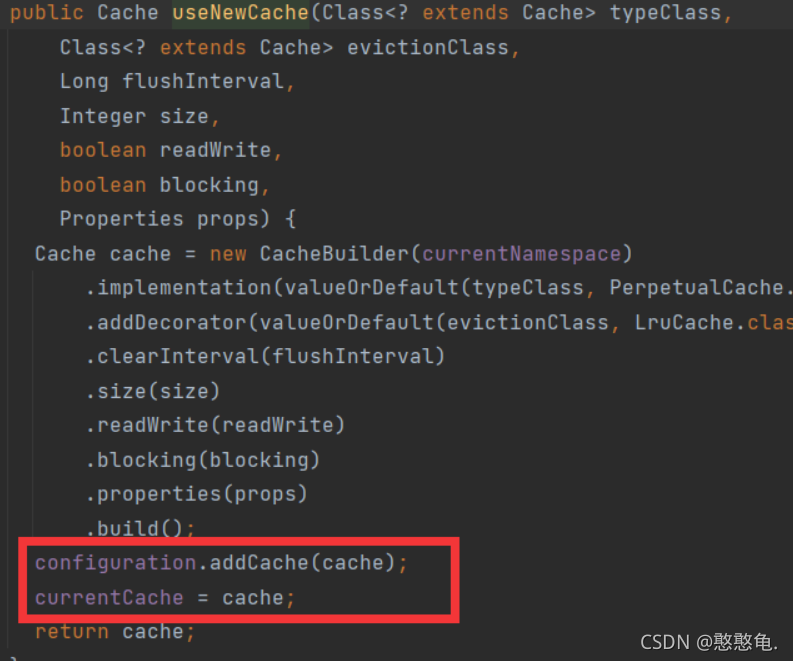
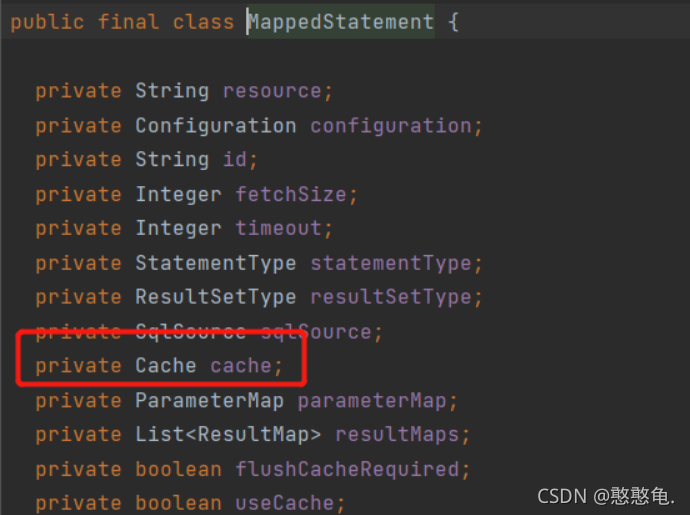
然后我们可以发现如果存储 cache 标签,那么对应的 Cache对象会被保存在 currentCache 属性中。(解析映射文件的步骤里面)
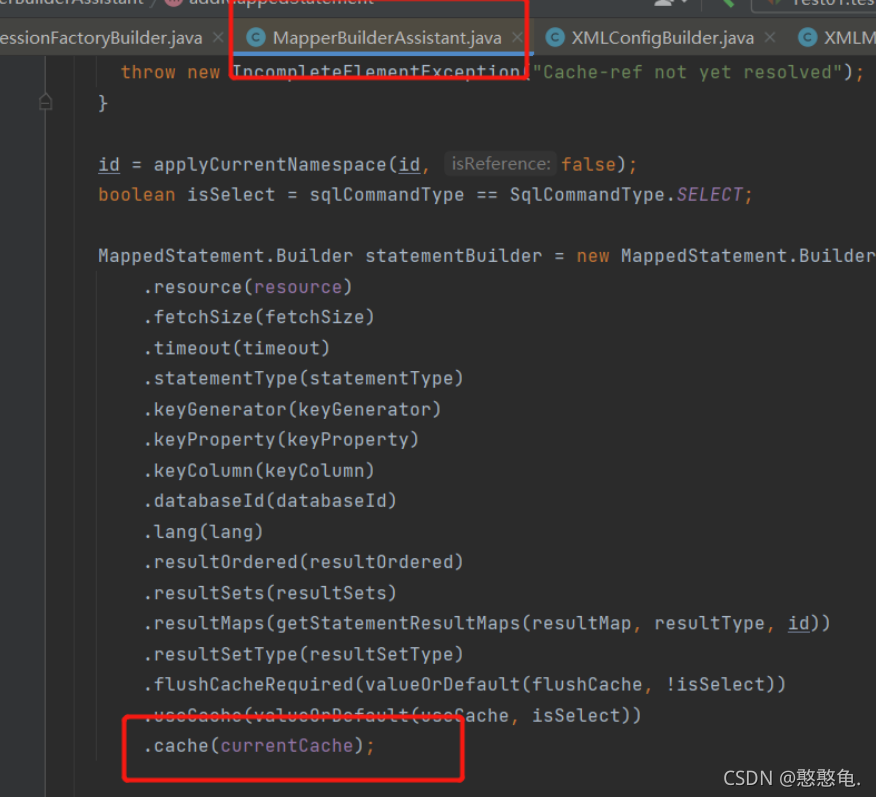
进而在 Cache 对象 保存在了 MapperStatement 对象的 cache 属性中。
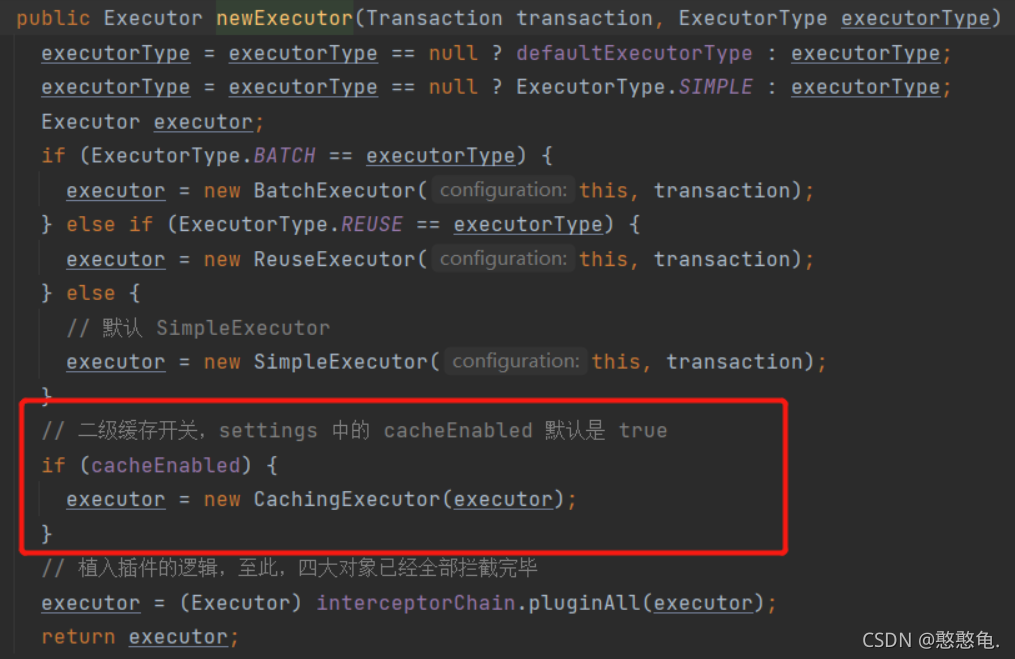
然后我们再看看openSession的时候又做了哪些操作,在创建对应的执行器的时候会有缓存的操作。
public Executor newExecutor(Transaction transaction, ExecutorType executorType) {executorType = executorType == null ? defaultExecutorType : executorType;executorType = executorType == null ? ExecutorType.SIMPLE : executorType;Executor executor;if (ExecutorType.BATCH == executorType) {executor = new BatchExecutor(this, transaction);} else if (ExecutorType.REUSE == executorType) {executor = new ReuseExecutor(this, transaction);} else {// 默认 SimpleExecutorexecutor = new SimpleExecutor(this, transaction);}// 二级缓存开关,settings 中的 cacheEnabled 默认是 trueif (cacheEnabled) {executor = new CachingExecutor(executor);}// 植入插件的逻辑,至此,四大对象已经全部拦截完毕executor = (Executor) interceptorChain.pluginAll(executor);return executor;
}
也就是如果 cacheEnabled 为 true 就会通过 CachingExecutor 来装饰executor 对象,然后就是在执行SQL操作的时候会涉及到缓存的具体使用。这个就分为一级缓存和二级缓存,这个我们来分别介绍。
4.2 一级缓存
一级缓存也叫本地缓存(Local Cache),MyBatis的一级缓存是在会话(SqlSession)层面进行缓存的。MyBatis的一级缓存是默认开启的,不需要任何的配置(如果要关闭,localCacheScope设置为STATEMENT)。在BaseExecutor对象的query方法中有关闭一级缓存的逻辑。
然后我们需要考虑下在一级缓存中的 PerpetualCache 对象在哪创建的,因为一级缓存是Session级别的缓存,肯定需要在Session范围内创建,其实PerpetualCache的实例化是在BaseExecutor的构造方法中创建的。
protected BaseExecutor(Configuration configuration, Transaction transaction) {this.transaction = transaction;this.deferredLoads = new ConcurrentLinkedQueue<>();this.localCache = new PerpetualCache("LocalCache");this.localOutputParameterCache = new PerpetualCache("LocalOutputParameterCache");this.closed = false;this.configuration = configuration;this.wrapper = this;
}
一级缓存的具体实现也是在BaseExecutor的query方法中来实现的:
@Override
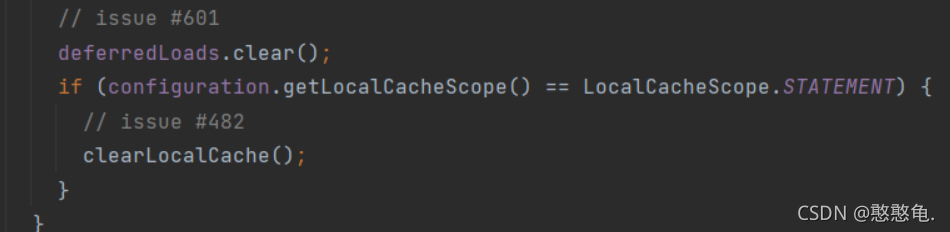
public <E> List<E> query(MappedStatement ms, Object parameter, RowBounds rowBounds, ResultHandler resultHandler, CacheKey key, BoundSql boundSql) throws SQLException {// 异常体系之 ErrorContextErrorContext.instance().resource(ms.getResource()).activity("executing a query").object(ms.getId());if (closed) {throw new ExecutorException("Executor was closed.");}if (queryStack == 0 && ms.isFlushCacheRequired()) {// flushCache="true"时,即使是查询,也清空一级缓存clearLocalCache();}List<E> list;try {// 防止递归查询重复处理缓存queryStack++;// 查询一级缓存// ResultHandler 和 ResultSetHandler的区别list = resultHandler == null ? (List<E>) localCache.getObject(key) : null;if (list != null) {handleLocallyCachedOutputParameters(ms, key, parameter, boundSql);} else {// 真正的查询流程list = queryFromDatabase(ms, parameter, rowBounds, resultHandler, key, boundSql);}} finally {queryStack--;}if (queryStack == 0) {for (DeferredLoad deferredLoad : deferredLoads) {deferredLoad.load();}// issue #601deferredLoads.clear();if (configuration.getLocalCacheScope() == LocalCacheScope.STATEMENT) {// issue #482clearLocalCache();}}return list;
}
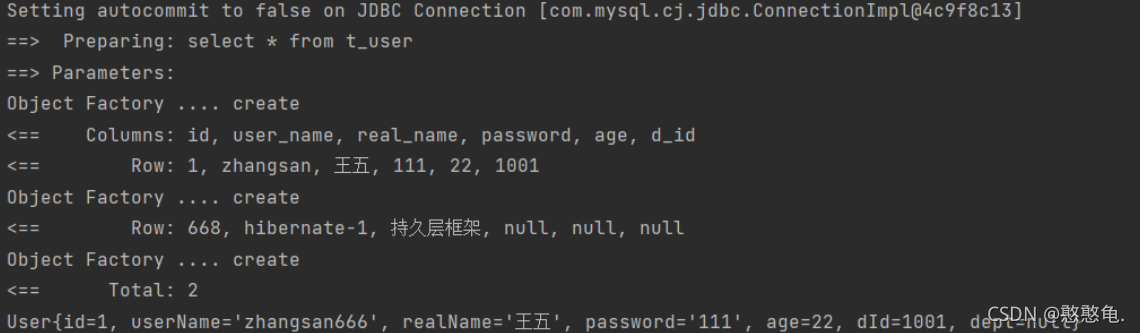
一级缓存的验证:
同一个Session中的多个相同操作:
    @Testpublic void test1() throws Exception {// 1.获取配置文件InputStream in = Resources.getResourceAsStream("mybatis-config.xml");// 2.加载解析配置文件并获取SqlSessionFactory对象SqlSessionFactory factory = new SqlSessionFactoryBuilder().build(in);// 3.根据SqlSessionFactory对象获取SqlSession对象SqlSession sqlSession = factory.openSession();// 4.通过SqlSession中提供的 API方法来操作数据库List<User> list = sqlSession.selectList("com.demo.mapper.UserMapper.selectUserList");
//        for (User user : list) {
//            System.out.println(user);
//        }System.out.println(list.size());// 一级缓存测试System.out.println("---------");list = sqlSession.selectList("com.demo.mapper.UserMapper.selectUserList");System.out.println(list.size());// 5.关闭会话sqlSession.close();}
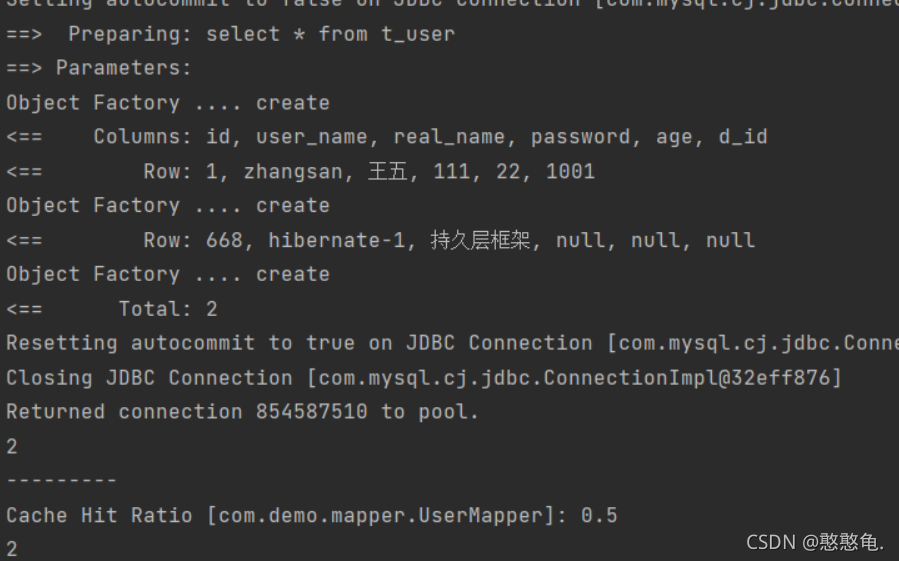
Setting autocommit to false on JDBC Connection [com.mysql.cj.jdbc.ConnectionImpl@ef9296d]
==>  Preparing: select * from t_user
==> Parameters:
Object Factory .... create
<==    Columns: id, user_name, real_name, password, age, d_id
<==        Row: 1, zhangsan, 王五, 111, 22, 1001
Object Factory .... create
<==        Row: 668, hibernate-1, 持久层框架, null, null, null
Object Factory .... create
<==      Total: 2
2
---------
2
可以看到第二次查询没有经过数据库操作。
多个session相同操作:
	@Testpublic void test1() throws Exception {// 1.获取配置文件InputStream in = Resources.getResourceAsStream("mybatis-config.xml");// 2.加载解析配置文件并获取SqlSessionFactory对象SqlSessionFactory factory = new SqlSessionFactoryBuilder().build(in);// 3.根据SqlSessionFactory对象获取SqlSession对象SqlSession sqlSession = factory.openSession();// 4.通过SqlSession中提供的 API方法来操作数据库List<User> list = sqlSession.selectList("com.demo.mapper.UserMapper.selectUserList");
//        for (User user : list) {
//            System.out.println(user);
//        }sqlSession.close();sqlSession = factory.openSession();System.out.println(list.size());// 一级缓存测试System.out.println("---------");list = sqlSession.selectList("com.demo.mapper.UserMapper.selectUserList");System.out.println(list.size());// 5.关闭会话sqlSession.close();}
通过输出我们能够发现,不同的Session中的相同操作,一级缓存是没有起作用的。
4.3 二级缓存
二级缓存是用来解决一级缓存不能跨会话共享的问题的,范围是namespace级别的,可以被多个SqlSession共享(只要是同一个接口里面的相同方法,都可以共享),生命周期和应用同步。
二级缓存的设置,首先是settings中的cacheEnabled要设置为true,当然默认的就是为true,这个步骤决定了在创建Executor对象的时候是否通过CachingExecutor来装饰。
那么设置了cacheEnabled标签为true是否就意味着 二级缓存是否一定可用呢?当然不是,我们还需要在 对应的映射文件中添加 cache 标签才行。
<!-- 声明这个namespace使用二级缓存 --> <cache type="org.apache.ibatis.cache.impl.PerpetualCache" size="1024" <!—最多缓存对象个数,默认1024--> eviction="LRU" <!—回收策略--> flushInterval="120000" <!—自动刷新时间 ms,未配置时只有调用时刷新--> readOnly="false"/> <!—默认是false(安全),改为true可读写时,对象必须支持序列化 -->
cache属性详解:
| 属性 | 含义 | 取值 |
|---|---|---|
| type | 缓存实现类 | 需要实现Cache接口,默认是PerpetualCache,可以使用第三方缓存 |
| size | 最多缓存个数 | 默认1024 |
| eviction | 回收策略 | LRU – 最近最少使用的:移除最长时间不被使用的对象(默认)。FIFO – 先进先出:按对象进入缓存的顺序来移除它们。SOFT – 软引用:移除 基于垃圾回收器状态和软引用规则的对象。WEAK – 弱引用:更积极地 移除基于垃圾收集器状态和弱引用规则的对象。 |
| flushInterval | 定时自动清空缓存间隔 | 自动刷新时间,单位 ms,未配置时只有调用时刷新 |
| readOnly | 是否只读 | true:只读缓存;会给所有调用者返回缓存对象的相同实例。因此这些 对象不能被修改。这提供了很重要的性能优势。false:读写缓存;会返 回缓存对象的拷贝(通过序列化),不会共享。这会慢一些,但是安 全,因此默认是 false。改为false可读写时,对象必须支持序列化。 |
| blocking | 启用阻塞缓存 | 通过在get/put方式中加锁,保证只有一个线程操作缓存,基于Java重入锁实现 |
再来看下cache标签在源码中的体现,创建cacheKey:
@Override
public <E> List<E> query(MappedStatement ms, Object parameterObject, RowBounds rowBounds, ResultHandler resultHandler) throws SQLException {// 获取SQLBoundSql boundSql = ms.getBoundSql(parameterObject);// 创建CacheKey:什么样的SQL是同一条SQL? >>CacheKey key = createCacheKey(ms, parameterObject, rowBounds, boundSql);return query(ms, parameterObject, rowBounds, resultHandler, key, boundSql);
}
createCacheKey自行进去查看:
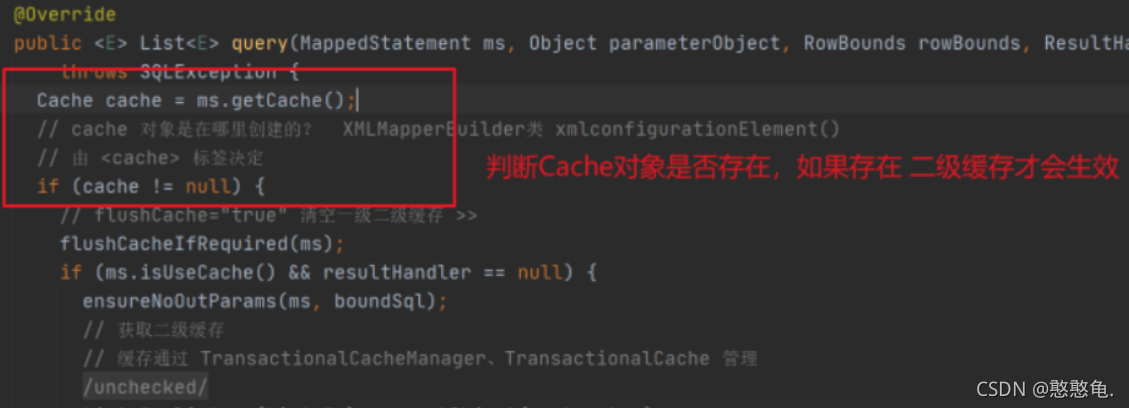
而这看到的和我们前面在缓存初始化时看到的 cache 标签解析操作是对应上的。所以我们要开启二级缓存两个条件都要满足。

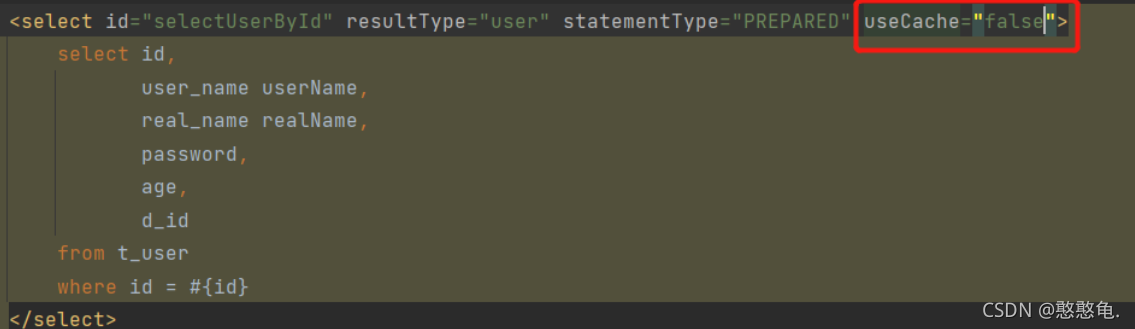
这样的设置表示当前的映射文件中的相关查询操作都会触发二级缓存,但如果某些个别方法我们不希望走二级缓存怎么办呢?我们可以在标签中添加一个 useCache=false 来实现的设置不使用二级缓存。
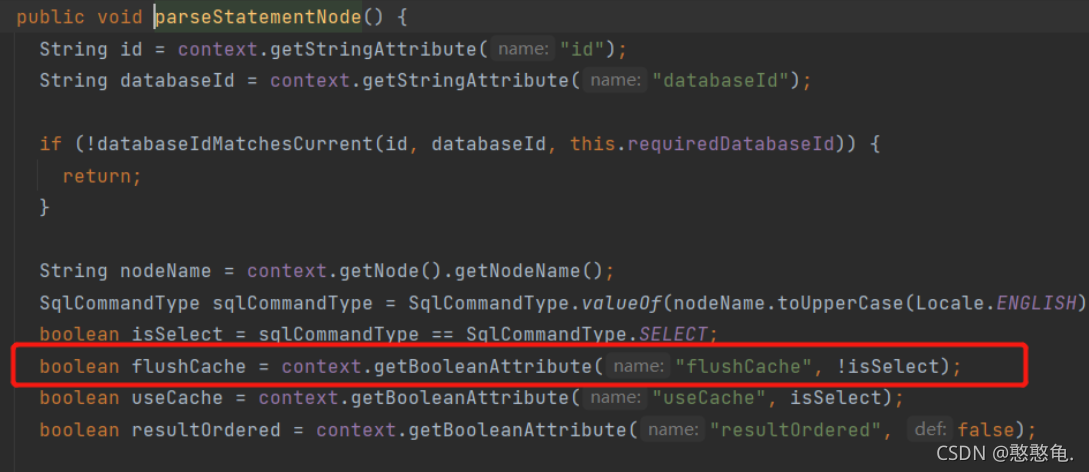
还有就是当我们执行的对应的DML操作,在MyBatis中会清空对应的二级缓存和一级缓存。
private void flushCacheIfRequired(MappedStatement ms) { Cache cache = ms.getCache(); // 增删改查的标签上有属性:flushCache="true" (select语句默认是false) // 一级二级缓存都会被清理 if (cache != null && ms.isFlushCacheRequired()) { tcm.clear(cache); }
}
在解析映射文件的时候DML操作flushCacheRequired为true。
4.4 第三方缓存
在实际开发的时候我们一般也很少使用MyBatis自带的二级缓存,这时我们会使用第三方的缓存工具Ehcache获取Redis来实现,那么他们是如何来实现的呢?
https://github.com/mybatis/redis-cache
添加依赖
<dependency><groupId>org.mybatis.caches</groupId><artifactId>mybatis-redis</artifactId><version>1.0.0-beta2</version>
</dependency>
然后加上Cache标签的配置
<cache type="org.mybatis.caches.redis.RedisCache" eviction="FIFO" flushInterval="60000" size="512" readOnly="true"/>
然后添加redis的属性文件
host=127.0.0.1
port=6379
connectionTimeout=5000
soTimeout=5000
database=0
测试效果(测试代码还是之前测试多个session操作时候的代码)
数据存储到了Redis中

然后大家也可以自行分析下第三方的Cache是如何替换掉PerpetualCache的,因为PerpetualCache是基于HashMap处理的,而RedisCache是基于Redis来存储缓存数据的。
提示:
缓存模块我们就介绍到此。 然后大家可以基于我们上面所介绍的基础支持层,再系统的来梳理下核心处理层的流程。
如若内容造成侵权/违法违规/事实不符,请联系编程学习网邮箱:809451989@qq.com进行投诉反馈,一经查实,立即删除!
相关文章
- Web前端期末大作业---响应式唯美婚庆公司网站网页设计
临近期末, 你还在为HTML网页设计结课作业,老师的作业要求感到头大?网页要求的总数量太多?HTML网页作业无从下手?没有合适的模板?等等一系列问题。你想要解决的问题,在这里常见网页设计作业题材有 个人、 美食、 公司、…...
2024/4/17 19:51:52 - Codeforces Round #748 (Div. 3) 题解代码
题目链接 A #include<iostream> #include<algorithm> #include<cstring> using namespace std; #define x first #define y second typedef pair<int,int> PII; const int N 1e4 10;int main() {int T;cin >> T;while(T--){int mx 0;int a[…...
2024/4/16 16:02:37 - (3)图像处理-cv2一些函数记录
1、putText cv2.putText(Img,text,(50,50),cv2.FONT_HERSHEY_COMPLEX,6,(0,0,255),5)图片/需要打印的字符串/左下角坐标位置/字体样式/字体大小/字体颜色(BGR),字体粗细...
2024/4/20 5:11:50 - Element Table 实现点击行变色效果
Element Table 实现点击行变色效果1、el-table组件中对row-style和row-click属性绑定处理函数2、在data中定义currentRowId记录当前点击的行,通过row-click的点击事件进行切换当前行1、el-table组件中对row-style和row-click属性绑定处理函数 <el-table:data&qu…...
2024/4/20 11:51:26 - 能能AI文章伪原创生成工具【长期更新】
...
2024/4/19 18:22:51 - Impala导出查询结果到文件
想用impala-shell 命令行中将查询的结果导出到本地文件,想当然的以为impala 和 hive 一样可以用 insert overwrite local directory ‘/home/test.txt’ select ……. 这样的命令导出到本地,执行了一下,发现impala 不支持这个。 然后查了一下…...
2024/4/20 8:54:37 - (PTA)实验3
7-1 栈的实现及基本操作 (15 分) 给定一个初始为空的栈和一系列压栈、弹栈操作,请编写程序输出每次弹栈的元素。栈的元素值均为整数。 输入格式: 输入第1行为1个正整数n,表示操作个数;接下来n行,每行表示一个操作,格式…...
2024/4/16 14:54:11 - 小Q百度指数批量查询工具【持久更新】
...
2024/4/19 13:07:30 - 剑指 Offer 58 - II. 左旋转字符串——记录(C++)
class Solution { public:string reverseLeftWords(string s, int n) {int ls.size();string a(l,0);int j0;for(int in;i<l;i){a[j]s[i];j;}for(int i0;i<n;i){a[j]s[i];j;}return a;} }; 加油!...
2024/4/15 4:19:55 - 资深投资人也在关注的办公软件
我有几款非常好用的远程办公软件,是我从网络上各种好评推荐中选出几款,然后进行实际体验综合得出来的五款最火,实用的远程办公软件!据说顶级投资人都在关注呦!嘻嘻! 1.亿图脑图 亿图脑图即MindMaster&…...
2024/4/15 4:19:50 - Date类、DateFormat类、Calendar类的简单介绍
一、包的位置 java.util.Date;java.text.DateFormat;java.lang.Calendar; 二、整体概括三者的介绍 java.util.Date 表示的是特定的时刻,精度为毫秒不适合国际化处理; java.text.DateFormat 日期格式化类࿱…...
2024/4/17 3:33:08 - SAP Commerce Cloud 产品明细页面设计概述
url:http://localhost:4299/electronics-spa/en/USD/jerryproduct/300938/Photosmart%20E317%20Digital%20Camera template:ProductDetailsPageTemplate 17个 content slot: 我关心的是这个 slot:TabsSlot CMSTabParagraphC…...
2024/4/20 7:15:03 - IDEA14:maven快速排查依赖包冲突
文章目录一、提问:二、解决步骤:一、提问: 在maven导入架包的过程中,如果架包出现冲突,如何快速去排查依赖包的冲突并进行解决? 二、解决步骤: 1、IDEA打开pom.xml–定位到内容里点击右键–D…...
2024/4/18 15:54:19 - 2022年计算机二级考试的一些心得、经验和资料总结分享
相信很多在校的计算机以及计算机相关专业的同学都知道计算机考级的事情,也有很多同学规划着要考二级等等。 那么计算机考级到底有没有用?这个仁者见而智者见智,总的来说,如果有时间,考了肯定比考是有优势的࿰…...
2024/4/19 12:29:09 - Java Swing 如何让界面更加美观
文章目录一、设置窗体的背景图二、设置Button组件三、设置字体大小和颜色四、设置组件的背景色五、综合测试案例一、设置窗体的背景图 利用JLable类的构造方法或方法加载图片 ImageIcon image new ImageIcon("D:\\背景.jpg"); JLabel jlable new JLabel(image); …...
2024/4/18 1:47:31 - 云计算学习笔记7——分布式存储及计算
Hadoop生态系统 2005年,雅虎工程师,分布式计算系统Hadoop,后开源。采用MapReduce分布式计算框架,并根据GFS开发了HDFS分布式文件系统。 核心组件: HDFSMapReduce 1. 分布式文件系统——GFS 1.1 GFS 超大规模分布式…...
2024/4/19 20:15:08 - Linux Shell脚本与Vim常用操作笔记
本篇笔记记录最最基本的vim和shell操作。ShellScript能干什么 Shellscript类似与Windows的批处理,可以把很多指令汇总到一起,于是可以很容易地通过一个操作执行多个命令。很轻量,有效率。在Vim中编写 Vim/Vi编辑器很强大,功能非常多,快捷键、指令更多,只需要知道最常用的…...
2024/4/16 8:27:57 - vscode 远程开发配置 ssh 不输入密码登录
cmd 生成秘钥: ssh-keygen -t rsa # 不要输入密码 # 默认生成在 ~/.ssh/id_rsa.pub复制公钥追加至远端机器的 ~/.ssh/authorized_keys...
2024/4/15 4:19:55 - 三十六.robotframework通过javascript定位元素
常用查找元素方法 document.getElementsByClassName("classname") document.getElementsByTagName("tagname") document.getElementsByClassName("classname")[0].children[0]返回某元素个数 ${num} Execute Javascript return document…...
2024/4/15 13:20:59 - 模型训练的auc和loss比较问题
AUC 反应的是正样本在负样本前面的概率问题,AUC越大,说明正样本更靠前。 LOSS 反应的是真实值与预测值之前的差值,就是损失,LOSS越小,说明预测值越接近于真实值。在二分类问题中,LOSS越小,说明…...
2024/4/19 12:56:08
最新文章
- 【加密周报】中东“惊雷”炸响币圈!比特币减半成功完成,市场情绪已被提前消化!中美突传USDT重磅消息!
周五(4月19日),比特币经历惊魂一刻,伊朗核设施所处的中部城市伊斯法罕惊传爆炸,叙利亚与伊拉克也都传来爆炸声响,中东全面战争与核武攻击威胁触发加密市场恐慌情绪。比特币一度下探59600美元。但随后伊朗强调核设施未受损…...
2024/4/20 19:09:06 - 梯度消失和梯度爆炸的一些处理方法
在这里是记录一下梯度消失或梯度爆炸的一些处理技巧。全当学习总结了如有错误还请留言,在此感激不尽。 权重和梯度的更新公式如下: w w − η ⋅ ∇ w w w - \eta \cdot \nabla w ww−η⋅∇w 个人通俗的理解梯度消失就是网络模型在反向求导的时候出…...
2024/3/20 10:50:27 - 论文阅读AI工具链
文献检索 可以利用智谱清言来生成合适的文献检索式,并根据需要不断调整。 谷歌学术 在Google Scholar中进行检索时,您可以使用类似的逻辑来构建您的搜索式,但是语法会有所不同。Google Scholar的搜索框接受普通的文本搜索,但是…...
2024/4/20 11:27:16 - WPS二次开发专题:WPS SDK实现文档打印功能
作者持续关注WPS二次开发专题系列,持续为大家带来更多有价值的WPS开发技术细节,如果能够帮助到您,请帮忙来个一键三连,更多问题请联系我(QQ:250325397) 在办公场景或者家教场景中经常碰到需要对文档进行打印…...
2024/4/17 19:28:01 - 【外汇早评】美通胀数据走低,美元调整
原标题:【外汇早评】美通胀数据走低,美元调整昨日美国方面公布了新一期的核心PCE物价指数数据,同比增长1.6%,低于前值和预期值的1.7%,距离美联储的通胀目标2%继续走低,通胀压力较低,且此前美国一季度GDP初值中的消费部分下滑明显,因此市场对美联储后续更可能降息的政策…...
2024/4/19 14:24:02 - 【原油贵金属周评】原油多头拥挤,价格调整
原标题:【原油贵金属周评】原油多头拥挤,价格调整本周国际劳动节,我们喜迎四天假期,但是整个金融市场确实流动性充沛,大事频发,各个商品波动剧烈。美国方面,在本周四凌晨公布5月份的利率决议和新闻发布会,维持联邦基金利率在2.25%-2.50%不变,符合市场预期。同时美联储…...
2024/4/19 18:20:22 - 【外汇周评】靓丽非农不及疲软通胀影响
原标题:【外汇周评】靓丽非农不及疲软通胀影响在刚结束的周五,美国方面公布了新一期的非农就业数据,大幅好于前值和预期,新增就业重新回到20万以上。具体数据: 美国4月非农就业人口变动 26.3万人,预期 19万人,前值 19.6万人。 美国4月失业率 3.6%,预期 3.8%,前值 3…...
2024/4/19 11:57:31 - 【原油贵金属早评】库存继续增加,油价收跌
原标题:【原油贵金属早评】库存继续增加,油价收跌周三清晨公布美国当周API原油库存数据,上周原油库存增加281万桶至4.692亿桶,增幅超过预期的74.4万桶。且有消息人士称,沙特阿美据悉将于6月向亚洲炼油厂额外出售更多原油,印度炼油商预计将每日获得至多20万桶的额外原油供…...
2024/4/19 11:57:31 - 【外汇早评】日本央行会议纪要不改日元强势
原标题:【外汇早评】日本央行会议纪要不改日元强势近两日日元大幅走强与近期市场风险情绪上升,避险资金回流日元有关,也与前一段时间的美日贸易谈判给日本缓冲期,日本方面对汇率问题也避免继续贬值有关。虽然今日早间日本央行公布的利率会议纪要仍然是支持宽松政策,但这符…...
2024/4/19 11:57:52 - 【原油贵金属早评】欧佩克稳定市场,填补伊朗问题的影响
原标题:【原油贵金属早评】欧佩克稳定市场,填补伊朗问题的影响近日伊朗局势升温,导致市场担忧影响原油供给,油价试图反弹。此时OPEC表态稳定市场。据消息人士透露,沙特6月石油出口料将低于700万桶/日,沙特已经收到石油消费国提出的6月份扩大出口的“适度要求”,沙特将满…...
2024/4/19 11:57:53 - 【外汇早评】美欲与伊朗重谈协议
原标题:【外汇早评】美欲与伊朗重谈协议美国对伊朗的制裁遭到伊朗的抗议,昨日伊朗方面提出将部分退出伊核协议。而此行为又遭到欧洲方面对伊朗的谴责和警告,伊朗外长昨日回应称,欧洲国家履行它们的义务,伊核协议就能保证存续。据传闻伊朗的导弹已经对准了以色列和美国的航…...
2024/4/19 11:58:14 - 【原油贵金属早评】波动率飙升,市场情绪动荡
原标题:【原油贵金属早评】波动率飙升,市场情绪动荡因中美贸易谈判不安情绪影响,金融市场各资产品种出现明显的波动。随着美国与中方开启第十一轮谈判之际,美国按照既定计划向中国2000亿商品征收25%的关税,市场情绪有所平复,已经开始接受这一事实。虽然波动率-恐慌指数VI…...
2024/4/19 11:58:20 - 【原油贵金属周评】伊朗局势升温,黄金多头跃跃欲试
原标题:【原油贵金属周评】伊朗局势升温,黄金多头跃跃欲试美国和伊朗的局势继续升温,市场风险情绪上升,避险黄金有向上突破阻力的迹象。原油方面稍显平稳,近期美国和OPEC加大供给及市场需求回落的影响,伊朗局势并未推升油价走强。近期中美贸易谈判摩擦再度升级,美国对中…...
2024/4/20 7:40:48 - 【原油贵金属早评】市场情绪继续恶化,黄金上破
原标题:【原油贵金属早评】市场情绪继续恶化,黄金上破周初中国针对于美国加征关税的进行的反制措施引发市场情绪的大幅波动,人民币汇率出现大幅的贬值动能,金融市场受到非常明显的冲击。尤其是波动率起来之后,对于股市的表现尤其不安。隔夜美国股市出现明显的下行走势,这…...
2024/4/19 11:58:39 - 【外汇早评】美伊僵持,风险情绪继续升温
原标题:【外汇早评】美伊僵持,风险情绪继续升温昨日沙特两艘油轮再次发生爆炸事件,导致波斯湾局势进一步恶化,市场担忧美伊可能会出现摩擦生火,避险品种获得支撑,黄金和日元大幅走强。美指受中美贸易问题影响而在低位震荡。继5月12日,四艘商船在阿联酋领海附近的阿曼湾、…...
2024/4/19 11:58:51 - 【原油贵金属早评】贸易冲突导致需求低迷,油价弱势
原标题:【原油贵金属早评】贸易冲突导致需求低迷,油价弱势近日虽然伊朗局势升温,中东地区几起油船被袭击事件影响,但油价并未走高,而是出于调整结构中。由于市场预期局势失控的可能性较低,而中美贸易问题导致的全球经济衰退风险更大,需求会持续低迷,因此油价调整压力较…...
2024/4/20 3:12:02 - 氧生福地 玩美北湖(上)——为时光守候两千年
原标题:氧生福地 玩美北湖(上)——为时光守候两千年一次说走就走的旅行,只有一张高铁票的距离~ 所以,湖南郴州,我来了~ 从广州南站出发,一个半小时就到达郴州西站了。在动车上,同时改票的南风兄和我居然被分到了一个车厢,所以一路非常愉快地聊了过来。 挺好,最起…...
2024/4/19 11:59:15 - 氧生福地 玩美北湖(中)——永春梯田里的美与鲜
原标题:氧生福地 玩美北湖(中)——永春梯田里的美与鲜一觉醒来,因为大家太爱“美”照,在柳毅山庄去寻找龙女而错过了早餐时间。近十点,向导坏坏还是带着饥肠辘辘的我们去吃郴州最富有盛名的“鱼头粉”。说这是“十二分推荐”,到郴州必吃的美食之一。 哇塞!那个味美香甜…...
2024/4/19 11:59:23 - 氧生福地 玩美北湖(下)——奔跑吧骚年!
原标题:氧生福地 玩美北湖(下)——奔跑吧骚年!让我们红尘做伴 活得潇潇洒洒 策马奔腾共享人世繁华 对酒当歌唱出心中喜悦 轰轰烈烈把握青春年华 让我们红尘做伴 活得潇潇洒洒 策马奔腾共享人世繁华 对酒当歌唱出心中喜悦 轰轰烈烈把握青春年华 啊……啊……啊 两…...
2024/4/19 11:59:44 - 扒开伪装医用面膜,翻六倍价格宰客,小姐姐注意了!
原标题:扒开伪装医用面膜,翻六倍价格宰客,小姐姐注意了!扒开伪装医用面膜,翻六倍价格宰客!当行业里的某一品项火爆了,就会有很多商家蹭热度,装逼忽悠,最近火爆朋友圈的医用面膜,被沾上了污点,到底怎么回事呢? “比普通面膜安全、效果好!痘痘、痘印、敏感肌都能用…...
2024/4/19 11:59:48 - 「发现」铁皮石斛仙草之神奇功效用于医用面膜
原标题:「发现」铁皮石斛仙草之神奇功效用于医用面膜丽彦妆铁皮石斛医用面膜|石斛多糖无菌修护补水贴19大优势: 1、铁皮石斛:自唐宋以来,一直被列为皇室贡品,铁皮石斛生于海拔1600米的悬崖峭壁之上,繁殖力差,产量极低,所以古代仅供皇室、贵族享用 2、铁皮石斛自古民间…...
2024/4/19 12:00:06 - 丽彦妆\医用面膜\冷敷贴轻奢医学护肤引导者
原标题:丽彦妆\医用面膜\冷敷贴轻奢医学护肤引导者【公司简介】 广州华彬企业隶属香港华彬集团有限公司,专注美业21年,其旗下品牌: 「圣茵美」私密荷尔蒙抗衰,产后修复 「圣仪轩」私密荷尔蒙抗衰,产后修复 「花茵莳」私密荷尔蒙抗衰,产后修复 「丽彦妆」专注医学护…...
2024/4/19 16:57:22 - 广州械字号面膜生产厂家OEM/ODM4项须知!
原标题:广州械字号面膜生产厂家OEM/ODM4项须知!广州械字号面膜生产厂家OEM/ODM流程及注意事项解读: 械字号医用面膜,其实在我国并没有严格的定义,通常我们说的医美面膜指的应该是一种「医用敷料」,也就是说,医用面膜其实算作「医疗器械」的一种,又称「医用冷敷贴」。 …...
2024/4/19 12:00:25 - 械字号医用眼膜缓解用眼过度到底有无作用?
原标题:械字号医用眼膜缓解用眼过度到底有无作用?医用眼膜/械字号眼膜/医用冷敷眼贴 凝胶层为亲水高分子材料,含70%以上的水分。体表皮肤温度传导到本产品的凝胶层,热量被凝胶内水分子吸收,通过水分的蒸发带走大量的热量,可迅速地降低体表皮肤局部温度,减轻局部皮肤的灼…...
2024/4/19 12:00:40 - 配置失败还原请勿关闭计算机,电脑开机屏幕上面显示,配置失败还原更改 请勿关闭计算机 开不了机 这个问题怎么办...
解析如下:1、长按电脑电源键直至关机,然后再按一次电源健重启电脑,按F8健进入安全模式2、安全模式下进入Windows系统桌面后,按住“winR”打开运行窗口,输入“services.msc”打开服务设置3、在服务界面,选中…...
2022/11/19 21:17:18 - 错误使用 reshape要执行 RESHAPE,请勿更改元素数目。
%读入6幅图像(每一幅图像的大小是564*564) f1 imread(WashingtonDC_Band1_564.tif); subplot(3,2,1),imshow(f1); f2 imread(WashingtonDC_Band2_564.tif); subplot(3,2,2),imshow(f2); f3 imread(WashingtonDC_Band3_564.tif); subplot(3,2,3),imsho…...
2022/11/19 21:17:16 - 配置 已完成 请勿关闭计算机,win7系统关机提示“配置Windows Update已完成30%请勿关闭计算机...
win7系统关机提示“配置Windows Update已完成30%请勿关闭计算机”问题的解决方法在win7系统关机时如果有升级系统的或者其他需要会直接进入一个 等待界面,在等待界面中我们需要等待操作结束才能关机,虽然这比较麻烦,但是对系统进行配置和升级…...
2022/11/19 21:17:15 - 台式电脑显示配置100%请勿关闭计算机,“准备配置windows 请勿关闭计算机”的解决方法...
有不少用户在重装Win7系统或更新系统后会遇到“准备配置windows,请勿关闭计算机”的提示,要过很久才能进入系统,有的用户甚至几个小时也无法进入,下面就教大家这个问题的解决方法。第一种方法:我们首先在左下角的“开始…...
2022/11/19 21:17:14 - win7 正在配置 请勿关闭计算机,怎么办Win7开机显示正在配置Windows Update请勿关机...
置信有很多用户都跟小编一样遇到过这样的问题,电脑时发现开机屏幕显现“正在配置Windows Update,请勿关机”(如下图所示),而且还需求等大约5分钟才干进入系统。这是怎样回事呢?一切都是正常操作的,为什么开时机呈现“正…...
2022/11/19 21:17:13 - 准备配置windows 请勿关闭计算机 蓝屏,Win7开机总是出现提示“配置Windows请勿关机”...
Win7系统开机启动时总是出现“配置Windows请勿关机”的提示,没过几秒后电脑自动重启,每次开机都这样无法进入系统,此时碰到这种现象的用户就可以使用以下5种方法解决问题。方法一:开机按下F8,在出现的Windows高级启动选…...
2022/11/19 21:17:12 - 准备windows请勿关闭计算机要多久,windows10系统提示正在准备windows请勿关闭计算机怎么办...
有不少windows10系统用户反映说碰到这样一个情况,就是电脑提示正在准备windows请勿关闭计算机,碰到这样的问题该怎么解决呢,现在小编就给大家分享一下windows10系统提示正在准备windows请勿关闭计算机的具体第一种方法:1、2、依次…...
2022/11/19 21:17:11 - 配置 已完成 请勿关闭计算机,win7系统关机提示“配置Windows Update已完成30%请勿关闭计算机”的解决方法...
今天和大家分享一下win7系统重装了Win7旗舰版系统后,每次关机的时候桌面上都会显示一个“配置Windows Update的界面,提示请勿关闭计算机”,每次停留好几分钟才能正常关机,导致什么情况引起的呢?出现配置Windows Update…...
2022/11/19 21:17:10 - 电脑桌面一直是清理请关闭计算机,windows7一直卡在清理 请勿关闭计算机-win7清理请勿关机,win7配置更新35%不动...
只能是等着,别无他法。说是卡着如果你看硬盘灯应该在读写。如果从 Win 10 无法正常回滚,只能是考虑备份数据后重装系统了。解决来方案一:管理员运行cmd:net stop WuAuServcd %windir%ren SoftwareDistribution SDoldnet start WuA…...
2022/11/19 21:17:09 - 计算机配置更新不起,电脑提示“配置Windows Update请勿关闭计算机”怎么办?
原标题:电脑提示“配置Windows Update请勿关闭计算机”怎么办?win7系统中在开机与关闭的时候总是显示“配置windows update请勿关闭计算机”相信有不少朋友都曾遇到过一次两次还能忍但经常遇到就叫人感到心烦了遇到这种问题怎么办呢?一般的方…...
2022/11/19 21:17:08 - 计算机正在配置无法关机,关机提示 windows7 正在配置windows 请勿关闭计算机 ,然后等了一晚上也没有关掉。现在电脑无法正常关机...
关机提示 windows7 正在配置windows 请勿关闭计算机 ,然后等了一晚上也没有关掉。现在电脑无法正常关机以下文字资料是由(历史新知网www.lishixinzhi.com)小编为大家搜集整理后发布的内容,让我们赶快一起来看一下吧!关机提示 windows7 正在配…...
2022/11/19 21:17:05 - 钉钉提示请勿通过开发者调试模式_钉钉请勿通过开发者调试模式是真的吗好不好用...
钉钉请勿通过开发者调试模式是真的吗好不好用 更新时间:2020-04-20 22:24:19 浏览次数:729次 区域: 南阳 > 卧龙 列举网提醒您:为保障您的权益,请不要提前支付任何费用! 虚拟位置外设器!!轨迹模拟&虚拟位置外设神器 专业用于:钉钉,外勤365,红圈通,企业微信和…...
2022/11/19 21:17:05 - 配置失败还原请勿关闭计算机怎么办,win7系统出现“配置windows update失败 还原更改 请勿关闭计算机”,长时间没反应,无法进入系统的解决方案...
前几天班里有位学生电脑(windows 7系统)出问题了,具体表现是开机时一直停留在“配置windows update失败 还原更改 请勿关闭计算机”这个界面,长时间没反应,无法进入系统。这个问题原来帮其他同学也解决过,网上搜了不少资料&#x…...
2022/11/19 21:17:04 - 一个电脑无法关闭计算机你应该怎么办,电脑显示“清理请勿关闭计算机”怎么办?...
本文为你提供了3个有效解决电脑显示“清理请勿关闭计算机”问题的方法,并在最后教给你1种保护系统安全的好方法,一起来看看!电脑出现“清理请勿关闭计算机”在Windows 7(SP1)和Windows Server 2008 R2 SP1中,添加了1个新功能在“磁…...
2022/11/19 21:17:03 - 请勿关闭计算机还原更改要多久,电脑显示:配置windows更新失败,正在还原更改,请勿关闭计算机怎么办...
许多用户在长期不使用电脑的时候,开启电脑发现电脑显示:配置windows更新失败,正在还原更改,请勿关闭计算机。。.这要怎么办呢?下面小编就带着大家一起看看吧!如果能够正常进入系统,建议您暂时移…...
2022/11/19 21:17:02 - 还原更改请勿关闭计算机 要多久,配置windows update失败 还原更改 请勿关闭计算机,电脑开机后一直显示以...
配置windows update失败 还原更改 请勿关闭计算机,电脑开机后一直显示以以下文字资料是由(历史新知网www.lishixinzhi.com)小编为大家搜集整理后发布的内容,让我们赶快一起来看一下吧!配置windows update失败 还原更改 请勿关闭计算机&#x…...
2022/11/19 21:17:01 - 电脑配置中请勿关闭计算机怎么办,准备配置windows请勿关闭计算机一直显示怎么办【图解】...
不知道大家有没有遇到过这样的一个问题,就是我们的win7系统在关机的时候,总是喜欢显示“准备配置windows,请勿关机”这样的一个页面,没有什么大碍,但是如果一直等着的话就要两个小时甚至更久都关不了机,非常…...
2022/11/19 21:17:00 - 正在准备配置请勿关闭计算机,正在准备配置windows请勿关闭计算机时间长了解决教程...
当电脑出现正在准备配置windows请勿关闭计算机时,一般是您正对windows进行升级,但是这个要是长时间没有反应,我们不能再傻等下去了。可能是电脑出了别的问题了,来看看教程的说法。正在准备配置windows请勿关闭计算机时间长了方法一…...
2022/11/19 21:16:59 - 配置失败还原请勿关闭计算机,配置Windows Update失败,还原更改请勿关闭计算机...
我们使用电脑的过程中有时会遇到这种情况,当我们打开电脑之后,发现一直停留在一个界面:“配置Windows Update失败,还原更改请勿关闭计算机”,等了许久还是无法进入系统。如果我们遇到此类问题应该如何解决呢࿰…...
2022/11/19 21:16:58 - 如何在iPhone上关闭“请勿打扰”
Apple’s “Do Not Disturb While Driving” is a potentially lifesaving iPhone feature, but it doesn’t always turn on automatically at the appropriate time. For example, you might be a passenger in a moving car, but your iPhone may think you’re the one dri…...
2022/11/19 21:16:57