Visual Studio代码:高级用户指南
In this guide, you’ll learn how to take advantage of Visual Studio Code to supercharge your development workflow.
在本指南中,您将学习如何利用Visual Studio Code来增强开发工作流。
This article is written for Visual Studio Code beginners, and users looking to get more out of the app. VS Code, as it’s commonly known, is considered a “lightweight” code editor. In comparison with full integrated development environment (IDE) editors which occupy gigabytes of disk space, VS Code uses less than 200MB when installed.
本文是为Visual Studio Code初学者和希望从应用程序中获得更多收益的用户而写的。 众所周知,VS Code被认为是“轻量级”代码编辑器。 与占用数GB磁盘空间的完全集成开发环境(IDE)编辑器相比,VS Code安装时使用的内存不足200MB。
Despite the “lightweight” term, Visual Studio Code offers a massive number of features which keep increasing and improving with every new update. For this guide, we’ll cover the most popularly used features. Every programmer has their own toolset that they update whenever they discover new workflows. If you want to learn every tool and feature VS Code has to offer, check out their official documentation. In addition, you may want to keep track of updates for new and improved features.
尽管术语“轻量级”,但Visual Studio Code提供了大量的功能,这些功能会随着每次新更新而不断增加和改进。 在本指南中,我们将介绍最常用的功能。 每个程序员都有自己的工具集,只要发现新的工作流程就可以对其进行更新。 如果您想了解VS Code提供的所有工具和功能,请查看其官方文档 。 此外,您可能希望跟踪新功能和改进功能的更新 。
先决条件 (Prerequisites)
In order to follow this guide, you need to be proficient in at least one programming language and framework. You also need to be conversant with versioning your project code with git. You’ll also need to have an account with a remote repository platform such as GitHub. I recommend you setup SSH Keys to connect with your remote repo.
为了遵循本指南,您需要精通至少一种编程语言和框架。 您还需要精通git对项目代码进行版本控制。 您还需要拥有一个远程存储库平台(例如GitHub)的帐户。 我建议您设置SSH密钥以与远程仓库连接。
We’ll use a minimal Next.js project to demonstrate VS Code features. If you’re new to this, don’t worry — the focus of the guide isn’t the framework or language used. You can transfer the skills we’ll teach to any language and framework you work with in Visual Studio Code.
我们将使用最小的Next.js项目来演示VS Code功能。 如果您是新手,请不要担心-本指南的重点不是所使用的框架或语言。 您可以将我们将教授的技能转移到您在Visual Studio Code中使用的任何语言和框架。
一点历史 (A Bit of History)
Not so long ago, these were the fully integrated development environments on offer:
不久之前,这些是提供的完全集成的开发环境:
Visual Studio IDE
Visual Studio IDE
NetBeans
NetBeans
Eclipse
蚀
IntelliJ IDEA
IntelliJ IDEA
These platforms provide the complete development workflow, from coding to testing and deployment. They analyze code, highlight errors, and have all sorts of other features that provide assistance. They also contain plenty of features that most developers don’t use, though they are essential for some teams. As a result, these platforms took a lot of disk space and were slow to start up. Many developers preferred using advanced text editors such as emacs and vim to write their code in.
这些平台提供了从编码到测试和部署的完整开发工作流程。 他们分析代码,突出显示错误,并具有各种其他功能来提供帮助。 它们还包含许多开发人员不使用的许多功能,尽管它们对于某些团队来说是必不可少的。 结果,这些平台占用了大量磁盘空间,并且启动缓慢。 许多开发人员更喜欢使用emacs和vim等高级文本编辑器来编写代码。
Soon, a new crop of platform independent code editors arrived. These lightweight editors provided many features that were previously exclusive to IDEs. I’ve listed them below in the order they were released:
不久,又出现了一批新的平台独立代码编辑器。 这些轻量级编辑器提供了许多IDE以前独有的功能。 我按照发布的顺序在下面列出了它们:
Sublime Text: July 2013
崇高文字 :2013年7月
Atom.io: June 2015
Atom.io:2015年 6月
Visual Studio Code: April 2016
Visual Studio代码 :2016年4月
Mac developers had access to TextMate, which was released in October 2004. The snippets system used by all of these editors originated from TextMate. According to a developer survey done by Stack OverFlow in 2019, Visual Studio Code is the most popular code development environment with 50.7% usage. Visual Studio IDE comes second, and NotePad++ comes third.
Mac开发曾获得的TextMate ,这是在2004年10月由所有这些编辑器源于TextMate的片段的系统释放。 根据Stack OverFlow在2019年所做的开发人员调查显示,Visual Studio Code是最受欢迎的代码开发环境,使用率为50.7%。 Visual Studio IDE位居第二,NotePad ++位居第三。
That’s enough history and stats. Let’s show you how to use Visual Studio Code’s features.
足够的历史记录和统计数据。 让我们向您展示如何使用Visual Studio Code的功能。
设置和更新 (Setup and Updates)
Visual Studio Code’s package installer is less than 100MB and consumes less than 200MB when fully installed. When you visit the download page, it will detect your operating system and offer you the correct download link.
Visual Studio Code的程序包安装程序小于100MB,完全安装后的消耗小于200MB。 当您访问下载页面时,它将检测您的操作系统并为您提供正确的下载链接。
Updating VS Code is easy. When an update is available, it displays a notification prompt. For Windows users, you’ll have to click on the notification to download and install the latest version. The download process occurs in the background while you’re working. When it’s ready to install, a restart prompt will appear. Clicking this will install the update for you and restart VS Code.
更新VS Code很容易。 有可用更新时,它将显示通知提示。 对于Windows用户,您必须单击通知以下载并安装最新版本。 在您工作时,下载过程在后台进行。 准备安装时,将出现重新启动提示。 单击此按钮将为您安装更新并重新启动VS Code。
For Ubuntu-based distributions, clicking on the update notification will simply open the website for you to download the latest installer. A much easier way is simply running sudo apt update && sudo apt upgrade -y. This will update all installed Linux packages including Visual Studio Code. The reason this works is because VS Code added its repo to your package repo registry during the initial installation. You can find the repo information on this path: /etc/apt/sources.list.d/vscode.list.
对于基于Ubuntu的发行版,单击更新通知将仅打开网站供您下载最新的安装程序。 一个简单得多的方法是简单地运行sudo apt update && sudo apt upgrade -y 。 这将更新所有已安装的Linux软件包,包括Visual Studio Code。 之所以起作用,是因为VS Code在初始安装期间将其存储库添加到了软件包存储库注册表中。 您可以在以下路径中找到回购信息: /etc/apt/sources.list.d/vscode.list 。
用户界面 (User Interface)
Let’s first get acquainted with the user interface:
让我们先熟悉一下用户界面:
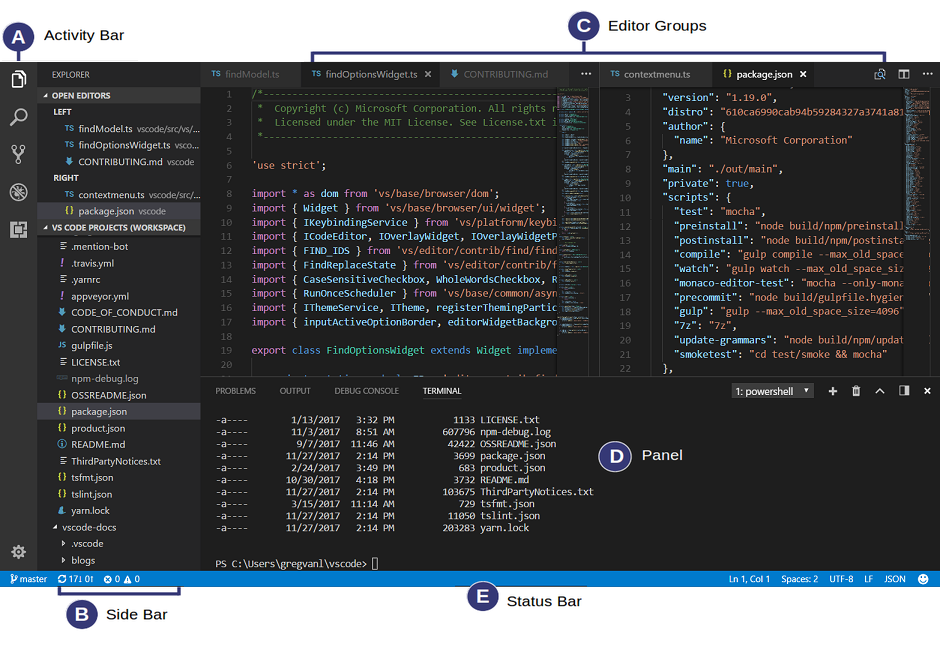
Visual Studio Code’s user interface is divided into five main areas which you can easily adjust.
Visual Studio Code的用户界面分为五个主要区域,您可以轻松调整它们。
Activity Bar: allows you to switch between views: explorer, search, version control, debug and extensions.
活动栏 :允许您在以下视图之间切换:资源管理器,搜索,版本控制,调试和扩展。
Side Bar: contains the active view.
侧栏 :包含活动视图。
Editor: this is where you edit files and preview markdown files. You can arrange multiple open files side-by-side.
编辑器 :您可以在其中编辑文件和预览降价文件。 您可以并排排列多个打开的文件。
Panel: displays different panels: integrated terminal, output panels for debug information, errors and warnings.
面板 :显示不同的面板:集成终端,用于调试信息,错误和警告的输出面板。
Status: displays information about the currently opened project and file. Also contains buttons for executing version control actions, and enabling/disabling extension features.
状态 :显示有关当前打开的项目和文件的信息。 还包含用于执行版本控制操作以及启用/禁用扩展功能的按钮。
There’s also the top Menu Bar where you can access the editor’s menu system. For Linux users, the default integrated terminal will probably be the Bash shell. For Windows users, it’s PowerShell. Fortunately, there’s a shell selector located inside the terminal dropdown that will allow you to choose a different shell. If installed, you can choose any of the following:
还有顶部的菜单栏 ,您可以在其中访问编辑器的菜单系统。 对于Linux用户,默认的集成终端可能是Bash shell。 对于Windows用户,它是PowerShell 。 幸运的是,终端下拉菜单中有一个外壳选择器,您可以选择其他外壳。 如果已安装,则可以选择以下任意一项:
- Command Prompt 命令提示符
- PowerShell 电源外壳
- PowerShell Core PowerShell核心
- Git Bash 吉特·巴什
- WSL Bash WSL重击
处理项目 (Working with Projects)
Unlike full IDEs, Visual Studio Code doesn’t provide project creation or offer project templates in the traditional way. It simply works with folders. On my Linux development machine, I’m using the following folder pattern to store and manage my projects:
与完整的IDE不同,Visual Studio Code不提供传统方式的项目创建或项目模板 。 它仅适用于文件夹。 在Linux开发机器上,我使用以下文件夹模式来存储和管理我的项目:
/home/{username}/Projects/{company-name}/{repo-provider}/{project-name}The Projects folder is what I refer to as to the workspace. As a freelance writer and developer, I separate projects based on which company I’m working for, and which repo I’m using. For personal projects, I store them under my own fictitious “company name”. For projects that I experiment with for learning purposes, and which I don’t intend to keep for long, I’ll just use a name such as play or tuts as a substitute for {repo-provider}.
该Projects的文件夹就是我称之为工作区 。 作为自由撰稿人和开发人员,我根据工作的公司和所使用的回购项来分离项目。 对于个人项目,我将它们存储在我自己的虚拟“公司名称”下。 对于我出于学习目的进行试验的项目,并且我不想长期保留这些项目,我只会使用诸如play或tuts类的名称来代替{repo-provider} 。
If you’d like to create a new project and open it in VS Code, you can use the following steps. Open a terminal and execute the following commands:
如果要创建一个新项目并用VS Code打开它,则可以使用以下步骤。 打开一个终端并执行以下命令:
$ mkdir vscode-demo
$ cd vscode-demo
# Launch Visual Studio Code
$ code .
You can also do this in File Explorer. When you access the mouse context menu, you should be able to open any folder in VS Code.
您也可以在“文件资源管理器”中执行此操作。 访问鼠标上下文菜单时,应该可以在VS Code中打开任何文件夹。
If you want to create a new project linked to a remote repo, it’s easier creating one on the repo site — for example, GitHub or BitBucket.
如果您要创建一个链接到远程仓库的新项目,则在仓库站点上创建一个项目会比较容易,例如GitHub或BitBucket 。
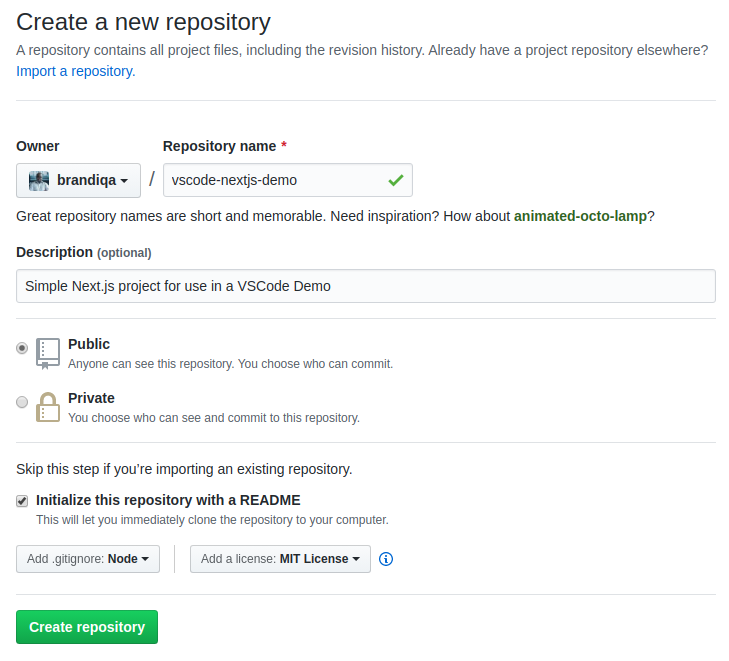
Take note of all the fields that have been filled in and selected. Next, go to the terminal and execute the following:
记下已填写并选择的所有字段。 接下来,转到终端并执行以下操作:
# Navigate to workspace/company/repo folder
$ cd Projects/sitepoint/github/
# Clone the project to your machine
$ git clone git@github.com:{insert-username-here}/vscode-nextjs-demo.git
# Open project in VS Code
$ cd vscode-nextjs-demo
$ code .
Once the editor is up and running, you can launch the integrated terminal using the keyboard shortcut Ctrl+~ (tilde key). Use the following commands to generate package.json and install packages:
编辑器启动并运行后,您可以使用键盘快捷键Ctrl+~ (波浪号)启动集成终端。 使用以下命令生成package.json并安装软件包:
# Generate `package.json` file with default settings
$ npm init -y
# Install package dependencies
$ npm install next react react-dom
Next, open package.json and replace the scripts section with this:
接下来,打开package.json并将scripts部分替换为:
"scripts": {
"dev": "next",
"build": "next build",
"start": "next start"
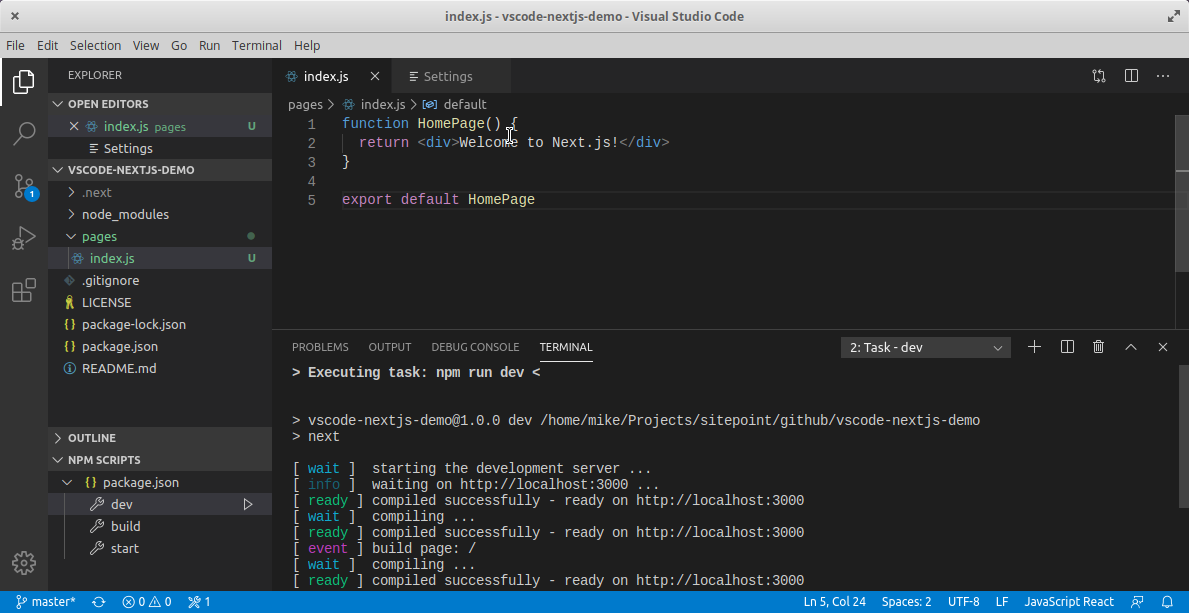
}The entire Visual Studio Code window should look like this:
整个Visual Studio代码窗口应如下所示:
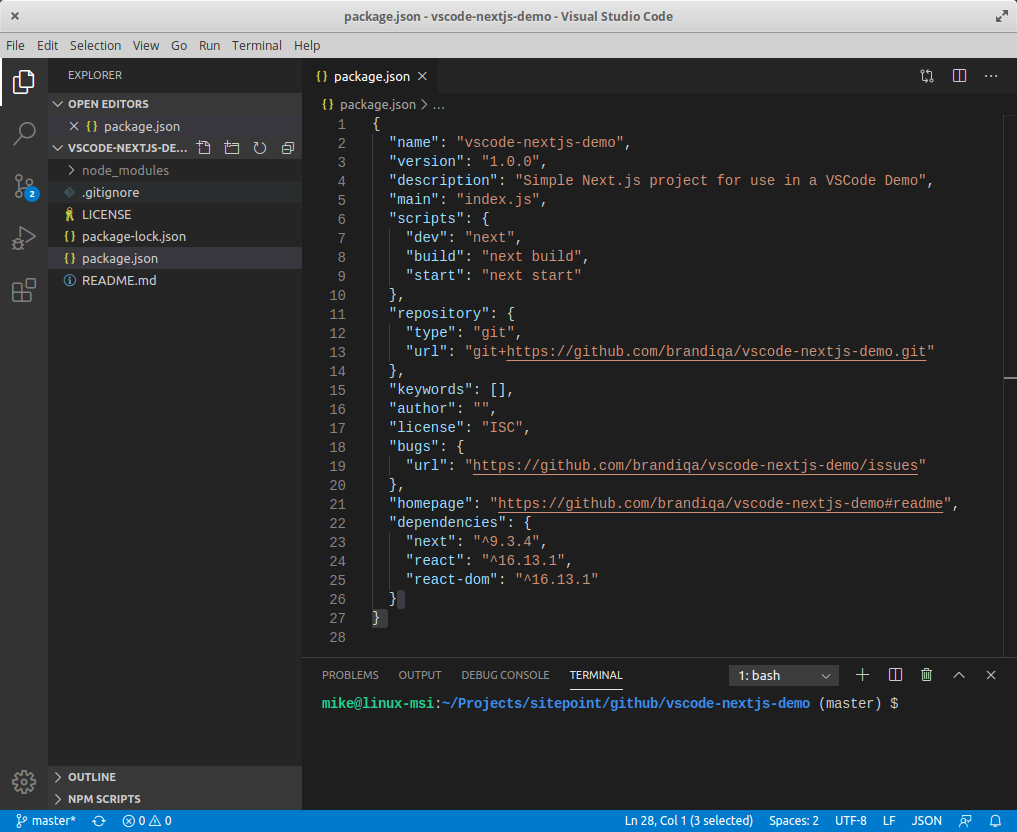
Before we look at the next section, I’d like to mention that VS Code also supports the concept of multi-root workspaces. If you’re working with related projects — front-end, back-end, docs etc. — you can manage them all in a single workspace inside one editor. This will make it easier to keep your source code and documentation in sync.
在看下一节之前,我想提到VS Code还支持多根工作区的概念。 如果您正在处理相关项目(前端,后端,文档等),则可以在一个编辑器中的单个工作区中对它们进行全部管理。 这样可以更轻松地使源代码和文档保持同步。
使用Git进行版本控制 (Version Control with Git)
Visual Studio Code comes built-in with Git source control manager. It provides a UI interface where you can stage, commit, create new branches and switch to existing ones. Let’s commit the changes we just did in our project. On the Activity bar, open the Source Control Panel and locate the Stage All Changes plus button as shown below.
Visual Studio Code内置于Git源代码管理器中。 它提供了一个UI界面,您可以在其中执行,提交,创建新分支以及切换到现有分支。 让我们提交我们刚刚在项目中所做的更改。 在“ 活动”栏上 ,打开“ 源代码控制面板”,然后找到“ Stage All Changes加号”按钮,如下所示。
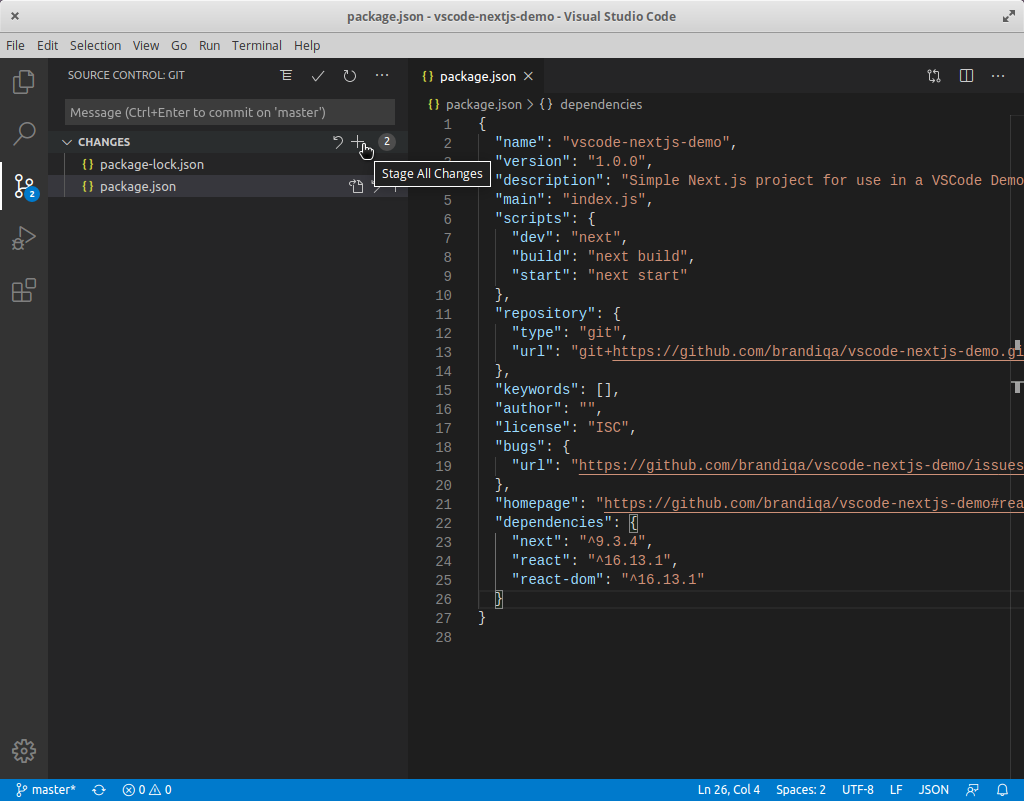
Click on it. Next, enter the commit message “Installed next.js dependencies”, then click the Commit button at the top. It has the checkmark icon. This will commit the new changes. If you look at the status located at the bottom, you’ll see various status icons at the left-hand corner. The 0 ↓ means there’s nothing to pull from the remote repo. The 1 ↑ means you’ve got one commit you need to push to your remote repo. Clicking on it will display a prompt on the action that will take place. Click OK to pull and push your code. This should sync up your local repo with the remote repo.
点击它。 接下来,输入提交消息“已安装next.js依赖项”,然后单击顶部的“ 提交”按钮。 它带有复选标记图标。 这将提交新更改。 如果查看底部的状态,则会在左上角看到各种状态图标。 0 ↓表示没有任何东西可以从远程仓库中获取。 1 ↑表示您需要提交一次提交才能推送到远程仓库。 单击它会提示将要执行的操作。 单击确定以pull并push您的代码。 这将使您的本地存储库与远程存储库同步。
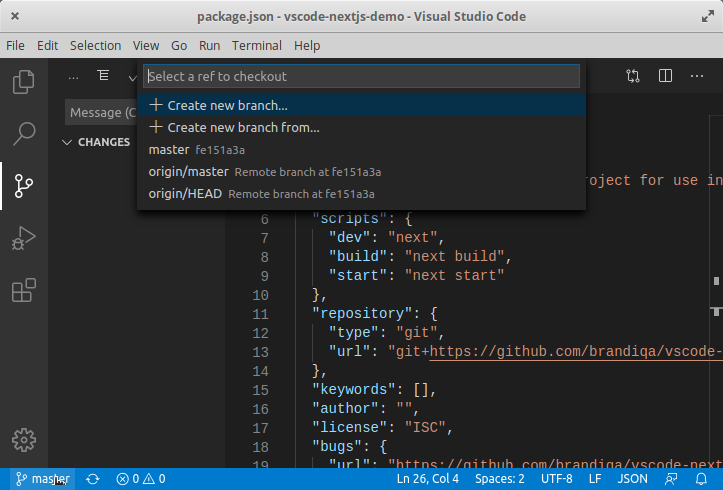
To create a new branch or switch to an existing branch, just click the branch name master on the status bar, left bottom corner. This will pop up a branch panel for you to take an action.
要创建新分支或切换到现有分支,只需单击状态栏左下角的分支名称 master 。 这将弹出一个分支面板供您执行操作。
Do check out the following extensions for an even better experience with Git:
请检查以下扩展以更好地体验Git:
Git Lens
吉特·伦斯
Git History
git历史
Support for a different type of SCM, such as SVN, can be added via installing the relevant SCM extension from the marketplace.
可以通过从市场上安装相关的SCM扩展来添加对其他类型的SCM(例如SVN)的支持。
创建和运行代码 (Creating and Running Code)
On the Activity Bar, head back to the Explorer Panel and use the New Folder button to create the folder pages at the root of the project. Select this folder and use the New File button to create the file pages/index.js. Copy the following code:
在活动栏上 ,返回到“ 资源管理器面板”,然后使用“ 新建文件夹”按钮在项目的根目录下创建文件夹pages 。 选择此文件夹,然后使用“ 新建文件”按钮创建文件pages / index.js 。 复制以下代码:
function HomePage() {
return <div>Welcome to Next.js!</div>;
}
export default HomePage;
With the Explorer Panel, you should see a section called NPM Scripts. Expand on this and hover over dev. A run button (play icon) will appear next to it. Click on it and this will launch a Next.js dev server inside the Integrated Terminal.
使用资源管理器面板 ,您应该看到一个名为NPM脚本的部分。 对此进行扩展,并将鼠标悬停在dev 。 旁边会出现一个run按钮(播放图标)。 单击它,这将在Integrated Terminal中启动Next.js开发服务器。
It should take a few seconds to spin up. Use Ctrl + Click on the URL http://localhost:3000 to open it in your browser. The page should open successfully displaying the “Welcome” message. In the next section, we’ll look at how we can change Visual Studio Code preferences.
启动起来需要几秒钟。 使用Ctrl + 单击 URL http://localhost:3000在浏览器中将其打开。 该页面应成功打开,并显示“欢迎”消息。 在下一节中,我们将研究如何更改Visual Studio Code首选项。
用户和工作区设置 (User and Workspace Settings)
To access VS Code preference settings, use the shortcut key Ctrl + ,. You can also access it via the menu command like this:
要访问VS代码偏好设置,使用快捷键Ctrl +。 您也可以通过如下菜单命令访问它:
On Windows/Linux – File > Preferences > Settings
在Windows / Linux上- 文件 > 首选项 > 设置
On macOS – Code > Preferences > Settings
在macOS上- 代码 > 首选项 > 设置
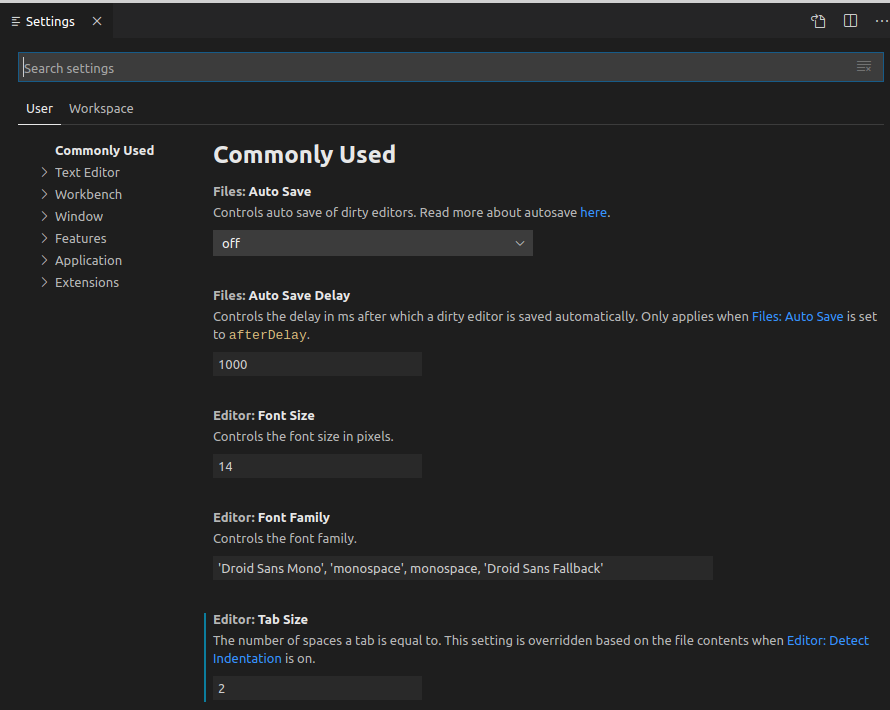
By default, a Settings editor graphical interface should appear. It helps users make changes to preferences easily, as there are thousands of editable settings that are available. The Settings editor provides user friendly names and description for what each setting does. In addition, related settings have been grouped together and there’s a search bar for locating a specific setting.
默认情况下,应显示“设置”编辑器图形界面。 由于有成千上万的可编辑设置,它可以帮助用户轻松更改首选项。 设置编辑器为每个设置提供用户友好的名称和说明。 此外,相关设置已分组在一起,并且有一个搜索栏可用于查找特定设置。
When changing settings using the editor, pay attention to the active scope at the top. Take note that not all settings can be configured via the graphical interface. For that, you have to edit the file settings.json directly. As you scroll down the Settings editor, you’ll come across a shortcut that will take you to this file.
使用编辑器更改设置时,请注意顶部的活动范围。 请注意,并非所有设置都可以通过图形界面进行配置。 为此,您必须直接编辑文件settings.json 。 在“设置”编辑器中向下滚动时,您会遇到一个捷径,它将带您进入该文件。
There are two different scopes that Visual Studio Code settings are classified under:
Visual Studio Code设置分为两个不同的作用域:
User Settings: Settings are stored under user account. They will take effect on all projects your work on.
用户设置 :设置存储在用户帐户下。 它们将对您从事的所有项目生效。
Workspace: Settings are stored within project or workspace folder. They will apply only in that specific project.
工作区 :设置存储在项目或工作区文件夹中。 它们仅适用于该特定项目。
Depending on your platform, you can locate VS Code’s user setting in the following locations:
根据您的平台,可以在以下位置找到VS Code的用户设置:
Windows:
%APPDATA%\Code\User\settings.jsonWindows:
%APPDATA%\Code\User\settings.jsonmacOS:
$HOME/Library/Application Support/Code/User/settings.jsonmacOS:
$HOME/Library/Application Support/Code/User/settings.jsonLinux:
$HOME/.config/Code/User/settings.jsonLinux:
$HOME/.config/Code/User/settings.json
For Workspace, simply create a folder .vscode at the root of your project. Then create the file settings.json inside this folder. If working with the Settings editor panel, it will do this for you automatically when you change settings under the Workspace scope. Here’s a subset of the global settings I prefer to work with:
对于Workspace ,只需在项目的根目录下创建一个文件夹.vscode 。 然后在此文件夹中创建文件settings.json 。 如果使用“ 设置”编辑器面板,则在“ 工作区”范围下更改设置时,它将自动为您执行此操作。 这是我更喜欢使用的全局设置的一部分:
{
"editor.minimap.enabled": false,
"window.openFoldersInNewWindow": "on",
"diffEditor.ignoreTrimWhitespace": false,
"files.trimTrailingWhitespace": true,
"javascript.updateImportsOnFileMove.enabled": "always",
"workbench.editor.enablePreview": false,
"workbench.list.openMode": "doubleClick",
"window.openFilesInNewWindow": "default",
"editor.formatOnPaste": true,
"editor.defaultFormatter": "esbenp.prettierVS Code",
"editor.formatOnSave": true,
"editor.tabSize": 2,
"explorer.confirmDelete": false
}
I tend to work with multiple projects simultaneously, hence the setting window.openFoldersInNewWindow allows me to open new project folders without closing (replacing) the active one. For editor.defaultFormatter, I’ve set it to Prettier, which is an extension I have installed. We’ll discuss this in a later section shortly. Next, let’s look at language associations.
我倾向于同时处理多个项目,因此设置window.openFoldersInNewWindow允许我打开新的项目文件夹而无需关闭(替换)活动的文件夹。 对于editor.defaultFormatter ,我将其设置为Prettier ,这是我已安装的扩展。 我们将在稍后的部分中对此进行讨论。 接下来,让我们看一下语言关联。
语言协会 (Language Association)
I do a lot of projects using React. Lately, most React frameworks generate components use the .js extension instead of .jsx. As a result, formatting and syntax colorization becomes a problem when you start writing JSX code. To fix this, you need to associate .js files with JavaScriptReact. You can easily do this by changing Language Mode via the Ctrl + Shift + P command panel. You can also update settings.json by adding this configuration:
我使用React做很多项目。 最近,大多数React框架生成的组件使用.js扩展名而不是.jsx 。 结果,当您开始编写JSX代码时,格式设置和语法着色成为问题。 要解决此问题,您需要将.js文件与JavaScriptReact关联。 您可以通过Ctrl + Shift + P命令面板更改语言模式来轻松完成此操作。 您还可以通过添加以下配置来更新settings.json :
{
"files.associations": {
"*.js": "javascriptreact"
}
}
Next time you open a JS file, it will be treated as a React JSX file. I’ve specified this in my global settings since I often work with React projects. Unfortunately, doing this breaks a built-in feature called Emmet. It’s a popular plugin that helps developers autocomplete HTML and CSS code in a very intuitive way. You can fix this issue by adding the following configuration in settings.json:
下次打开JS文件时,它将被视为React JSX文件。 我经常在React项目中工作,因此已在全局设置中指定了这一点。 不幸的是,这样做破坏了称为Emmet的内置功能。 这是一个受欢迎的插件,可以帮助开发人员以非常直观的方式自动完成HTML和CSS代码。 您可以通过在settings.json添加以下配置来解决此问题:
{
"emmet.includeLanguages": {
"javascript": "javascriptreact"
}
}
Next time you have trouble activating Emmet for a particular file extension or language, check to see if it can be resolved by adding the language association in emmet.includeLanguages. For more information, check out the official documentation for VS Code Emmet.
下次在为特定文件扩展名或语言激活Emmet时遇到麻烦时,请检查是否可以通过在emmet.includeLanguages添加语言关联来解决它。 有关更多信息,请查看VS Code Emmet的官方文档 。
键盘快捷键 (Keyboard Shortcuts)
So far, we’ve covered two keyboard shortcuts:
到目前为止,我们已经介绍了两个键盘快捷键:
Ctrl + ,: Open settings
按Ctrl +:打开设置
Ctrl + Shift + P: Open command palette
Ctrl + Shift + P :打开命令面板
The Command Palette provides access to Visual Studio Code’s entire functionality including keyboard shortcuts for common operations. If you install an extension, any manually triggered actions will be listed here. However, for extensions such as Prettier and Beautify, they’ll use the same Format command. Visual Studio Code also has its own built-in formatter plugin. To specify which plugin should execute the action, you need to go to the Settings editor and change the Default Formatter configuration. Here’s an example of how I’ve set it in mine:
通过命令面板,可以访问Visual Studio Code的全部功能,包括用于常规操作的键盘快捷键。 如果您安装扩展程序,则任何手动触发的操作都将在此处列出。 但是,对于诸如Prettier和Beautify的扩展,它们将使用相同的Format命令。 Visual Studio Code还具有自己的内置格式化程序插件。 要指定哪个插件应执行该操作,您需要转到“ 设置”编辑器并更改“ 默认格式化程序”配置。 这是我在我的设置方法的一个示例:
{
"editor.defaultFormatter": "esbenp.prettierVS Code"
}
You can also specify a different formatter for a specific language mode. Here are several more keyboard shortcuts you need to memorize:
您还可以为特定的语言模式指定其他格式程序。 您还需要记住以下几个键盘快捷键:
Ctrl + P will let you navigate to any file or symbol by typing its name
Ctrl + P将让您通过键入文件或符号的名称导航到任何文件或符号
Ctrl + Tab will cycle you through the last set of files opened
Ctrl + Tab将使您循环浏览打开的最后一组文件
Ctrl + Shift + O will let you navigate to a specific symbol in a file
Ctrl + Shift + O将允许您导航到文件中的特定符号
Ctrl + G will let you navigate to a specific line in a file
Ctrl + G将使您导航到文件中的特定行
Here are my favorite commands I use often while writing code:
这是我在编写代码时经常使用的最喜欢的命令:
Ctrl + D: press multiple times to select identical keywords. When you start typing, it renames all the selected keywords
Ctrl + D :按多次以选择相同的关键字。 开始输入时,它将重命名所有选定的关键字
Ctrl + Shift + Up/Down: Add Cursor above or below in order to edit multiple lines at once
Ctrl + Shift + 上/下 :在上方或下方添加光标,以便一次编辑多行
Alt + Shift + Click: Add Cursor at multiple locations in order to edit in different sections of code simultaneously
Alt + Shift + 单击 :在多个位置添加光标,以便同时在代码的不同部分进行编辑
Ctrl + J: Add 2 or more lines into one. Works perfectly if you’ve a formatter active as you edit code
Ctrl + J :将2行或更多行添加为一行。 如果您在编辑代码时激活了格式化程序,则可以完美地工作
Ctrl + F: Search for a keyword in current file
Ctrl + F :在当前文件中搜索关键字
Ctrl + H: Search and replace in current file
Ctrl + H :在当前文件中搜索并替换
Ctrl + Shift + F: Search in all files
Ctrl + Shift + F :搜索所有文件
If you visit the Menu options, you’ll find shortcut keys for most commands. Personally, I’ve never gotten used to some of the default shortcut keys that come with Visual Studio Code due to using editors such as Atom for a long time. The solution I found was simply to install the Atom Keymap. This allows me to use the shortcut key Ctrl + \ to toggle the Side Bar. If you’d like to edit the keyboard bindings yourself, simply go to the menu under File > Preferences > Keyboard Shortcuts. (Code > Preferences > Keyboard Shortcuts on macOS).
如果您访问菜单选项,则将找到大多数命令的快捷键。 就个人而言,由于长期使用Atom之类的编辑器,我从未习惯于Visual Studio Code附带的一些默认快捷键。 我发现的解决方案只是安装Atom Keymap 。 这使我可以使用快捷键Ctrl + \切换侧边栏 。 如果您想自己编辑键盘绑定,只需转到文件 > 首选项 > 键盘快捷方式下的菜单。 (在macOS上,依次为代码 > 首选项 > 键盘快捷键 )。
代码编辑器功能 (Code Editor Features)
In this section, we’ll quickly look into the various developer-friendly features Visual Studio Code provides to help you write faster, cleaner and more maintainable code.
在本节中,我们将快速研究Visual Studio Code提供的各种对开发人员友好的功能,这些功能可帮助您编写更快,更干净和更可维护的代码。
智能感知 (Intellisense)
This is a popular feature also known as “code completion” or autocomplete. Out of the box, VS Code provides Intellisense for:
这是一个流行的功能,也称为“代码完成”或自动完成。 VS Code开箱即用,可为以下人员提供Intellisense:
- JavaScript, TypeScript JavaScript,TypeScript
- HTML HTML
- CSS, SCSS and Less CSS,SCSS和更少
As you type your code, a pop with a list of possible options will appear. The more you type, the shorter the list gets. You can press Enter or Tab once your intended keyword is highlighted to autocomplete your code. Pressing Esc will remove the popup. Inserting a . at the end of a keyword or pressing Ctrl + space bar will trigger the IntelliSense popup to appear.
键入代码时,将显示一个弹出窗口,其中包含可能的选项列表。 输入的次数越多,列表越短。 突出显示所需关键字后,您可以按Enter或Tab键以自动完成代码。 按Esc键将删除弹出窗口。 插入. 在关键字末尾或按Ctrl +空格键将触发IntelliSense弹出窗口的显示。
If you’re working with a language that is not supported out of the box, you can install a language extension from the marketplace to activate IntelliSense for your desired programming language. Check out the official docs to learn more on how you can customize IntelliSense.
如果您使用的是开箱即用不支持的语言,则可以从市场上安装语言扩展以激活所需编程语言的IntelliSense。 查看官方文档以了解有关如何自定义IntelliSense的更多信息。
片段 (Snippets)
Typing repetitive code such as if statements, for loops and component declaration can be a bit tiring. You might find yourself copying and pasting code to work faster. Fortunately, Visual Studio Code offers a feature called Snippets, which are simply templates of code. For example, instead of typing console.log, just type log and IntelliSense will prompt to insert the snippet for you.
键入诸如if语句, for循环和组件声明之类的重复代码可能有点累。 您可能会发现自己复制和粘贴代码可以更快地工作。 幸运的是,Visual Studio Code提供了一个名为Snippets的功能,它只是代码模板。 例如,不用键入console.log ,只需键入log ,IntelliSense就会提示您为您插入代码段。
There are many snippets you can access as long as you’ve memorized the shorthand or keyword that triggers snippet insertion. Since you’re new to this, you can access a list of all snippets available via Command Palette > Insert Snippets:
只要记住了触发代码段插入的速记或关键字,就可以访问许多代码段。 由于您是新手,因此可以通过“ 命令面板” >“ 插入片段”访问所有可用片段的列表:

Scroll up and down to view the entire list. Take note that most snippets have tabstops that allow you to replace the relevant sections of code when you insert them. You can find more snippet extensions in the marketplace. You can also create your own. This article shows you how to do both. You can check out the official docs for more information on how to define your own snippets.
上下滚动以查看整个列表。 请注意,大多数代码片段都有制表符,可以在插入时替换代码的相关部分。 您可以在市场中找到更多的代码片段扩展。 您也可以创建自己的。 本文向您展示了两种方法。 您可以查看官方文档 ,以获取有关如何定义自己的代码段的更多信息。
格式化 (Formatting)
Often when typing or pasting code from different sources, we tend to mix coding styles. For example:
通常,在键入或粘贴来自不同来源的代码时,我们倾向于混合使用编码样式。 例如:
- indenting with space vs tabs 缩进空格与制表符
- ending with semicolon 以分号结尾
- double quotes or single quotes 双引号或单引号
Formatting is important, as it makes the code readable. However, it can be time consuming when you come across large sections of unformatted code. Luckily, Visual Studio Code can perform formatting for you with a single command. You can execute the formatting command via the Command Palette. Visual Studio Code supports formatting for the following languages out of the box:
格式化很重要,因为它使代码可读。 但是,当您遇到大部分未格式化的代码时,可能会很耗时。 幸运的是,Visual Studio Code可以用一个命令为您执行格式化。 您可以通过“ 命令面板”执行格式化命令。 Visual Studio Code支持以下语言的格式化:
- JavaScript JavaScript
- TypeScript 打字稿
- JSON JSON格式
- HTML HTML
You can customize Visual Studio Code’s formatting behavior by changing the following settings to true or false:
您可以通过将以下设置更改为true或false来定制Visual Studio Code的格式设置行为:
editor.formatOnType: format the line after typingeditor.formatOnType:键入后格式化行editor.formatOnSave: format a file on saveeditor.formatOnSave:保存时格式化文件editor.formatOnPaste: format the pasted contenteditor.formatOnPaste:格式化粘贴的内容
However, the built-in formatters may not conform to your style of coding. If you’re working with frameworks such as React, Vue or Angular, you’ll find that the built-in formatters tend to mess up your code. You can fix this by disabling formatting for a specific language:
但是,内置的格式化程序可能不符合您的编码风格。 如果您使用的是React,Vue或Angular等框架,则会发现内置格式化程序会弄乱您的代码。 您可以通过禁用特定语言的格式来解决此问题:
"html.format.enable": falseHowever, the best solution is to install a formatter extension from the marketplace. My favorite is [Prettier](https://marketplace.visualstudio.com/items?itemName=esbenp.prettierVS Code), as it supports a huge number of languages including:
但是,最好的解决方案是从市场上安装格式化扩展程序。 我最喜欢的是[Prettier](https://marketplace.visualstudio.com/items?itemName=esbenp.prettierVS代码),因为它支持多种语言,包括:
- Flow · JSX · JSON 流·JSX·JSON
- CSS · SCSS · Less CSS·SCSS·更少
- Vue · Angular Vue·角形
- GraphQL · Markdown · YAML GraphQL·Markdown·YAML
After installing it, you’ll need to set it as the default formatter:
安装后,您需要将其设置为默认格式化程序:
{
"editor.defaultFormatter": "esbenp.prettierVS Code",
"[javascript]": {
"editor.defaultFormatter": "esbenp.prettierVS Code"
}
}
It’s also recommended you install prettier package locally as a dev dependency:
还建议您在本地安装prettier软件包作为dev依赖项:
npm install prettier -D --save-exactThe default formatting options Prettier enforces may work out for you. If not, you can customize by creating a .prettierrc configuration file either at the root of your project or in your home directory. You can place your custom formatting rules here. Here’s an example:
Prettier强制使用的默认格式设置选项可能对您有用。 如果没有,则可以通过在项目的根目录或主目录中创建.prettierrc配置文件进行自定义。 您可以在此处放置自定义格式设置规则。 这是一个例子:
{
"trailingComma": "all",
"tabWidth": 2,
"semi": false,
"singleQuote": true
}
Feel free to check out other formatting extensions. However, you’ll find Prettier to be the most popular.
随时检查其他格式扩展名 。 但是,您会发现Prettier最受欢迎。
林亭 (Linting)
A Lint, or Linter is a tool that analyzes your code and checks for syntax errors, styling issues, calls to undeclared variables, usage of deprecated functions, misuse of scope and many other issues. Visual Studio Code doesn’t come shipped in with any Linter. However, it does make it easy setting up one for the programming language you’re using. For example, if you’re working on new Python project, you’ll get a prompt to install one for you. You can also open the Command Palette (Ctrl + Shift + P) and select the Python: Select Linter command.
Lint或Linter是一种工具,可以分析您的代码并检查语法错误,样式问题,对未声明变量的调用,不赞成使用的函数的使用,范围的滥用以及许多其他问题。 所有Linter都不随附Visual Studio Code。 但是,这样做确实很容易为您使用的编程语言设置一种语言。 例如,如果您正在开发新的Python项目,则会提示您为您安装一个。 您还可以打开命令面板 ( Ctrl + Shift + P )并选择Python:Select Linter命令。
For JavaScript, you’ll need to install an extension such as ESLint which is the most popular. This extension requires you to install ESLint as a dev dependency. You may also need one or more ESLint plugins that will help you lint the coding style and framework you’re using. You can check out our guide on how to configure ESLint. There are also other linter tools you can check out. My recommendation is to go with ESLint as it’s easier to configure and supports more JavaScript styles and frameworks.
对于JavaScript,您需要安装最流行的扩展程序,例如ESLint 。 此扩展要求您将ESLint安装为dev依赖项。 您可能还需要一个或多个ESLint插件,这些插件将帮助您确定所使用的编码样式和框架。 您可以查看有关如何配置ESLint的指南 。 您还可以签出其他棉绒工具 。 我的建议是与ESLint一起使用,因为它更易于配置并支持更多JavaScript样式和框架。
Once you’ve set up the linting tool, VS Code will automatically lint your code every time you save the file. You should also update your package.json scripts to include a command for running the lint tool.
设置好皮棉工具后,每次保存文件时,VS Code都会自动将您的代码皮棉。 您还应该更新package.json脚本,以包含用于运行lint工具的命令。
调试 (Debugging)
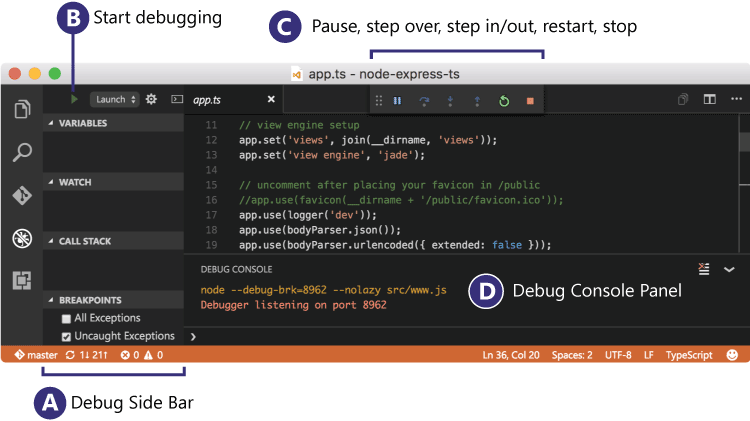
If you use print statements to debug, you should cease and desist as there’s a better way to debug your code. With VS Code, you can set breakpoints and inspect variables while your code is running.
如果使用打印语句进行调试,则应停止并停止,因为有更好的方法来调试代码。 使用VS Code,您可以在代码运行时设置断点并检查变量。
Check out our guide on debugging JavaScript projects with VS Code and Chrome Debugger for step-by-step instructions on how to debug your code.
请查看我们的有关使用VS Code和Chrome Debugger调试JavaScript项目的指南,以获取有关如何调试代码的逐步说明。
摘要 (Summary)
We’ve now come to the end of the guide. As noted earlier, the information here will help you jump start your way into improving your coding workflow with Visual Studio Code. I recommend you check out our top 10 must-have extensions for VS Code. While most VS Code tools are easy to learn and integrate into your workflow, others need some time to figure out and get used to. Nevertheless, mastering VS Code features will make you an efficient and better software developer.
我们现在到了指南的结尾。 如前所述,此处的信息将帮助您快速入门,以改进Visual Studio Code的编码工作流程。 我建议您查看VS Code的十大必备扩展 。 虽然大多数VS Code工具易于学习并集成到您的工作流程中,但其他工具则需要一些时间来弄清并习惯。 但是,掌握VS Code功能将使您成为高效,更好的软件开发人员。
If you want to reach the absolute peak of productive performance with Visual Studio Code, check out Visual Studio Code: End-to-End Editing and Debugging Tools for Web Developers. It’s a fantastic book from Wiley that you can read online (or off!) in our Premium library.
如果要使用Visual Studio Code达到生产性能的绝对高峰,请查看Visual Studio Code:面向Web开发人员的端到端编辑和调试工具 。 这是一本来自Wiley的很棒的书,您可以在我们的高级图书馆中在线(或离线!)阅读。
翻译自: https://www.sitepoint.com/visual-studio-code-power-user-guide/
如若内容造成侵权/违法违规/事实不符,请联系编程学习网邮箱:809451989@qq.com进行投诉反馈,一经查实,立即删除!
相关文章
- 2020-08-25
实习指导:李春雨 1) Java开发 2) WebUI开发 2. 实习目的:全国疫情可视化平台 3. 当前开发架构 合格软件工程师基本素质 1. 熟悉linux操作系统 2. 能够使用终端的绝对不使用图形化界面,能使用英文界面绝对不汉化 1) 前端工程师…...
2024/5/2 23:36:42 - 杰普实习日志 第一天学习内容
这里写自定义目录标题欢迎使用Markdown编辑器新的改变功能快捷键合理的创建标题,有助于目录的生成如何改变文本的样式插入链接与图片如何插入一段漂亮的代码片生成一个适合你的列表创建一个表格设定内容居中、居左、居右SmartyPants创建一个自定义列表如何创建一个注…...
2024/4/21 15:13:07 - 8月27日学习日志
css基础 选择器 类选择器 .first {} 选中class为first的元素 id选择器 #one {} 选中id为one的元素 标签选择器 div {} 选中所有的div元素 父子选择器 .first > div {} 选中class为first的所有div孩子元素 后代选择器 .first div{} 选中class为first的所有div后代元素 基础布…...
2024/4/21 15:13:06 - 杰普实训日志第一天学习内容
杰普实习日志 第一天学习内容 主讲人:李春雨 主讲人原创内容,https://gitee.com/plusyu/shixun_hdjd/commit/7fd126f6bacfec6b27357a22bfad4afb1a2ad4b3 1 主要学习内容: 2 1) Java开发 3 2) WebUI开发 4 5 2. 全国疫情可视化平台 6 7 3. …...
2024/4/21 15:13:03 - 实训上课内容1
实训第一天上课内容汇总 概述 Java开发WebUI开发 全国疫情可视化平台 当前开发架构 合格软件工程师基本素质 熟悉linux操作系统能够使用终端的绝对不使用图形化界面,能使用英文界面绝对不汉化 前端工程师 1. 重构技能:html/css/js 2. 交互技能&…...
2024/5/3 1:49:49 - day1 笔记
day1笔记 李 Java开发WebUI开发 全国疫情可视化平台 当前开发架构 合格软件工程师基本素质 熟悉linux操作系统能够使用终端的绝对不使用图形化界面,能使用英文界面绝对不汉化 前端工程师 1. 重构技能:html/css/js 2. 交互技能:ajax 3. …...
2024/4/20 15:03:11 - 8.25日学习日志
Java开发WebUI开发 全国疫情可视化平台 当前开发架构 合格软件工程师基本素质 熟悉linux操作系统能够使用终端的绝对不使用图形化界面,能使用英文界面绝对不汉化 前端工程师 1. 重构技能:html/css/js 2. 交互技能:ajax 3. 企业级框架技能…...
2024/5/3 2:34:37 - 8.25实训内容
8.25实训内容 1.当前开发架构 合格软件工程师基本素质 1. 熟悉linux操作系统 2. 能够使用终端的绝对不使用图形化界面,能使用英文界面绝对不汉化 前端工程师 1. 重构技能:html/css/js 2. 交互技能:ajax 3. 企业级框架技能:vue…...
2024/5/3 6:18:09 - 华东交通大学18级企业实训day1笔记·讲师:李春雨
前端工程师 1. 重构技能:html/css/js 2. 交互技能:ajax 3. 企业级框架技能:vue/vuerouter/vuex/elementui | react | angular 4. 移动端技能:webapp、hybirdapp、小程序 5. 通用技能:linux/svn/git/vscodeJava工程师 …...
2024/4/28 3:34:56 - 做双眼皮的疤痕
...
2024/4/20 8:56:46 - 开刀双眼皮怎么弄成
...
2024/5/1 16:36:39 - 哪里双眼皮医院好心情
...
2024/4/20 15:03:05 - 上海开邯郸天姿割割了双眼皮多久能恢复吗
...
2024/4/21 15:13:02 - 开双眼皮多少宽合适
...
2024/5/3 0:48:34 - SolidWorks 2016 SP5.0 64位 中文版
万万没想到下载安装的SolidWorks 2018 SP4.0我的老爷机独显4G居然带不动了,略卡绘图还是挺难受的。于是打算装回SolidWorks 2016 SP5.0 结果发现自己引文一心要装18版本把之前的16版删除了,百度云真的是下载慢。但是还是下载下来了,不删了,再删我是Dog。自己留着备份吧!每…...
2024/4/21 15:13:01 - ionic3使用iframe引用外部网站
1,在configxml文件中添加 <access origin"*" /> <allow-intent href"*" /> <allow-navigation href"*" /> 2.html中加入iframe标签 <ion-content > <iframe id"iframe" sandbox&…...
2024/4/21 15:12:59 - 在开双眼皮哪里好找
...
2024/5/2 5:53:22 - 什么脸型不适合长沙双眼皮价格要美莱
...
2024/4/21 15:12:58 - 哈尔滨双眼皮艺星医生
...
2024/5/2 23:57:05 - angular8.x升级到angular9.x之后。 Template variables are read-only.
问题描述: angular8.x升级到angular9.x之后。 原因分析: angular9之后的模板类型检查增加了严格模式即:strictTemplates标志。出错原因: 某个或多个html模板中,有ngFor下的双向绑定的代码,如上图。 解决方…...
2024/4/23 13:17:57
最新文章
- 基于java,SpringBoot和VUE的求职招聘简历管理系统设计
摘要 基于Java, Spring Boot和Vue的求职招聘管理系统是一个为了简化求职者与雇主间互动流程而设计的现代化在线平台。该系统后端采用Spring Boot框架,以便快速搭建具有自动配置、安全性和事务管理等特性的RESTful API服务,而前端则使用Vue.js框架构建动…...
2024/5/3 7:26:08 - 梯度消失和梯度爆炸的一些处理方法
在这里是记录一下梯度消失或梯度爆炸的一些处理技巧。全当学习总结了如有错误还请留言,在此感激不尽。 权重和梯度的更新公式如下: w w − η ⋅ ∇ w w w - \eta \cdot \nabla w ww−η⋅∇w 个人通俗的理解梯度消失就是网络模型在反向求导的时候出…...
2024/3/20 10:50:27 - STL--vector有哪些应用场景
vector 在 C 中是一种非常灵活和强大的容器,适用于多种不同的应用场景。以下是一些常见的应用场景: 1 动态数据集合:当你不确定数据集的大小,或者数据集的大小会随时间变化时,vector 是理想的选择。例如,在…...
2024/5/3 5:48:45 - Python(乱学)
字典在转化为其他类型时,会出现是否舍弃value的操作,只有在转化为字符串的时候才不会舍弃value 注释的快捷键是ctrl/ 字符串无法与整数,浮点数,等用加号完成拼接 5不入??? 还有一种格式化的方法…...
2024/5/1 7:10:08 - 【外汇早评】美通胀数据走低,美元调整
原标题:【外汇早评】美通胀数据走低,美元调整昨日美国方面公布了新一期的核心PCE物价指数数据,同比增长1.6%,低于前值和预期值的1.7%,距离美联储的通胀目标2%继续走低,通胀压力较低,且此前美国一季度GDP初值中的消费部分下滑明显,因此市场对美联储后续更可能降息的政策…...
2024/5/1 17:30:59 - 【原油贵金属周评】原油多头拥挤,价格调整
原标题:【原油贵金属周评】原油多头拥挤,价格调整本周国际劳动节,我们喜迎四天假期,但是整个金融市场确实流动性充沛,大事频发,各个商品波动剧烈。美国方面,在本周四凌晨公布5月份的利率决议和新闻发布会,维持联邦基金利率在2.25%-2.50%不变,符合市场预期。同时美联储…...
2024/5/2 16:16:39 - 【外汇周评】靓丽非农不及疲软通胀影响
原标题:【外汇周评】靓丽非农不及疲软通胀影响在刚结束的周五,美国方面公布了新一期的非农就业数据,大幅好于前值和预期,新增就业重新回到20万以上。具体数据: 美国4月非农就业人口变动 26.3万人,预期 19万人,前值 19.6万人。 美国4月失业率 3.6%,预期 3.8%,前值 3…...
2024/4/29 2:29:43 - 【原油贵金属早评】库存继续增加,油价收跌
原标题:【原油贵金属早评】库存继续增加,油价收跌周三清晨公布美国当周API原油库存数据,上周原油库存增加281万桶至4.692亿桶,增幅超过预期的74.4万桶。且有消息人士称,沙特阿美据悉将于6月向亚洲炼油厂额外出售更多原油,印度炼油商预计将每日获得至多20万桶的额外原油供…...
2024/5/2 9:28:15 - 【外汇早评】日本央行会议纪要不改日元强势
原标题:【外汇早评】日本央行会议纪要不改日元强势近两日日元大幅走强与近期市场风险情绪上升,避险资金回流日元有关,也与前一段时间的美日贸易谈判给日本缓冲期,日本方面对汇率问题也避免继续贬值有关。虽然今日早间日本央行公布的利率会议纪要仍然是支持宽松政策,但这符…...
2024/4/27 17:58:04 - 【原油贵金属早评】欧佩克稳定市场,填补伊朗问题的影响
原标题:【原油贵金属早评】欧佩克稳定市场,填补伊朗问题的影响近日伊朗局势升温,导致市场担忧影响原油供给,油价试图反弹。此时OPEC表态稳定市场。据消息人士透露,沙特6月石油出口料将低于700万桶/日,沙特已经收到石油消费国提出的6月份扩大出口的“适度要求”,沙特将满…...
2024/4/27 14:22:49 - 【外汇早评】美欲与伊朗重谈协议
原标题:【外汇早评】美欲与伊朗重谈协议美国对伊朗的制裁遭到伊朗的抗议,昨日伊朗方面提出将部分退出伊核协议。而此行为又遭到欧洲方面对伊朗的谴责和警告,伊朗外长昨日回应称,欧洲国家履行它们的义务,伊核协议就能保证存续。据传闻伊朗的导弹已经对准了以色列和美国的航…...
2024/4/28 1:28:33 - 【原油贵金属早评】波动率飙升,市场情绪动荡
原标题:【原油贵金属早评】波动率飙升,市场情绪动荡因中美贸易谈判不安情绪影响,金融市场各资产品种出现明显的波动。随着美国与中方开启第十一轮谈判之际,美国按照既定计划向中国2000亿商品征收25%的关税,市场情绪有所平复,已经开始接受这一事实。虽然波动率-恐慌指数VI…...
2024/4/30 9:43:09 - 【原油贵金属周评】伊朗局势升温,黄金多头跃跃欲试
原标题:【原油贵金属周评】伊朗局势升温,黄金多头跃跃欲试美国和伊朗的局势继续升温,市场风险情绪上升,避险黄金有向上突破阻力的迹象。原油方面稍显平稳,近期美国和OPEC加大供给及市场需求回落的影响,伊朗局势并未推升油价走强。近期中美贸易谈判摩擦再度升级,美国对中…...
2024/4/27 17:59:30 - 【原油贵金属早评】市场情绪继续恶化,黄金上破
原标题:【原油贵金属早评】市场情绪继续恶化,黄金上破周初中国针对于美国加征关税的进行的反制措施引发市场情绪的大幅波动,人民币汇率出现大幅的贬值动能,金融市场受到非常明显的冲击。尤其是波动率起来之后,对于股市的表现尤其不安。隔夜美国股市出现明显的下行走势,这…...
2024/5/2 15:04:34 - 【外汇早评】美伊僵持,风险情绪继续升温
原标题:【外汇早评】美伊僵持,风险情绪继续升温昨日沙特两艘油轮再次发生爆炸事件,导致波斯湾局势进一步恶化,市场担忧美伊可能会出现摩擦生火,避险品种获得支撑,黄金和日元大幅走强。美指受中美贸易问题影响而在低位震荡。继5月12日,四艘商船在阿联酋领海附近的阿曼湾、…...
2024/4/28 1:34:08 - 【原油贵金属早评】贸易冲突导致需求低迷,油价弱势
原标题:【原油贵金属早评】贸易冲突导致需求低迷,油价弱势近日虽然伊朗局势升温,中东地区几起油船被袭击事件影响,但油价并未走高,而是出于调整结构中。由于市场预期局势失控的可能性较低,而中美贸易问题导致的全球经济衰退风险更大,需求会持续低迷,因此油价调整压力较…...
2024/4/26 19:03:37 - 氧生福地 玩美北湖(上)——为时光守候两千年
原标题:氧生福地 玩美北湖(上)——为时光守候两千年一次说走就走的旅行,只有一张高铁票的距离~ 所以,湖南郴州,我来了~ 从广州南站出发,一个半小时就到达郴州西站了。在动车上,同时改票的南风兄和我居然被分到了一个车厢,所以一路非常愉快地聊了过来。 挺好,最起…...
2024/4/29 20:46:55 - 氧生福地 玩美北湖(中)——永春梯田里的美与鲜
原标题:氧生福地 玩美北湖(中)——永春梯田里的美与鲜一觉醒来,因为大家太爱“美”照,在柳毅山庄去寻找龙女而错过了早餐时间。近十点,向导坏坏还是带着饥肠辘辘的我们去吃郴州最富有盛名的“鱼头粉”。说这是“十二分推荐”,到郴州必吃的美食之一。 哇塞!那个味美香甜…...
2024/4/30 22:21:04 - 氧生福地 玩美北湖(下)——奔跑吧骚年!
原标题:氧生福地 玩美北湖(下)——奔跑吧骚年!让我们红尘做伴 活得潇潇洒洒 策马奔腾共享人世繁华 对酒当歌唱出心中喜悦 轰轰烈烈把握青春年华 让我们红尘做伴 活得潇潇洒洒 策马奔腾共享人世繁华 对酒当歌唱出心中喜悦 轰轰烈烈把握青春年华 啊……啊……啊 两…...
2024/5/1 4:32:01 - 扒开伪装医用面膜,翻六倍价格宰客,小姐姐注意了!
原标题:扒开伪装医用面膜,翻六倍价格宰客,小姐姐注意了!扒开伪装医用面膜,翻六倍价格宰客!当行业里的某一品项火爆了,就会有很多商家蹭热度,装逼忽悠,最近火爆朋友圈的医用面膜,被沾上了污点,到底怎么回事呢? “比普通面膜安全、效果好!痘痘、痘印、敏感肌都能用…...
2024/4/27 23:24:42 - 「发现」铁皮石斛仙草之神奇功效用于医用面膜
原标题:「发现」铁皮石斛仙草之神奇功效用于医用面膜丽彦妆铁皮石斛医用面膜|石斛多糖无菌修护补水贴19大优势: 1、铁皮石斛:自唐宋以来,一直被列为皇室贡品,铁皮石斛生于海拔1600米的悬崖峭壁之上,繁殖力差,产量极低,所以古代仅供皇室、贵族享用 2、铁皮石斛自古民间…...
2024/4/28 5:48:52 - 丽彦妆\医用面膜\冷敷贴轻奢医学护肤引导者
原标题:丽彦妆\医用面膜\冷敷贴轻奢医学护肤引导者【公司简介】 广州华彬企业隶属香港华彬集团有限公司,专注美业21年,其旗下品牌: 「圣茵美」私密荷尔蒙抗衰,产后修复 「圣仪轩」私密荷尔蒙抗衰,产后修复 「花茵莳」私密荷尔蒙抗衰,产后修复 「丽彦妆」专注医学护…...
2024/4/30 9:42:22 - 广州械字号面膜生产厂家OEM/ODM4项须知!
原标题:广州械字号面膜生产厂家OEM/ODM4项须知!广州械字号面膜生产厂家OEM/ODM流程及注意事项解读: 械字号医用面膜,其实在我国并没有严格的定义,通常我们说的医美面膜指的应该是一种「医用敷料」,也就是说,医用面膜其实算作「医疗器械」的一种,又称「医用冷敷贴」。 …...
2024/5/2 9:07:46 - 械字号医用眼膜缓解用眼过度到底有无作用?
原标题:械字号医用眼膜缓解用眼过度到底有无作用?医用眼膜/械字号眼膜/医用冷敷眼贴 凝胶层为亲水高分子材料,含70%以上的水分。体表皮肤温度传导到本产品的凝胶层,热量被凝胶内水分子吸收,通过水分的蒸发带走大量的热量,可迅速地降低体表皮肤局部温度,减轻局部皮肤的灼…...
2024/4/30 9:42:49 - 配置失败还原请勿关闭计算机,电脑开机屏幕上面显示,配置失败还原更改 请勿关闭计算机 开不了机 这个问题怎么办...
解析如下:1、长按电脑电源键直至关机,然后再按一次电源健重启电脑,按F8健进入安全模式2、安全模式下进入Windows系统桌面后,按住“winR”打开运行窗口,输入“services.msc”打开服务设置3、在服务界面,选中…...
2022/11/19 21:17:18 - 错误使用 reshape要执行 RESHAPE,请勿更改元素数目。
%读入6幅图像(每一幅图像的大小是564*564) f1 imread(WashingtonDC_Band1_564.tif); subplot(3,2,1),imshow(f1); f2 imread(WashingtonDC_Band2_564.tif); subplot(3,2,2),imshow(f2); f3 imread(WashingtonDC_Band3_564.tif); subplot(3,2,3),imsho…...
2022/11/19 21:17:16 - 配置 已完成 请勿关闭计算机,win7系统关机提示“配置Windows Update已完成30%请勿关闭计算机...
win7系统关机提示“配置Windows Update已完成30%请勿关闭计算机”问题的解决方法在win7系统关机时如果有升级系统的或者其他需要会直接进入一个 等待界面,在等待界面中我们需要等待操作结束才能关机,虽然这比较麻烦,但是对系统进行配置和升级…...
2022/11/19 21:17:15 - 台式电脑显示配置100%请勿关闭计算机,“准备配置windows 请勿关闭计算机”的解决方法...
有不少用户在重装Win7系统或更新系统后会遇到“准备配置windows,请勿关闭计算机”的提示,要过很久才能进入系统,有的用户甚至几个小时也无法进入,下面就教大家这个问题的解决方法。第一种方法:我们首先在左下角的“开始…...
2022/11/19 21:17:14 - win7 正在配置 请勿关闭计算机,怎么办Win7开机显示正在配置Windows Update请勿关机...
置信有很多用户都跟小编一样遇到过这样的问题,电脑时发现开机屏幕显现“正在配置Windows Update,请勿关机”(如下图所示),而且还需求等大约5分钟才干进入系统。这是怎样回事呢?一切都是正常操作的,为什么开时机呈现“正…...
2022/11/19 21:17:13 - 准备配置windows 请勿关闭计算机 蓝屏,Win7开机总是出现提示“配置Windows请勿关机”...
Win7系统开机启动时总是出现“配置Windows请勿关机”的提示,没过几秒后电脑自动重启,每次开机都这样无法进入系统,此时碰到这种现象的用户就可以使用以下5种方法解决问题。方法一:开机按下F8,在出现的Windows高级启动选…...
2022/11/19 21:17:12 - 准备windows请勿关闭计算机要多久,windows10系统提示正在准备windows请勿关闭计算机怎么办...
有不少windows10系统用户反映说碰到这样一个情况,就是电脑提示正在准备windows请勿关闭计算机,碰到这样的问题该怎么解决呢,现在小编就给大家分享一下windows10系统提示正在准备windows请勿关闭计算机的具体第一种方法:1、2、依次…...
2022/11/19 21:17:11 - 配置 已完成 请勿关闭计算机,win7系统关机提示“配置Windows Update已完成30%请勿关闭计算机”的解决方法...
今天和大家分享一下win7系统重装了Win7旗舰版系统后,每次关机的时候桌面上都会显示一个“配置Windows Update的界面,提示请勿关闭计算机”,每次停留好几分钟才能正常关机,导致什么情况引起的呢?出现配置Windows Update…...
2022/11/19 21:17:10 - 电脑桌面一直是清理请关闭计算机,windows7一直卡在清理 请勿关闭计算机-win7清理请勿关机,win7配置更新35%不动...
只能是等着,别无他法。说是卡着如果你看硬盘灯应该在读写。如果从 Win 10 无法正常回滚,只能是考虑备份数据后重装系统了。解决来方案一:管理员运行cmd:net stop WuAuServcd %windir%ren SoftwareDistribution SDoldnet start WuA…...
2022/11/19 21:17:09 - 计算机配置更新不起,电脑提示“配置Windows Update请勿关闭计算机”怎么办?
原标题:电脑提示“配置Windows Update请勿关闭计算机”怎么办?win7系统中在开机与关闭的时候总是显示“配置windows update请勿关闭计算机”相信有不少朋友都曾遇到过一次两次还能忍但经常遇到就叫人感到心烦了遇到这种问题怎么办呢?一般的方…...
2022/11/19 21:17:08 - 计算机正在配置无法关机,关机提示 windows7 正在配置windows 请勿关闭计算机 ,然后等了一晚上也没有关掉。现在电脑无法正常关机...
关机提示 windows7 正在配置windows 请勿关闭计算机 ,然后等了一晚上也没有关掉。现在电脑无法正常关机以下文字资料是由(历史新知网www.lishixinzhi.com)小编为大家搜集整理后发布的内容,让我们赶快一起来看一下吧!关机提示 windows7 正在配…...
2022/11/19 21:17:05 - 钉钉提示请勿通过开发者调试模式_钉钉请勿通过开发者调试模式是真的吗好不好用...
钉钉请勿通过开发者调试模式是真的吗好不好用 更新时间:2020-04-20 22:24:19 浏览次数:729次 区域: 南阳 > 卧龙 列举网提醒您:为保障您的权益,请不要提前支付任何费用! 虚拟位置外设器!!轨迹模拟&虚拟位置外设神器 专业用于:钉钉,外勤365,红圈通,企业微信和…...
2022/11/19 21:17:05 - 配置失败还原请勿关闭计算机怎么办,win7系统出现“配置windows update失败 还原更改 请勿关闭计算机”,长时间没反应,无法进入系统的解决方案...
前几天班里有位学生电脑(windows 7系统)出问题了,具体表现是开机时一直停留在“配置windows update失败 还原更改 请勿关闭计算机”这个界面,长时间没反应,无法进入系统。这个问题原来帮其他同学也解决过,网上搜了不少资料&#x…...
2022/11/19 21:17:04 - 一个电脑无法关闭计算机你应该怎么办,电脑显示“清理请勿关闭计算机”怎么办?...
本文为你提供了3个有效解决电脑显示“清理请勿关闭计算机”问题的方法,并在最后教给你1种保护系统安全的好方法,一起来看看!电脑出现“清理请勿关闭计算机”在Windows 7(SP1)和Windows Server 2008 R2 SP1中,添加了1个新功能在“磁…...
2022/11/19 21:17:03 - 请勿关闭计算机还原更改要多久,电脑显示:配置windows更新失败,正在还原更改,请勿关闭计算机怎么办...
许多用户在长期不使用电脑的时候,开启电脑发现电脑显示:配置windows更新失败,正在还原更改,请勿关闭计算机。。.这要怎么办呢?下面小编就带着大家一起看看吧!如果能够正常进入系统,建议您暂时移…...
2022/11/19 21:17:02 - 还原更改请勿关闭计算机 要多久,配置windows update失败 还原更改 请勿关闭计算机,电脑开机后一直显示以...
配置windows update失败 还原更改 请勿关闭计算机,电脑开机后一直显示以以下文字资料是由(历史新知网www.lishixinzhi.com)小编为大家搜集整理后发布的内容,让我们赶快一起来看一下吧!配置windows update失败 还原更改 请勿关闭计算机&#x…...
2022/11/19 21:17:01 - 电脑配置中请勿关闭计算机怎么办,准备配置windows请勿关闭计算机一直显示怎么办【图解】...
不知道大家有没有遇到过这样的一个问题,就是我们的win7系统在关机的时候,总是喜欢显示“准备配置windows,请勿关机”这样的一个页面,没有什么大碍,但是如果一直等着的话就要两个小时甚至更久都关不了机,非常…...
2022/11/19 21:17:00 - 正在准备配置请勿关闭计算机,正在准备配置windows请勿关闭计算机时间长了解决教程...
当电脑出现正在准备配置windows请勿关闭计算机时,一般是您正对windows进行升级,但是这个要是长时间没有反应,我们不能再傻等下去了。可能是电脑出了别的问题了,来看看教程的说法。正在准备配置windows请勿关闭计算机时间长了方法一…...
2022/11/19 21:16:59 - 配置失败还原请勿关闭计算机,配置Windows Update失败,还原更改请勿关闭计算机...
我们使用电脑的过程中有时会遇到这种情况,当我们打开电脑之后,发现一直停留在一个界面:“配置Windows Update失败,还原更改请勿关闭计算机”,等了许久还是无法进入系统。如果我们遇到此类问题应该如何解决呢࿰…...
2022/11/19 21:16:58 - 如何在iPhone上关闭“请勿打扰”
Apple’s “Do Not Disturb While Driving” is a potentially lifesaving iPhone feature, but it doesn’t always turn on automatically at the appropriate time. For example, you might be a passenger in a moving car, but your iPhone may think you’re the one dri…...
2022/11/19 21:16:57