move_base导航的源码心得
参考move_base当中的代码的学习。
http://www.cnblogs.com/shhu1993/p/6323699.html
关于planner主要关注的就是:
nav_core::BaseGlobalPlanner
nav_core::BaseLocalPlanner
nav_core::RecoveryBehavior
上面的这个三个东西都是插件的形式进行存储,十分是可以更换的。
关于costmap要关注的就是:
global planner costmap
local planner costmap
这里是关于action这个PKG,我看的云里雾里的。
http://wiki.ros.org/actionlib
但是我就是觉得这玩意挺重要
我们在实现的过程中,就是要写一些自己的plugIn。
参考链接:
http://blog.csdn.net/u013158492/article/details/50502266
在costmap_2d中,大量使用了plugin技术,来配置layer和planner. plugin不需要重新编译就可以实现
最近在做一个多点导航的事情,在创客智造上面找到turtlebot的自主导航
内容参考创客智造
先补充一些基础
rospack depends package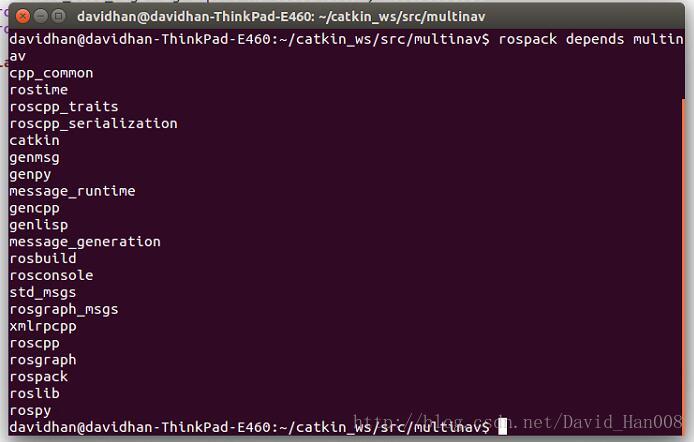
可以查询package的依赖项
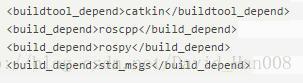
书写package.xml
定义简单的消息发布机制

rosed packagename msgname 其实就是进入了VIM界面。
1、需要修改package.xml
添加这两条
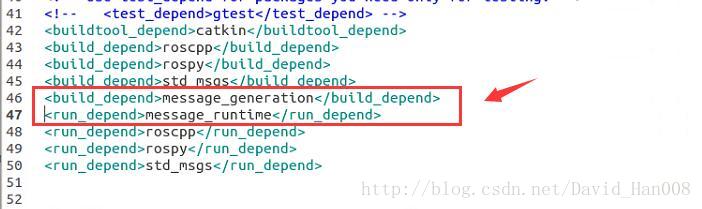
<build_depend>message_generation</build_depend>
<run_depend>message_runtime</run_depend>
2、然后在cmakelist当中添加
find_package(catkin REQUIRED COMPONENTSroscpprospystd_msgsmessage_generation
)add_message_files(FILESNum.msg
) generate_messages(DEPENDENCIESstd_msgs)catkin_package(
# INCLUDE_DIRS include
# LIBRARIES beginner_tutorials CATKIN_DEPENDS roscpp rospy std_msgs message_runtime
# DEPENDS system_lib
)3、然后编译一下
4、检查服务命令
rosmsg show multinav/Num
输出int64 num
python编写简单的服务器和客户端
$ roscd beginner_tutorials
$ mkdir srv
$ cd srv
$ touch AddTwoInts.srv
$ rosed beginner_tutorials AddTwoInts.srv
将srv稳中分成请求部分和响应部分 通过—进行分隔
int64 A
int64 B
---
int64 Sum
修改package.xml,添加下面两条依赖项
<build_depend>message_generation</build_depend>
<run_depend>message_runtime</run_depend>
CMakeLists.txt,增加依赖,
find_package(catkin REQUIRED COMPONENTSroscpprospystd_msgsmessage_generation
)
catkin_package(
# INCLUDE_DIRS include
# LIBRARIES beginner_tutorials CATKIN_DEPENDS roscpp rospy std_msgs message_runtime
# DEPENDS system_lib
)然后编译一下
用rossrv show beginner_tutorials/AddTwoInts
int64 A
int64 B
---
int64 sum
由于前面是大A和大B 那么后面写代码的地方也应该是大A和大B
#!/usr/bin/env pythonNAME='add_two_ints_server'from multinav.srv import *
import rospydef add_two_ints(req):print("add %s + %s = %s"%(req.A,req.B,(req.A+req.B)))sum=req.A+req.Breturn AddTwoIntsResponse(sum)def add_two_ints_server():rospy.init_node(NAME)s=rospy.Service('add_two_ints',AddTwoInts,add_two_ints)print "read to add two ints"rospy.spin()if __name__=="__main__":add_two_ints_server()
from multinav.srv import *导入自定义的服务这是定义的服务的节点名称,服务的类型,和处理函数,基本上就是这三个。
s = rospy.Service('add_two_ints', AddTwoInts, add_two_ints)rosservice call /add_two_inits 1 2
sum :3rosrun beginner_tutorials add_two_ints_server.py
Ready to add Two Ints
Returning [1 + 2 = 3]
Returning [1 + 4 = 5]
Returning [1 + 3 = 4]上面的这是一个服务器,与服务器对应的就是客户端。
#!/usr/bin/env pythonimport sys
import osimport rospy# imports the AddTwoInts service
from rospy_tutorials.srv import *## add two numbers using the add_two_ints service
## @param x int: first number to add
## @param y int: second number to add
def add_two_ints_client(x, y):# NOTE: you don't have to call rospy.init_node() to make calls against# a service. This is because service clients do not have to be# nodes.# block until the add_two_ints service is available# you can optionally specify a timeoutrospy.wait_for_service('add_two_ints')try:# create a handle to the add_two_ints serviceadd_two_ints = rospy.ServiceProxy('add_two_ints', AddTwoInts)print "Requesting %s+%s"%(x, y)# simplified styleresp1 = add_two_ints(x, y)# formal styleresp2 = add_two_ints.call(AddTwoIntsRequest(x, y))if not resp1.sum == (x + y):raise Exception("test failure, returned sum was %s"%resp1.sum)if not resp2.sum == (x + y):raise Exception("test failure, returned sum was %s"%resp2.sum)return resp1.sumexcept rospy.ServiceException, e:print "Service call failed: %s"%edef usage():return "%s [x y]"%sys.argv[0]if __name__ == "__main__":argv = rospy.myargv()if len(argv) == 1:import randomx = random.randint(-50000, 50000)y = random.randint(-50000, 50000)elif len(argv) == 3:try:x = int(argv[1])y = int(argv[2])except:print usage()sys.exit(1)else:print usage()sys.exit(1)print "%s + %s = %s"%(x, y, add_two_ints_client(x, y))rospy.wait_for_service('add_two_ints')表示接入服务节点
add_two_ints=rospy.ServiceProxy(‘add_two_ints’,AddTwoInts)创建一个实例化的句柄
进行测试的rosrun beginner_tutorials add_two_ints_client.py 4 5
获取全局参数
rospy.get_param('/global_param_name')
获取目前命名空间的参数
rospy.get_param('param_name')获取私有命名空间的参数
rospy.get_param('~private_param_name')获取参数,如果没有,那么使用默认的值
rospy.get_parpam('foo','default_value')设置参数.使用使用rospy.set_param(param_name,param_value)
rospy.set_param('some_number',[1,2,3,4])
rospy.set_param('truth',True)
rospy.set_param('~private_bar',1+2)
删除参数
rospy.delete_param('to_delete')判断参数是否存在
if rospy.has_param('to_delete'):rospy.delete_param('to_delete')解释参数名
rospy.resolve_name(name)用来获取一个节点的最初的名字。因为在remap可以将节点的名称进行各种映射。
搜索参数
rospy.search_param(‘参数名’)
rospy当中的日志的API
rospy.logdebug(msg,*args)
rospy.logwarn(msg,*args)
rospy.loginfo(msg,*args)
rospy.logerr(msg,*args)
rospy.logfatal(msg,*args)
实际使用
#!/usr/bin/env python
import rospy
from std_msgs.msg import Stringdef log_level():debug="This is debug"rospy.logdebug("success to debug %s",debug)info="This is info"rospy.loginfo("success to info %s",info)warn="This is warn"rospy.logwarn("success to warn %s",warn)error="This is error"rospy.logerr("success to err %s",error)fatal="This is fatal"rospy.logfatal("success to fatal %s", fatal)if __name__=='__main__':try:rospy.init_node('log_level',log_level=rospy.DEBUG)log_level()except rospy.ROSException:pass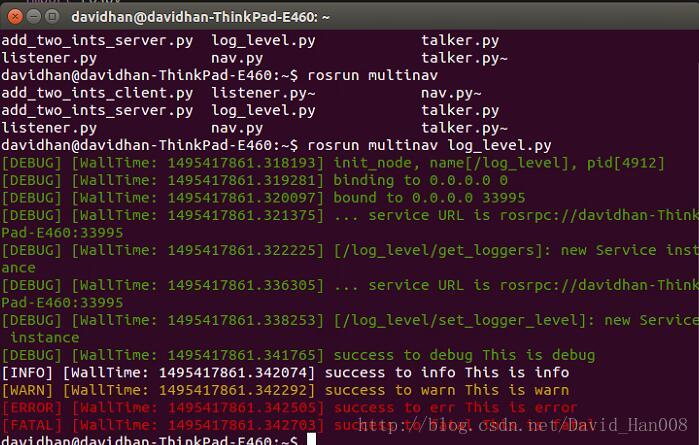
可以重用一个已经在你工作区间的包

未使用numpy的listener的节点
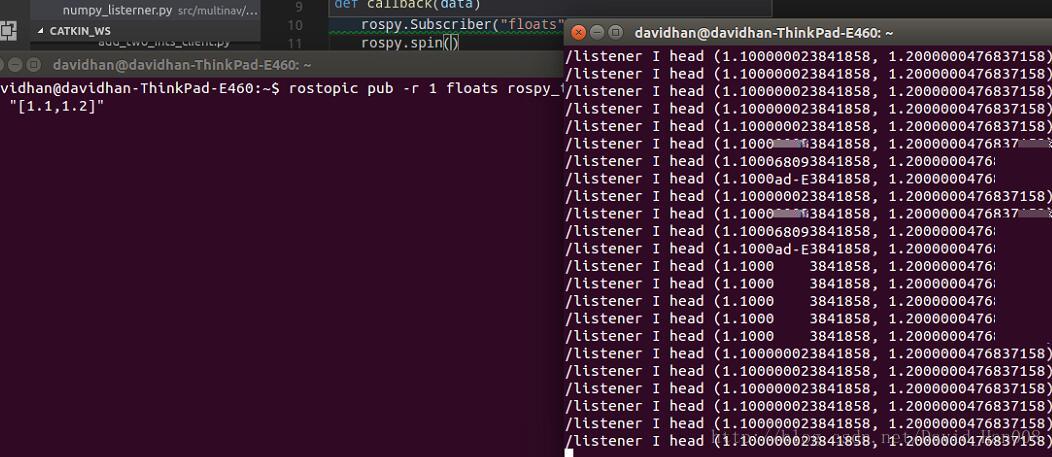
#!/usr/bin/env pythonimport rospy
from rospy_tutorials.msg import Floatsdef callback(data):print rospy.get_name(), "I heard %s"%str(data.data)def listener():rospy.init_node('listener')rospy.Subscriber("floats", Floats, callback)rospy.spin()if __name__ == '__main__':listener()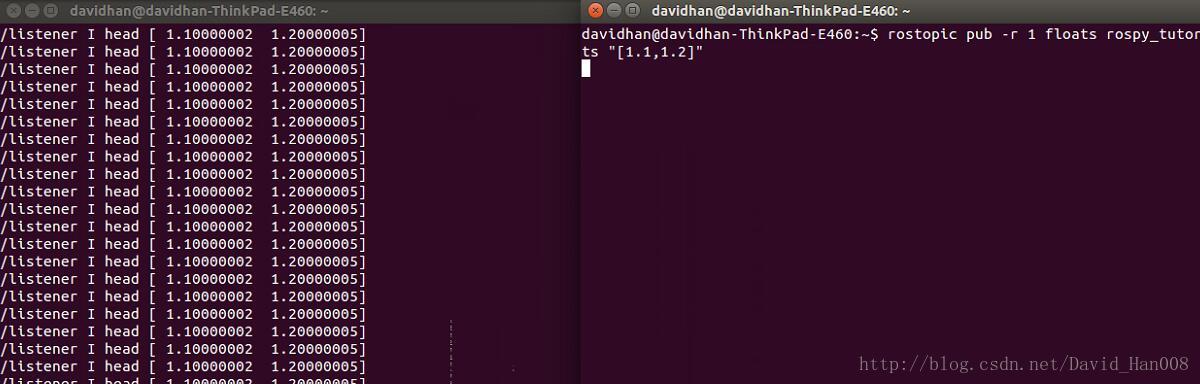
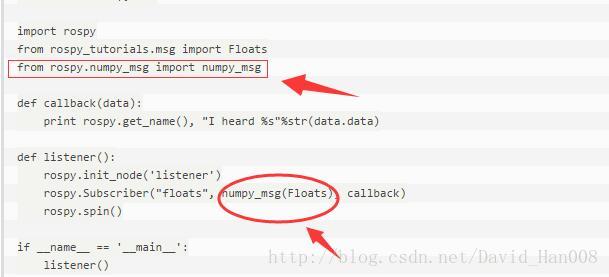

#!/usr/bin/env pythonimport rospy
from rospy.numpy_msg import numpy_msg
from rospy_tutorials.msg import Floatsimport numpy
def talker():pub = rospy.Publisher('floats', numpy_msg(Floats),queue_size=10)rospy.init_node('talker', anonymous=True)r = rospy.Rate(10) # 10hzwhile not rospy.is_shutdown(): 这个地方相当于while(ros::ok())a = numpy.array([1.0, 2.1, 3.2, 4.3, 5.4, 6.5], dtype=numpy.float32)pub.publish(a)r.sleep()if __name__ == '__main__':talker()
通过这个函数来发布经过numpy函数处理过的浮点值内容
pub = rospy.Publisher('floats', numpy_msg(Floats))
a = numpy.array([1.0, 2.1, 3.2, 4.3, 5.4, 6.5], dtype=numpy.float32)
利用numpy转化成numpy的数组结构,指定内容的数据格式,最后说明是float类型。

verbose=FALSE,意思就是设置运行的时候不显示详细信息。
从这两句我们就可以看出,单引号里面可以包含多引号,反正就是这么写。
print "subscribe to /camera/image/compress success"print 'received image type : “%s”'%ros_data.format导入python的库
# Python libs
import sys, time
# numpy and scipy
import numpy as np
from scipy.ndimage import filters# OpenCV
import cv2# Ros libraries
import roslib
import rospy# Ros Messages
from sensor_msgs.msg import CompressedImage
导入所需要的库文件,Python numpy库,opencv的库,ros相关的消息
time用于测量特征的时间 import time Numpy和SciPy用于处理转换和显示特征
class image_feature:def __init__(self): 用于实例化...def callback(self, ros_data): 用于处理图片信息初始化节点
rospy.init_node('my_node_name')
rospy.init_node('my_node_name',anonymous=True)
init_node()函数需要提供一个节点名,必须要是唯一的节点名称。
如果不太关心节点的唯一性情况下,可以设置anonymous=True。
关闭节点
while not rospy.is_shutdown():do some work使用命令行的参数
rospy.myargv(argv=sys.argv)发布数据和话题
pub=rospy.Publisher('toplic_name',std_msgs.msg.String,queue_size=10)
pub.publish(std_msgs.msg.String("foo"))rospy.Publisher(toplic_name,msg_class,queue_size)ros当中有rospy.time 和rospy.Duration
获取当前的时间
now=rospy.Time.now()
now=rospy.get_time()
TF的广播器
#!/usr/bin/env python
import roslib
roslib.load_manifest('learning_tf')
import rospyimport tf
import turtlesim.msgdef handle_turtle_pose(msg,turtlesim):br=tf.TransformBroadcaster()br.sendTransform((msg.x,msg.y,0),tf.translations.quaternion_from_euler(0,0,msg.theta),rospy.Time.now(),turtlename,"world")if __name__=="__main__":rospy.init_node('turtle_tf_broadcaster')turtlename=rospy.get_param('~turtle')rospy.Subscriber('%s/pose'%turtlename,turtlesim.msg.Pose,handle_turtle_pose,turtlename)rospy.spin()
导入actonlib的库
import actionlib导入生成的消息
import actionlib_tutorials.msgself._as = actionlib.SimpleActionServer(self._action_name, actionlib_tutorials.msg.FibonacciAction, execute_cb=self.execute_cb, auto_start = False)将上面的创客智造的代码分析完毕之后,进入正题,关于多点导航的问题
在这个地方肯定是要
如果在python当中,设置URDF模型的初始的位置?
# Goal state return values goal_states = ['PENDING', 'ACTIVE', 'PREEMPTED','SUCCEEDED', 'ABORTED', 'REJECTED','PREEMPTING', 'RECALLING', 'RECALLED','LOST'] # Set up the goal locations. Poses are defined in the map frame. # An easy way to find the pose coordinates is to point-and-click # Nav Goals in RViz when running in the simulator. # Pose coordinates are then displayed in the terminal # that was used to launch RViz. locations = dict() 或者在地方改。
  rospy.loginfo("Click on the map in RViz to set the intial pose...")  rospy.wait_for_message('initialpose', PoseWithCovarianceStamped)
rospy.Subscriber('initialpose', PoseWithCovarianceStamped, self.update_initial_pose)
然后这个应该就是问题的所在。改成sorted之后就没问题了
 # Wait for the /odom topic to become available
rospy.wait_for_message('input', PoseWithCovarianceStamped)
这个人在这个地方使用了一个for循环来遍历整个字典当中的点,也是可以了
https://segmentfault.com/a/1190000006262518
机器人卡尔曼滤波器的roswiki官网的教程
http://wiki.ros.org/robot_pose_ekf
这个roswiki值得关注一下
http://wiki.ros.org/pose_publisher
http://www.codeforge.cn/read/236617/set_pose.py__html
仔细看了一下这个地方,感觉还是可以的
http://answers.ros.org/question/114631/robot-estimated-pose/
http://answers.ros.org/question/205308/publishing-to-initialpose-programmatically-on-turtlebot-navigation/
还有这个链接
感谢大神无私的贴出源码
#!/usr/bin/env python
import rospy
from geometry_msgs.msg import PoseWithCovarianceStampeddef initial_pos_pub():publisher = rospy.Publisher('initialpose', PoseWithCovarianceStamped, queue_size=10)rospy.init_node('initial_pos_pub', anonymous=True)#Creating the message with the type PoseWithCovarianceStampedrospy.loginfo("This node sets the turtlebot's position to the red cross on the floor. It will shudown after publishing to the topic /initialpose")start_pos = PoseWithCovarianceStamped()#filling header with relevant informationstart_pos.header.frame_id = "map"start_pos.header.stamp = rospy.Time.now()#filling payload with relevant information gathered from subscribing# to initialpose topic published by RVIZ via rostopic echo initialposestart_pos.pose.pose.position.x = -0.846684932709start_pos.pose.pose.position.y = 0.333061099052start_pos.pose.pose.position.z = 0.0start_pos.pose.pose.orientation.x = 0.0start_pos.pose.pose.orientation.y = 0.0start_pos.pose.pose.orientation.z = -0.694837665627start_pos.pose.pose.orientation.w = 0.719166613815start_pos.pose.covariance[0] = 0.25start_pos.pose.covariance[7] = 0.25start_pos.pose.covariance[1:7] = [0.0, 0.0, 0.0, 0.0, 0.0, 0.0] start_pos.pose.covariance[8:34] = [0.0, 0.0, 0.0, 0.0, 0.0, 0.0, 0.0, 0.0, 0.0, 0.0, 0.0, 0.0, 0.0, 0.0, 0.0, 0.0, 0.0, 0.0, 0.0, 0.0, 0.0, 0.0, 0.0, 0.0, 0.0, 0.0] start_pos.pose.covariance[35] = 0.06853891945200942rospy.loginfo(start_pos)publisher.publish(start_pos)if __name__ == '__main__':try:initial_pos_pub()except rospy.ROSInterruptException:pass
在这个里面我们发现,主要就是初始化了一个东西,然后给这个东西进行了赋值。分别对head.frame_id,以及header.stamp这里面每个参数都有。这里关于covariance的东西,我还是不是理解。
start_pos = PoseWithCovarianceStamped()#filling header with relevant informationstart_pos.header.frame_id = "map"start_pos.header.stamp = rospy.Time.now()#filling payload with relevant information gathered from subscribing# to initialpose topic published by RVIZ via rostopic echo initialposestart_pos.pose.pose.position.x = -0.846684932709start_pos.pose.pose.position.y = 0.333061099052start_pos.pose.pose.position.z = 0.0start_pos.pose.pose.orientation.x = 0.0start_pos.pose.pose.orientation.y = 0.0start_pos.pose.pose.orientation.z = -0.694837665627start_pos.pose.pose.orientation.w = 0.719166613815start_pos.pose.covariance[0] = 0.25start_pos.pose.covariance[7] = 0.25start_pos.pose.covariance[1:7] = [0.0, 0.0, 0.0, 0.0, 0.0, 0.0] start_pos.pose.covariance[8:34] = [0.0, 0.0, 0.0, 0.0, 0.0, 0.0, 0.0, 0.0, 0.0, 0.0, 0.0, 0.0, 0.0, 0.0, 0.0, 0.0, 0.0, 0.0, 0.0, 0.0, 0.0, 0.0, 0.0, 0.0, 0.0, 0.0] start_pos.pose.covariance[35] = 0.06853891945200942这下面是我要使用的,就是可以不通过做鼠标的点击RVIZ来实现
#!/usr/bin/env python
import rospy
import actionlib
from actionlib_msgs.msg import *
from geometry_msgs.msg import Pose, PoseWithCovarianceStamped, Point, Quaternion, Twist
from move_base_msgs.msg import MoveBaseAction, MoveBaseGoal
from random import sample
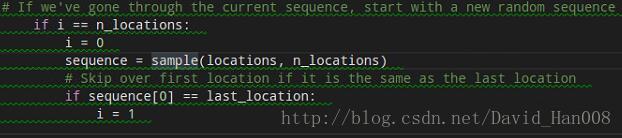
from math import pow, sqrt MAP_POINT_NUM=3class MultiNav(): def __init__(self): rospy.init_node('MultiNav', anonymous=True) rospy.on_shutdown(self.shutdown) # How long in seconds should the robot pause at each location? self.rest_time = rospy.get_param("~rest_time", 2) # Are we running in the fake simulator? self.fake_test = rospy.get_param("~fake_test", False) # Goal state return values goal_states = ['PENDING', 'ACTIVE', 'PREEMPTED','SUCCEEDED', 'ABORTED', 'REJECTED','PREEMPTING', 'RECALLING', 'RECALLED','LOST'] # Set up the goal locations. Poses are defined in the map frame. # An easy way to find the pose coordinates is to point-and-click # Nav Goals in RViz when running in the simulator. # Pose coordinates are then displayed in the terminal # that was used to launch RViz. locations = dict() locations[0] = Pose(Point(5.088, -0.171, 0.00), Quaternion(0.000, 0.000, 0.721, 0.693)) locations[1] = Pose(Point(9.394,-0.562, 0.00), Quaternion(0.000, 0.000, -0.646, 0.763)) locations[2] = Pose(Point(19.575, 0.065, 0.00), Quaternion(0.000, 0.000, 0.720, 0.694)) # locations['home_refrigerator'] = Pose(Point(-1.00, 6.88, 0.00), Quaternion(0.000, 0.000, 1.000, 0.000)) # locations['home_door'] = Pose(Point(-2.80, 8.00, 0.00), Quaternion(0.000, 0.000, 0.000, 1.000))# locations['home_balcony'] = Pose(Point(-2.08, 4.57, 0.00), Quaternion(0.000, 0.000, 0.000, 1.000)) # Publisher to manually control the robot (e.g. to stop it) self.cmd_vel_pub = rospy.Publisher('cmd_vel', Twist, queue_size=5) # Subscribe to the move_base action server self.move_base = actionlib.SimpleActionClient("move_base", MoveBaseAction) rospy.loginfo("Waiting for move_base action server...") # Wait 60 seconds for the action server to become available self.move_base.wait_for_server(rospy.Duration(60)) rospy.loginfo("Connected to move base server") # A variable to hold the initial pose of the robot to be set by the user in RViz initial_pose = PoseWithCovarianceStamped() initial_pose.header.frame_id='map'initial_pose.header.stamp=rospy.Time.now()initial_pose.pose.pose.position.x=-0.257initial_pose.pose.pose.position.y=0.036initial_pose.pose.pose.position.z=0initial_pose.pose.pose.orientation.x=0initial_pose.pose.pose.orientation.y=0initial_pose.pose.pose.orientation.z=-0.01initial_pose.pose.pose.orientation.w=1initial_pose.pose.covariance[0]=0.25initial_pose.pose.covariance[7]=0.25initial_pose.pose.covariance[1:7]=[0.0,0.0,0.0,0.0,0.0,0.0]initial_pose.pose.covariance[8:34]=[0,0,0,0,0,0,0,0,0,0,0,0,0,0,0,0,0,0,0,0,0,0,0,0,0,0]initial_pose.pose.covariance[35]=0.06853891945200942# Variables to keep track of success rate, running time, and distance traveled n_locations = len(locations) n_goals = 0 n_successes = 0 i = n_locations distance_traveled = 0 start_time = rospy.Time.now() running_time = 0 location = "" last_location = "" # Get the initial pose from the user# rospy.loginfo("Click on the map in RViz to set the intial pose...") # rospy.wait_for_message('initialpose', PoseWithCovarianceStamped) self.last_location = Pose() # rospy.Subscriber('initialpose', PoseWithCovarianceStamped, self.update_initial_pose) # Make sure we have the initial pose while initial_pose.header.stamp == "": rospy.sleep(1) rospy.loginfo("Starting navigation test") # Begin the main loop and run through a sequence of locations while not rospy.is_shutdown(): # If we've gone through the current sequence, start with a new random sequence if i == n_locations: i = 0 sequence = sorted(locations) # Skip over first location if it is the same as the last location if sequence[0] == last_location: i = 1 # Get the next location in the current sequence location = sequence[i] # Keep track of the distance traveled. # Use updated initial pose if available. if initial_pose.header.stamp == "": distance = sqrt(pow(locations[location].position.x - locations[last_location].position.x, 2) + pow(locations[location].position.y - locations[last_location].position.y, 2)) else: rospy.loginfo("Updating current pose.") distance = sqrt(pow(locations[location].position.x - initial_pose.pose.pose.position.x, 2) + pow(locations[location].position.y - initial_pose.pose.pose.position.y, 2)) initial_pose.header.stamp = "" # Store the last location for distance calculations last_location = location # Increment the counters i += 1 n_goals += 1 # Set up the next goal location self.goal = MoveBaseGoal() self.goal.target_pose.pose = locations[location] self.goal.target_pose.header.frame_id = 'map' self.goal.target_pose.header.stamp = rospy.Time.now() # Let the user know where the robot is going next rospy.loginfo("Going to: " + str(location)) # Start the robot toward the next location self.move_base.send_goal(self.goal) # Allow 5 minutes to get there finished_within_time = self.move_base.wait_for_result(rospy.Duration(300)) # Check for success or failure if not finished_within_time: self.move_base.cancel_goal() rospy.loginfo("Timed out achieving goal") else: state = self.move_base.get_state() if state == GoalStatus.SUCCEEDED: rospy.loginfo("Goal succeeded!") n_successes += 1 distance_traveled += distance else: rospy.loginfo("Goal failed with error code: " + str(goal_states[state])) # How long have we been running? running_time = rospy.Time.now() - start_time running_time = running_time.secs / 60.0 # Print a summary success/failure, distance traveled and time elapsed rospy.loginfo("Success so far: " + str(n_successes) + "/" + str(n_goals) + " = " + str(100 * n_successes/n_goals) + "%") rospy.loginfo("Running time: " + str(trunc(running_time, 1)) + " min Distance: " + str(trunc(distance_traveled, 1)) + " m") rospy.sleep(self.rest_time)#judge stopif i==MAP_POINT_NUM: break def update_initial_pose(self, initial_pose): self.initial_pose = initial_pose def shutdown(self): rospy.loginfo("Stopping the robot...") self.move_base.cancel_goal() rospy.sleep(2) self.cmd_vel_pub.publish(Twist()) rospy.sleep(1)
def trunc(f, n): # Truncates/pads a float f to n decimal places without rounding slen = len('%.*f' % (n, f)) return float(str(f)[:slen]) if __name__ == '__main__': try: MultiNav() rospy.spin() except rospy.ROSInterruptException: rospy.loginfo("AMCL navigation test finished.") 这个地方是,是顺序排查字典里面的元素
sequence = sorted(locations) 这个地方是做了一个字典当中数量的判断。
#judge stopif i==MAP_POINT_NUM: break 我觉得将来也可以作一个安卓的APP
http://blog.csdn.net/lu199012/article/details/72649357
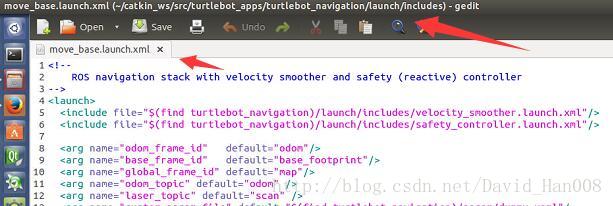
我打算花一些时间弄清楚整个move_base的框架,
然后我吧turtlebot_app当中的turtlebot_navigation,然后我出现了一个问题,就是没有turtlebot_msgs。然后我再下面的这个链接当中找到了下载路径。
https://github.com/turtlebot/turtlebot_msgs
随后编译就能过了。
找到这个配置文件。
这三个文件当中包含的关于地图的参数:
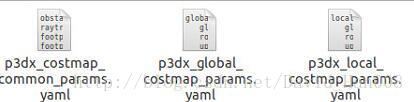
反应到launch文件当中就是

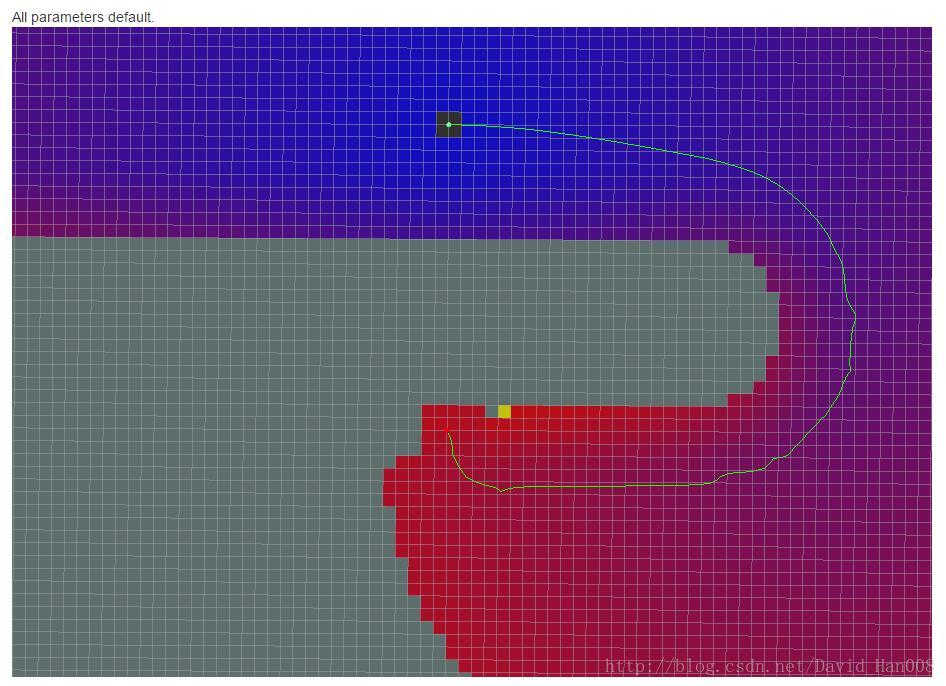
关于这里面参数,如果你是默认的参数的参数的话:
所有的参数都是用的默认的参数的话。
如果我们使用的栅格路径的话。也就是说将use_grid_path=True的话。

如果不使用二次方式的话 use_quadratic=False
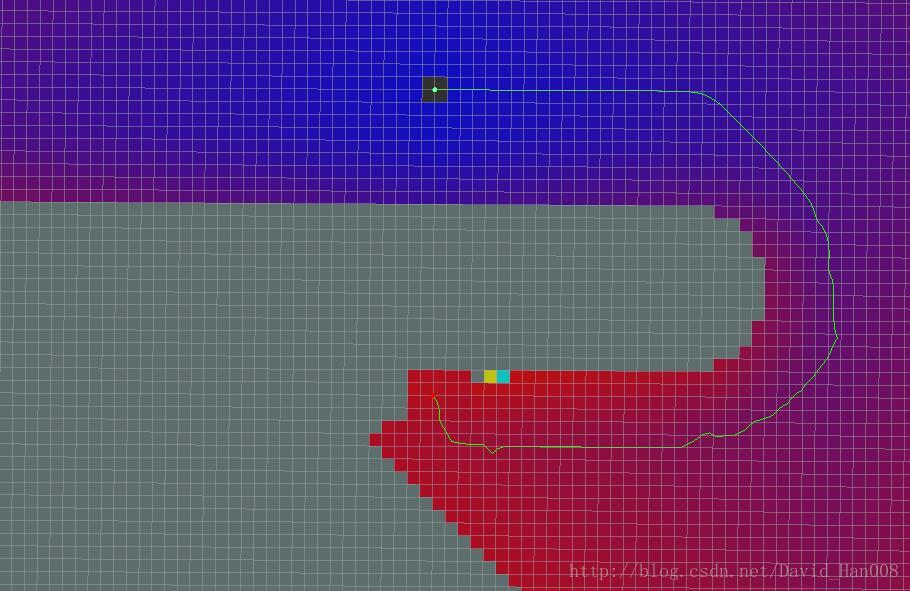
使用A*算法的话,也就是use_dijkdtra=False

同样的条件下,如果我们使用Dijkstra算法的话:

如果我们只是使用A*算法的话。

如果想查看默认的参数,那么点击这个链接:http://wiki.ros.org/global_planner
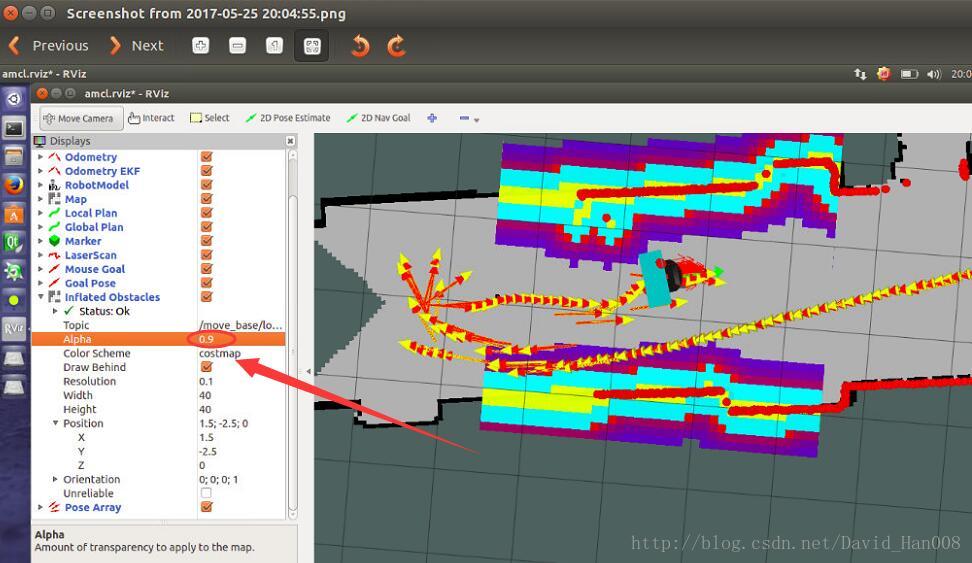
这个地方是改膨胀区的的透明度,值越大越不透明。
那么下面我们讲解一下参数:
<node pkg="move_base" type="move_base" respawn="false" name="move_base" output="screen"><rosparam file="$(find turtlebot_navigation)/param/costmap_common_params.yaml" command="load" ns="global_costmap" /><rosparam file="$(find turtlebot_navigation)/param/costmap_common_params.yaml" command="load" ns="local_costmap" /> <rosparam file="$(find turtlebot_navigation)/param/local_costmap_params.yaml" command="load" /> <rosparam file="$(find turtlebot_navigation)/param/global_costmap_params.yaml" command="load" /><rosparam file="$(find turtlebot_navigation)/param/dwa_local_planner_params.yaml" command="load" /><rosparam file="$(find turtlebot_navigation)/param/move_base_params.yaml" command="load" /><rosparam file="$(find turtlebot_navigation)/param/global_planner_params.yaml" command="load" /><rosparam file="$(find turtlebot_navigation)/param/navfn_global_planner_params.yaml" command="load" />在这些参数里面分成两类:map和planner。我原来的包当中,Planner用了一个base的配置文件。现在就是导入这么多文件。
footprint: [[-0.17, -0.20], [-0.20, -0.10], [-0.225, 0.0], [-0.20, 0.10], [-0.17, 0.20], [0.10, 0.20], [0.17, 0.10], [0.225, 0.0], [0.17, -0.10], [0.10, -0.20]] #机器人的形状
footprint_padding: 0.01
inflation_radius: 0.20 #膨胀区的半径map_type: voxel #地图的类型是栅格地图
obstacle_layer: enable: truemax_obstacle_height: 0.6 # 最大障碍物高度min_obstacle_height: 0.0 # 最小障碍物高度origin_z: 0.0 z_resolution: 0.2z_voxels: 2unknow_threshold: 15 未知区域的阈值mark_threshold: 0  combination_methold: 1 合并方式,这里应该是有一些方式obstacle_range: 2.5 障碍物的半径raytrace_range: 3.0 光线跟踪的半径min_obstacle_dist: 1.0 最小的障碍物的距离costmap_obstacles_behind_robot_dist: 1.2 距离障碍物几米之后,回来。weight_obstacle: 50 障碍物的宽度observation_sources: scan 观测的来源scan: {data_type: LaserScan, topic: /scan, marking: true, clearing: true}static_layer:enable: trueinflation_layer: #关于膨胀区enable: truecost_scaling_factor: 5.0 花费的尺度 障碍物成本的下降速率inflation_radius: 0.5 离障碍物的最大距离
全局的代价地图
global_costmap:global_frame: /maprobot_base_frame: /base_footprint #机器人的参考 这里我的先锋是base_linkupdate_frequency: 1.0publish_frequency: 0.5static_map: truetransform_tolerance: 0.5<!-- global map引入了以下三层,经融合构成了master map,用于global planner-->plugins: #插入地图的类型- {name: static_layer, type: "costmap_2d::StaticLayer"}- {name: obstacle_layer, type: "costmap_2d::VoxelLayer"}- {name: inflation_layer, type: "costmap_2d::InflationLayer"}local_costmap:global_frame: odomrobot_base_frame: /base_footprint #我这里是base_linkupdate_frequency: 5.0publish_frequency: 2.0static_map: falserolling_window: true #是否进行滑窗width: 4.0height: 4.0resolution: 0.05transform_tolerance: 0.5<!-- local map引入了以下两层,经融合构成了master map,用于局部planner-->plugins:- {name: obstacle_layer, type: "costmap_2d::VoxelLayer"}- {name: inflation_layer, type: "costmap_2d::InflationLayer"}地图上面只是做了一些显示的效果。关键的差异还是在planner的差异
然后是导入路径规划的参数:
/param/move_base_params.yaml" command="load" /param/global_planner_params.yaml" command="load" /param/navfn_global_planner_params.yaml" command="load" /param/dwa_local_planner_params.yaml" command="load" move_base_params.yaml
shutdown_costmaps: false 不关闭地图controller_frequency: 5.0 控制器更新的频率
controller_patience: 3.0 控制器容忍
planner_frequency: 1.0 规划的频率
planner_patience: 5.0 5秒没有反应就重新规划oscillation_timeout: 10.0 震动的时间
oscillation_distance: 0.2 震动的频率# local planner - default is trajectory rollout
base_local_planner: "dwa_local_planner/DWAPlannerROS"
<!--这里配置了local planner为dwa_local_planner -->用动态窗口法做局部的路径规划
<!--这里配置了global planner为navfn/NavfnROS -->全局的算用navfnROS
base_global_planner: "navfn/NavfnROS" #alternatives: global_planner/GlobalPlanner, carrot_planner/CarrotPlanner
全局的路径规划:
GlobalPlanner:old_navfn_behavior: falseuse_quadratic: trueuse_dijsktra: true #if you want to use A* so use falseuse_grid_path: falseallow_unknow: trueplanner_windows_x: 0.0planner_windows_y: 0.0default_tolerance: 0.0publish_scale: 100planner_costmap_publish_frequency: 0.0lethal_cost: 253neutral_cost: 50cost_factor: 3.0publish_potential: true p3dx_dwa_local_planner_params.yaml
DWAPlanerROS:max_vel_x: 0.5min_vel_x: 0.1max_vel_y: 0.0min_vel_y: 0.0max_trans_vel: 0.5min_trans_vel: 0.1trans_stopped_vel: 0.1max_rotational_vel: 0.5max_rotational_vel: 1.0max_rot_vel: 5.0min_rot_vel: 0.4rot_stopped_vel: 0.4acc_lim_theta: 0.75acc_lim_x: 0.2acc_lim_y: 0.4yaw_goal_tolerance: 0.3xy_goal_tolerance: 0.15sim_time: 1.0vx_samples: 6vy_samples: 1vthea_samples: 20path_distance_bias: 64.0goal_distance_bias: 24.0occdist_scale: 0.5forward_point_distance: 0.325stop_time_buffer: 0.2scaling_speed: 0.25max_scaling_factor: 0.2oscillation_reset_dist: 0.05publish_traj_pc: truepublish_cost_grid_pc: true global_frame_id: odom原始的文件:
controller_frequency: 10.0
recovery_behavior_enabled: false # 复原行为使能
clearing_rotation_allowed: false # 清除旋转允许
TrajectoryPlannerROS:max_vel_x: 0.50min_vel_x: 0.10max_rotational_vel: 0.5min_in_place_rotational_vel: 1.0acc_lim_theta: 0.75acc_lim_x: 0.20acc_lim_y: 0.50pdist_scale: 0.4gdist_scale: 0.8meter_scoring: truebackup_vel: -0.2holonomic_robot: falseyaw_goal_tolerance: 0.78xy_goal_tolerance: 0.15goal_distance_bias: 0.8path_distance_bias: 0.6sim_time: 1.5heading_lookahead: 0.325oscillation_reset_dist: 0.05vx_samples: 6vtheta_samples: 20dwa: false
在这个video当中讲解了如何添加导航的puglin(插件)
https://www.youtube.com/watch?v=We1gGDXAO_o
这个video是讲的如何使用你创建的插件
https://www.youtube.com/watch?v=t4A_niNlDdg
这里是关于如何将ROSQT的插件
https://www.youtube.com/watch?v=GqBzI7O9h8A
我感觉合格video对于使用A*的路径规划算法很有帮助。
https://www.youtube.com/watch?v=wf7FvOBaquY
这个hunman的插件让我考虑一下到底要不要去做
https://github.com/marinaKollmitz/human_aware_navigation
在下载movebase源码的过程,遇到的问题
CMake Error at /opt/ros/indigo/share/catkin/cmake/catkin_workspace.cmake:95 (message):This workspace contains non-catkin packages in it, and catkin cannot builda non-homogeneous workspace without isolation.  Try the'catkin_make_isolated' command instead.
Call Stack (most recent call first):CMakeLists.txt:63 (catkin_workspace)-- Configuring incomplete, errors occurred!
See also "/home/davidhan/catkin_ws01/build/CMakeFiles/CMakeOutput.log".
See also "/home/davidhan/catkin_ws01/build/CMakeFiles/CMakeError.log".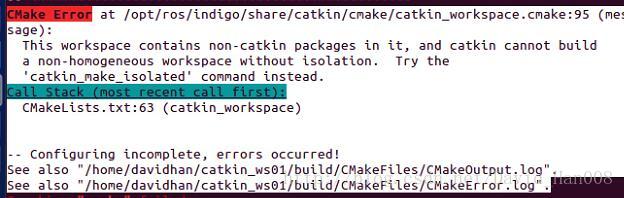
就是这个这个package里面哟不是catkin能够编译的包,那么我就可以用catkin_make_isolated进行编译。
$ sudo apt-get install ros-indigo-turtlebot-bringup \
ros-indigo-turtlebot-create-desktop ros-indigo-openni-* \
ros-indigo-openni2-* ros-indigo-freenect-* ros-indigo-usb-cam \
ros-indigo-laser-* ros-indigo-hokuyo-node \
ros-indigo-audio-common gstreamer0.10-pocketsphinx \
ros-indigo-pocketsphinx ros-indigo-slam-gmapping \
ros-indigo-joystick-drivers python-rosinstall \
ros-indigo-orocos-kdl ros-indigo-python-orocos-kdl \
python-setuptools ros-indigo-dynamixel-motor-* \
libopencv-dev python-opencv ros-indigo-vision-opencv \
ros-indigo-depthimage-to-laserscan ros-indigo-arbotix-* \
ros-indigo-turtlebot-teleop ros-indigo-move-base \
ros-indigo-map-server ros-indigo-fake-localization \
ros-indigo-amcl git subversion mercurial
总之就是各种编译不过,然后我尝试着暗转一些启动的一些东,能不能把编译通过了
sudo apt-get install ros-indigo-orocos-kdl
ros-indigo-fake-localization
ros-indigo-laser-*
ros-indigo-dynamixel-motor-*
sudo apt-get install ros-indigo-dynamic-reconfigure
如果这个时候还是有问题的话,呢么你就把build 和devel这两个文件都删除掉,然后在进行catkin_make,吐槽一句,其实出现这个问题原因是因为一些ROS当中,因为为了增加开发的效率,会保存一些上次编译的东西在build和devel当中,所有为了能够然让你这次的编译通过,那么直接将原来的这个两个文件删除之后,重新编译就可以通过了。
感觉还是白巧克力博客比较好
http://blog.csdn.net/heyijia0327/article/details/41823809/
PWM值,就是脉冲宽度调制。通过在一个周期中,开关导通的时间开控制转速。
整个move_base的框架必须要输入的是:
goal
tf
odom
LaserScan
输出
cmd_vel
move_base接收到goal之后,将目标goal通过actionlib的client(客户端)想服务器发送数据,服务器根据你的tf关系以及发布odom消息不断反馈机器人的状态到客户端,然后让move_base当中的客户端进行控制转向twist
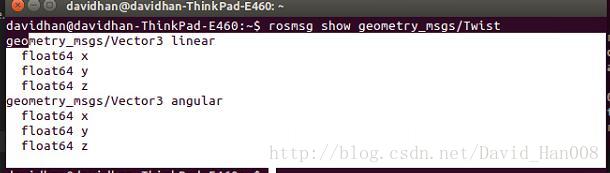
其中linear 的x就是代表前进方向的速度,单位为m/s。angular 的z就代表机器人的绕中心旋转的角速度,单位为 弧度/s (rad/s)。
如何将左右轮的差速,转化成转过的角度,就是用下面这个公式:
yaw_rate = (Rwheelspeed - Lwheelspeed) / d .其中d为两轮间的间距,得到的转速单位rad/s。
move_base实现了一个actionlib用于设定目标的位置。
链接global planner和local planner用于导航。 可以通过重新实现nav_core::BaseGlobalPlanner是nav_core::BaseLocalPlanner修改global和local planner的导航策略。
因为我要修改的local planner那么我先把这个地方做了,然后将来有机会的话,我觉得,就是那个人的想法,使用多个雷达,或者一个激光雷达进行路径规划和测距,其实我觉得在代码里面也是能够实现,到时候看情况吧,目前我还是觉得不管怎么样子,在local planner 这个地方还是需要将壁障给弄好,然后弄好之后,接下来就是该是做全局的路径规划,然后就是能够通过ROS制作一个界面出来,之后这部分就不在花时间做做了,将来的这个地方,地方就是能够将机械活动的部分在加上,基本上就可以了。
然后自己现在开始看的定地方技术就是这个地方,然后我尽快找到这个函数的实现地方
但是感觉这个点放只是指定做单个的点的位置,还是不能够满足用户用的需要,如果我能够指定多个在输入的时候多个目标点,那会怎么样呢?
我也不知道该怎么分析代码,那就一个文件一个文件的看吧,或者在网上找了一个大牛的博客,然后边看博客,边对照源码进行参看。
<library path="lib/libglobal_planner"><class name="global_planner/GlobalPlanner" type="global_planner::GlobalPlanner" base_class_type="nav_core::BaseGlobalPlanner"><description>A implementation of a grid based planner using Dijkstras or A*</description></class>
</library>
然后将这个插件的细节都提取出来。
感觉这个cfg很多东西 都是python的东西
其实不管怎么样,我觉得现在我还是需要先把按个关于如何设置插件的这个过程熟悉一下,然后开始写代码。
MoveBase::executeCb这个函数就用来启动线程的
如若内容造成侵权/违法违规/事实不符,请联系编程学习网邮箱:809451989@qq.com进行投诉反馈,一经查实,立即删除!
相关文章
- angularJS的指令封装
什么是angular的指令?指令,说的直白一点就是一个标签,只要贴上这个标签,那么就是执行某个函数,完成某个动作!在angular框架理念中,指令也是核心的模块之一。这么说吧,web前端原生开发…...
2024/4/20 16:14:57 - 机器人SLAM与自主导航(二)——必备条件
机器人SLAM与自主导航(二)——必备条件 目录总述一、传感器信息二、仿真平台总述 ROS中SLAMda和自主导航的相关功能包可以通用于各种移动机器人平台,但为达到最佳效果,对机器人的硬件仍然有以下三个要求。 1)导航功能…...
2024/4/21 12:46:31 - 埋线双眼皮去割
...
2024/4/21 12:46:32 - 南昌割双眼皮高效*爱思特mei名
...
2024/5/2 21:14:16 - 双眼皮做后疼不疼
...
2024/4/21 12:46:28 - 做双眼皮需要准备
...
2024/4/21 12:46:27 - 清潭first割双眼皮为什么不痛
...
2024/4/21 12:46:26 - 内眦眼皮怎么变做了双眼皮显老怎么不
...
2024/4/21 12:46:25 - 现在割双眼皮恢复快吗
...
2024/4/21 12:46:24 - 双眼皮提肌能做几次
...
2024/4/21 12:46:24 - 双眼皮亚韩
...
2024/4/21 12:46:22 - AJAX:判断用户是否存在及用户名密码是否正确问题
概念:AJAX = Asynchronous JavaScript and XML(异步的 JavaScript 和 XML)。AJAX 不是新的编程语言,而是一种使用现有标准的新方法。AJAX 不需要任何浏览器插件,但需要用户允许JavaScript在浏览器上执行。AJAX是一种用于创建快速动态网页的技术。优点:通过在后台与服务器…...
2024/4/21 12:46:21 - 做埋线双眼皮失败的四种情况(图)
...
2024/4/21 12:46:27 - 广扇形双眼皮怎么化妆
...
2024/4/20 16:15:08 - angular4学习笔记(第一章 基础篇)
1.环境搭配 安装nodejs 使用npm -v 来查看版本安装angular cli 使用命令(npm install -g angular/cli) 使用 ng v 来查看版本 安装开发工具,使用的是 visual studio code 创建项目 ng new projectname进入项目 cd projectname启动项目 ng serve 2.认识angular项目的…...
2024/4/20 16:15:09 - 在广州割双眼皮出众-美来
...
2024/5/2 10:57:15 - 南京双眼皮修复出众-美来
...
2024/4/20 16:15:05 - response.write()区别response.getWrite().write()
首先解释一下PrintWriter = response.getWriter(); wirte()是类PrintWriter提供的一个方法,是发送请求内容至页面,ajax常用到这个 response.write()是直接在页面输出内容 javascript如何获得后台response.getWriter().write()返回的值 用的struts2这个你要用ajax才可以获得。…...
2024/4/20 16:15:04 - ionic打包apk时报错No resource identifier found for attribute ‘appComponentFactory‘ in package ‘android‘
运行打包apk的指令ionic cordova run android,报错No resource identifier found for attribute appComponentFactory in package android 我的解决方法: ①在安卓平台中./platforms/android/build.gradle文件内,查找到allprojects…...
2024/4/20 16:15:03 - 切双眼皮要多少费用是多少钱呀
...
2024/4/20 16:15:02
最新文章
- Vue阶段练习:初始化渲染、获取焦点、记账清单
阶段练习主要承接Vue 生命周期-CSDN博客 ,学习完该部分内容后,进行自我检测,每个练习主要分为效果显示、需求分析、静态代码、完整代码、总结 四个部分,效果显示和准备代码已给出,我们需要完成“完整代码”部分。 练习…...
2024/5/6 16:55:27 - 梯度消失和梯度爆炸的一些处理方法
在这里是记录一下梯度消失或梯度爆炸的一些处理技巧。全当学习总结了如有错误还请留言,在此感激不尽。 权重和梯度的更新公式如下: w w − η ⋅ ∇ w w w - \eta \cdot \nabla w ww−η⋅∇w 个人通俗的理解梯度消失就是网络模型在反向求导的时候出…...
2024/5/6 9:38:23 - Ubuntu磁盘扩容
使用 df -h命令查看系统磁盘控件的使用情况: [samspobosrv:~]$ df -h Filesystem Size Used Avail Use% Mounted on udev 7.8G 0 7.8G 0% /dev tmpfs 1.6G 1.7M 1.…...
2024/5/5 4:50:46 - Databend 开源周报第 138 期
Databend 是一款现代云数仓。专为弹性和高效设计,为您的大规模分析需求保驾护航。自由且开源。即刻体验云服务:https://app.databend.cn 。 Whats On In Databend 探索 Databend 本周新进展,遇到更贴近你心意的 Databend 。 支持多表插入 …...
2024/5/6 10:31:53 - 【外汇早评】美通胀数据走低,美元调整
原标题:【外汇早评】美通胀数据走低,美元调整昨日美国方面公布了新一期的核心PCE物价指数数据,同比增长1.6%,低于前值和预期值的1.7%,距离美联储的通胀目标2%继续走低,通胀压力较低,且此前美国一季度GDP初值中的消费部分下滑明显,因此市场对美联储后续更可能降息的政策…...
2024/5/4 23:54:56 - 【原油贵金属周评】原油多头拥挤,价格调整
原标题:【原油贵金属周评】原油多头拥挤,价格调整本周国际劳动节,我们喜迎四天假期,但是整个金融市场确实流动性充沛,大事频发,各个商品波动剧烈。美国方面,在本周四凌晨公布5月份的利率决议和新闻发布会,维持联邦基金利率在2.25%-2.50%不变,符合市场预期。同时美联储…...
2024/5/4 23:54:56 - 【外汇周评】靓丽非农不及疲软通胀影响
原标题:【外汇周评】靓丽非农不及疲软通胀影响在刚结束的周五,美国方面公布了新一期的非农就业数据,大幅好于前值和预期,新增就业重新回到20万以上。具体数据: 美国4月非农就业人口变动 26.3万人,预期 19万人,前值 19.6万人。 美国4月失业率 3.6%,预期 3.8%,前值 3…...
2024/5/4 23:54:56 - 【原油贵金属早评】库存继续增加,油价收跌
原标题:【原油贵金属早评】库存继续增加,油价收跌周三清晨公布美国当周API原油库存数据,上周原油库存增加281万桶至4.692亿桶,增幅超过预期的74.4万桶。且有消息人士称,沙特阿美据悉将于6月向亚洲炼油厂额外出售更多原油,印度炼油商预计将每日获得至多20万桶的额外原油供…...
2024/5/6 9:21:00 - 【外汇早评】日本央行会议纪要不改日元强势
原标题:【外汇早评】日本央行会议纪要不改日元强势近两日日元大幅走强与近期市场风险情绪上升,避险资金回流日元有关,也与前一段时间的美日贸易谈判给日本缓冲期,日本方面对汇率问题也避免继续贬值有关。虽然今日早间日本央行公布的利率会议纪要仍然是支持宽松政策,但这符…...
2024/5/4 23:54:56 - 【原油贵金属早评】欧佩克稳定市场,填补伊朗问题的影响
原标题:【原油贵金属早评】欧佩克稳定市场,填补伊朗问题的影响近日伊朗局势升温,导致市场担忧影响原油供给,油价试图反弹。此时OPEC表态稳定市场。据消息人士透露,沙特6月石油出口料将低于700万桶/日,沙特已经收到石油消费国提出的6月份扩大出口的“适度要求”,沙特将满…...
2024/5/4 23:55:05 - 【外汇早评】美欲与伊朗重谈协议
原标题:【外汇早评】美欲与伊朗重谈协议美国对伊朗的制裁遭到伊朗的抗议,昨日伊朗方面提出将部分退出伊核协议。而此行为又遭到欧洲方面对伊朗的谴责和警告,伊朗外长昨日回应称,欧洲国家履行它们的义务,伊核协议就能保证存续。据传闻伊朗的导弹已经对准了以色列和美国的航…...
2024/5/4 23:54:56 - 【原油贵金属早评】波动率飙升,市场情绪动荡
原标题:【原油贵金属早评】波动率飙升,市场情绪动荡因中美贸易谈判不安情绪影响,金融市场各资产品种出现明显的波动。随着美国与中方开启第十一轮谈判之际,美国按照既定计划向中国2000亿商品征收25%的关税,市场情绪有所平复,已经开始接受这一事实。虽然波动率-恐慌指数VI…...
2024/5/4 23:55:16 - 【原油贵金属周评】伊朗局势升温,黄金多头跃跃欲试
原标题:【原油贵金属周评】伊朗局势升温,黄金多头跃跃欲试美国和伊朗的局势继续升温,市场风险情绪上升,避险黄金有向上突破阻力的迹象。原油方面稍显平稳,近期美国和OPEC加大供给及市场需求回落的影响,伊朗局势并未推升油价走强。近期中美贸易谈判摩擦再度升级,美国对中…...
2024/5/4 23:54:56 - 【原油贵金属早评】市场情绪继续恶化,黄金上破
原标题:【原油贵金属早评】市场情绪继续恶化,黄金上破周初中国针对于美国加征关税的进行的反制措施引发市场情绪的大幅波动,人民币汇率出现大幅的贬值动能,金融市场受到非常明显的冲击。尤其是波动率起来之后,对于股市的表现尤其不安。隔夜美国股市出现明显的下行走势,这…...
2024/5/6 1:40:42 - 【外汇早评】美伊僵持,风险情绪继续升温
原标题:【外汇早评】美伊僵持,风险情绪继续升温昨日沙特两艘油轮再次发生爆炸事件,导致波斯湾局势进一步恶化,市场担忧美伊可能会出现摩擦生火,避险品种获得支撑,黄金和日元大幅走强。美指受中美贸易问题影响而在低位震荡。继5月12日,四艘商船在阿联酋领海附近的阿曼湾、…...
2024/5/4 23:54:56 - 【原油贵金属早评】贸易冲突导致需求低迷,油价弱势
原标题:【原油贵金属早评】贸易冲突导致需求低迷,油价弱势近日虽然伊朗局势升温,中东地区几起油船被袭击事件影响,但油价并未走高,而是出于调整结构中。由于市场预期局势失控的可能性较低,而中美贸易问题导致的全球经济衰退风险更大,需求会持续低迷,因此油价调整压力较…...
2024/5/4 23:55:17 - 氧生福地 玩美北湖(上)——为时光守候两千年
原标题:氧生福地 玩美北湖(上)——为时光守候两千年一次说走就走的旅行,只有一张高铁票的距离~ 所以,湖南郴州,我来了~ 从广州南站出发,一个半小时就到达郴州西站了。在动车上,同时改票的南风兄和我居然被分到了一个车厢,所以一路非常愉快地聊了过来。 挺好,最起…...
2024/5/4 23:55:06 - 氧生福地 玩美北湖(中)——永春梯田里的美与鲜
原标题:氧生福地 玩美北湖(中)——永春梯田里的美与鲜一觉醒来,因为大家太爱“美”照,在柳毅山庄去寻找龙女而错过了早餐时间。近十点,向导坏坏还是带着饥肠辘辘的我们去吃郴州最富有盛名的“鱼头粉”。说这是“十二分推荐”,到郴州必吃的美食之一。 哇塞!那个味美香甜…...
2024/5/4 23:54:56 - 氧生福地 玩美北湖(下)——奔跑吧骚年!
原标题:氧生福地 玩美北湖(下)——奔跑吧骚年!让我们红尘做伴 活得潇潇洒洒 策马奔腾共享人世繁华 对酒当歌唱出心中喜悦 轰轰烈烈把握青春年华 让我们红尘做伴 活得潇潇洒洒 策马奔腾共享人世繁华 对酒当歌唱出心中喜悦 轰轰烈烈把握青春年华 啊……啊……啊 两…...
2024/5/4 23:55:06 - 扒开伪装医用面膜,翻六倍价格宰客,小姐姐注意了!
原标题:扒开伪装医用面膜,翻六倍价格宰客,小姐姐注意了!扒开伪装医用面膜,翻六倍价格宰客!当行业里的某一品项火爆了,就会有很多商家蹭热度,装逼忽悠,最近火爆朋友圈的医用面膜,被沾上了污点,到底怎么回事呢? “比普通面膜安全、效果好!痘痘、痘印、敏感肌都能用…...
2024/5/5 8:13:33 - 「发现」铁皮石斛仙草之神奇功效用于医用面膜
原标题:「发现」铁皮石斛仙草之神奇功效用于医用面膜丽彦妆铁皮石斛医用面膜|石斛多糖无菌修护补水贴19大优势: 1、铁皮石斛:自唐宋以来,一直被列为皇室贡品,铁皮石斛生于海拔1600米的悬崖峭壁之上,繁殖力差,产量极低,所以古代仅供皇室、贵族享用 2、铁皮石斛自古民间…...
2024/5/4 23:55:16 - 丽彦妆\医用面膜\冷敷贴轻奢医学护肤引导者
原标题:丽彦妆\医用面膜\冷敷贴轻奢医学护肤引导者【公司简介】 广州华彬企业隶属香港华彬集团有限公司,专注美业21年,其旗下品牌: 「圣茵美」私密荷尔蒙抗衰,产后修复 「圣仪轩」私密荷尔蒙抗衰,产后修复 「花茵莳」私密荷尔蒙抗衰,产后修复 「丽彦妆」专注医学护…...
2024/5/4 23:54:58 - 广州械字号面膜生产厂家OEM/ODM4项须知!
原标题:广州械字号面膜生产厂家OEM/ODM4项须知!广州械字号面膜生产厂家OEM/ODM流程及注意事项解读: 械字号医用面膜,其实在我国并没有严格的定义,通常我们说的医美面膜指的应该是一种「医用敷料」,也就是说,医用面膜其实算作「医疗器械」的一种,又称「医用冷敷贴」。 …...
2024/5/4 23:55:01 - 械字号医用眼膜缓解用眼过度到底有无作用?
原标题:械字号医用眼膜缓解用眼过度到底有无作用?医用眼膜/械字号眼膜/医用冷敷眼贴 凝胶层为亲水高分子材料,含70%以上的水分。体表皮肤温度传导到本产品的凝胶层,热量被凝胶内水分子吸收,通过水分的蒸发带走大量的热量,可迅速地降低体表皮肤局部温度,减轻局部皮肤的灼…...
2024/5/4 23:54:56 - 配置失败还原请勿关闭计算机,电脑开机屏幕上面显示,配置失败还原更改 请勿关闭计算机 开不了机 这个问题怎么办...
解析如下:1、长按电脑电源键直至关机,然后再按一次电源健重启电脑,按F8健进入安全模式2、安全模式下进入Windows系统桌面后,按住“winR”打开运行窗口,输入“services.msc”打开服务设置3、在服务界面,选中…...
2022/11/19 21:17:18 - 错误使用 reshape要执行 RESHAPE,请勿更改元素数目。
%读入6幅图像(每一幅图像的大小是564*564) f1 imread(WashingtonDC_Band1_564.tif); subplot(3,2,1),imshow(f1); f2 imread(WashingtonDC_Band2_564.tif); subplot(3,2,2),imshow(f2); f3 imread(WashingtonDC_Band3_564.tif); subplot(3,2,3),imsho…...
2022/11/19 21:17:16 - 配置 已完成 请勿关闭计算机,win7系统关机提示“配置Windows Update已完成30%请勿关闭计算机...
win7系统关机提示“配置Windows Update已完成30%请勿关闭计算机”问题的解决方法在win7系统关机时如果有升级系统的或者其他需要会直接进入一个 等待界面,在等待界面中我们需要等待操作结束才能关机,虽然这比较麻烦,但是对系统进行配置和升级…...
2022/11/19 21:17:15 - 台式电脑显示配置100%请勿关闭计算机,“准备配置windows 请勿关闭计算机”的解决方法...
有不少用户在重装Win7系统或更新系统后会遇到“准备配置windows,请勿关闭计算机”的提示,要过很久才能进入系统,有的用户甚至几个小时也无法进入,下面就教大家这个问题的解决方法。第一种方法:我们首先在左下角的“开始…...
2022/11/19 21:17:14 - win7 正在配置 请勿关闭计算机,怎么办Win7开机显示正在配置Windows Update请勿关机...
置信有很多用户都跟小编一样遇到过这样的问题,电脑时发现开机屏幕显现“正在配置Windows Update,请勿关机”(如下图所示),而且还需求等大约5分钟才干进入系统。这是怎样回事呢?一切都是正常操作的,为什么开时机呈现“正…...
2022/11/19 21:17:13 - 准备配置windows 请勿关闭计算机 蓝屏,Win7开机总是出现提示“配置Windows请勿关机”...
Win7系统开机启动时总是出现“配置Windows请勿关机”的提示,没过几秒后电脑自动重启,每次开机都这样无法进入系统,此时碰到这种现象的用户就可以使用以下5种方法解决问题。方法一:开机按下F8,在出现的Windows高级启动选…...
2022/11/19 21:17:12 - 准备windows请勿关闭计算机要多久,windows10系统提示正在准备windows请勿关闭计算机怎么办...
有不少windows10系统用户反映说碰到这样一个情况,就是电脑提示正在准备windows请勿关闭计算机,碰到这样的问题该怎么解决呢,现在小编就给大家分享一下windows10系统提示正在准备windows请勿关闭计算机的具体第一种方法:1、2、依次…...
2022/11/19 21:17:11 - 配置 已完成 请勿关闭计算机,win7系统关机提示“配置Windows Update已完成30%请勿关闭计算机”的解决方法...
今天和大家分享一下win7系统重装了Win7旗舰版系统后,每次关机的时候桌面上都会显示一个“配置Windows Update的界面,提示请勿关闭计算机”,每次停留好几分钟才能正常关机,导致什么情况引起的呢?出现配置Windows Update…...
2022/11/19 21:17:10 - 电脑桌面一直是清理请关闭计算机,windows7一直卡在清理 请勿关闭计算机-win7清理请勿关机,win7配置更新35%不动...
只能是等着,别无他法。说是卡着如果你看硬盘灯应该在读写。如果从 Win 10 无法正常回滚,只能是考虑备份数据后重装系统了。解决来方案一:管理员运行cmd:net stop WuAuServcd %windir%ren SoftwareDistribution SDoldnet start WuA…...
2022/11/19 21:17:09 - 计算机配置更新不起,电脑提示“配置Windows Update请勿关闭计算机”怎么办?
原标题:电脑提示“配置Windows Update请勿关闭计算机”怎么办?win7系统中在开机与关闭的时候总是显示“配置windows update请勿关闭计算机”相信有不少朋友都曾遇到过一次两次还能忍但经常遇到就叫人感到心烦了遇到这种问题怎么办呢?一般的方…...
2022/11/19 21:17:08 - 计算机正在配置无法关机,关机提示 windows7 正在配置windows 请勿关闭计算机 ,然后等了一晚上也没有关掉。现在电脑无法正常关机...
关机提示 windows7 正在配置windows 请勿关闭计算机 ,然后等了一晚上也没有关掉。现在电脑无法正常关机以下文字资料是由(历史新知网www.lishixinzhi.com)小编为大家搜集整理后发布的内容,让我们赶快一起来看一下吧!关机提示 windows7 正在配…...
2022/11/19 21:17:05 - 钉钉提示请勿通过开发者调试模式_钉钉请勿通过开发者调试模式是真的吗好不好用...
钉钉请勿通过开发者调试模式是真的吗好不好用 更新时间:2020-04-20 22:24:19 浏览次数:729次 区域: 南阳 > 卧龙 列举网提醒您:为保障您的权益,请不要提前支付任何费用! 虚拟位置外设器!!轨迹模拟&虚拟位置外设神器 专业用于:钉钉,外勤365,红圈通,企业微信和…...
2022/11/19 21:17:05 - 配置失败还原请勿关闭计算机怎么办,win7系统出现“配置windows update失败 还原更改 请勿关闭计算机”,长时间没反应,无法进入系统的解决方案...
前几天班里有位学生电脑(windows 7系统)出问题了,具体表现是开机时一直停留在“配置windows update失败 还原更改 请勿关闭计算机”这个界面,长时间没反应,无法进入系统。这个问题原来帮其他同学也解决过,网上搜了不少资料&#x…...
2022/11/19 21:17:04 - 一个电脑无法关闭计算机你应该怎么办,电脑显示“清理请勿关闭计算机”怎么办?...
本文为你提供了3个有效解决电脑显示“清理请勿关闭计算机”问题的方法,并在最后教给你1种保护系统安全的好方法,一起来看看!电脑出现“清理请勿关闭计算机”在Windows 7(SP1)和Windows Server 2008 R2 SP1中,添加了1个新功能在“磁…...
2022/11/19 21:17:03 - 请勿关闭计算机还原更改要多久,电脑显示:配置windows更新失败,正在还原更改,请勿关闭计算机怎么办...
许多用户在长期不使用电脑的时候,开启电脑发现电脑显示:配置windows更新失败,正在还原更改,请勿关闭计算机。。.这要怎么办呢?下面小编就带着大家一起看看吧!如果能够正常进入系统,建议您暂时移…...
2022/11/19 21:17:02 - 还原更改请勿关闭计算机 要多久,配置windows update失败 还原更改 请勿关闭计算机,电脑开机后一直显示以...
配置windows update失败 还原更改 请勿关闭计算机,电脑开机后一直显示以以下文字资料是由(历史新知网www.lishixinzhi.com)小编为大家搜集整理后发布的内容,让我们赶快一起来看一下吧!配置windows update失败 还原更改 请勿关闭计算机&#x…...
2022/11/19 21:17:01 - 电脑配置中请勿关闭计算机怎么办,准备配置windows请勿关闭计算机一直显示怎么办【图解】...
不知道大家有没有遇到过这样的一个问题,就是我们的win7系统在关机的时候,总是喜欢显示“准备配置windows,请勿关机”这样的一个页面,没有什么大碍,但是如果一直等着的话就要两个小时甚至更久都关不了机,非常…...
2022/11/19 21:17:00 - 正在准备配置请勿关闭计算机,正在准备配置windows请勿关闭计算机时间长了解决教程...
当电脑出现正在准备配置windows请勿关闭计算机时,一般是您正对windows进行升级,但是这个要是长时间没有反应,我们不能再傻等下去了。可能是电脑出了别的问题了,来看看教程的说法。正在准备配置windows请勿关闭计算机时间长了方法一…...
2022/11/19 21:16:59 - 配置失败还原请勿关闭计算机,配置Windows Update失败,还原更改请勿关闭计算机...
我们使用电脑的过程中有时会遇到这种情况,当我们打开电脑之后,发现一直停留在一个界面:“配置Windows Update失败,还原更改请勿关闭计算机”,等了许久还是无法进入系统。如果我们遇到此类问题应该如何解决呢࿰…...
2022/11/19 21:16:58 - 如何在iPhone上关闭“请勿打扰”
Apple’s “Do Not Disturb While Driving” is a potentially lifesaving iPhone feature, but it doesn’t always turn on automatically at the appropriate time. For example, you might be a passenger in a moving car, but your iPhone may think you’re the one dri…...
2022/11/19 21:16:57