okta使用_如何使用Okta向您的Vue应用添加身份验证
okta使用
This article was originally published on the Okta developer blog. Thank you for supporting the partners who make SitePoint possible.
本文最初发布在Okta开发人员博客上 。 感谢您支持使SitePoint成为可能的合作伙伴。
I’ve danced the JavaScript framework shuffle for years starting with jQuery, then on to Angular. After being frustrated with Angular’s complexity, I found React and thought I was in the clear. What seemed simple on the surface ended up being a frustrating mess. Then I found Vue.js. It just felt right. It worked as expected. It was fast. The documentation was incredible. Templating was eloquent. There was a unanimous consensus around how to handle state management, conditional rendering, two-way binding, routing, and more.
从jQuery开始,到Angular,我已经对JavaScript框架改组已经进行了很多年。 在对Angular的复杂性感到沮丧之后,我找到了React,并以为我很清楚。 表面上看似简单的事情最终变成了令人沮丧的混乱。 然后我找到了Vue.js。 感觉还不错。 它按预期工作。 很快 该文档令人难以置信。 模板雄辩。 关于如何处理状态管理,条件渲染,双向绑定,路由等等,存在一致的共识。
This tutorial will take you step by step through scaffolding a Vue.js project, offloading secure authentication to Okta’s OpenID Connect API (OIDC), locking down protected routes, and performing CRUD operations through a backend REST API server. This tutorial uses the following technologies but doesn’t require intimate knowledge to follow along:
本教程将逐步指导您完成Vue.js项目,将安全认证转移到Okta的OpenID Connect API(OIDC) ,锁定受保护的路由以及通过后端REST API服务器执行CRUD操作的步骤。 本教程使用以下技术,但不需要任何专业知识:
Vue.js with vue-cli, vue-router, and Okta Vue SDK
带有vue-cli , vue-router和Okta Vue SDK的 Vue.js
Node with Express, Okta JWT Verifier, Sequelize, and Epilogue
Express , Okta JWT Verifier , Sequelize和Epilogue的节点
关于Vue.js (About Vue.js)
Vue.js is a robust but simple Javascript framework. It has one of the lowest barriers to entry of any modern framework while providing all the required features for high performance web applications.
Vue.js是一个健壮但简单的Javascript框架。 它是所有现代框架进入的最低障碍之一,同时为高性能Web应用程序提供了所有必需的功能。
This tutorial covers two primary builds, a frontend web app and backend REST API server. The frontend will be a single page application (SPA) with a homepage, login and logout, and a posts manager.
本教程涵盖两个主要构建,一个前端Web应用程序和一个后端REST API服务器。 前端将是一个具有主页,登录和注销以及帖子管理器的单页应用程序(SPA)。
Okta’s OpenID Connect (OIDC) will handle our web app’s authentication through the use of Okta’s Vue SDK. If an unauthenticated user navigates to the posts manager, the web app should attempt to authenticate the user.
Okta的OpenID Connect(OIDC)将通过使用Okta的Vue SDK处理我们的Web应用程序的身份验证。 如果未经身份验证的用户导航到帖子管理器,则Web应用程序应尝试对用户进行身份验证。
The server will run Express with Sequelize and Epilogue. At a high level, with Sequelize and Epilogue you can quickly generate dynamic REST endpoints with just a few lines of code.
该服务器将运行带有Sequelize和Epilogue的 Express 。 在较高的层次上,使用Sequelize和Epilogue,您只需几行代码即可快速生成动态REST端点。
You will use JWT-based authentication when making requests from the web app and Okta’s JWT Verifier in an Express middleware to validate the token. Your app will expose the following endpoints which all require requests to have a valid access token.
从Web应用程序和Express中间件中的Okta的JWT验证程序发出请求以验证令牌时,将使用基于JWT的身份验证。 您的应用程序将公开以下端点,所有这些端点均要求请求具有有效的访问令牌。
- GET /posts
- GET /posts/:id
- POST /posts
- PUT /posts/:id
- DELETE /posts/:id
创建您的Vue.js应用 (Create Your Vue.js App)
To get your project off the ground quickly you can leverage the scaffolding functionality from vue-cli. For this tutorial, you are going to use the progressive web app (PWA) template that includes a handful of features including webpack, hot reloading, CSS extraction, and unit testing.
为了快速启动您的项目,您可以利用vue-cli的脚手架功能。 在本教程中,您将使用渐进式Web应用程序(PWA)模板 ,其中包括一些功能,包括webpack , 热重载 ,CSS提取和单元测试。
If you’re not familiar with the tenets of PWA, check out our ultimate guide to progressive web applications.
如果您不熟悉PWA的宗旨,请查看我们有关渐进式Web应用程序的最终指南 。
To install vue-cli run:
要安装vue-cli运行:
npm install -g vue-cliNext, you need to initialize your project. When you run the vue init command just accept all the default values.
接下来,您需要初始化您的项目。 运行vue init命令时,只需接受所有默认值即可。
vue init pwa my-vue-app
cd ./my-vue-app
npm install
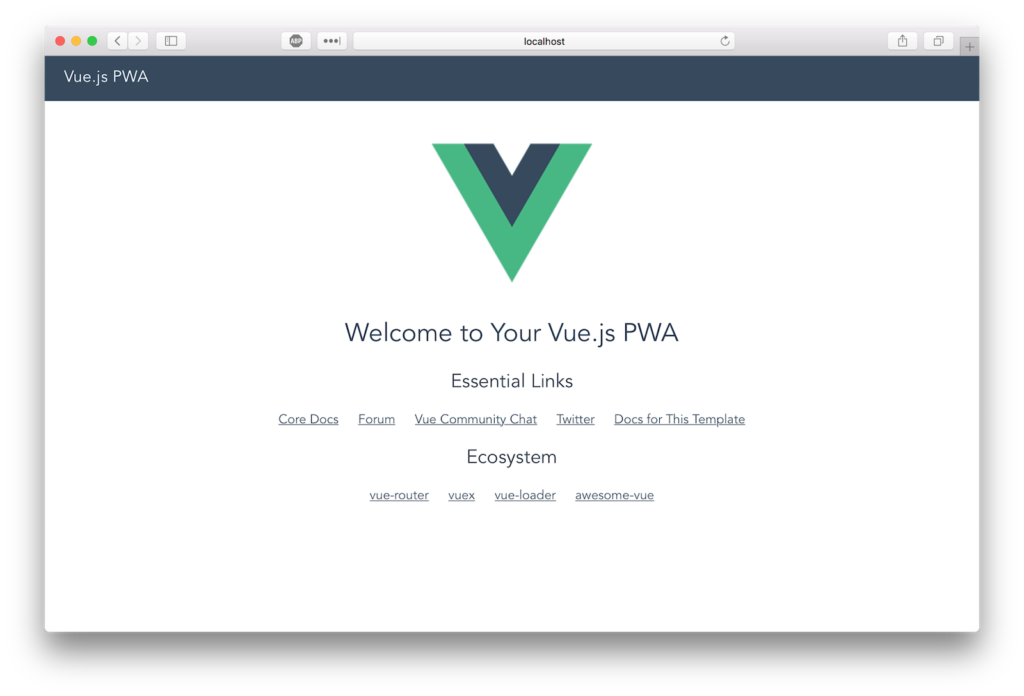
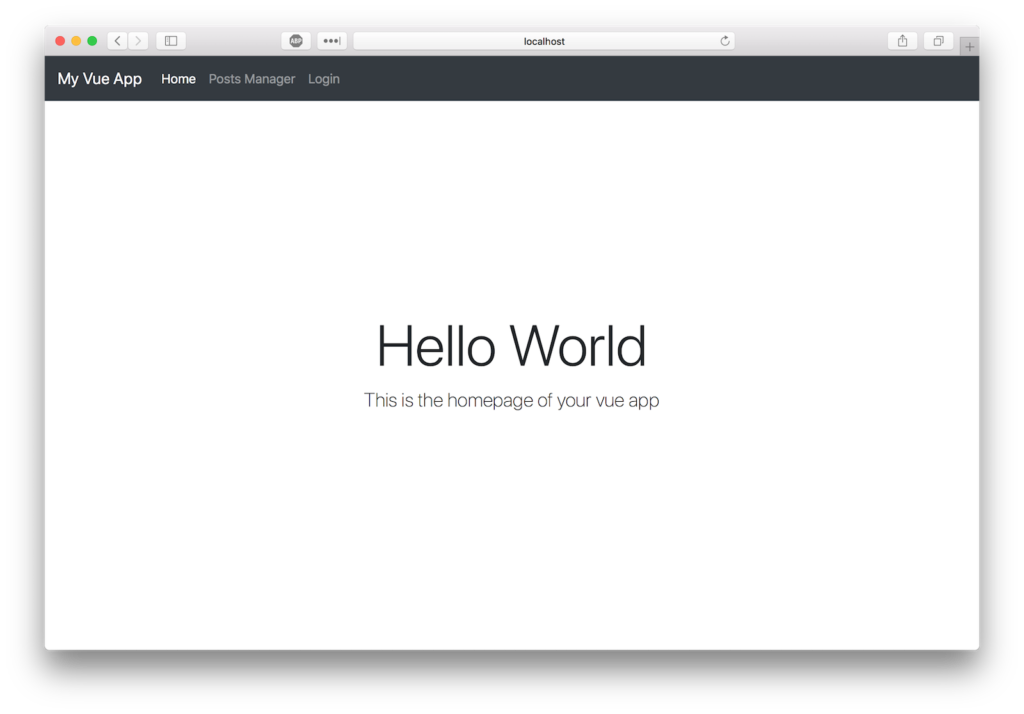
npm run devPoint your favorite browser to http://localhost:8080 and you should see the fruits of your labor:
将您喜欢的浏览器指向http://localhost:8080 ,您应该看到自己的工作成果:
Extra Credit: Check out the other templates available for vue-cli.
额外的信用 :查看适用于vue-cli的其他模板 。
安装引导程序 (Install Bootstrap)
Let’s install bootstrap-vue so you can take advantage of the various premade components (plus you can keep the focus on functionality and not on custom CSS):
让我们安装bootstrap-vue,以便您可以利用各种预制组件 (此外,您可以专注于功能而不是自定义CSS):
npm i --save bootstrap-vue bootstrapTo complete the installation, modify ./src/main.js to include bootstrap-vue and import the required CSS files. Your ./src/main.js file should look like this:
要完成安装,请修改./src/main.js以包括bootstrap-vue并导入所需CSS文件。 您的./src/main.js文件应如下所示:
// The Vue build version to load with the `import` command
// (runtime-only or standalone) has been set in webpack.base.conf with an alias.
import Vue from 'vue'
import App from './App'
import router from './router'
import BootstrapVue from 'bootstrap-vue'
import 'bootstrap/dist/css/bootstrap.css'
import 'bootstrap-vue/dist/bootstrap-vue.css'
Vue.use(BootstrapVue)
Vue.config.productionTip = false
/* eslint-disable no-new */
new Vue({
el: '#app',
router,
template: '<App/>',
components: { App }
})
使用Okta添加身份验证 (Add Authentication with Okta)
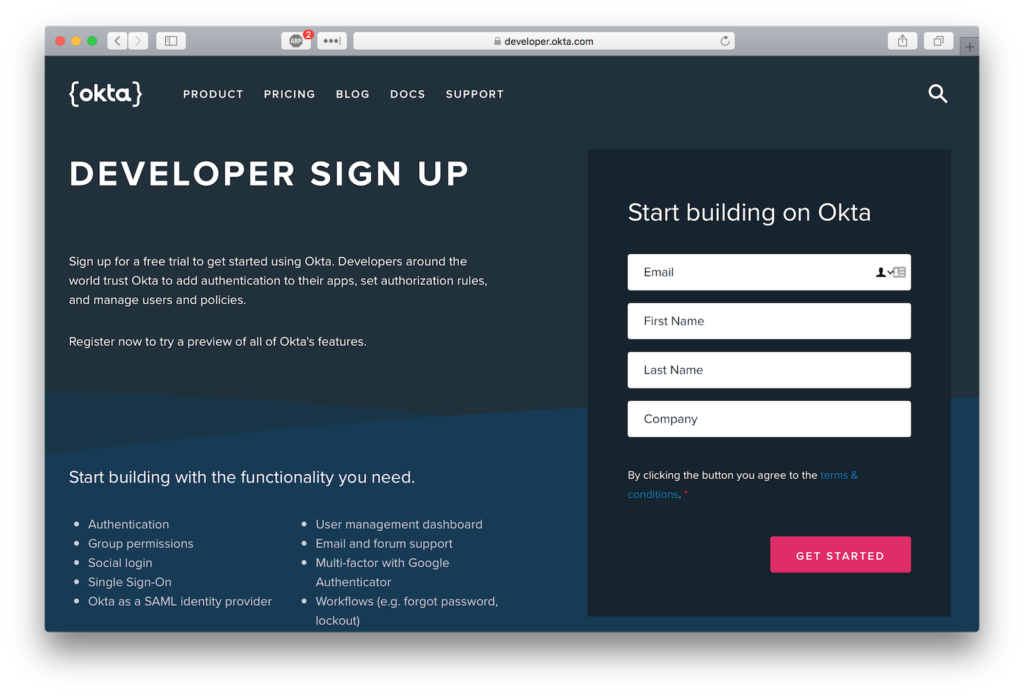
Dealing with authentication in a web app is the bane of every developer’s existence. That’s where Okta comes in to secure your web applications with minimal code. To get started, you will need to create an OIDC application in Okta. Sign up for a forever-free developer account (or log in if you already have one).
在Web应用程序中处理身份验证是每个开发人员生存的祸根。 那就是Okta用最少的代码保护您的Web应用程序安全的地方。 首先,您需要在Okta中创建一个OIDC应用程序。 注册一个永久免费的开发者帐户 (如果已有,请登录)。
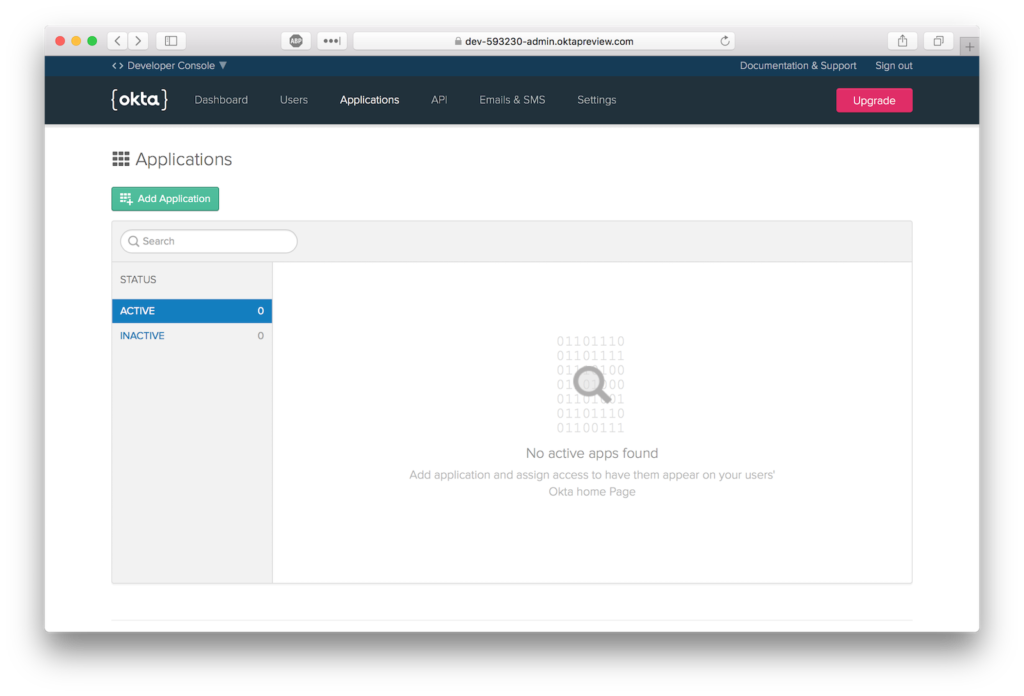
Once logged in, create a new application by clicking “Add Application”.
登录后,单击“添加应用程序”创建一个新的应用程序。
Select the “Single-Page App” platform option.
选择“单页应用”平台选项。
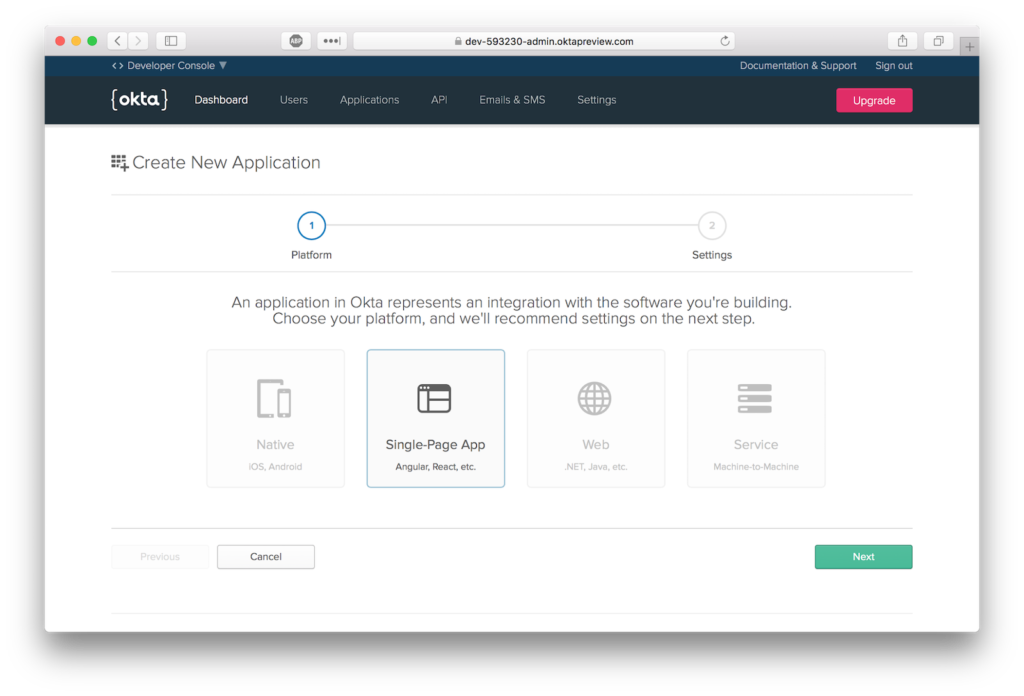
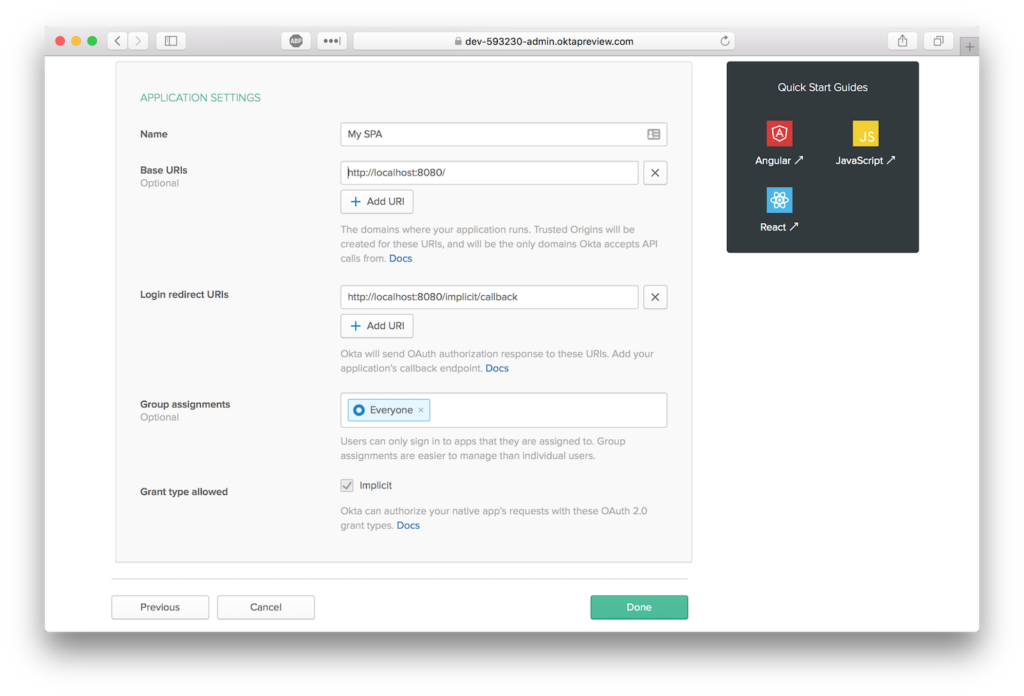
The default application settings should be the same as those pictured.
默认的应用程序设置应与图片相同。
To install the Okta Vue SDK, run the following command:
要安装Okta Vue SDK,请运行以下命令:
npm i --save @okta/okta-vueOpen ./src/router/index.js and replace the entire file with the following code.
打开./src/router/index.js并将整个文件替换为以下代码。
import Vue from 'vue'
import Router from 'vue-router'
import Hello from '@/components/Hello'
import PostsManager from '@/components/PostsManager'
import Auth from '@okta/okta-vue'
Vue.use(Auth, {
issuer: 'https://{yourOktaDomain}.com/oauth2/default',
client_id: '{yourClientId}',
redirect_uri: 'http://localhost:8080/implicit/callback',
scope: 'openid profile email'
})
Vue.use(Router)
let router = new Router({
mode: 'history',
routes: [
{
path: '/',
name: 'Hello',
component: Hello
},
{
path: '/implicit/callback',
component: Auth.handleCallback()
},
{
path: '/posts-manager',
name: 'PostsManager',
component: PostsManager,
meta: {
requiresAuth: true
}
}
]
})
router.beforeEach(Vue.prototype.$auth.authRedirectGuard())
export default router
You’ll need to replace {yourOktaDomain} and {yourClientId} which can be found on your application overview page in the Okta Developer Console. This will inject an authClient object into your Vue instance which can be accessed by calling this.$auth anywhere inside your Vue instance.
您需要替换{yourOktaDomain}和{yourClientId} ,它们可以在Okta开发者控制台的应用程序概述页面上找到。 这会将authClient对象注入到Vue实例中,可以通过在Vue实例内的任何位置调用this.$auth来访问该对象。
Vue.use(Auth, {
issuer: 'https://{yourOktaDomain}.com/oauth2/default',
client_id: '{yourClientId}',
redirect_uri: 'http://localhost:8080/implicit/callback',
scope: 'openid profile email'
})
The final step of Okta’s authentication flow is redirecting the user back to your app with the token values in the URL. The Auth.handleCallback() component included in the SDK handles the redirect and persists the tokens on the browser.
Okta身份验证流程的最后一步是使用URL中的令牌值将用户重定向回您的应用。 SDK中包含的Auth.handleCallback()组件可处理重定向并在浏览器中保留令牌。
{
path: '/implicit/callback',
component: Auth.handleCallback()
}
You also need to lock down protected routes from being accessed by unauthenticated users. This is accomplished by implementing a navigation guard. As the name suggests, navigation guards are primarily used to guard navigations either by redirecting or canceling.
您还需要锁定未经保护的路由,以防止未经身份验证的用户访问。 这可以通过实现导航卫士来实现。 顾名思义, 导航卫士主要用于通过重定向或取消来保护导航。
The SDK comes with the method auth.authRedirectGuard() that checks matched routes’ metadata for the key requiresAuth and redirects the user to the authentication flow if they are not authenticated.
该SDK自带的方法auth.authRedirectGuard()支票匹配路由的元数据的键requiresAuth并且如果它们不认证的用户重定向至身份验证流程。
router.beforeEach(Vue.prototype.$auth.authRedirectGuard())With this navigation guard installed, any route that has the following metadata will be protected.
安装此导航保护后,具有以下元数据的任何路线都将受到保护。
meta: {
requiresAuth: true
}
在Vue中自定义您的应用布局 (Customize Your App Layout in Vue)
The web app’s layout is located in a component ./src/App.vue. You can use the router-view component to render the matched component for the given path.
Web应用程序的布局位于组件./src/App.vue 。 您可以使用router-view组件来呈现给定路径的匹配组件。
For the main menu, you’ll want to change the visibility of certain menu items based on the status of the activeUser:
对于主菜单,您将需要根据activeUser的状态更改某些菜单项的可见性:
Not Authenticated: Show only Login
未验证:仅显示登录
Authenticated: Show only Logout
已验证:仅显示注销
You can toggle the visibility of these menu items using the v-if directive in Vue.js that checks the existence of activeUser on the component. When the component is loaded (which calls created()) or when a route changes we want to refresh the activeUser.
您可以使用Vue.js中的v-if指令切换这些菜单项的可见性,该指令检查组件上是否存在activeUser 。 加载组件时(调用created() )或更改路线时,我们要刷新activeUser 。
Open ./src/App.vue and copy/paste the following code.
打开./src/App.vue并复制/粘贴以下代码。
<template>
<div id="app">
<b-navbar toggleable="md" type="dark" variant="dark">
<b-navbar-toggle target="nav_collapse"></b-navbar-toggle>
<b-navbar-brand to="/">My Vue App</b-navbar-brand>
<b-collapse is-nav id="nav_collapse">
<b-navbar-nav>
<b-nav-item to="/">Home</b-nav-item>
<b-nav-item to="/posts-manager">Posts Manager</b-nav-item>
<b-nav-item href="#" @click.prevent="login" v-if="!activeUser">Login</b-nav-item>
<b-nav-item href="#" @click.prevent="logout" v-else>Logout</b-nav-item>
</b-navbar-nav>
</b-collapse>
</b-navbar>
<!-- routes will be rendered here -->
<router-view />
</div>
</template>
<script>
export default {
name: 'app',
data () {
return {
activeUser: null
}
},
async created () {
await this.refreshActiveUser()
},
watch: {
// everytime a route is changed refresh the activeUser
'$route': 'refreshActiveUser'
},
methods: {
login () {
this.$auth.loginRedirect()
},
async refreshActiveUser () {
this.activeUser = await this.$auth.getUser()
},
async logout () {
await this.$auth.logout()
await this.refreshActiveUser()
this.$router.push('/')
}
}
}
</script>
Every login must have a logout. The following snippet will logout your user, refresh the active user (which is now null), and then redirect the user to the homepage. This method is called when a user clicks on the logout link in the nav.
每次登录都必须注销。 以下代码段将注销您的用户,刷新活动用户(现在为null),然后将用户重定向到首页。 当用户单击导航中的注销链接时,将调用此方法。
async logout () {
await this.$auth.logout()
await this.refreshActiveUser()
this.$router.push('/')
}
Components are the building blocks within Vue.js. Each of your pages will be defined in the app as a component. Since the vue-cli webpack template utilizes vue-loader, your component source files have a convention that separates template, script, and style (see here).
组件是Vue.js中的构建块。 您的每个页面都将在应用程序中定义为组件。 由于vue-cli Webpack模板使用vue-loader ,因此组件源文件具有将模板,脚本和样式分开的约定( 请参见此处 )。
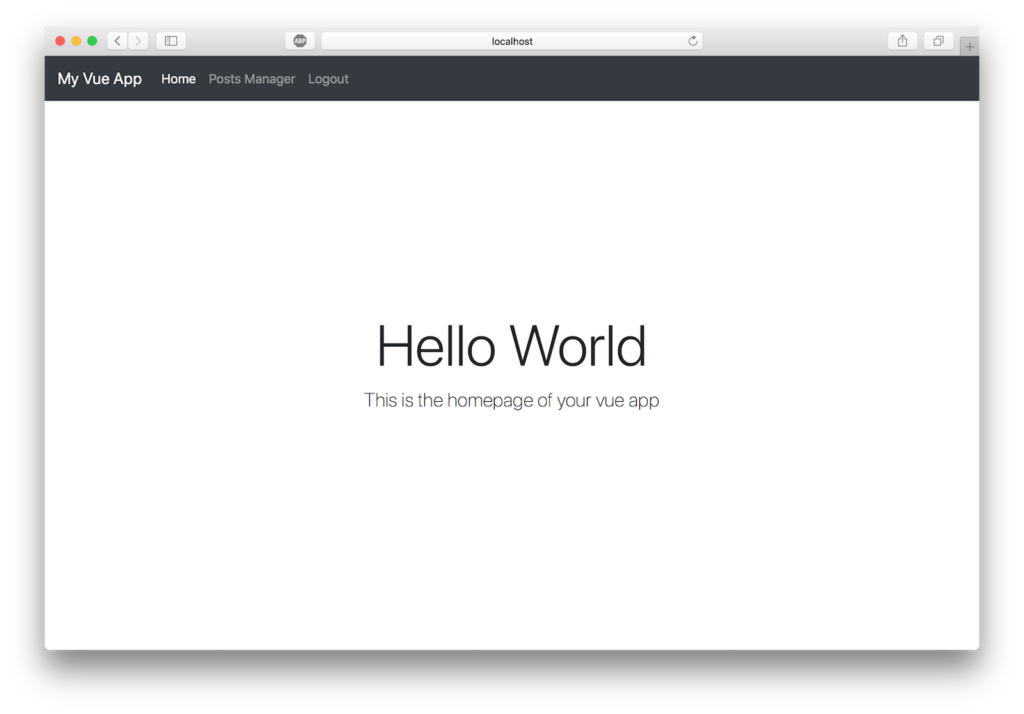
Now that you’ve added vue-bootstrap, modify ./src/components/Hello.vue to remove the boilerplate links vue-cli generates.
现在,您已经添加了vue-bootstrap,修改./src/components/Hello.vue以删除vue-cli生成的样板链接。
<template>
<div class="hero">
<div>
<h1 class="display-3">Hello World</h1>
<p class="lead">This is the homepage of your vue app</p>
</div>
</div>
</template>
<style>
.hero {
height: 90vh;
display: flex;
align-items: center;
justify-content: center;
text-align: center;
}
.hero .lead {
font-weight: 200;
font-size: 1.5rem;
}
</style>
At this point you can stub out the Post Manager page to test your authentication flow. Once you confirm authentication works, you’ll start to build out the API calls and components required to perform CRUD operations on your Posts model.
此时,您可以将“邮递管理器”页面存根,以测试身份验证流程。 确认身份验证成功后,您将开始构建在Posts模型上执行CRUD操作所需的API调用和组件。
Create a new file ./src/components/PostsManager.vue and paste the following code:
创建一个新文件./src/components/PostsManager.vue并粘贴以下代码:
<template>
<div class="container-fluid mt-4">
<h1 class="h1">Posts Manager</h1>
<p>Only authenticated users should see this page</p>
</div>
</template>
使用您的Vue.js前端和身份验证流程进行测试 (Take Your Vue.js Frontend and Auth Flows for a Test Drive)
In your terminal run npm run dev (if it’s not already running). Navigate to http://localhost:8080 and you should see the new homepage.
在终端中运行npm run dev (如果尚未运行)。 导航到http://localhost:8080 ,您应该看到新的主页。
If you click Posts Manager or Login you should be directed to Okta’s flow. Enter your Okta dev account credentials.
如果您单击Posts Manager或Login ,则应转到Okta的流程。 输入您的Okta开发人员帐户凭据。
NOTE: If you are logged in to your Okta Developer Account you will be redirected automatically back to the app. You can test this by using incognito or private browsing mode.
注意:如果您登录到Okta开发者帐户,您将被自动重定向回该应用程序。 您可以使用隐身或私人浏览模式进行测试。
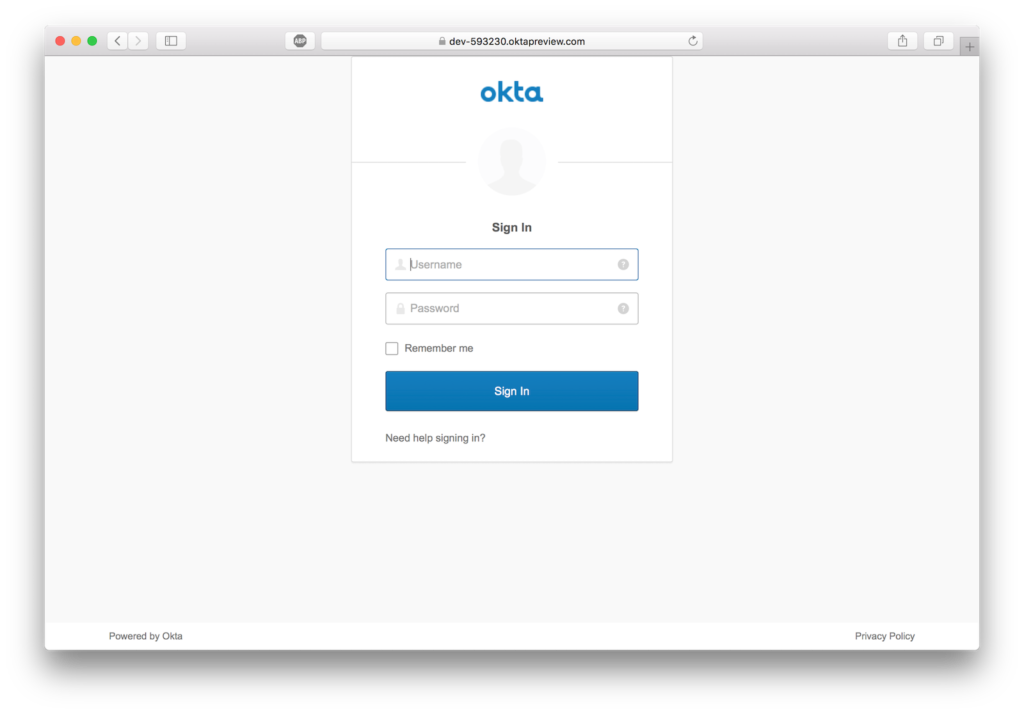
If successful, you should return to the homepage logged in.
如果成功,则应返回登录的主页。
Clicking on Posts Manager link should render the protected component.
单击Posts Manager链接应呈现受保护的组件。

添加后端REST API服务器 (Add a Backend REST API Server)
Now that users can securely authenticate, you can build the REST API server to perform CRUD operations on a post model. Add the following dependencies to your project:
现在,用户可以安全地进行身份验证,您可以构建REST API服务器以在帖子模型上执行CRUD操作。 将以下依赖项添加到您的项目中:
npm i --save express cors @okta/jwt-verifier sequelize sqlite3 epilogue axiosThen, create the file ./src/server.js and paste the following code.
然后,创建文件./src/server.js并粘贴以下代码。
const express = require('express')
const cors = require('cors')
const bodyParser = require('body-parser')
const Sequelize = require('sequelize')
const epilogue = require('epilogue')
const OktaJwtVerifier = require('@okta/jwt-verifier')
const oktaJwtVerifier = new OktaJwtVerifier({
clientId: '{yourClientId}',
issuer: 'https://{yourOktaDomain}.com/oauth2/default'
})
let app = express()
app.use(cors())
app.use(bodyParser.json())
// verify JWT token middleware
app.use((req, res, next) => {
// require every request to have an authorization header
if (!req.headers.authorization) {
return next(new Error('Authorization header is required'))
}
let parts = req.headers.authorization.trim().split(' ')
let accessToken = parts.pop()
oktaJwtVerifier.verifyAccessToken(accessToken)
.then(jwt => {
req.user = {
uid: jwt.claims.uid,
email: jwt.claims.sub
}
next()
})
.catch(next) // jwt did not verify!
})
// For ease of this tutorial, we are going to use SQLite to limit dependencies
let database = new Sequelize({
dialect: 'sqlite',
storage: './test.sqlite'
})
// Define our Post model
// id, createdAt, and updatedAt are added by sequelize automatically
let Post = database.define('posts', {
title: Sequelize.STRING,
body: Sequelize.TEXT
})
// Initialize epilogue
epilogue.initialize({
app: app,
sequelize: database
})
// Create the dynamic REST resource for our Post model
let userResource = epilogue.resource({
model: Post,
endpoints: ['/posts', '/posts/:id']
})
// Resets the database and launches the express app on :8081
database
.sync({ force: true })
.then(() => {
app.listen(8081, () => {
console.log('listening to port localhost:8081')
})
})
Make sure to replace the variables {yourOktaDomain} and {clientId} in the above code with values from your OIDC app in Okta.
确保使用来自Okta的OIDC应用中的值替换上面代码中的变量{yourOktaDomain}和{clientId} 。
添加续集 (Add Sequelize)
Sequelize is a promise-based ORM for Node.js. It supports the dialects PostgreSQL, MySQL, SQLite, and MSSQL and features solid transaction support, relations, read replication, and more.
Sequelize是Node.js的基于承诺的ORM。 它支持方言PostgreSQL,MySQL,SQLite和MSSQL,并具有可靠的事务支持,关系,读取复制等功能。
For ease of this tutorial, you’re going to use SQLite to limit external dependencies. The following code initializes a Sequelize instance using SQLite as your driver.
为了简化本教程,您将使用SQLite限制外部依赖关系。 以下代码使用SQLite作为驱动程序初始化Sequelize实例。
let database = new Sequelize({
dialect: 'sqlite',
storage: './test.sqlite'
})
Each post has a title and body. (The fields createdAt, and updatedAt are added by Sequelize automatically). With Sequelize, you define models by calling define() on your instance.
每个帖子都有title和body 。 (字段createdAt ,和updatedAt由Sequelize自动添加)。 使用Sequelize,您可以通过在实例上调用define()来定义模型。
let Post = database.define('posts', {
title: Sequelize.STRING,
body: Sequelize.TEXT
})
添加结尾 (Add Epilogue)
Epilogue creates flexible REST endpoints from Sequelize models within an Express app. If you ever coded REST endpoints you know how much repetition there is. D.R.Y. FTW!
Epilogue通过Express应用程序中的Sequelize模型创建灵活的REST端点。 如果您曾经编码过REST端点,您就会知道有多少重复。 干FTW!
// Initialize epilogue
epilogue.initialize({
app: app,
sequelize: database
})
// Create the dynamic REST resource for our Post model
let userResource = epilogue.resource({
model: Post,
endpoints: ['/posts', '/posts/:id']
})
验证您的JWT (Verify Your JWT)
This is the most crucial component of your REST API server. Without this middleware any user can perform CRUD operations on our database. If no authorization header is present, or the access token is invalid, the API call will fail and return an error.
这是REST API服务器最关键的组件。 没有此中间件,任何用户都可以在我们的数据库上执行CRUD操作。 如果不存在授权头,或者访问令牌无效,则API调用将失败并返回错误。
// verify JWT token middleware
app.use((req, res, next) => {
// require every request to have an authorization header
if (!req.headers.authorization) {
return next(new Error('Authorization header is required'))
}
let parts = req.headers.authorization.trim().split(' ')
let accessToken = parts.pop()
oktaJwtVerifier.verifyAccessToken(accessToken)
.then(jwt => {
req.user = {
uid: jwt.claims.uid,
email: jwt.claims.sub
}
next()
})
.catch(next) // jwt did not verify!
})
运行服务器 (Run the Server)
Open a new terminal window and run the server with the command node ./src/server. You should see debug information from Sequelize and the app listening on port 8081.
打开一个新的终端窗口,并使用命令node ./src/server运行服务器。 您应该从Sequelize中看到调试信息,并且该应用程序正在侦听端口8081。
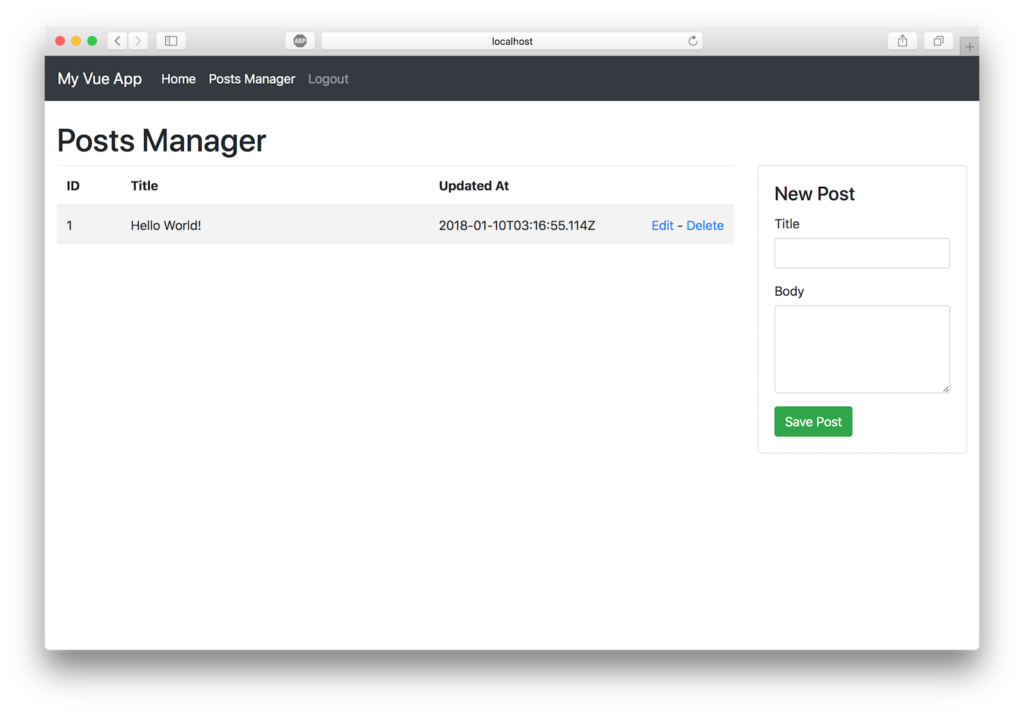
完成帖子管理器组件 (Complete the Posts Manager Component)
Now that the REST API server is complete, you can start wiring up your posts manager to fetch posts, create posts, edit posts, and delete posts.
现在REST API服务器已经完成,您可以开始连接帖子管理器以获取帖子,创建帖子,编辑帖子和删除帖子。
I always centralize my API integrations into a single helper module. This keeps the code in components much cleaner and provides single location in case you need to change anything with the API request.
我总是将我的API集成集中到单个帮助程序模块中。 这样可以使组件中的代码更加整洁,并提供单个位置,以防您需要通过API请求进行任何更改。
Create a file ./src/api.js and copy/paste the following code into it:
创建一个文件./src/api.js并将以下代码复制/粘贴到其中:
import Vue from 'vue'
import axios from 'axios'
const client = axios.create({
baseURL: 'http://localhost:8081/',
json: true
})
export default {
async execute (method, resource, data) {
// inject the accessToken for each request
let accessToken = await Vue.prototype.$auth.getAccessToken()
return client({
method,
url: resource,
data,
headers: {
Authorization: `Bearer ${accessToken}`
}
}).then(req => {
return req.data
})
},
getPosts () {
return this.execute('get', '/posts')
},
getPost (id) {
return this.execute('get', `/posts/${id}`)
},
createPost (data) {
return this.execute('post', '/posts', data)
},
updatePost (id, data) {
return this.execute('put', `/posts/${id}`, data)
},
deletePost (id) {
return this.execute('delete', `/posts/${id}`)
}
}
When you authenticate with OIDC, an access token is persisted locally in the browser. Since each API request must have an access token, you can fetch it from the authentication client and set it in the request.
当您使用OIDC进行身份验证时,访问令牌将在浏览器中本地保留。 由于每个API请求都必须具有访问令牌,因此您可以从身份验证客户端获取它,并将其设置在请求中。
let accessToken = await Vue.prototype.$auth.getAccessToken()
return client({
method,
url: resource,
data,
headers: {
Authorization: `Bearer ${accessToken}`
}
})
By creating the following proxy methods inside your API helper, the code outside the helper module remains clean and semantic.
通过在API帮助器中创建以下代理方法,帮助器模块外部的代码将保持清晰和语义。
getPosts () {
return this.execute('get', '/posts')
},
getPost (id) {
return this.execute('get', `/posts/${id}`)
},
createPost (data) {
return this.execute('post', '/posts', data)
},
updatePost (id, data) {
return this.execute('put', `/posts/${id}`, data)
},
deletePost (id) {
return this.execute('delete', `/posts/${id}`)
}
You now have all the components required to wire up your posts manager component to make CRUD operations via the REST API. Open ./src/components/PostsManager.vue and copy/paste the following code.
现在,您具有连接帖子管理器组件以通过REST API进行CRUD操作所需的所有组件。 打开./src/components/PostsManager.vue并复制/粘贴以下代码。
<template>
<div class="container-fluid mt-4">
<h1 class="h1">Posts Manager</h1>
<b-alert :show="loading" variant="info">Loading...</b-alert>
<b-row>
<b-col>
<table class="table table-striped">
<thead>
<tr>
<th>ID</th>
<th>Title</th>
<th>Updated At</th>
<th> </th>
</tr>
</thead>
<tbody>
<tr v-for="post in posts" :key="post.id">
<td>{{ post.id }}</td>
<td>{{ post.title }}</td>
<td>{{ post.updatedAt }}</td>
<td class="text-right">
<a href="#" @click.prevent="populatePostToEdit(post)">Edit</a> -
<a href="#" @click.prevent="deletePost(post.id)">Delete</a>
</td>
</tr>
</tbody>
</table>
</b-col>
<b-col lg="3">
<b-card :title="(model.id ? 'Edit Post ID#' + model.id : 'New Post')">
<form @submit.prevent="savePost">
<b-form-group label="Title">
<b-form-input type="text" v-model="model.title"></b-form-input>
</b-form-group>
<b-form-group label="Body">
<b-form-textarea rows="4" v-model="model.body"></b-form-textarea>
</b-form-group>
<div>
<b-btn type="submit" variant="success">Save Post</b-btn>
</div>
</form>
</b-card>
</b-col>
</b-row>
</div>
</template>
<script>
import api from '@/api'
export default {
data () {
return {
loading: false,
posts: [],
model: {}
}
},
async created () {
this.refreshPosts()
},
methods: {
async refreshPosts () {
this.loading = true
this.posts = await api.getPosts()
this.loading = false
},
async populatePostToEdit (post) {
this.model = Object.assign({}, post)
},
async savePost () {
if (this.model.id) {
await api.updatePost(this.model.id, this.model)
} else {
await api.createPost(this.model)
}
this.model = {} // reset form
await this.refreshPosts()
},
async deletePost (id) {
if (confirm('Are you sure you want to delete this post?')) {
// if we are editing a post we deleted, remove it from the form
if (this.model.id === id) {
this.model = {}
}
await api.deletePost(id)
await this.refreshPosts()
}
}
}
}
</script>上市帖子 (Listing Posts)
You’ll use api.getPosts() to fetch posts from your REST API server. You should refresh the list of posts when the component is loaded and after any mutating operation (create, update, or delete).
您将使用api.getPosts()从REST API服务器中获取帖子。 加载组件时以及任何更改操作(创建,更新或删除)之后,您应该刷新帖子列表。
async refreshPosts () {
this.loading = true
this.posts = await api.getPosts()
this.loading = false
}The attribute this.loading is toggled so the UI can reflect the pending API call. You might not see the loading message since the API request is not going out to the internet.
切换this.loading属性,以便UI可以反映未决的API调用。 您可能看不到加载消息,因为API请求没有发送到互联网。
创建帖子 (Creating Posts)
A form is included in the component to save a post. It’s wired up to call savePosts() when the form is submitted and its inputs are bound to the model object on the component.
组件中包含一个表格来保存帖子。 提交表单并将表单的输入绑定到组件上的model对象时,它会连接调用savePosts() 。
When savePost() is called, it will perform either an update or create based on the existence of model.id. This is mostly a shortcut to not have to define two separate forms for creating and updating.
调用savePost() ,它将基于model.id的存在执行更新或创建。 这通常是一种快捷方式,不必定义两个单独的表单即可进行创建和更新。
async savePost () {
if (this.model.id) {
await api.updatePost(this.model.id, this.model)
} else {
await api.createPost(this.model)
}
this.model = {} // reset form
await this.refreshPosts()
}更新帖子 (Updating Posts)
When updating a post, you first must load the post into the form. This sets model.id which will the trigger an update in savePost().
更新帖子时,首先必须将帖子加载到表单中。 这将设置model.id ,它将触发savePost()的更新。
async populatePostToEdit (post) {
this.model = Object.assign({}, post)
}
Important: The Object.assign() call copies the value of the post argument rather than the reference. When dealing with mutation of objects in Vue, you should always set to the value, not reference.
重要提示: Object.assign()调用复制post参数而不是引用的值。 在Vue中处理对象变异时,应始终将其设置为值,而不是引用。
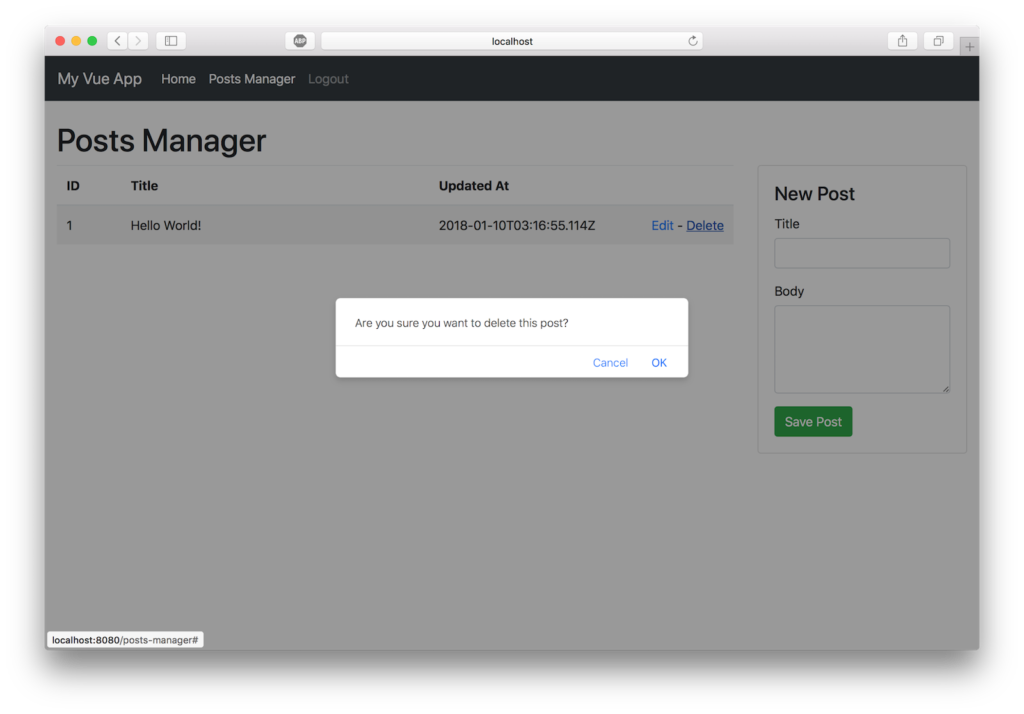
删除帖子 (Deleting Posts)
To delete a post simply call api.deletePost(id). It’s always good to confirm before delete so let’s throw in a native confirmation alert box to make sure the click was intentional.
要删除帖子,只需调用api.deletePost(id) 。 在删除之前进行确认始终是一件好事,因此让我们在本机确认警报框中添加以确保单击是有意的。
async deletePost (id) {
if (confirm('Are you sure you want to delete this post?')) {
await api.deletePost(id)
await this.refreshPosts()
}
}
测试您的Vue.js + Node CRUD应用 (Test Your Vue.js + Node CRUD App)
Make sure both the server and frontend are running.
确保服务器和前端都在运行。
Terminal #1
1号航站楼
node ./src/serverTerminal #2
2号航站楼
npm run devNavigate to http://localhost:8080 and give it a whirl.
导航到http://localhost:8080并进行旋转。

用Vue做更多事! (Do More With Vue!)
As I said at the top of this post, I think Vue stands head and shoulders above other frameworks. Here are five quick reasons why:
正如我在这篇文章的开头所说,我认为Vue领先于其他框架。 以下是五个快速原因:
Simple component lifecycle
简单的组件生命周期
HTML-based templating and native two-way binding
基于HTML的模板和本机双向绑定
Widely agreed upon ways to handle routing, state management, webpack configuration, and isomorphic web apps
广泛同意处理路由 , 状态管理 , Webpack配置和同构Web应用程序的方法
Massive community supported resources, components, libraries, and projects
大量社区支持的资源,组件,库和项目
Vue feels very similar to React (without the JSX!) which lowers the barrier to entry for those with React experience. Moving between React and Vue isn’t very difficult.
Vue与React (没有JSX!)非常相似,它降低了具有React经验的人员的进入门槛。 在React和Vue之间移动不是很困难。
I covered a lot of material in this tutorial but don’t feel bad if you didn’t grasp everything the first time. The more you work with these technologies, the more familiar they will become.
我在本教程中介绍了很多内容,但是如果您第一次不掌握所有内容,也不会感到难过。 您使用这些技术的次数越多,他们就会变得越熟悉。
To learn more about Vue.js head over to https://vuejs.org or check out these other great resources from the @oktadev team:
要了解有关Vue.js的更多信息,请转到https://vuejs.org或从@oktadev团队中查看以下其他重要资源:
The Ultimate Guide to Progressive Web Applications
渐进式Web应用程序终极指南
The Lazy Developer’s Guide to Authentication with Vue.js
懒惰的Vue.js开发人员认证指南
Build a Cryptocurrency Comparison Site with Vue.js
使用Vue.js构建一个加密货币比较网站
You can find the source code for the application developed in this post at https://github.com/oktadeveloper/okta-vue-node-example.
您可以在https://github.com/oktadeveloper/okta-vue-node-example上找到本文中开发的应用程序的源代码。
As always, follow @oktadev on Twitter to see all the cool content our dev team is creating.
与往常一样,在Twitter上关注@oktadev ,以查看我们的开发团队正在创建的所有精彩内容。
翻译自: https://www.sitepoint.com/add-authentication-vue-okta/
okta使用
如若内容造成侵权/违法违规/事实不符,请联系编程学习网邮箱:809451989@qq.com进行投诉反馈,一经查实,立即删除!
相关文章
- stack.h file_使用Filestack构建MEAN Stack File Uploader应用
stack.h file介绍 ( Introduction ) Filepicker is a web service which helps us developers smoothly handle file uploading. An amazing feature it provides is to let users to choose the source from where to upload a picture, so you can easily upload a picture f…...
2024/4/20 19:45:13 - 脏值检查
脏值检查,通过digest遍历所有的watcher,最终得到统一的数据,再更新view。脏值检查Change Detection内部的一个非常重要的阶段——digest阶段, 当系统进入此阶段时,将会进行数据检查, 它的处理流程如下:标记dirty false遍历所有通…...
2024/4/20 19:45:11 - 你所要知道的所有关于Angular的变化检测机制
原文地址:Everything you need to know about change detection in Angular 如果想像我一样全面的了解Angular的脏值检测机制,除了浏览源代码之外别无他法,网上可没有太多可用信息。大部分文章都提到,Angular中每个组件都自带一个…...
2024/4/20 19:45:11 - Angular4 组件变化检测总结 (Change Detection)
看了很多有关的文章,也认真观看了Angular2 团队放在youtube的相关演讲视频。(你懂的) Change Detection In Angular 2 我也想用自己的理解总结一下Angular2/4组件变化的原理。内容分这么几个小节: 什么操作会引发组件绑定属性变…...
2024/4/20 19:45:09 - angular1.x 脏检测
写在前面 双向绑定是angular的大亮点,然后支撑它的就是脏检测。一直对脏检测都有一些理解,却没有比较系统的概念。 以下是我阅读网上博文以及angular高级程序设计的理解与总结。 接收指导与批评。 脏检查: 将原对象赋值一份快照。在某个时间&…...
2024/4/21 4:40:30 - angular 脏检查机制
很久没有写点东西了,从今天起,在博客园对自己过往的工作,学习和生活做一些梳理,总结和温故。今天窗外的阳光不那么任性,天空白云点点,蝉鸣依旧嘹亮,安静地坐在阳台上,吹着风…...
2024/4/21 4:40:29 - Angular--变更检测策略
概述 简单来说变化检测就是Angular用来检测视图与模型之间绑定的值是否发生了改变,当检测到模型中绑定的值发生改变时,则同步到视图上,反之,当检测到视图上绑定的值发生改变时,则回调对应的绑定函数。 什么情况下会引起…...
2024/4/21 4:40:27 - 关于Angular的变更检测(Change Detection)
如果你像我一样,想对Angular的变更检测机制有一个深入的理解,由于在网上并没有多少有用的信息,你只能去看源码。大多数文章都会提到每一个组件都会有一个属于自己的变更检测器(change detector),它负责检查…...
2024/4/21 4:40:27 - Angular 4 依赖注入教程之七 ValueProvider的使用
目录 Angular 4 依赖注入教程之一 依赖注入简介Angular 4 依赖注入教程之二 组件服务注入Angular 4 依赖注入教程之三 ClassProvider的使用Angular 4 依赖注入教程之四 FactoryProvider的使用Angular 4 依赖注入教程之五 FactoryProvider配置依赖对象Angular 4 依赖注入教程之六…...
2024/4/21 4:40:28 - Angular No provider for EffectsRootModule错误消息的出现原因和修复方式
错误消息: main.ts:12 NullInjectorError: R3InjectorError(AppModule)[EffectsFeatureModule -> EffectsRootModule -> EffectsRootModule -> EffectsRootModule]: NullInjectorError: No provider for EffectsRootModule! at NullInjector.get (http://l…...
2024/4/25 9:00:06 - angular的provider服务
<!DOCTYPE html> <html><head><meta charset"UTF-8"><title>自定义服务其他的方式</title><script src"day2/src/angular.js"></script><style type"text/css"></style></head&…...
2024/4/21 4:40:23 - Angularjs前端项目环境搭建
Angularjs前端项目环境搭建 AngularJs是Google工程师研发的一款JS框架,官方文档中对它的描述是,它是完全使用JavaScript编写的客户端技术,同其他历史悠久的Web技术(HTML,CSS等)配合使用,使得Web…...
2024/4/21 4:40:22 - 前端框架AngularJS入门与实战
1、AngularJS简介 AngularJS 诞生于2009年,由Misko Hevery 等人创建,后为Google所收购。是一款优秀的前端JS框架,已经被用于Google的多款产品当中。AngularJS有着诸多特性,最为核心的是:MVC、模块化、自动化双向数据…...
2024/4/24 13:43:14 - angularjs(angular1)项目初体验
angularjs(angular1)项目初体验 我刚开始接手一个微信公众号的项目,技术栈还是angular1,之前只用过2以上版本,最近用angular1发现还是有一点坑点。坑点一:ng-if中的ng-model值无效的问题 ng-if指令也会创建一个子级作用域 因此&…...
2024/5/1 7:50:24 - Angular入门:AngularJS
前言:目前正在准备加入ITOO项目组,所以学习一下Angular,首先先从了解AngularJS开始,下面总结一下有关AngularJS的知识点。什么是 AngularJS? AngularJS 使得开发现代的单一页面应用程序(SPAs:Si…...
2024/4/24 10:30:19 - angularjs 滚动条 angular-scroll插件
超级无敌好用强推!!!! 超级无敌好用强推!!!! 超级无敌好用强推!!!! 使用缘由: 在进行网页开发时,导航栏想做…...
2024/4/21 4:40:18 - AngularJS $destroy
$destroy用于监控当前页面是否关闭; 在Controller中监听$destory事件,这个事件会在页面发生跳转的时候触发。 $scope.$on("$destroy", function() {// 关闭页面时要做的事 })...
2024/4/26 16:43:07 - 使用fileinput与angularjs上传文件
目录 目录文件准备form表单的代码angular的代码服务器端代码angular自启动函数写法 文件准备 首先必要的是引入fileinput的相关js和cs文件 <link type"text/css" rel"stylesheet" href"css/fileinput.css" /> <script src" js…...
2024/4/20 15:50:25 - angularjs2学习心得之使用第三方JS库
使用angularjs2的时候,我们难免会用到第三方的js库,而和其他框架不一样的是,angular是通过typings,类似于maven仓库一样,我的理解是这样,地址是:http://microsoft.github.io/TypeSearch/,在里面…...
2024/4/20 13:58:44 - IntelliJ IDEA安装AngularJS插件
Settings→Plugins→Install JetBrains plugins...输入an后选择AngularJS,然后点击Install进行安装按照提示重启IDEA下图为插件管理窗口,点击下方的Install JetBrains plugins...按钮输入an,即可在列表中找到AngularJS,然后点击右…...
2024/4/26 16:16:02
最新文章
- AnolisOS8.8基于yum安装mariadb并进行授权管理
1 安装并启动MariaDB # 安装 dnf -y install mariadb-server # 设置开机启动并立即启动 systemctl enable --now mariadb2 配置root用户允许远程访问 注意:本机ip地址 一定要替换成自己mariadb服务的ip mysql<<eof grant all privileges on *.* to root本机…...
2024/5/3 0:33:55 - 梯度消失和梯度爆炸的一些处理方法
在这里是记录一下梯度消失或梯度爆炸的一些处理技巧。全当学习总结了如有错误还请留言,在此感激不尽。 权重和梯度的更新公式如下: w w − η ⋅ ∇ w w w - \eta \cdot \nabla w ww−η⋅∇w 个人通俗的理解梯度消失就是网络模型在反向求导的时候出…...
2024/3/20 10:50:27 - 探索进程控制第一弹(进程终止、进程等待)
文章目录 进程创建初识fork函数fork函数返回值fork常规用法fork调用失败的原因 写时拷贝进程终止进程终止是在做什么?进程终止的情况代码跑完,结果正确/不正确代码异常终止 如何终止 进程等待概述进程等待方法wait方法waitpid 进程创建 初识fork函数 在…...
2024/5/1 13:05:31 - C++ 【原型模式】
简单介绍 原型模式是一种创建型设计模式 | 它使你能够复制已有对象,客户端不需要知道要复制的对象是哪个类的实例,只需通过原型工厂获取该对象的副本。 以后需要更改具体的类或添加新的原型类,客户端代码无需改变,只需修改原型工…...
2024/5/1 7:27:36 - 【外汇早评】美通胀数据走低,美元调整
原标题:【外汇早评】美通胀数据走低,美元调整昨日美国方面公布了新一期的核心PCE物价指数数据,同比增长1.6%,低于前值和预期值的1.7%,距离美联储的通胀目标2%继续走低,通胀压力较低,且此前美国一季度GDP初值中的消费部分下滑明显,因此市场对美联储后续更可能降息的政策…...
2024/5/1 17:30:59 - 【原油贵金属周评】原油多头拥挤,价格调整
原标题:【原油贵金属周评】原油多头拥挤,价格调整本周国际劳动节,我们喜迎四天假期,但是整个金融市场确实流动性充沛,大事频发,各个商品波动剧烈。美国方面,在本周四凌晨公布5月份的利率决议和新闻发布会,维持联邦基金利率在2.25%-2.50%不变,符合市场预期。同时美联储…...
2024/5/2 16:16:39 - 【外汇周评】靓丽非农不及疲软通胀影响
原标题:【外汇周评】靓丽非农不及疲软通胀影响在刚结束的周五,美国方面公布了新一期的非农就业数据,大幅好于前值和预期,新增就业重新回到20万以上。具体数据: 美国4月非农就业人口变动 26.3万人,预期 19万人,前值 19.6万人。 美国4月失业率 3.6%,预期 3.8%,前值 3…...
2024/4/29 2:29:43 - 【原油贵金属早评】库存继续增加,油价收跌
原标题:【原油贵金属早评】库存继续增加,油价收跌周三清晨公布美国当周API原油库存数据,上周原油库存增加281万桶至4.692亿桶,增幅超过预期的74.4万桶。且有消息人士称,沙特阿美据悉将于6月向亚洲炼油厂额外出售更多原油,印度炼油商预计将每日获得至多20万桶的额外原油供…...
2024/5/2 9:28:15 - 【外汇早评】日本央行会议纪要不改日元强势
原标题:【外汇早评】日本央行会议纪要不改日元强势近两日日元大幅走强与近期市场风险情绪上升,避险资金回流日元有关,也与前一段时间的美日贸易谈判给日本缓冲期,日本方面对汇率问题也避免继续贬值有关。虽然今日早间日本央行公布的利率会议纪要仍然是支持宽松政策,但这符…...
2024/4/27 17:58:04 - 【原油贵金属早评】欧佩克稳定市场,填补伊朗问题的影响
原标题:【原油贵金属早评】欧佩克稳定市场,填补伊朗问题的影响近日伊朗局势升温,导致市场担忧影响原油供给,油价试图反弹。此时OPEC表态稳定市场。据消息人士透露,沙特6月石油出口料将低于700万桶/日,沙特已经收到石油消费国提出的6月份扩大出口的“适度要求”,沙特将满…...
2024/4/27 14:22:49 - 【外汇早评】美欲与伊朗重谈协议
原标题:【外汇早评】美欲与伊朗重谈协议美国对伊朗的制裁遭到伊朗的抗议,昨日伊朗方面提出将部分退出伊核协议。而此行为又遭到欧洲方面对伊朗的谴责和警告,伊朗外长昨日回应称,欧洲国家履行它们的义务,伊核协议就能保证存续。据传闻伊朗的导弹已经对准了以色列和美国的航…...
2024/4/28 1:28:33 - 【原油贵金属早评】波动率飙升,市场情绪动荡
原标题:【原油贵金属早评】波动率飙升,市场情绪动荡因中美贸易谈判不安情绪影响,金融市场各资产品种出现明显的波动。随着美国与中方开启第十一轮谈判之际,美国按照既定计划向中国2000亿商品征收25%的关税,市场情绪有所平复,已经开始接受这一事实。虽然波动率-恐慌指数VI…...
2024/4/30 9:43:09 - 【原油贵金属周评】伊朗局势升温,黄金多头跃跃欲试
原标题:【原油贵金属周评】伊朗局势升温,黄金多头跃跃欲试美国和伊朗的局势继续升温,市场风险情绪上升,避险黄金有向上突破阻力的迹象。原油方面稍显平稳,近期美国和OPEC加大供给及市场需求回落的影响,伊朗局势并未推升油价走强。近期中美贸易谈判摩擦再度升级,美国对中…...
2024/4/27 17:59:30 - 【原油贵金属早评】市场情绪继续恶化,黄金上破
原标题:【原油贵金属早评】市场情绪继续恶化,黄金上破周初中国针对于美国加征关税的进行的反制措施引发市场情绪的大幅波动,人民币汇率出现大幅的贬值动能,金融市场受到非常明显的冲击。尤其是波动率起来之后,对于股市的表现尤其不安。隔夜美国股市出现明显的下行走势,这…...
2024/5/2 15:04:34 - 【外汇早评】美伊僵持,风险情绪继续升温
原标题:【外汇早评】美伊僵持,风险情绪继续升温昨日沙特两艘油轮再次发生爆炸事件,导致波斯湾局势进一步恶化,市场担忧美伊可能会出现摩擦生火,避险品种获得支撑,黄金和日元大幅走强。美指受中美贸易问题影响而在低位震荡。继5月12日,四艘商船在阿联酋领海附近的阿曼湾、…...
2024/4/28 1:34:08 - 【原油贵金属早评】贸易冲突导致需求低迷,油价弱势
原标题:【原油贵金属早评】贸易冲突导致需求低迷,油价弱势近日虽然伊朗局势升温,中东地区几起油船被袭击事件影响,但油价并未走高,而是出于调整结构中。由于市场预期局势失控的可能性较低,而中美贸易问题导致的全球经济衰退风险更大,需求会持续低迷,因此油价调整压力较…...
2024/4/26 19:03:37 - 氧生福地 玩美北湖(上)——为时光守候两千年
原标题:氧生福地 玩美北湖(上)——为时光守候两千年一次说走就走的旅行,只有一张高铁票的距离~ 所以,湖南郴州,我来了~ 从广州南站出发,一个半小时就到达郴州西站了。在动车上,同时改票的南风兄和我居然被分到了一个车厢,所以一路非常愉快地聊了过来。 挺好,最起…...
2024/4/29 20:46:55 - 氧生福地 玩美北湖(中)——永春梯田里的美与鲜
原标题:氧生福地 玩美北湖(中)——永春梯田里的美与鲜一觉醒来,因为大家太爱“美”照,在柳毅山庄去寻找龙女而错过了早餐时间。近十点,向导坏坏还是带着饥肠辘辘的我们去吃郴州最富有盛名的“鱼头粉”。说这是“十二分推荐”,到郴州必吃的美食之一。 哇塞!那个味美香甜…...
2024/4/30 22:21:04 - 氧生福地 玩美北湖(下)——奔跑吧骚年!
原标题:氧生福地 玩美北湖(下)——奔跑吧骚年!让我们红尘做伴 活得潇潇洒洒 策马奔腾共享人世繁华 对酒当歌唱出心中喜悦 轰轰烈烈把握青春年华 让我们红尘做伴 活得潇潇洒洒 策马奔腾共享人世繁华 对酒当歌唱出心中喜悦 轰轰烈烈把握青春年华 啊……啊……啊 两…...
2024/5/1 4:32:01 - 扒开伪装医用面膜,翻六倍价格宰客,小姐姐注意了!
原标题:扒开伪装医用面膜,翻六倍价格宰客,小姐姐注意了!扒开伪装医用面膜,翻六倍价格宰客!当行业里的某一品项火爆了,就会有很多商家蹭热度,装逼忽悠,最近火爆朋友圈的医用面膜,被沾上了污点,到底怎么回事呢? “比普通面膜安全、效果好!痘痘、痘印、敏感肌都能用…...
2024/4/27 23:24:42 - 「发现」铁皮石斛仙草之神奇功效用于医用面膜
原标题:「发现」铁皮石斛仙草之神奇功效用于医用面膜丽彦妆铁皮石斛医用面膜|石斛多糖无菌修护补水贴19大优势: 1、铁皮石斛:自唐宋以来,一直被列为皇室贡品,铁皮石斛生于海拔1600米的悬崖峭壁之上,繁殖力差,产量极低,所以古代仅供皇室、贵族享用 2、铁皮石斛自古民间…...
2024/4/28 5:48:52 - 丽彦妆\医用面膜\冷敷贴轻奢医学护肤引导者
原标题:丽彦妆\医用面膜\冷敷贴轻奢医学护肤引导者【公司简介】 广州华彬企业隶属香港华彬集团有限公司,专注美业21年,其旗下品牌: 「圣茵美」私密荷尔蒙抗衰,产后修复 「圣仪轩」私密荷尔蒙抗衰,产后修复 「花茵莳」私密荷尔蒙抗衰,产后修复 「丽彦妆」专注医学护…...
2024/4/30 9:42:22 - 广州械字号面膜生产厂家OEM/ODM4项须知!
原标题:广州械字号面膜生产厂家OEM/ODM4项须知!广州械字号面膜生产厂家OEM/ODM流程及注意事项解读: 械字号医用面膜,其实在我国并没有严格的定义,通常我们说的医美面膜指的应该是一种「医用敷料」,也就是说,医用面膜其实算作「医疗器械」的一种,又称「医用冷敷贴」。 …...
2024/5/2 9:07:46 - 械字号医用眼膜缓解用眼过度到底有无作用?
原标题:械字号医用眼膜缓解用眼过度到底有无作用?医用眼膜/械字号眼膜/医用冷敷眼贴 凝胶层为亲水高分子材料,含70%以上的水分。体表皮肤温度传导到本产品的凝胶层,热量被凝胶内水分子吸收,通过水分的蒸发带走大量的热量,可迅速地降低体表皮肤局部温度,减轻局部皮肤的灼…...
2024/4/30 9:42:49 - 配置失败还原请勿关闭计算机,电脑开机屏幕上面显示,配置失败还原更改 请勿关闭计算机 开不了机 这个问题怎么办...
解析如下:1、长按电脑电源键直至关机,然后再按一次电源健重启电脑,按F8健进入安全模式2、安全模式下进入Windows系统桌面后,按住“winR”打开运行窗口,输入“services.msc”打开服务设置3、在服务界面,选中…...
2022/11/19 21:17:18 - 错误使用 reshape要执行 RESHAPE,请勿更改元素数目。
%读入6幅图像(每一幅图像的大小是564*564) f1 imread(WashingtonDC_Band1_564.tif); subplot(3,2,1),imshow(f1); f2 imread(WashingtonDC_Band2_564.tif); subplot(3,2,2),imshow(f2); f3 imread(WashingtonDC_Band3_564.tif); subplot(3,2,3),imsho…...
2022/11/19 21:17:16 - 配置 已完成 请勿关闭计算机,win7系统关机提示“配置Windows Update已完成30%请勿关闭计算机...
win7系统关机提示“配置Windows Update已完成30%请勿关闭计算机”问题的解决方法在win7系统关机时如果有升级系统的或者其他需要会直接进入一个 等待界面,在等待界面中我们需要等待操作结束才能关机,虽然这比较麻烦,但是对系统进行配置和升级…...
2022/11/19 21:17:15 - 台式电脑显示配置100%请勿关闭计算机,“准备配置windows 请勿关闭计算机”的解决方法...
有不少用户在重装Win7系统或更新系统后会遇到“准备配置windows,请勿关闭计算机”的提示,要过很久才能进入系统,有的用户甚至几个小时也无法进入,下面就教大家这个问题的解决方法。第一种方法:我们首先在左下角的“开始…...
2022/11/19 21:17:14 - win7 正在配置 请勿关闭计算机,怎么办Win7开机显示正在配置Windows Update请勿关机...
置信有很多用户都跟小编一样遇到过这样的问题,电脑时发现开机屏幕显现“正在配置Windows Update,请勿关机”(如下图所示),而且还需求等大约5分钟才干进入系统。这是怎样回事呢?一切都是正常操作的,为什么开时机呈现“正…...
2022/11/19 21:17:13 - 准备配置windows 请勿关闭计算机 蓝屏,Win7开机总是出现提示“配置Windows请勿关机”...
Win7系统开机启动时总是出现“配置Windows请勿关机”的提示,没过几秒后电脑自动重启,每次开机都这样无法进入系统,此时碰到这种现象的用户就可以使用以下5种方法解决问题。方法一:开机按下F8,在出现的Windows高级启动选…...
2022/11/19 21:17:12 - 准备windows请勿关闭计算机要多久,windows10系统提示正在准备windows请勿关闭计算机怎么办...
有不少windows10系统用户反映说碰到这样一个情况,就是电脑提示正在准备windows请勿关闭计算机,碰到这样的问题该怎么解决呢,现在小编就给大家分享一下windows10系统提示正在准备windows请勿关闭计算机的具体第一种方法:1、2、依次…...
2022/11/19 21:17:11 - 配置 已完成 请勿关闭计算机,win7系统关机提示“配置Windows Update已完成30%请勿关闭计算机”的解决方法...
今天和大家分享一下win7系统重装了Win7旗舰版系统后,每次关机的时候桌面上都会显示一个“配置Windows Update的界面,提示请勿关闭计算机”,每次停留好几分钟才能正常关机,导致什么情况引起的呢?出现配置Windows Update…...
2022/11/19 21:17:10 - 电脑桌面一直是清理请关闭计算机,windows7一直卡在清理 请勿关闭计算机-win7清理请勿关机,win7配置更新35%不动...
只能是等着,别无他法。说是卡着如果你看硬盘灯应该在读写。如果从 Win 10 无法正常回滚,只能是考虑备份数据后重装系统了。解决来方案一:管理员运行cmd:net stop WuAuServcd %windir%ren SoftwareDistribution SDoldnet start WuA…...
2022/11/19 21:17:09 - 计算机配置更新不起,电脑提示“配置Windows Update请勿关闭计算机”怎么办?
原标题:电脑提示“配置Windows Update请勿关闭计算机”怎么办?win7系统中在开机与关闭的时候总是显示“配置windows update请勿关闭计算机”相信有不少朋友都曾遇到过一次两次还能忍但经常遇到就叫人感到心烦了遇到这种问题怎么办呢?一般的方…...
2022/11/19 21:17:08 - 计算机正在配置无法关机,关机提示 windows7 正在配置windows 请勿关闭计算机 ,然后等了一晚上也没有关掉。现在电脑无法正常关机...
关机提示 windows7 正在配置windows 请勿关闭计算机 ,然后等了一晚上也没有关掉。现在电脑无法正常关机以下文字资料是由(历史新知网www.lishixinzhi.com)小编为大家搜集整理后发布的内容,让我们赶快一起来看一下吧!关机提示 windows7 正在配…...
2022/11/19 21:17:05 - 钉钉提示请勿通过开发者调试模式_钉钉请勿通过开发者调试模式是真的吗好不好用...
钉钉请勿通过开发者调试模式是真的吗好不好用 更新时间:2020-04-20 22:24:19 浏览次数:729次 区域: 南阳 > 卧龙 列举网提醒您:为保障您的权益,请不要提前支付任何费用! 虚拟位置外设器!!轨迹模拟&虚拟位置外设神器 专业用于:钉钉,外勤365,红圈通,企业微信和…...
2022/11/19 21:17:05 - 配置失败还原请勿关闭计算机怎么办,win7系统出现“配置windows update失败 还原更改 请勿关闭计算机”,长时间没反应,无法进入系统的解决方案...
前几天班里有位学生电脑(windows 7系统)出问题了,具体表现是开机时一直停留在“配置windows update失败 还原更改 请勿关闭计算机”这个界面,长时间没反应,无法进入系统。这个问题原来帮其他同学也解决过,网上搜了不少资料&#x…...
2022/11/19 21:17:04 - 一个电脑无法关闭计算机你应该怎么办,电脑显示“清理请勿关闭计算机”怎么办?...
本文为你提供了3个有效解决电脑显示“清理请勿关闭计算机”问题的方法,并在最后教给你1种保护系统安全的好方法,一起来看看!电脑出现“清理请勿关闭计算机”在Windows 7(SP1)和Windows Server 2008 R2 SP1中,添加了1个新功能在“磁…...
2022/11/19 21:17:03 - 请勿关闭计算机还原更改要多久,电脑显示:配置windows更新失败,正在还原更改,请勿关闭计算机怎么办...
许多用户在长期不使用电脑的时候,开启电脑发现电脑显示:配置windows更新失败,正在还原更改,请勿关闭计算机。。.这要怎么办呢?下面小编就带着大家一起看看吧!如果能够正常进入系统,建议您暂时移…...
2022/11/19 21:17:02 - 还原更改请勿关闭计算机 要多久,配置windows update失败 还原更改 请勿关闭计算机,电脑开机后一直显示以...
配置windows update失败 还原更改 请勿关闭计算机,电脑开机后一直显示以以下文字资料是由(历史新知网www.lishixinzhi.com)小编为大家搜集整理后发布的内容,让我们赶快一起来看一下吧!配置windows update失败 还原更改 请勿关闭计算机&#x…...
2022/11/19 21:17:01 - 电脑配置中请勿关闭计算机怎么办,准备配置windows请勿关闭计算机一直显示怎么办【图解】...
不知道大家有没有遇到过这样的一个问题,就是我们的win7系统在关机的时候,总是喜欢显示“准备配置windows,请勿关机”这样的一个页面,没有什么大碍,但是如果一直等着的话就要两个小时甚至更久都关不了机,非常…...
2022/11/19 21:17:00 - 正在准备配置请勿关闭计算机,正在准备配置windows请勿关闭计算机时间长了解决教程...
当电脑出现正在准备配置windows请勿关闭计算机时,一般是您正对windows进行升级,但是这个要是长时间没有反应,我们不能再傻等下去了。可能是电脑出了别的问题了,来看看教程的说法。正在准备配置windows请勿关闭计算机时间长了方法一…...
2022/11/19 21:16:59 - 配置失败还原请勿关闭计算机,配置Windows Update失败,还原更改请勿关闭计算机...
我们使用电脑的过程中有时会遇到这种情况,当我们打开电脑之后,发现一直停留在一个界面:“配置Windows Update失败,还原更改请勿关闭计算机”,等了许久还是无法进入系统。如果我们遇到此类问题应该如何解决呢࿰…...
2022/11/19 21:16:58 - 如何在iPhone上关闭“请勿打扰”
Apple’s “Do Not Disturb While Driving” is a potentially lifesaving iPhone feature, but it doesn’t always turn on automatically at the appropriate time. For example, you might be a passenger in a moving car, but your iPhone may think you’re the one dri…...
2022/11/19 21:16:57