人脸检测:Viola-Jones
这篇论文是2001年投稿、2004年发表的,作者是Paul Viola和Michael J. Jones。有趣的是当年的论文需要两年的审议时间,而如今两个月前的论文就可能过时了,时代在变化。
这篇论文实现了实时的人脸检测算法,是人脸检测这一问题最重要的论文之一,现在的OpenCV中人脸检测的方法就是基于这一论文。
概述
目标检测任务框架中有三个问题:1、如何选择待检测区域;2、如何提取目标特征;3、如何判断是不是指定目标。针对这三个问题,Viola-Jones给出的答案是:滑动窗口法,Haar-like特征和Cascading AdaBoost分类器。
人脸检测
滑动窗口法
使用矩形框,依次滑动遍历整个图像,然后不断增加矩形框的大小,继续遍历。这样便可以检测出不同大小的人脸区域,缺点是检测的矩形框会有很多,影响速度。
Haar特征
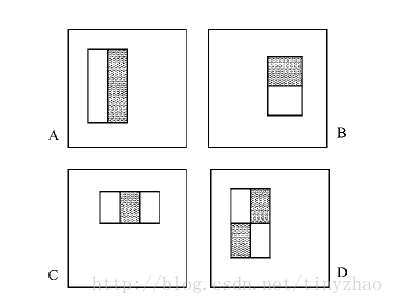
Haar特征就是两个矩形区域像素值和相减。如上图所示,就是拿黑色区域的像素值和减去白色区域像素值的和。这样的矩形窗选择有很多种,最后得到的Haar特征非常的大,24*24的区域可以得到160000维特征。
积分图
在Haar特征的计算中,主要就是求和并相减。如果每个窗口都这样做,非常影响速度,其中的很多求和操作都是重复的。作者使用了积分图加快求Haar特征这一操作。
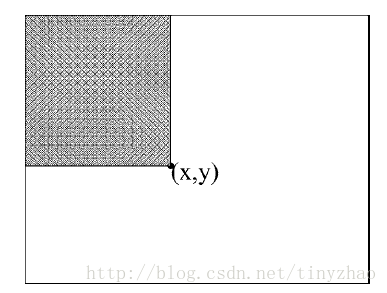
(x,y)处积分图的值就是该点左上角所有像素值的和。
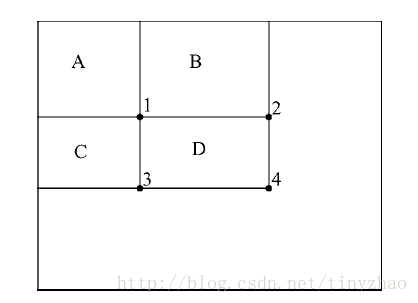
当计算区域D的像素和时,只需要使用4+1-(2+3)即可,这样就避免了多次的求和计算。
级联Adaboost
AdaBoost
得到特征以后,如何判断是不是人脸呢?这时候使用AdaBoost作为人脸的分类器。AdaBoost是一种用于分类的机器学习方法,它使用多个弱分类器组合形成一个强分类器,这部分具体内容可以看看维基百科或者李航的《统计学习方法》。 使用AdaBoost的意义在于:从大量的潜在的候选特征集合中选出少量的关键视觉特征。Haar特征维数庞大,必须借助AdaBoost选取其中最关键的一些特征。
级联
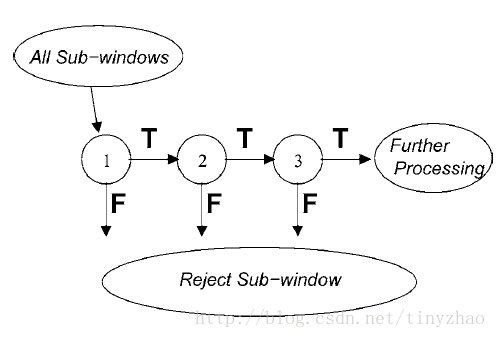
作者使用多个AdaBoost分类器进行级联来区分是否是人脸。这些分类器中,越往后越复杂,相应的计算时间也就越长。每一级的分类器都将本级分类器认为是图像的背景区域(无人脸区域)丢弃掉, 以便下一级的分类器能够将主要的计算力和精力放在更像是人脸的区域。只要前面任何一级认为该区域不是人脸,那么就停止检测的过程,检测窗口滑动到下一个矩形区域。 作者在论文中采用的分类器的个数为38个, 尽管分类器的数目很多, 但是由于采用了这种级联的结构使得检测速度得到提升。
综合起来,看段视频就清楚了:
http://weibo.com/tv/v/DnL35Ch2r?fid=1034:9fdac15750897f55067bc247c2c6c6c2
结果
这篇论文发表于2001年,在700 MHz Pentium III处理器上,384*288的图片检测时间为0.067s。
总结
这篇论文是人脸检测的重要论文之一,它标志着人脸检测问题达到实用。在OpenCV中的人脸检测就是使用了这个算法。目标检测问题框架中有三个问题:1、如何选择待检测区域;2、如何提取目标特征;3如何判断是不是指定对象。这几年流行的R-CNN方法也是这样的框架,只是对其中的一些步骤进行了优化。
<p style="letter-spacing:.5px;color:rgb(62,62,62);font-size:16px;margin-left:0em;"><span style="letter-spacing:.5px;"><span style="color:rgb(133,118,106);font-size:12.6316px;text-align:justify;"> 作者丨葛政</span><span style="color:rgb(133,118,106);font-size:12.6316px;"></span></span></p><p style="letter-spacing:0px;margin-left:0em;color:rgb(62,62,62);font-size:16px;line-height:1.5em;"><span style="color:rgb(133,118,106);font-size:12.6316px;letter-spacing:.5px;">学校丨<span style="color:rgb(133,118,106);font-size:12.6316px;letter-spacing:3px;text-align:justify;">早稻田大学硕士生</span></span></p><p style="letter-spacing:0px;margin-left:0em;color:rgb(62,62,62);font-size:16px;line-height:1.5em;"><span style="color:rgb(133,118,106);font-size:12.6316px;letter-spacing:.5px;">研究方向丨深度学习,计算机视觉</span></p><p style="letter-spacing:0px;margin-left:0em;color:rgb(62,62,62);font-size:16px;line-height:1.5em;"><span style="color:rgb(133,118,106);font-size:12.6316px;letter-spacing:.5px;"><span style="color:rgb(133,118,106);font-size:12.6316px;letter-spacing:.5px;">个人博客丨Xraft.Lab</span></span></p><p style="line-height:1.75em;"><br></p><p style="letter-spacing:.5px;font-size:16px;color:rgb(62,62,62);line-height:1.75em;text-align:justify;"><span style="color:rgb(63,63,63);font-size:15px;text-align:justify;letter-spacing:.5px;">相信做机器学习或深度学习的同学们回家总会有这样一个烦恼:<strong>亲朋好友询问你从事什么工作的时候,如何通俗地解释能避免尴尬?</strong></span></p><p style="letter-spacing:.5px;font-size:16px;color:rgb(62,62,62);line-height:1.75em;text-align:justify;"><span style="color:rgb(63,63,63);font-size:15px;text-align:justify;letter-spacing:.5px;"><br></span></p><p style="letter-spacing:.5px;font-size:16px;color:rgb(62,62,62);line-height:1.75em;text-align:justify;"><span style="color:rgb(63,63,63);font-size:15px;text-align:justify;letter-spacing:.5px;">我尝试过很多名词来形容自己的工作:机器学习,深度学习,算法工程师/研究员,搞计算机的,程序员…这些词要么自己觉得不满意,要么对方听不懂。经历无数次失败沟通,<strong>最后总结了一个简单实用的答案:“做人脸识别的”</strong>。</span></p><p style="letter-spacing:.5px;font-size:16px;color:rgb(62,62,62);line-height:1.75em;text-align:justify;"><span style="color:rgb(63,63,63);font-size:15px;text-align:justify;letter-spacing:.5px;"><br></span></p><p style="letter-spacing:.5px;font-size:16px;color:rgb(62,62,62);line-height:1.75em;text-align:justify;"><span style="color:rgb(63,63,63);font-size:15px;text-align:justify;letter-spacing:.5px;">为什么这个答案管用,因为人脸识别在深度学习相关领域的课题中属于商业落地情景多,被普及率广的一项技术,以至于谁说不出几个人脸识别应用,都有那么点落后于时代的意思。</span></p><p style="letter-spacing:.5px;font-size:16px;color:rgb(62,62,62);line-height:1.75em;text-align:justify;"><span style="color:rgb(63,63,63);font-size:15px;text-align:justify;letter-spacing:.5px;"><br></span></p><p style="letter-spacing:.5px;font-size:16px;color:rgb(62,62,62);line-height:1.75em;text-align:justify;"><span style="color:rgb(63,63,63);font-size:15px;text-align:justify;letter-spacing:.5px;">今天出这篇人脸识别,是基于我过去三个月在人脸识别方向小小的探索,希望能<strong>为非技术从业者提供人脸识别的基本概念</strong>(第一部分),以及<strong>为人脸识别爱好者和入门人员提供储备知识和实验数据参考</strong>(第二、第三部分),也欢迎专业人士提供宝贵的交流意见。 </span></p><p style="letter-spacing:.5px;font-size:16px;color:rgb(62,62,62);line-height:1.75em;text-align:justify;"><span style="color:rgb(63,63,63);font-size:15px;text-align:justify;letter-spacing:.5px;"><br></span></p><p style="letter-spacing:.5px;font-size:16px;color:rgb(62,62,62);line-height:1.75em;text-align:justify;"><strong><span style="color:rgb(63,63,63);font-size:15px;text-align:justify;letter-spacing:.5px;">本文将从接下来三个方面介绍人脸识别</span></strong><span style="color:rgb(63,63,63);font-size:15px;text-align:justify;letter-spacing:.5px;">,读者可根据自身需求选择性阅读:</span></p><p style="letter-spacing:.5px;font-size:16px;color:rgb(62,62,62);line-height:1.75em;text-align:justify;"><span style="color:rgb(63,63,63);font-size:15px;text-align:justify;letter-spacing:.5px;"><br></span></p><ul class="list-paddingleft-2" style="list-style-type:disc;"><li><p style="letter-spacing:.5px;font-size:16px;color:rgb(62,62,62);line-height:1.75em;text-align:justify;"><span style="color:rgb(63,63,63);font-size:15px;text-align:justify;letter-spacing:.5px;">Chapter 1:人脸识别是什么?怎么识别? </span></p></li><li><p style="letter-spacing:.5px;font-size:16px;color:rgb(62,62,62);line-height:1.75em;text-align:justify;"><span style="color:rgb(63,63,63);font-size:15px;text-align:justify;letter-spacing:.5px;">Chapter 2:科研领域近期进展 </span></p></li><li><p style="letter-spacing:.5px;font-size:16px;color:rgb(62,62,62);line-height:1.75em;text-align:justify;"><span style="color:rgb(63,63,63);font-size:15px;text-align:justify;letter-spacing:.5px;">Chapter 3:实验及细节</span></p></li></ul><p style="letter-spacing:.5px;font-size:16px;color:rgb(62,62,62);text-align:justify;line-height:normal;"><br></p><h1 style="font-weight:bold;color:rgb(62,62,62);line-height:1.2;border-left-color:rgb(16,142,233);font-size:20px !important;border-left-width:6px !important;border-left-style:solid !important;letter-spacing:1px !important;word-spacing:1px !important;"><a name="t0"></a><span style="letter-spacing:.5px;">Chapter 1</span></h1><p style="text-align:justify;line-height:normal;"><span style="color:rgb(51,51,51);font-size:15px;letter-spacing:.5px;text-align:justify;"><br></span></p><p style="text-align:justify;line-height:1.75em;"><strong><span style="color:rgb(51,51,51);letter-spacing:.5px;font-size:18px;">人脸识别是什么</span></strong><br></p><p style="text-align:justify;line-height:1.75em;"><span style="color:rgb(51,51,51);font-size:15px;letter-spacing:.5px;text-align:justify;"><br></span></p><p style="text-align:justify;line-height:1.75em;"><span style="color:rgb(51,51,51);font-size:15px;letter-spacing:.5px;text-align:justify;">人脸识别问题宏观上分为两类:1. 人脸验证(又叫人脸比对)2. 人脸识别。</span></p><p style="text-align:justify;line-height:1.75em;"><span style="color:rgb(51,51,51);font-size:15px;letter-spacing:.5px;text-align:justify;"><br></span></p><p style="text-align:justify;line-height:1.75em;"><span style="color:rgb(51,51,51);font-size:15px;letter-spacing:.5px;text-align:justify;">人脸验证做的是 1 比 1 的比对,即判断两张图片里的人是否为同一人。<strong>最常见的应用场景便是人脸解锁</strong>,终端设备(如手机)只需将用户事先注册的照片与临场采集的照片做对比,判断是否为同一人,即可完成身份验证。</span></p><p style="text-align:justify;line-height:1.75em;"><span style="color:rgb(51,51,51);font-size:15px;letter-spacing:.5px;text-align:justify;"><br></span></p><p style="text-align:justify;line-height:1.75em;"><span style="color:rgb(51,51,51);font-size:15px;letter-spacing:.5px;text-align:justify;">人脸识别做的是 1 比 N 的比对,即判断系统当前见到的人,为事先见过的众多人中的哪一个。比如<strong>疑犯追踪,小区门禁,会场签到,以及新零售概念里的客户识别</strong>。</span></p><p style="text-align:justify;line-height:1.75em;"><span style="color:rgb(51,51,51);font-size:15px;letter-spacing:.5px;"><br></span></p><p style="text-align:justify;line-height:1.75em;"><span style="color:rgb(51,51,51);font-size:15px;letter-spacing:.5px;">这些应用场景的共同特点是:人脸识别系统都事先存储了大量的不同人脸和身份信息,系统运行时需要将见到的人脸与之前存储的大量人脸做比对,找出匹配的人脸。</span></p><p style="text-align:justify;line-height:1.75em;"><span style="color:rgb(51,51,51);font-size:15px;letter-spacing:.5px;"><br></span></p><p style="text-align:justify;line-height:1.75em;"><span style="color:rgb(51,51,51);font-size:15px;letter-spacing:.5px;">两者在早期(2012年~2015年)是通过不同的算法框架来实现的,想同时拥有人脸验证和人脸识别系统,需要分开训练两个神经网络。而 2015 年 Google 的 <strong>FaceNet</strong> <span style="color:rgb(136,136,136);font-size:15px;letter-spacing:.5px;text-align:justify;">[1]</span> 论文的发表改变了这一现状,将两者统一到一个框架里。</span></p><p style="letter-spacing:.5px;text-align:justify;line-height:1.75em;"><span style="font-size:15px;color:rgb(51,51,51);letter-spacing:.5px;"><br></span></p><p style="letter-spacing:.5px;text-align:justify;line-height:1.75em;"><span style="font-size:18px;"><strong><span style="color:rgb(51,51,51);letter-spacing:.5px;">人脸识别,怎么识别</span></strong></span></p><p style="letter-spacing:.5px;text-align:justify;line-height:1.75em;"><span style="font-size:15px;color:rgb(51,51,51);letter-spacing:.5px;"><br></span></p><p style="letter-spacing:.5px;text-align:justify;line-height:1.75em;"><span style="font-size:15px;color:rgb(51,51,51);letter-spacing:.5px;">这部分只想阐明一个核心思想:<strong>不同人脸由不同特征组成</strong>。</span></p><p style="letter-spacing:.5px;text-align:justify;line-height:1.75em;"><span style="font-size:15px;color:rgb(51,51,51);letter-spacing:.5px;"><br></span></p><p style="letter-spacing:.5px;text-align:justify;line-height:1.75em;"><span style="font-size:15px;color:rgb(51,51,51);letter-spacing:.5px;">理解这个思想,首先需要引入的的是“特征”的概念。先看下面这个例子:</span></p><p style="letter-spacing:.5px;text-align:justify;line-height:1.75em;"><br></p><p style="text-align:center;"><img class="img_loading" src="https://ss.csdn.net/p?https://mmbiz.qpic.cn/mmbiz_png/VBcD02jFhgl3miacsukQl2KD81mEGzzM8sOdOWMib3YIckqZLyJZ3ueia92UQbny8YjTyXSm7b34icFIRwqcEqlWZw/640" alt="640"></p><p style="letter-spacing:.5px;text-align:justify;line-height:1.75em;"><span style="font-size:15px;color:rgb(51,51,51);letter-spacing:.5px;"><br></span></p><p style="letter-spacing:.5px;text-align:justify;line-height:1.75em;"><span style="font-size:15px;color:rgb(51,51,51);letter-spacing:.5px;">假设这 5 个特征足够形容一张人脸,那每张人脸都可表示为这 5 个特征的组合:</span></p><p style="letter-spacing:.5px;text-align:justify;line-height:1.75em;"><span style="font-size:15px;color:rgb(51,51,51);letter-spacing:.5px;"><br></span></p><p style="letter-spacing:.5px;text-align:center;line-height:1.75em;"><span style="font-size:15px;color:rgb(51,51,51);letter-spacing:.5px;"> (特征1,特征2,特征3,特征4,特征5)</span></p><p style="letter-spacing:.5px;text-align:justify;line-height:1.75em;"><span style="font-size:15px;color:rgb(51,51,51);letter-spacing:.5px;"><br></span></p><p style="letter-spacing:.5px;text-align:justify;line-height:1.75em;"><span style="font-size:15px;color:rgb(51,51,51);letter-spacing:.5px;">一位双眼皮,挺鼻梁,蓝眼睛,白皮肤,瓜子脸的欧美系小鲜肉即可用特征表示为(见表格加粗项): </span></p><p style="letter-spacing:.5px;text-align:center;line-height:1.75em;"><span style="font-size:15px;color:rgb(51,51,51);letter-spacing:.5px;"><br></span></p><p style="letter-spacing:.5px;text-align:center;line-height:1.75em;"><span style="font-size:15px;color:rgb(51,51,51);letter-spacing:.5px;">(1,1,0,1,0)</span></p><p style="letter-spacing:.5px;text-align:justify;line-height:1.75em;"><span style="font-size:15px;color:rgb(51,51,51);letter-spacing:.5px;"><br></span></p><p style="letter-spacing:.5px;text-align:justify;line-height:1.75em;"><span style="font-size:15px;color:rgb(51,51,51);letter-spacing:.5px;">那么遍历上面这张特征表格一共可以代表</span><img src="https://ss.csdn.net/p?https://mmbiz.qpic.cn/mmbiz_png/VBcD02jFhgl3miacsukQl2KD81mEGzzM8dUYPrE8v6O26EAHlATBedqCKw1A7zwmpUWfvBY55ES36CBiaTupsZDA/640" alt="640"><span style="color:rgb(51,51,51);font-size:15px;">张不同的脸。32 张脸可远远不够覆盖 70 多亿的人口。为了让不同特征组成的人脸能覆盖足够多人脸,我们需要扩充上面那张特征表。扩张特征表可以从行、列两个角度展开。 </span></p><p style="letter-spacing:.5px;text-align:justify;line-height:1.75em;"><span style="font-size:15px;color:rgb(51,51,51);letter-spacing:.5px;"><br></span></p><p style="letter-spacing:.5px;text-align:justify;line-height:1.75em;"><span style="font-size:15px;color:rgb(51,51,51);letter-spacing:.5px;">列的角度很简单,只需要增加特征数量:(特征6.脸型,特征7.两眼之间距离,特征8.嘴唇厚薄…)实际应用中通常应用 128,256,512 或者 1024 个不同特征,<strong>这么多特征从哪来</strong>,该不会人为一个一个去设计吧?这个问题在后面会解答。 </span></p><p style="letter-spacing:.5px;text-align:justify;line-height:1.75em;"><span style="font-size:15px;color:rgb(51,51,51);letter-spacing:.5px;"><br></span></p><p style="letter-spacing:.5px;text-align:justify;line-height:1.75em;"><span style="font-size:15px;color:rgb(51,51,51);letter-spacing:.5px;">从行的角度扩充也很好理解,比如“特征3”,除了值 0 代表蓝色,值 1 代表灰色,是不是可以增加一个值 2 代表黑色,值 3 代表没有头发呢?此外,除了这些离散的整数,我们也可以取连续的小数,比如特征 3 的值 0.1,代表“蓝中略微带黑”,值 0.9 代表“灰中带蓝”……</span></p><p style="letter-spacing:.5px;text-align:justify;line-height:1.75em;"><span style="font-size:15px;color:rgb(51,51,51);letter-spacing:.5px;"><br></span></p><p style="letter-spacing:.5px;text-align:justify;line-height:1.75em;"><span style="font-size:15px;color:rgb(51,51,51);letter-spacing:.5px;">经过这样的扩充,特征空间便会变得无限大。扩充后特征空间里的一张脸可能表示为: </span></p><p style="letter-spacing:.5px;text-align:justify;line-height:1.75em;"><span style="font-size:15px;color:rgb(51,51,51);letter-spacing:.5px;"><br></span></p><p style="letter-spacing:.5px;text-align:center;line-height:1.75em;"><span style="font-size:15px;color:rgb(51,51,51);letter-spacing:.5px;">(0, 1, 0.3, 0.5, 0.1, 2, 2.3, 1.75,…)</span></p><p style="letter-spacing:.5px;text-align:justify;line-height:1.75em;"><span style="font-size:15px;color:rgb(51,51,51);letter-spacing:.5px;"><br></span></p><p style="letter-spacing:.5px;text-align:justify;line-height:1.75em;"><span style="font-size:15px;color:rgb(51,51,51);letter-spacing:.5px;">之前提出的问题:<strong>用于表示人脸的大量特征从哪来?</strong>这便是深度学习(深度神经网络)发挥作用的地方。它通过在千万甚至亿级别的人脸数据库上学习训练后,会自动总结出最适合于计算机理解和区分的人脸特征。</span></p><p style="letter-spacing:.5px;text-align:justify;line-height:1.75em;"><span style="font-size:15px;color:rgb(51,51,51);letter-spacing:.5px;"><br></span></p><p style="letter-spacing:.5px;text-align:justify;line-height:1.75em;"><span style="font-size:15px;color:rgb(51,51,51);letter-spacing:.5px;">算法工程师通常需要一定的可视化手段才能知道机器到底学习到了哪些利于区分不同人的特征,当然这部分不是本节重点。 </span></p><p style="letter-spacing:.5px;text-align:justify;line-height:1.75em;"><span style="font-size:15px;color:rgb(51,51,51);letter-spacing:.5px;"><br></span></p><p style="letter-spacing:.5px;text-align:justify;line-height:1.75em;"><span style="font-size:15px;color:rgb(51,51,51);letter-spacing:.5px;">阐明了<strong>不同人脸由不同特征组成</strong>后,我们便有了足够的知识来分析人脸识别,到底怎么识别。 </span></p><p style="letter-spacing:.5px;text-align:justify;line-height:1.75em;"><span style="font-size:15px;color:rgb(51,51,51);letter-spacing:.5px;"><br></span></p><p style="letter-spacing:.5px;text-align:justify;line-height:1.75em;"><span style="font-size:15px;color:rgb(51,51,51);letter-spacing:.5px;">现在考虑最简单最理想的情况,用于区分不同人的特征只有两个:特征1和特征2。那么每一张脸都可以表示为一个坐标(特征1,特征2),即特征空间(这个例子里是二维空间)内的一个点。</span></p><p style="letter-spacing:.5px;text-align:justify;line-height:1.75em;"><span style="font-size:15px;color:rgb(51,51,51);letter-spacing:.5px;"><br></span></p><p style="letter-spacing:.5px;text-align:justify;line-height:1.75em;"><span style="font-size:15px;color:rgb(51,51,51);letter-spacing:.5px;">人脸识别基于一个默认成立的假设:<strong>同一个人在不同照片里的脸,在特征空间里非常接近</strong>。</span></p><p style="letter-spacing:.5px;text-align:justify;line-height:1.75em;"><span style="font-size:15px;color:rgb(51,51,51);letter-spacing:.5px;"><br></span></p><p style="letter-spacing:.5px;text-align:justify;line-height:1.75em;"><span style="font-size:15px;color:rgb(51,51,51);letter-spacing:.5px;">为什么这个假设默认成立,设想一下,一个棕色头发的人,在不同光照,遮挡,角度条件下,发色看起来虽然有轻微的区别,但依然与真实颜色非常接近,反应在发色的特征值上,可能是 0 到 0.1 之间的浮动。</span></p><p style="letter-spacing:.5px;text-align:justify;line-height:1.75em;"><span style="font-size:15px;color:rgb(51,51,51);letter-spacing:.5px;"><br></span></p><p style="letter-spacing:.5px;text-align:justify;line-height:1.75em;"><span style="font-size:15px;color:rgb(51,51,51);letter-spacing:.5px;">深度学习的另一任务和挑战便是在各种极端复杂的环境条件下,精确的识别各个特征。</span></p><p style="letter-spacing:.5px;text-align:justify;line-height:1.75em;"><br></p><p style="text-align:center;"><img class="img_loading" src="https://ss.csdn.net/p?https://mmbiz.qpic.cn/mmbiz_png/VBcD02jFhgl3miacsukQl2KD81mEGzzM81f5H4SkptnSaKJkfs4vXpdSRXb1NUK9cwmLOqwXXnzqEicCxKdOH2GQ/640" alt="640"></p><p style="text-align:center;"><br></p><p style="letter-spacing:.5px;text-align:justify;line-height:1.75em;"><span style="font-size:15px;color:rgb(51,51,51);letter-spacing:.5px;"></span><span style="color:rgb(51,51,51);font-size:15px;letter-spacing:.5px;text-align:justify;">上图是在熊本做大规模人脸数据集去噪演讲时用的 PPT,三张山下智久的照片经过神经网络提取出 128 维的特征后,变成了 3 个在 128 维空间中的点(红色),石原里美的特征点为绿色。</span></p><p style="letter-spacing:.5px;text-align:justify;line-height:1.75em;"><span style="color:rgb(51,51,51);font-size:15px;letter-spacing:.5px;text-align:justify;"><br></span></p><p style="letter-spacing:.5px;text-align:justify;line-height:1.75em;"><span style="color:rgb(51,51,51);font-size:15px;letter-spacing:.5px;text-align:justify;">这张 PPT 想表达同样的意思:<strong>同一人的不通照片提取出的特征,在特征空间里距离很近,不同人的脸在特征空间里相距较远</strong>。</span></p><p style="letter-spacing:.5px;text-align:justify;line-height:1.75em;"><span style="color:rgb(51,51,51);font-size:15px;letter-spacing:.5px;text-align:justify;"><br></span></p><p style="letter-spacing:.5px;text-align:justify;line-height:1.75em;"><span style="color:rgb(51,51,51);font-size:15px;letter-spacing:.5px;text-align:justify;">再来考虑人脸识别领域的两个问题:<strong>人脸验证</strong>和<strong>人脸识别</strong>。</span></p><p style="letter-spacing:.5px;text-align:justify;line-height:1.75em;"><span style="color:rgb(51,51,51);font-size:15px;letter-spacing:.5px;text-align:justify;"><br></span></p><p style="letter-spacing:.5px;text-align:justify;line-height:1.75em;"><span style="font-size:18px;"><strong><span style="color:rgb(51,51,51);letter-spacing:.5px;text-align:justify;">人脸验证</span></strong></span></p><p style="letter-spacing:.5px;text-align:justify;line-height:1.75em;"><span style="color:rgb(51,51,51);font-size:15px;letter-spacing:.5px;text-align:justify;"><br></span></p><p style="letter-spacing:.5px;text-align:justify;line-height:1.75em;"><span style="color:rgb(51,51,51);font-size:15px;letter-spacing:.5px;text-align:justify;">比如 FaceID 人脸解锁,iPhone 事先存了一张用户的照片(需要用户注册),这张照片变成了转换成了一连串特征数值(即特征空间里的一个点),用户解锁时,手机只需要对比当前采集到的脸和事先注册的脸在特征空间里的几何距离,如果距离足够近,则判断为同一人,如果距离不够近,则解锁失败。距离阈值的设定,则是算法工程师通过大量实验得到的。</span></p><p style="letter-spacing:.5px;text-align:justify;line-height:1.75em;"><span style="color:rgb(51,51,51);font-size:15px;letter-spacing:.5px;text-align:justify;"><br></span></p><p style="letter-spacing:.5px;text-align:justify;line-height:1.75em;"><span style="font-size:18px;"><strong><span style="color:rgb(51,51,51);letter-spacing:.5px;text-align:justify;">人脸识别</span></strong></span></p><p style="letter-spacing:.5px;text-align:justify;line-height:1.75em;"><span style="color:rgb(51,51,51);font-size:15px;letter-spacing:.5px;text-align:justify;"><br></span></p><p style="letter-spacing:.5px;text-align:justify;line-height:1.75em;"><span style="color:rgb(51,51,51);font-size:15px;letter-spacing:.5px;text-align:justify;">同样考虑一个场景,人脸考勤。公司 X 有员工 A,B,C,公司会要求三名员工在入职的时候各提供一张个人照片用于注册在公司系统里,静静地躺在特征空间中。</span></p><p style="letter-spacing:.5px;text-align:justify;line-height:1.75em;"><span style="color:rgb(51,51,51);font-size:15px;letter-spacing:.5px;text-align:justify;"><br></span></p><p style="letter-spacing:.5px;text-align:justify;line-height:1.75em;"><span style="color:rgb(51,51,51);font-size:15px;letter-spacing:.5px;text-align:justify;">第二天早上员工 A 上班打卡时,将脸对准考勤机器,系统会把当前员工 A 的脸放到特征空间里,与之前特征空间里注册好的脸一一对比,发现注册的脸中距离当前采集到的脸最近的特征脸是员工 A,打卡完毕。</span></p><p style="letter-spacing:.5px;text-align:justify;line-height:1.75em;"><span style="color:rgb(51,51,51);font-size:15px;letter-spacing:.5px;text-align:justify;"><br></span></p><p style="letter-spacing:.5px;text-align:justify;line-height:1.75em;"><span style="color:rgb(51,51,51);font-size:15px;letter-spacing:.5px;text-align:justify;">知道了人脸识别的基本原理,便能看清它的技术局限。下图展示了一些容易识别失败的案例:</span></p><p style="letter-spacing:.5px;text-align:justify;line-height:1.75em;"><br></p><p style="text-align:center;"><img class="img_loading" src="https://ss.csdn.net/p?https://mmbiz.qpic.cn/mmbiz_png/VBcD02jFhgl3miacsukQl2KD81mEGzzM8ryOkWoL0n6BT4f1CkFrTLg4k3QCJcuQBVJplhicRic7dOBiasI93gPrLg/640" alt="640"></p><p style="text-align:center;"><br></p><p style="text-align:justify;"><span style="color:rgb(51,51,51);font-size:15px;letter-spacing:.5px;text-align:justify;">在光照较差,遮挡,形变(大笑),侧脸等诸多条件下,神经网络很难提取出与“标准脸”相似的特征,<strong>异常脸在特征空间里落到错误的位置,导致识别和验证失败</strong>。这是现代人脸识别系统的局限,一定程度上也是深度学习(深度神经网络)的局限。</span></p><p style="text-align:justify;"><span style="color:rgb(51,51,51);font-size:15px;letter-spacing:.5px;text-align:justify;"><br></span></p><p style="text-align:justify;"><span style="color:rgb(51,51,51);font-size:15px;letter-spacing:.5px;text-align:justify;">面对这种局限,<strong>通常采取三种应对措施,使人脸识别系统能正常运作</strong>:</span></p><p style="text-align:justify;"><span style="color:rgb(51,51,51);font-size:15px;letter-spacing:.5px;text-align:justify;"><br></span></p><p style="text-align:justify;"><strong><span style="color:rgb(51,51,51);font-size:15px;letter-spacing:.5px;text-align:justify;">1. 工程角度</span></strong><span style="color:rgb(51,51,51);font-size:15px;letter-spacing:.5px;text-align:justify;">:</span><span style="color:rgb(51,51,51);font-size:15px;letter-spacing:.5px;text-align:justify;">研发质量模型,对检测到人脸质量进行评价,质量较差则不识别/检验。</span></p><p style="text-align:justify;"><span style="color:rgb(51,51,51);font-size:15px;letter-spacing:.5px;text-align:justify;"><br></span></p><p style="text-align:justify;"><strong><span style="color:rgb(51,51,51);font-size:15px;letter-spacing:.5px;text-align:justify;">2. 应用角度</span></strong><span style="color:rgb(51,51,51);font-size:15px;letter-spacing:.5px;text-align:justify;">:施加场景限制,比如刷脸解锁,人脸闸机,会场签到时,都要求用户在良好的光照条件下正对摄像头,以避免采集到质量差的图片。</span></p><p style="text-align:justify;"><span style="color:rgb(51,51,51);font-size:15px;letter-spacing:.5px;text-align:justify;"><br></span></p><p style="text-align:justify;"><strong><span style="color:rgb(51,51,51);font-size:15px;letter-spacing:.5px;text-align:justify;">3. 算法角度</span></strong><span style="color:rgb(51,51,51);font-size:15px;letter-spacing:.5px;text-align:justify;">:提升人脸识别模型性能,在训练数据里添加更多复杂场景和质量的照片,以增强模型的抗干扰能力。</span></p><p style="text-align:justify;"><span style="color:rgb(51,51,51);font-size:15px;letter-spacing:.5px;text-align:justify;"><br></span></p><p style="text-align:justify;"><span style="color:rgb(51,51,51);font-size:15px;letter-spacing:.5px;text-align:justify;">总而言之,人脸识别/深度学习还远未达到人们想象的那般智能。希望各位读者看完第一节后,有能力分辨社交网络,自媒体上的信息真伪,更理性的看待人工智能,给它时间和包容,慢慢成长。</span></p><h1 style="font-weight:bold;color:rgb(62,62,62);line-height:1.2;border-left-color:rgb(16,142,233);font-size:20px !important;border-left-width:6px !important;border-left-style:solid !important;letter-spacing:1px !important;word-spacing:1px !important;text-align:left;"><a name="t1"></a><span style="letter-spacing:.5px;">Chapter 2</span></h1><p style="margin-left:0em;letter-spacing:.5px;text-align:justify;line-height:normal;"><span style="color:rgb(63,63,63);font-size:15px;letter-spacing:.5px;"><br></span></p><p style="margin-left:0em;letter-spacing:.5px;text-align:justify;line-height:1.75em;"><span style="color:rgb(63,63,63);font-size:15px;letter-spacing:.5px;"> 这部分将从两个思路跟进现代人脸识别算法: </span></p><p style="margin-left:0em;letter-spacing:.5px;text-align:justify;line-height:1.75em;"><span style="color:rgb(63,63,63);font-size:15px;letter-spacing:.5px;"><br></span></p><p style="margin-left:0em;letter-spacing:.5px;text-align:justify;line-height:1.75em;"><strong><span style="color:rgb(63,63,63);font-size:15px;letter-spacing:.5px;">思路1</span></strong><span style="color:rgb(63,63,63);font-size:15px;letter-spacing:.5px;">:Metric Learning: Contrastive Loss, Triplet loss 及相关 sampling method。 </span></p><p style="margin-left:0em;letter-spacing:.5px;text-align:justify;line-height:1.75em;"><span style="color:rgb(63,63,63);font-size:15px;letter-spacing:.5px;"><br></span></p><p style="margin-left:0em;letter-spacing:.5px;text-align:justify;line-height:1.75em;"><strong><span style="color:rgb(63,63,63);font-size:15px;letter-spacing:.5px;">思路2</span></strong><span style="color:rgb(63,63,63);font-size:15px;letter-spacing:.5px;">:Margin Based Classification: 包含 Softmax with Center loss, Sphereface, NormFace, AM-softmax (CosFace) 和 ArcFace. </span></p><p style="margin-left:0em;letter-spacing:.5px;text-align:justify;line-height:1.75em;"><span style="color:rgb(63,63,63);font-size:15px;letter-spacing:.5px;"><br></span></p><p style="margin-left:0em;letter-spacing:.5px;text-align:justify;line-height:1.75em;"><strong><span style="color:rgb(63,63,63);font-size:15px;letter-spacing:.5px;">关键字</span></strong><span style="color:rgb(63,63,63);font-size:15px;letter-spacing:.5px;">:DeepID2, Facenet, Center loss, Triplet loss, Contrastive Loss, Sampling method, Sphereface, Additive Margin Softmax (CosFace), ArcFace. </span></p><p style="margin-left:0em;letter-spacing:.5px;text-align:justify;line-height:1.75em;"><span style="font-size:18px;"><strong><span style="color:rgb(63,63,63);letter-spacing:.5px;"><br></span></strong></span></p><p style="margin-left:0em;letter-spacing:.5px;text-align:justify;line-height:1.75em;"><span style="font-size:18px;"><strong><span style="font-size:18px;color:rgb(63,63,63);letter-spacing:.5px;">思路1:Metric Learning </span></strong></span></p><p style="margin-left:0em;letter-spacing:.5px;text-align:justify;line-height:1.75em;"><span style="color:rgb(63,63,63);font-size:15px;letter-spacing:.5px;"><br></span></p><p style="margin-left:0em;letter-spacing:.5px;text-align:justify;line-height:1.75em;"><strong><span style="color:rgb(63,63,63);font-size:15px;letter-spacing:.5px;">Contrastive Loss</span></strong><span style="color:rgb(63,63,63);font-size:15px;letter-spacing:.5px;"> </span></p><p style="margin-left:0em;letter-spacing:.5px;text-align:justify;line-height:1.75em;"><span style="color:rgb(63,63,63);font-size:15px;letter-spacing:.5px;"><br></span></p><p style="margin-left:0em;letter-spacing:.5px;text-align:justify;line-height:1.75em;"><span style="color:rgb(63,63,63);font-size:15px;letter-spacing:.5px;">基于深度学习的人脸识别领域最先应用 Metric Learning 思想之一的便是 <strong>DeepID2</strong> </span><span style="font-size:15px;letter-spacing:.5px;color:rgb(136,136,136);">[2]</span><span style="color:rgb(63,63,63);font-size:15px;letter-spacing:.5px;"> 了,同 Chapter 1 的思想,“特征”在这篇文章中被称为“DeepID Vector”。</span></p><p style="margin-left:0em;letter-spacing:.5px;text-align:justify;line-height:1.75em;"><span style="color:rgb(63,63,63);font-size:15px;letter-spacing:.5px;"><br></span></p><p style="margin-left:0em;letter-spacing:.5px;text-align:justify;line-height:1.75em;"><strong><span style="color:rgb(63,63,63);font-size:15px;letter-spacing:.5px;">DeepID2 在同一个网络同时训练 Verification 和 Classification(即有两个监督信号)</span></strong><span style="color:rgb(63,63,63);font-size:15px;letter-spacing:.5px;">。其中 Verification Loss 便在特征层引入了 Contrastive Loss。</span></p><p style="margin-left:0em;letter-spacing:.5px;text-align:justify;line-height:1.75em;"><span style="color:rgb(63,63,63);font-size:15px;letter-spacing:.5px;"><br></span></p><p style="margin-left:0em;letter-spacing:.5px;text-align:justify;line-height:1.75em;"><span style="color:rgb(63,63,63);font-size:15px;letter-spacing:.5px;">Contrastive Loss 本质上是使同一个人的照片在特征空间距离足够近,不同人在特征空间里相距足够远直到超过某个阈值 m(听起来和 Triplet Loss 很像)。</span></p><p style="margin-left:0em;letter-spacing:.5px;text-align:justify;line-height:1.75em;"><span style="color:rgb(63,63,63);font-size:15px;letter-spacing:.5px;"><br></span></p><p style="margin-left:0em;letter-spacing:.5px;text-align:justify;line-height:1.75em;"><span style="color:rgb(63,63,63);font-size:15px;letter-spacing:.5px;">基于这样的 insight,DeepID2 在训练的时候不是以一张图片为单位了,而是以 Image Pair 为单位,每次输入两张图片,为同一人则 Verification Label 为 1,不是同一人则 Label 为 -1,参数更新思路见下面公式(截自 DeepID2 论文):</span></p><p style="margin-left:0em;letter-spacing:.5px;text-align:justify;line-height:1.75em;"><br></p><p><img class="img_loading" src="https://ss.csdn.net/p?https://mmbiz.qpic.cn/mmbiz_png/VBcD02jFhgl3miacsukQl2KD81mEGzzM8qibicdvvXliaUoWOeArgKXzXesSCPzsQCC5zIU5CglLPUERD1sb87rYlA/640" alt="640"></p><p style="margin-left:0em;letter-spacing:.5px;text-align:justify;line-height:1.75em;"><span style="color:rgb(63,63,63);font-size:15px;letter-spacing:.5px;"><br></span></p><p style="margin-left:0em;letter-spacing:.5px;text-align:justify;line-height:1.75em;"><span style="color:rgb(63,63,63);font-size:15px;">DeepID2 在 14 年是人脸领域非常有影响力的工作,也掀起了在人脸领域引进 Metric Learning 的浪潮。 </span></p><p style="margin-left:0em;letter-spacing:.5px;text-align:justify;line-height:1.75em;"><span style="color:rgb(63,63,63);font-size:15px;"><br></span></p><p style="margin-left:0em;letter-spacing:.5px;text-align:justify;line-height:1.75em;"><strong><span style="color:rgb(63,63,63);font-size:15px;">Triplet Loss from FaceNet </span></strong></p><p style="margin-left:0em;letter-spacing:.5px;text-align:justify;line-height:1.75em;"><span style="color:rgb(63,63,63);font-size:15px;"><br></span></p><p style="margin-left:0em;letter-spacing:.5px;text-align:justify;line-height:1.75em;"><span style="color:rgb(63,63,63);font-size:15px;">这篇 15 年来自 Google 的 FaceNet 同样是人脸识别领域的分水岭性工作。不仅仅因为他们成功应用了 Triplet Loss 在 benchmark 上取得 state-of-art 的结果,更因为他们<strong>提出了一个绝大部分人脸问题的统一解决框架</strong>,即:识别、验证、搜索等问题都可以放到特征空间里做,需要专注解决的仅仅是如何将人脸更好的映射到特征空间。</span></p><p style="margin-left:0em;letter-spacing:.5px;text-align:justify;line-height:1.75em;"><span style="color:rgb(63,63,63);font-size:15px;"><br></span></p><p style="margin-left:0em;letter-spacing:.5px;text-align:justify;line-height:1.75em;"><span style="color:rgb(63,63,63);font-size:15px;">为此,Google 在 DeepID2 的基础上,抛弃了分类层即 Classification Loss,将 Contrastive Loss 改进为 Triplet Loss,只为了一个目的:<strong>学到更好的 feature</strong>。 </span></p><p style="margin-left:0em;letter-spacing:.5px;text-align:justify;line-height:1.75em;"><span style="color:rgb(63,63,63);font-size:15px;"><br></span></p><p style="margin-left:0em;letter-spacing:.5px;text-align:justify;line-height:1.75em;"><span style="color:rgb(63,63,63);font-size:15px;">Triplet Loss 的思想也很简单,输入不再是 Image Pair,而是三张图片(Triplet),分别为 Anchor Face,Negative Face 和 Positive Face。Anchor 与 Positive Face 为同一人,与 Negative Face 为不同人。那么 Triplet Loss 的损失即可表示为:</span><br></p><p style="margin-left:0em;letter-spacing:.5px;text-align:justify;line-height:1.75em;"><br></p><p style="text-align:center;"><img src="https://ss.csdn.net/p?https://mmbiz.qpic.cn/mmbiz_png/VBcD02jFhgl3miacsukQl2KD81mEGzzM8ibboIoNFhXFX6KB5HU2r1hFEwjXR6RODbzbyPGZcqaXN9TrA69LrXdQ/640" alt="640"></p><p style="margin-left:0em;letter-spacing:.5px;text-align:justify;line-height:1.75em;"><span style="color:rgb(63,63,63);font-size:15px;letter-spacing:.5px;"></span><br></p><p style="margin-left:0em;letter-spacing:.5px;text-align:justify;line-height:1.75em;"><span style="color:rgb(63,63,63);font-size:15px;">直观解释为:在特征空间里 Anchor 与 Positive 的距离要小于 Anchor 与 Negative 的距离超过一个 Margin Alpha。</span></p><p style="margin-left:0em;letter-spacing:.5px;text-align:justify;line-height:1.75em;"><span style="color:rgb(63,63,63);font-size:15px;"><br></span></p><p style="margin-left:0em;letter-spacing:.5px;text-align:justify;line-height:1.75em;"><span style="color:rgb(63,63,63);font-size:15px;">有了良好的人脸特征空间,人脸问题便转换成了 Chapter 1 末尾形容的那样简单直观。附上一张我制作的 Contrastive Loss 和 Triplet Loss 的 PPT:</span></p><p style="margin-left:0em;letter-spacing:.5px;text-align:justify;line-height:1.75em;"><br></p><p style="text-align:center;"><img class="img_loading" src="https://ss.csdn.net/p?https://mmbiz.qpic.cn/mmbiz_png/VBcD02jFhgl3miacsukQl2KD81mEGzzM8coKwOicia0HXYwyqic4K41D4aa4UkgnfLdlJnnLkVFXt5JhichOT3D9o0w/640" alt="640"></p><p style="margin-left:0em;letter-spacing:.5px;text-align:justify;line-height:1.75em;"><span style="color:rgb(63,63,63);font-size:15px;"><strong><br></strong></span></p><p style="margin-left:0em;letter-spacing:.5px;text-align:justify;line-height:1.75em;"><span style="font-size:18px;"><strong><span style="color:rgb(63,63,63);">Metric Learning 的问题 </span></strong></span></p><p style="margin-left:0em;letter-spacing:.5px;text-align:justify;line-height:1.75em;"><span style="color:rgb(63,63,63);font-size:15px;"><br></span></p><p style="margin-left:0em;letter-spacing:.5px;text-align:justify;line-height:1.75em;"><span style="color:rgb(63,63,63);font-size:15px;">基于 Contrastive Loss 和 Triplet Loss 的 Metric Learning 符合人的认知规律,在实际应用中也取得了不错的效果,但是它<strong>有非常致命的两个问题</strong>,使应用它们的时候犹如 pain in the ass。</span></p><p style="margin-left:0em;letter-spacing:.5px;text-align:justify;line-height:1.75em;"><span style="color:rgb(63,63,63);font-size:15px;"><br></span></p><p style="margin-left:0em;letter-spacing:.5px;text-align:justify;line-height:1.75em;"><strong><span style="color:rgb(63,63,63);font-size:15px;">1. 模型需要很很很很很很很很很很很很很很长时间才能拟合</span></strong><span style="color:rgb(63,63,63);font-size:15px;">(months mentioned in FaceNet paper),Contrastive Loss 和 Triplet Loss 的训练样本都基于 pair 或者 triplet 的,可能的样本数是 O (N2) 或者 O (N3) 的。</span></p><p style="margin-left:0em;letter-spacing:.5px;text-align:justify;line-height:1.75em;"><span style="color:rgb(63,63,63);font-size:15px;"><br></span></p><p style="margin-left:0em;letter-spacing:.5px;text-align:justify;line-height:1.75em;"><span style="color:rgb(63,63,63);font-size:15px;">当训练集很大时,基本不可能遍历到所有可能的样本(或能提供足够梯度额的样本),所以一般来说需要很长时间拟合。我在 10000 人,500,000 张左右的亚洲数据集上花了近一个月才拟合。 </span></p><p style="margin-left:0em;letter-spacing:.5px;text-align:justify;line-height:1.75em;"><span style="color:rgb(63,63,63);font-size:15px;"><br></span></p><p style="margin-left:0em;letter-spacing:.5px;text-align:justify;line-height:1.75em;"><strong><span style="color:rgb(63,63,63);font-size:15px;">2. 模型好坏很依赖训练数据的 Sample 方式</span></strong><span style="color:rgb(63,63,63);font-size:15px;">,理想的 Sample 方式不仅能提升算法最后的性能,更能略微加快训练速度。 </span></p><p style="margin-left:0em;letter-spacing:.5px;text-align:justify;line-height:1.75em;"><span style="color:rgb(63,63,63);font-size:15px;"><br></span></p><p style="margin-left:0em;letter-spacing:.5px;text-align:justify;line-height:1.75em;"><span style="color:rgb(63,63,63);font-size:15px;">关于这两个问题也有很多学者进行了后续研究,下面的内容作为 Metric Learning 的延伸阅读,不会很详细。 </span></p><p style="margin-left:0em;letter-spacing:.5px;text-align:justify;line-height:1.75em;"><span style="color:rgb(63,63,63);font-size:15px;"><br></span></p><p style="margin-left:0em;letter-spacing:.5px;text-align:justify;line-height:1.75em;"><span style="font-size:18px;"><strong><span style="color:rgb(63,63,63);">Metric Learning 延伸阅读</span></strong></span><strong><span style="color:rgb(63,63,63);font-size:15px;"> </span></strong></p><p style="margin-left:0em;letter-spacing:.5px;text-align:justify;line-height:1.75em;"><span style="color:rgb(63,63,63);font-size:15px;"><br></span></p><p style="margin-left:0em;letter-spacing:.5px;text-align:justify;line-height:1.75em;"><strong><span style="color:rgb(63,63,63);font-size:15px;">1. Deep Face Recognition </span><span style="font-size:15px;color:rgb(136,136,136);">[3]</span></strong></p><p style="margin-left:0em;letter-spacing:.5px;text-align:justify;line-height:1.75em;"><strong><span style="color:rgb(63,63,63);font-size:15px;"><br></span></strong></p><p style="margin-left:0em;letter-spacing:.5px;text-align:justify;line-height:1.75em;"><strong><span style="color:rgb(63,63,63);font-size:15px;">为了加速 Triplet Loss 的训练,这篇文章先用传统的 softmax 训练人脸识别模型</span></strong><span style="color:rgb(63,63,63);font-size:15px;">,因为 Classficiation 信号的强监督特性,模型会很快拟合(通常小于 2 天,快的话几个小时)。</span></p><p style="margin-left:0em;letter-spacing:.5px;text-align:justify;line-height:1.75em;"><span style="color:rgb(63,63,63);font-size:15px;"><br></span></p><p style="margin-left:0em;letter-spacing:.5px;text-align:justify;line-height:1.75em;"><span style="color:rgb(63,63,63);font-size:15px;">之后移除顶层的 Classificiation Layer,用 Triplet Loss 对模型进行特征层 finetune,取得了不错的效果。<strong>此外这篇论文还发布了人脸数据集 VGG-Face</strong>。 </span></p><p style="margin-left:0em;letter-spacing:.5px;text-align:justify;line-height:1.75em;"><strong><span style="color:rgb(63,63,63);font-size:15px;"><br></span></strong></p><p style="margin-left:0em;letter-spacing:.5px;text-align:justify;line-height:1.75em;"><strong><span style="color:rgb(63,63,63);font-size:15px;">2. In Defense of the Triplet Loss for Person Re-Identification </span><span style="font-size:15px;color:rgb(136,136,136);">[4]</span></strong></p><p style="margin-left:0em;letter-spacing:.5px;text-align:justify;line-height:1.75em;"><span style="color:rgb(63,63,63);font-size:15px;"><br></span></p><p style="margin-left:0em;letter-spacing:.5px;text-align:justify;line-height:1.75em;"><span style="color:rgb(63,63,63);font-size:15px;">这篇文章提出了三个非常有意思的观点:</span></p><p style="margin-left:0em;letter-spacing:.5px;text-align:justify;line-height:1.75em;"><span style="color:rgb(63,63,63);font-size:15px;"><br></span></p><ul class="list-paddingleft-2" style="list-style-type:disc;"><li><p style="margin-left:0em;letter-spacing:.5px;text-align:justify;line-height:1.75em;"><span style="color:rgb(63,63,63);font-size:15px;">作者说实验中,平方后的欧几里得距离(Squared Euclidean Distance)表现不如开方后的真实欧几里得距离(Non-squared Euclidean Distance),直白来说就是把下图公式中的平方摘掉。</span></p><p style="margin-left:0em;letter-spacing:.5px;text-align:justify;line-height:1.75em;"><br></p></li><li><p style="margin-left:0em;letter-spacing:.5px;text-align:justify;line-height:1.75em;"><span style="color:rgb(63,63,63);font-size:15px;">提出了 Soft-Margin 损失公式替代原始的 Triplet Loss 表达式。</span></p><p style="margin-left:0em;letter-spacing:.5px;text-align:justify;line-height:1.75em;"><br></p></li><li><p style="margin-left:0em;letter-spacing:.5px;text-align:justify;line-height:1.75em;"><span style="color:rgb(63,63,63);font-size:15px;"> 引进了 Batch Hard Sampling。</span><br></p></li></ul><p style="margin-left:0em;letter-spacing:.5px;text-align:justify;line-height:1.75em;"><br></p><p style="text-align:center;"><img src="https://ss.csdn.net/p?https://mmbiz.qpic.cn/mmbiz_png/VBcD02jFhgl3miacsukQl2KD81mEGzzM8hQUgpfu7P0uurSnSc8QEPsiaQMiazMcCLBldCxGeuK5JibD1iccmD1Fic7Q/640" alt="640"></p><p style="margin-left:0em;letter-spacing:.5px;text-align:justify;line-height:1.75em;"><strong><span style="color:rgb(63,63,63);font-size:15px;letter-spacing:.5px;"><br></span></strong></p><p style="margin-left:0em;letter-spacing:.5px;text-align:justify;line-height:1.75em;"><strong><span style="color:rgb(63,63,63);font-size:15px;letter-spacing:.5px;">3. Sampling Matters in Deep Embedding Learning </span></strong><span style="color:rgb(136,136,136);"><strong><span style="font-size:15px;letter-spacing:.5px;">[5]</span></strong></span></p><p style="margin-left:0em;letter-spacing:.5px;text-align:justify;line-height:1.75em;"><span style="color:rgb(63,63,63);font-size:15px;letter-spacing:.5px;"><br></span></p><p style="margin-left:0em;letter-spacing:.5px;text-align:justify;line-height:1.75em;"><span style="color:rgb(63,63,63);font-size:15px;letter-spacing:.5px;">这篇文章提出了两个有价值的点:</span></p><p style="margin-left:0em;letter-spacing:.5px;text-align:justify;line-height:1.75em;"><span style="color:rgb(63,63,63);font-size:15px;letter-spacing:.5px;"><br></span></p><ul class="list-paddingleft-2" style="list-style-type:disc;"><li><p style="margin-left:0em;letter-spacing:.5px;text-align:justify;line-height:1.75em;"><span style="color:rgb(63,63,63);font-size:15px;letter-spacing:.5px;"> 从导函数角度解释了为什么第 2 点中提到的 <span style="color:rgb(63,63,63);font-size:15px;letter-spacing:.5px;text-align:justify;">Non-squared Distance</span> 比 Squared-distance 好,并在这个 insight 基础上提出了 Margin Based Loss(本质还是 Triplet Loss 的 variant,见下图,图片取自原文)。</span></p><p style="line-height:1.75em;"><br></p></li><li><p style="margin-left:0em;letter-spacing:.5px;text-align:justify;line-height:1.75em;"><span style="color:rgb(63,63,63);font-size:15px;letter-spacing:.5px;">提出了 Distance Weighted Sampling。文章说 FaceNet 中的 Semi-hard Sampling,Deep Face Recognition</span><span style="font-size:15px;letter-spacing:.5px;color:rgb(136,136,136);"> [3]</span><span style="color:rgb(63,63,63);font-size:15px;letter-spacing:.5px;"> 中的 Random Hard 和 </span><span style="font-size:15px;letter-spacing:.5px;color:rgb(136,136,136);">[4] </span><span style="color:rgb(63,63,63);font-size:15px;letter-spacing:.5px;">中提到的 Batch Hard 都不能轻易取到会产生大梯度(大 loss,即对模型训练有帮助的 triplets),然后从统计学的视角使用了 Distance Weighted Sampling Method。</span></p></li></ul><p style="margin-left:0em;letter-spacing:.5px;text-align:justify;line-height:1.75em;"><br></p><p style="text-align:center;"><img class="img_loading" src="https://ss.csdn.net/p?https://mmbiz.qpic.cn/mmbiz_png/VBcD02jFhgl3miacsukQl2KD81mEGzzM8jVKo2wZcEr7SOhs3U4xKouWAMYGziaJN04LOq17mGbUPlH0F3GNibNxQ/640" alt="640"></p><p style="margin-left:0em;letter-spacing:.5px;text-align:justify;line-height:1.75em;"><span style="color:rgb(63,63,63);font-size:15px;letter-spacing:.5px;"> <br></span></p><p style="margin-left:0em;letter-spacing:.5px;text-align:justify;line-height:1.75em;"><strong><span style="color:rgb(63,63,63);font-size:15px;letter-spacing:.5px;">4. 我的实验感想</span></strong></p><p style="margin-left:0em;letter-spacing:.5px;text-align:justify;line-height:1.75em;"><span style="color:rgb(63,63,63);font-size:15px;letter-spacing:.5px;"><br></span></p><ul class="list-paddingleft-2" style="list-style-type:disc;"><li><p style="margin-left:0em;letter-spacing:.5px;text-align:justify;line-height:1.75em;"><span style="color:rgb(63,63,63);font-size:15px;letter-spacing:.5px;">2、3 点中提到的方式在试验中都应用过,直观感受是 Soft-Margin 和Margin Based Loss 都比原始的 Triplet Loss 好用,但是 Margin Based Loss 实验中更优越。</span></p><p style="margin-left:0em;letter-spacing:.5px;text-align:justify;line-height:1.75em;"><br></p></li><li><p style="margin-left:0em;letter-spacing:.5px;text-align:justify;line-height:1.75em;"><span style="color:rgb(63,63,63);font-size:15px;letter-spacing:.5px;">Distance Weighted Sampling Method 没有明显提升。 </span></p></li></ul><p style="margin-left:0em;letter-spacing:.5px;text-align:justify;line-height:1.75em;"><span style="color:rgb(63,63,63);font-size:15px;letter-spacing:.5px;"><br></span></p><p style="margin-left:0em;letter-spacing:.5px;text-align:justify;line-height:1.75em;"><span style="color:rgb(63,63,63);font-size:15px;letter-spacing:.5px;">延伸阅读中有提到大家感兴趣的论文,可参考 reference 查看原文。最后,值得注意的是,<strong>Triplet Loss 在行人重识别领域也取得了不错的效果</strong>,虽然很可能未来会被 Margin Based Classfication 打败。</span></p><p style="margin-left:0em;letter-spacing:.5px;text-align:justify;line-height:1.75em;"><span style="color:rgb(63,63,63);font-size:15px;letter-spacing:.5px;"><br></span></p><p style="margin-left:0em;letter-spacing:.5px;text-align:left;line-height:1.75em;"><span style="font-size:18px;"><strong><span style="color:rgb(63,63,63);">思路2:Margin Based Classification </span></strong></span></p><p style="margin-left:0em;letter-spacing:.5px;text-align:justify;line-height:1.75em;"><span style="color:rgb(63,63,63);font-size:15px;"><br></span></p><p style="margin-left:0em;letter-spacing:.5px;text-align:justify;line-height:1.75em;"><span style="color:rgb(63,63,63);font-size:15px;">顾名思义,Margin Based Classficiation 不像在 feature 层直接计算损失的 Metric Learning 那样,对 feature 加直观的强限制,而是<strong>依然把人脸识别当 classification 任务进行训练</strong>,通过对 softmax 公式的改造,间接实现了对 feature 层施加 margin 的限制,使网络最后得到的 feature 更 discriminative。</span></p><p style="margin-left:0em;letter-spacing:.5px;text-align:justify;line-height:1.75em;"><span style="color:rgb(63,63,63);font-size:15px;"><br></span></p><p style="margin-left:0em;letter-spacing:.5px;text-align:justify;line-height:1.75em;"><span style="color:rgb(63,63,63);font-size:15px;">这部分先从 <strong>Sphereface</strong></span><span style="font-size:15px;color:rgb(136,136,136);"> [6] </span><span style="color:rgb(63,63,63);font-size:15px;">说起。 </span></p><p style="margin-left:0em;letter-spacing:.5px;text-align:justify;line-height:1.75em;"><span style="color:rgb(63,63,63);font-size:15px;"><br></span></p><p style="margin-left:0em;letter-spacing:.5px;text-align:justify;line-height:1.75em;"><strong><span style="color:rgb(63,63,63);font-size:15px;">Sphereface </span></strong></p><p style="margin-left:0em;letter-spacing:.5px;text-align:justify;line-height:1.75em;"><span style="color:rgb(63,63,63);font-size:15px;"><br></span></p><p style="margin-left:0em;letter-spacing:.5px;text-align:justify;line-height:1.75em;"><span style="color:rgb(63,63,63);font-size:15px;">先跟随作者的 insight 理下思路(图截自原文):</span></p><p style="margin-left:0em;letter-spacing:.5px;text-align:justify;line-height:1.75em;"><br></p><p style="text-align:center;"><img class="img_loading" src="https://ss.csdn.net/p?https://mmbiz.qpic.cn/mmbiz_png/VBcD02jFhgl3miacsukQl2KD81mEGzzM8VMicoIiagNQGYhU0L8juniaHcRicz6z2pfJfo1whfk45vBpT0o6aT1pJsQ/640" alt="640"></p><p style="margin-left:0em;letter-spacing:.5px;text-align:justify;line-height:1.75em;"><span style="color:rgb(63,63,63);font-size:15px;"><br></span></p><p style="margin-left:0em;letter-spacing:.5px;text-align:justify;line-height:1.75em;"><span style="color:rgb(63,63,63);font-size:15px;">图 (a) 是用原始 softmax 损失函数训练出来的特征,图 (b) 是归一化的特征。不难发现在 softmax 的特征从角度上来看有 latent 分布。</span></p><p style="margin-left:0em;letter-spacing:.5px;text-align:justify;line-height:1.75em;"><span style="color:rgb(63,63,63);font-size:15px;"><br></span></p><p style="margin-left:0em;letter-spacing:.5px;text-align:justify;line-height:1.75em;"><span style="color:rgb(63,63,63);font-size:15px;">那么为何不直接去优化角度呢?<strong>如果把分类层的权重归一化</strong>,并且不考虑偏置的话,就得到了改进后的损失函数:</span><br></p><p style="margin-left:0em;letter-spacing:.5px;text-align:justify;line-height:1.75em;"><br></p><p style="text-align:center;"><img class="img_loading" src="https://ss.csdn.net/p?https://mmbiz.qpic.cn/mmbiz_png/VBcD02jFhgl3miacsukQl2KD81mEGzzM8rW2sFvLnJRARTC6sQ4diaXLWBfn89fMKf0mmPNdYj27PQicYn1dX4xmQ/640" alt="640"></p><p style="margin-left:0em;letter-spacing:.5px;text-align:justify;line-height:1.75em;"><span style="color:rgb(63,63,63);font-size:15px;"><br></span></p><p style="margin-left:0em;letter-spacing:.5px;text-align:justify;line-height:1.75em;"><span style="color:rgb(63,63,63);font-size:15px;">不难看出,对于特征 x_i,该损失函数优化的方向是使得其向该类别 y_i 中心靠近,并且远离其他的类别中心。这个目标跟人脸识别目标是一致的,最小化类内距离并且最大化类间距离。</span></p><p style="margin-left:0em;letter-spacing:.5px;text-align:justify;line-height:1.75em;"><span style="color:rgb(63,63,63);font-size:15px;"><br></span></p><p style="margin-left:0em;letter-spacing:.5px;text-align:justify;line-height:1.75em;"><span style="color:rgb(63,63,63);font-size:15px;">然而为了保证人脸比对的正确性,还要保证最大类内距离还要小于最小类间距离。上面的损失函数并不能保证这一点。所以作者引入了 margin 的思想,这跟 Triples Loss 里面引入 Margin Alpha 的思想是一致的。</span></p><p style="margin-left:0em;letter-spacing:.5px;text-align:justify;line-height:1.75em;"><span style="color:rgb(63,63,63);font-size:15px;"><br></span></p><p style="margin-left:0em;letter-spacing:.5px;text-align:justify;line-height:1.75em;"><strong><span style="color:rgb(63,63,63);font-size:15px;">那么作者是如何进一步改进上式,引入 margin 的呢?</span></strong></p><p style="margin-left:0em;letter-spacing:.5px;text-align:justify;line-height:1.75em;"><span style="color:rgb(63,63,63);font-size:15px;"><br></span></p><p style="margin-left:0em;letter-spacing:.5px;text-align:justify;line-height:1.75em;"><span style="color:rgb(63,63,63);font-size:15px;">上式红框中是样本特征与类中心的余弦值,我们的目标是缩小样本特征与类中心的角度,即增大这个值。换句话说,如果这个值越小,损失函数值越大,即我们对偏离优化目标的惩罚越大。</span></p><p style="margin-left:0em;letter-spacing:.5px;text-align:justify;line-height:1.75em;"><span style="color:rgb(63,63,63);font-size:15px;"><br></span></p><p style="margin-left:0em;letter-spacing:.5px;text-align:justify;line-height:1.75em;"><span style="color:rgb(63,63,63);font-size:15px;">也就是说,这样就能进一步的缩小类内距离和增大类间距离,达到我们的目标。基于这样的思想最终的损失函数为如下:</span></p><p style="margin-left:0em;letter-spacing:.5px;text-align:justify;line-height:1.75em;"><br></p><p style="text-align:center;"><img class="img_loading" src="https://ss.csdn.net/p?https://mmbiz.qpic.cn/mmbiz_png/VBcD02jFhgl3miacsukQl2KD81mEGzzM8fCqzuWK3w7O8hnmtBBKpg1BAJyk5vniaIzosL49xgnleGgCybkVQz7A/640" alt="640"></p><p style="margin-left:0em;letter-spacing:.5px;text-align:justify;line-height:1.75em;"><span style="color:rgb(63,63,63);font-size:15px;"><br></span></p><p style="margin-left:0em;letter-spacing:.5px;text-align:justify;line-height:1.75em;"><span style="color:rgb(63,63,63);font-size:15px;">原始的 cos(θ) 被换成了 phi(θ),phi(θ) 的最简单形式其实是 cos(mθ),之所以在原文中变得复杂,只是为了将定义域扩展到 [0,2π] 上,并保证在定义域内单调递减。</span></p><p style="margin-left:0em;letter-spacing:.5px;text-align:justify;line-height:1.75em;"><span style="color:rgb(63,63,63);font-size:15px;"><br></span></p><p style="margin-left:0em;letter-spacing:.5px;text-align:justify;line-height:1.75em;"><span style="color:rgb(63,63,63);font-size:15px;">而这个 m 便是增加的 margin 系数。当 m=1 时,phi(θ) 等于 cos(θ),当 m>1 时,phi 变小,损失变大。超参 m 控制着惩罚力度,m 越大,惩罚力度越大。</span></p><p style="margin-left:0em;letter-spacing:.5px;text-align:justify;line-height:1.75em;"><span style="color:rgb(63,63,63);font-size:15px;"><br></span></p><p style="margin-left:0em;letter-spacing:.5px;text-align:justify;line-height:1.75em;"><span style="color:rgb(63,63,63);font-size:15px;">为计算方便,m 一般设为整数。作者从数学上证明了,m>=3 就能保证最大类内距离小于最小类间距离。实现的时候使用倍角公式。</span></p><p style="margin-left:0em;letter-spacing:.5px;text-align:justify;line-height:1.75em;"><span style="color:rgb(63,63,63);font-size:15px;"><br></span></p><p style="margin-left:0em;letter-spacing:.5px;text-align:justify;line-height:1.75em;"><span style="color:rgb(63,63,63);font-size:15px;">另外:Sphereface 的训练很 tricky,关于其训练细节,这篇文章并没有提到,而是参考了作者前一篇文章 </span><span style="font-size:15px;color:rgb(136,136,136);">[10]</span><span style="color:rgb(63,63,63);font-size:15px;">。有关训练细节读者也可以去作者 Github 上去寻找,issues 里面有很多讨论。</span></p><p style="margin-left:0em;letter-spacing:.5px;text-align:justify;line-height:1.75em;"><strong><span style="color:rgb(63,63,63);font-size:15px;"><br></span></strong></p><p style="margin-left:0em;letter-spacing:.5px;text-align:justify;line-height:1.75em;"><strong><span style="color:rgb(63,63,63);font-size:15px;">Normface</span></strong></p><p style="margin-left:0em;letter-spacing:.5px;text-align:justify;line-height:1.75em;"><span style="color:rgb(63,63,63);font-size:15px;"><br></span></p><p style="margin-left:0em;letter-spacing:.5px;text-align:justify;line-height:1.75em;"><span style="color:rgb(63,63,63);font-size:15px;">Sphereface 效果很好,但是它不优美。在测试阶段,Sphereface 通过特征间的余弦值来衡量相似性,即以角度为相似性的度量。</span></p><p style="margin-left:0em;letter-spacing:.5px;text-align:justify;line-height:1.75em;"><span style="color:rgb(63,63,63);font-size:15px;"><br></span></p><p style="margin-left:0em;letter-spacing:.5px;text-align:justify;line-height:1.75em;"><span style="color:rgb(63,63,63);font-size:15px;">但在训练阶段,不知道读者有没有注意到,其实 Sphereface 的损失函数并不是在直接优化特征与类中心的角度,而是优化特征与类中心的角度在乘上一个特征的长度。</span></p><p style="margin-left:0em;letter-spacing:.5px;text-align:justify;line-height:1.75em;"><span style="color:rgb(63,63,63);font-size:15px;"><br></span></p><p style="margin-left:0em;letter-spacing:.5px;text-align:justify;line-height:1.75em;"><span style="color:rgb(63,63,63);font-size:15px;">也就是说,我在上文中关于 Sphereface 损失函数优化方向的表述是不严谨的,其实优化的方向还有一部分是去增大特征的长度去了。</span></p><p style="margin-left:0em;letter-spacing:.5px;text-align:justify;line-height:1.75em;"><span style="color:rgb(63,63,63);font-size:15px;"><br></span></p><p style="margin-left:0em;letter-spacing:.5px;text-align:justify;line-height:1.75em;"><span style="color:rgb(63,63,63);font-size:15px;">我在 MNIST 数据集上做过实验,以下图片分别为 m=1 和 m=4 时的特征可视化,注意坐标的尺度,就能验证上述观点。</span></p><p style="margin-left:0em;letter-spacing:.5px;text-align:justify;line-height:1.75em;"><br></p><p style="text-align:center;"><img class="img_loading" src="https://ss.csdn.net/p?https://mmbiz.qpic.cn/mmbiz_png/VBcD02jFhgl3miacsukQl2KD81mEGzzM8tWWDdu2hoaOiaA4GyYaSGLlSFDFsGnpyHqMPg18nm0lfAibnJaK9cSeA/640" alt="640"></p><p style="margin-left:0em;letter-spacing:.5px;text-align:justify;line-height:1.75em;"><span style="color:rgb(63,63,63);font-size:15px;"><br></span></p><p style="margin-left:0em;letter-spacing:.5px;text-align:justify;line-height:1.75em;"><span style="color:rgb(63,63,63);font-size:15px;">然而特征的长度在我们使用模型的时候是没有帮助的。这就造成了 training 跟 test 之间目标不一致,按照 Normface 作者原话说就是存在一个 gap。</span></p><p style="margin-left:0em;letter-spacing:.5px;text-align:justify;line-height:1.75em;"><span style="color:rgb(63,63,63);font-size:15px;"><br></span></p><p style="margin-left:0em;letter-spacing:.5px;text-align:justify;line-height:1.75em;"><span style="color:rgb(63,63,63);font-size:15px;">于是 Normface 的核心思想就出来了:<strong>为何在训练的时候不把特征也做归一化处理?</strong>相应的损失函数如下:</span><br></p><p style="margin-left:0em;letter-spacing:.5px;text-align:justify;line-height:1.75em;"><br></p><p style="text-align:center;"><img class="img_loading" src="https://ss.csdn.net/p?https://mmbiz.qpic.cn/mmbiz_png/VBcD02jFhgl3miacsukQl2KD81mEGzzM8Udibvns8d3UjkEf9pqoj1NP7GMMLwopaeibYDVuWsDoibjibPgNyRB5icHw/640" alt="640"></p><p style="margin-left:0em;letter-spacing:.5px;text-align:justify;line-height:1.75em;"><span style="color:rgb(63,63,63);font-size:15px;letter-spacing:.5px;text-align:justify;"><br></span></p><p style="margin-left:0em;letter-spacing:.5px;text-align:justify;line-height:1.75em;"><span style="color:rgb(63,63,63);font-size:15px;letter-spacing:.5px;text-align:justify;">其中 W 是归一化的权重,f_i 是归一化的特征,两个点积就是角度余弦值。参数 s 的引入是因为数学上的性质,保证了梯度大小的合理性,原文中有比较直观的解释,这里不是重点。</span></p><p style="margin-left:0em;letter-spacing:.5px;text-align:justify;line-height:1.75em;"><span style="color:rgb(63,63,63);font-size:15px;letter-spacing:.5px;text-align:justify;"><br></span></p><p style="margin-left:0em;letter-spacing:.5px;text-align:justify;line-height:1.75em;"><span style="color:rgb(63,63,63);font-size:15px;letter-spacing:.5px;text-align:justify;">如果没有 s 训练将无法收敛。关于 s 的设置,可以把它设为可学习的参数。但是作者更推荐把它当做超参数,其值根据分类类别多少有相应的推荐值,这部分原文 appendix 里有公式。</span></p><p style="margin-left:0em;letter-spacing:.5px;text-align:justify;line-height:1.75em;"><span style="color:rgb(63,63,63);font-size:15px;letter-spacing:.5px;text-align:justify;"><br></span></p><p style="margin-left:0em;letter-spacing:.5px;text-align:justify;line-height:1.75em;"><span style="color:rgb(63,63,63);font-size:15px;letter-spacing:.5px;text-align:justify;">文章中还有指出一点,<strong>FaceNet 中归一化特征的欧式距离,和余弦距离其实是统一的</strong>。还有关于权重与特征的归一化,这篇文章有很多有意思的探讨,有兴趣的读者建议阅读原文。</span></p><p style="margin-left:0em;letter-spacing:.5px;text-align:justify;line-height:1.75em;"><span style="color:rgb(63,63,63);font-size:15px;letter-spacing:.5px;text-align:justify;"><br></span></p><p style="margin-left:0em;letter-spacing:.5px;text-align:justify;line-height:1.75em;"><strong><span style="color:rgb(63,63,63);font-size:15px;letter-spacing:.5px;text-align:justify;">AM-softmax </span></strong><span style="color:rgb(136,136,136);"><strong><span style="font-size:15px;letter-spacing:.5px;text-align:justify;">[11]</span></strong></span><strong><span style="color:rgb(63,63,63);font-size:15px;letter-spacing:.5px;text-align:justify;"> / CosFace </span></strong><span style="color:rgb(136,136,136);"><strong><span style="font-size:15px;letter-spacing:.5px;text-align:justify;">[12]</span></strong></span></p><p style="margin-left:0em;letter-spacing:.5px;text-align:justify;line-height:1.75em;"><span style="color:rgb(63,63,63);font-size:15px;letter-spacing:.5px;text-align:justify;"><br></span></p><p style="margin-left:0em;letter-spacing:.5px;text-align:justify;line-height:1.75em;"><span style="color:rgb(63,63,63);font-size:15px;letter-spacing:.5px;text-align:justify;">这两篇文章是同一个东西。Normface 用特征归一化解决了 Sphereface 训练和测试不一致的问题。但是却没有了 margin 的意味。AM-softmax 可以说是在 Normface 的基础上引入了 margin。直接上损失函数:</span></p><p style="margin-left:0em;letter-spacing:.5px;text-align:justify;line-height:1.75em;"><br></p><p style="text-align:center;"><img class="img_loading" src="https://ss.csdn.net/p?https://mmbiz.qpic.cn/mmbiz_png/VBcD02jFhgl3miacsukQl2KD81mEGzzM89WN1icIF3MK4DsqP1pOzfVeup9OwfqAzfrZ6QAspXjNMlLEXGZllD3w/640" alt="640"></p><p style="margin-left:0em;letter-spacing:.5px;text-align:justify;line-height:1.75em;"><span style="color:rgb(63,63,63);font-size:15px;letter-spacing:.5px;text-align:justify;"><br></span></p><p style="margin-left:0em;letter-spacing:.5px;text-align:justify;line-height:1.75em;"><span style="color:rgb(63,63,63);font-size:15px;letter-spacing:.5px;text-align:justify;">其中这里的权重和特征都是归一化的。</span></p><p style="margin-left:0em;letter-spacing:.5px;text-align:justify;line-height:1.75em;"><span style="color:rgb(63,63,63);font-size:15px;letter-spacing:.5px;text-align:justify;"><br></span></p><p style="margin-left:0em;letter-spacing:.5px;text-align:justify;line-height:1.75em;"><span style="color:rgb(63,63,63);font-size:15px;letter-spacing:.5px;text-align:justify;">直观上来看,cos(θ)-m 比 cos(θ) 更小,所以损失函数值比 Normface 里的更大,因此有了 margin 的感觉。</span></p><p style="margin-left:0em;letter-spacing:.5px;text-align:justify;line-height:1.75em;"><span style="color:rgb(63,63,63);font-size:15px;letter-spacing:.5px;text-align:justify;"><br></span></p><p style="margin-left:0em;letter-spacing:.5px;text-align:justify;line-height:1.75em;"><span style="color:rgb(63,63,63);font-size:15px;letter-spacing:.5px;text-align:justify;">m 是一个超参数,控制惩罚的力度,m 越大,惩罚越强。作者推荐 m=0.35。这里引入 margin 的方式比 Sphereface 中的‘温柔’,不仅容易复现,没有很多调参的 tricks,效果也很好。</span></p><p style="margin-left:0em;letter-spacing:.5px;text-align:justify;line-height:1.75em;"><span style="color:rgb(63,63,63);font-size:15px;letter-spacing:.5px;text-align:justify;"><br></span></p><p style="margin-left:0em;letter-spacing:.5px;text-align:justify;line-height:1.75em;"><strong><span style="color:rgb(63,63,63);font-size:15px;letter-spacing:.5px;text-align:justify;">ArcFace </span><span style="font-size:15px;letter-spacing:.5px;text-align:justify;color:rgb(136,136,136);">[13]</span><span style="color:rgb(63,63,63);font-size:15px;letter-spacing:.5px;text-align:justify;"> </span></strong></p><p style="margin-left:0em;letter-spacing:.5px;text-align:justify;line-height:1.75em;"><span style="color:rgb(63,63,63);font-size:15px;letter-spacing:.5px;text-align:justify;"><br></span></p><p style="margin-left:0em;letter-spacing:.5px;text-align:justify;line-height:1.75em;"><span style="color:rgb(63,63,63);font-size:15px;letter-spacing:.5px;text-align:justify;">与 AM-softmax 相比,区别在于 Arcface 引入 margin 的方式不同,损失函数:</span></p><p style="margin-left:0em;letter-spacing:.5px;text-align:justify;line-height:1.75em;"><br></p><p style="text-align:center;"><img class="img_loading" src="https://ss.csdn.net/p?https://mmbiz.qpic.cn/mmbiz_png/VBcD02jFhgl3miacsukQl2KD81mEGzzM83kibdkau6G46Gia6MQ7ibKfFbnDT0WFV2wIdwiaa21BwBuLuSQGndFXxSA/640" alt="640"></p><p style="margin-left:0em;letter-spacing:.5px;text-align:justify;line-height:1.75em;"><span style="color:rgb(63,63,63);font-size:15px;letter-spacing:.5px;text-align:justify;"></span><br></p><p style="margin-left:0em;letter-spacing:.5px;text-align:justify;line-height:1.75em;"><span style="color:rgb(63,63,63);font-size:15px;letter-spacing:.5px;text-align:justify;">乍一看是不是和 AM-softmax一样?注意 m 是在余弦里面。文章指出基于上式优化得到的特征间的 boundary 更为优越,具有更强的几何解释。 </span></p><p style="margin-left:0em;letter-spacing:.5px;text-align:justify;line-height:1.75em;"><span style="color:rgb(63,63,63);font-size:15px;letter-spacing:.5px;text-align:justify;"><br></span></p><p style="margin-left:0em;letter-spacing:.5px;text-align:justify;line-height:1.75em;"><span style="color:rgb(63,63,63);font-size:15px;letter-spacing:.5px;text-align:justify;">然而这样引入 margin 是否会有问题?仔细想 cos(θ+m) 是否一定比 cos(θ) 小?</span></p><p style="margin-left:0em;letter-spacing:.5px;text-align:justify;line-height:1.75em;"><span style="color:rgb(63,63,63);font-size:15px;letter-spacing:.5px;text-align:justify;"><br></span></p><p style="margin-left:0em;letter-spacing:.5px;text-align:justify;line-height:1.75em;"><span style="color:rgb(63,63,63);font-size:15px;letter-spacing:.5px;text-align:justify;">最后我们用文章中的图来解释这个问题,并且也由此做一个本章 Margin-based Classification 部分的总结。</span></p><p style="margin-left:0em;letter-spacing:.5px;text-align:justify;line-height:1.75em;"><br></p><p style="margin-left:0em;letter-spacing:.5px;text-align:justify;line-height:1.75em;"><strong style="font-size:18px;letter-spacing:.5px;text-align:justify;"><span style="color:#3f3f3f;">小结</span></strong></p><p style="margin-left:0em;letter-spacing:.5px;text-align:justify;line-height:1.75em;"><strong style="font-size:18px;letter-spacing:.5px;text-align:justify;"><span style="color:#3f3f3f;"><br></span></strong></p><p style="text-align:justify;"><img class="img_loading" src="https://ss.csdn.net/p?https://mmbiz.qpic.cn/mmbiz_png/VBcD02jFhgl3miacsukQl2KD81mEGzzM8JicqP6e75T8fTcam2pf66zYOIdopv06YRuE8lbTTCbolACSBOFpNVhw/640" alt="640"></p><p style="text-align:justify;"><span style="color:rgb(63,63,63);font-size:15px;letter-spacing:.5px;text-align:justify;"><br></span></p><p style="text-align:justify;line-height:1.75em;"><span style="color:rgb(63,63,63);font-size:15px;letter-spacing:.5px;text-align:justify;">这幅图出自于 Arcface,横坐标为 θ 为特征与类中心的角度,纵坐标为损失函数分子指数部分的值(不考虑 s),其值越小损失函数越大。 </span></p><p style="text-align:justify;line-height:1.75em;"><span style="color:rgb(63,63,63);font-size:15px;letter-spacing:.5px;text-align:justify;"><br></span></p><p style="text-align:justify;line-height:1.75em;"><span style="color:rgb(63,63,63);font-size:15px;letter-spacing:.5px;text-align:justify;">看了这么多基于分类的人脸识别论文,相信你也有种感觉,大家似乎都在损失函数上做文章,或者更具体一点,大家都是在讨论如何设计上图的 Target logit-θ 曲线。</span></p><p style="text-align:justify;line-height:1.75em;"><span style="color:rgb(63,63,63);font-size:15px;letter-spacing:.5px;text-align:justify;"><br></span></p><p style="text-align:justify;line-height:1.75em;"><span style="color:rgb(63,63,63);font-size:15px;letter-spacing:.5px;text-align:justify;">这个曲线意味着你要如何优化偏离目标的样本,或者说,根据偏离目标的程度,要给予多大的惩罚。两点总结: </span></p><p style="text-align:justify;line-height:1.75em;"><span style="color:rgb(63,63,63);font-size:15px;letter-spacing:.5px;text-align:justify;"><br></span></p><p style="text-align:justify;line-height:1.75em;"><strong><span style="color:rgb(63,63,63);font-size:15px;letter-spacing:.5px;text-align:justify;">1. 太强的约束不容易泛化</span></strong><span style="color:rgb(63,63,63);font-size:15px;letter-spacing:.5px;text-align:justify;">。例如 Sphereface 的损失函数在 m=3 或 4 的时候能满足类内最大距离小于类间最小距离的要求。此时损失函数值很大,即 target logits 很小。但并不意味着能泛化到训练集以外的样本。施加太强的约束反而会降低模型性能,且训练不易收敛。 </span></p><p style="text-align:justify;line-height:1.75em;"><span style="color:rgb(63,63,63);font-size:15px;letter-spacing:.5px;text-align:justify;"><br></span></p><p style="text-align:justify;line-height:1.75em;"><strong><span style="color:rgb(63,63,63);font-size:15px;letter-spacing:.5px;text-align:justify;">2. 选择优化什么样的样本很重要</span></strong><span style="color:rgb(63,63,63);font-size:15px;letter-spacing:.5px;text-align:justify;">。Arcface 文章中指出,给予 θ∈[60° , 90°] 的样本过多惩罚可能会导致训练不收敛。优化 θ ∈ [30° , 60°] 的样本可能会提高模型准确率,而过分优化 θ∈[0° , 30°] 的样本则不会带来明显提升。至于更大角度的样本,偏离目标太远,强行优化很有可能会降低模型性能。</span></p><p style="text-align:justify;line-height:1.75em;"><span style="color:rgb(63,63,63);font-size:15px;letter-spacing:.5px;text-align:justify;"><br></span></p><p style="text-align:justify;line-height:1.75em;"><span style="color:rgb(63,63,63);font-size:15px;letter-spacing:.5px;text-align:justify;">这也回答了上一节留下的疑问,上图曲线 Arcface 后面是上升的,这无关紧要甚至还有好处。因为优化大角度的 hard sample 可能没有好处。这和 FaceNet 中对于样本选择的 semi-hard 策略是一个道理。 </span></p><p style="text-align:justify;line-height:1.75em;"><span style="font-size:18px;"><strong><span style="color:rgb(63,63,63);letter-spacing:.5px;text-align:justify;"><br></span></strong></span></p><p style="text-align:left;line-height:1.75em;"><span style="font-size:18px;"><strong><span style="font-size:18px;color:rgb(63,63,63);letter-spacing:.5px;text-align:justify;">Margin based classification 延伸阅读 </span></strong></span></p><p style="text-align:justify;line-height:1.75em;"><span style="color:rgb(63,63,63);font-size:15px;letter-spacing:.5px;text-align:justify;"><br></span></p><p style="text-align:justify;line-height:1.75em;"><strong><span style="color:rgb(63,63,63);font-size:15px;letter-spacing:.5px;text-align:justify;">1. A discriminative feature learning approach for deep face recognition </span></strong><span style="color:rgb(136,136,136);"><strong><span style="font-size:15px;letter-spacing:.5px;text-align:justify;">[14]</span></strong></span></p><p style="text-align:justify;line-height:1.75em;"><span style="color:rgb(63,63,63);font-size:15px;letter-spacing:.5px;text-align:justify;"><br></span></p><p style="text-align:justify;line-height:1.75em;"><span style="color:rgb(63,63,63);font-size:15px;letter-spacing:.5px;text-align:justify;">提出了 center loss,加权整合进原始的 softmax loss。通过维护一个欧式空间类中心,缩小类内距离,增强特征的 discriminative power。 </span></p><p style="text-align:justify;line-height:1.75em;"><span style="color:rgb(63,63,63);font-size:15px;letter-spacing:.5px;text-align:justify;"><br></span></p><p style="text-align:justify;line-height:1.75em;"><span style="color:rgb(63,63,63);font-size:15px;letter-spacing:.5px;text-align:justify;"><strong> </strong><strong>2. Large-margin softmax loss for convolutional neural networks </strong></span><span style="font-size:15px;letter-spacing:.5px;text-align:justify;color:rgb(136,136,136);"><strong>[10]</strong></span></p><p style="text-align:justify;line-height:1.75em;"><span style="color:rgb(63,63,63);font-size:15px;letter-spacing:.5px;text-align:justify;"><br></span></p><p style="text-align:justify;line-height:1.75em;"><span style="color:rgb(63,63,63);font-size:15px;letter-spacing:.5px;text-align:justify;">Sphereface 作者的前一篇文章,未归一化权重,在 softmax loss 中引入了 margin。里面也涉及到 Sphereface 的训练细节。 </span></p><p style="text-align:justify;line-height:1.75em;"><span style="color:rgb(63,63,63);font-size:15px;letter-spacing:.5px;text-align:justify;"><br></span></p><p style="text-align:justify;line-height:1.75em;"><em><span style="letter-spacing:.5px;text-align:justify;color:rgb(136,136,136);font-size:12px;">注:思路二由陈超撰写</span></em></p><p style="margin-left:0em;letter-spacing:.5px;text-align:justify;line-height:normal;"><br></p><h1 style="font-weight:bold;color:rgb(62,62,62);line-height:1.2;border-left-color:rgb(16,142,233);font-size:20px !important;border-left-width:6px !important;border-left-style:solid !important;letter-spacing:1px !important;word-spacing:1px !important;"><a name="t2"></a><span style="letter-spacing:.5px;">Chapter 3</span></h1><p style="margin-left:0em;line-height:normal;"><span style="color:rgb(136,136,136);font-size:12px;text-align:justify;letter-spacing:.5px;"><br></span></p><p style="text-align:justify;line-height:1.75em;margin-left:0em;"><span style="text-align:justify;font-size:15px;color:rgb(63,63,63);letter-spacing:.5px;">基于前两章的知识,我在 lfw 上取得了 99.47% 的结果,这个结果训练在 Vggface2 上,未与 lfw 去重,也没经历很痛苦的调参过程,算是 AM-softmax 损失函数直接带来的收益吧。</span></p><p style="text-align:justify;line-height:1.75em;margin-left:0em;"><span style="text-align:justify;font-size:15px;color:rgb(63,63,63);letter-spacing:.5px;"><br></span></p><p style="text-align:justify;line-height:1.75em;margin-left:0em;"><span style="text-align:justify;font-size:15px;color:rgb(63,63,63);letter-spacing:.5px;">过程中踩了很多坑,这一章将把前段时间的实验结果和心得做一个整理,此外也将回答绝大部分工程师在做人脸识别时最关心的一些问题。やりましょう! </span></p><p style="text-align:justify;line-height:1.75em;margin-left:0em;"><span style="text-align:justify;font-size:15px;color:rgb(63,63,63);letter-spacing:.5px;"><br></span></p><blockquote><p style="text-align:left;margin-left:0em;line-height:normal;"><span style="text-align:justify;letter-spacing:.5px;font-size:12px;color:rgb(136,136,136);">项目地址:</span></p><p style="text-align:left;margin-left:0em;line-height:normal;"><span style="text-align:justify;letter-spacing:.5px;font-size:12px;color:rgb(136,136,136);"><br></span></p><p style="text-align:left;margin-left:0em;line-height:normal;"><span style="text-align:justify;letter-spacing:.5px;font-size:12px;color:rgb(136,136,136);text-decoration:underline;">https://github.com/Joker316701882/Additive-Margin-Softmax </span></p><p style="text-align:left;margin-left:0em;line-height:normal;"><span style="text-align:justify;letter-spacing:.5px;font-size:12px;color:rgb(136,136,136);text-decoration:underline;"><br></span></p><p style="text-align:left;margin-left:0em;line-height:normal;"><span style="color:rgb(136,136,136);font-size:12px;text-align:justify;">包含代码可以复现所有实验结果 </span><br></p></blockquote><p style="text-align:justify;line-height:1.75em;margin-left:0em;"><span style="text-align:justify;font-size:15px;color:rgb(63,63,63);letter-spacing:.5px;"><br></span></p><p style="text-align:justify;line-height:1.75em;margin-left:0em;"><strong><span style="text-align:justify;font-size:15px;color:rgb(63,63,63);letter-spacing:.5px;">一个标准的人脸识别系统包含这几个环节</span></strong><span style="text-align:justify;font-size:15px;color:rgb(63,63,63);letter-spacing:.5px;">:人脸检测及特征点检测->人脸对齐->人脸识别。</span></p><p style="text-align:justify;margin-left:0em;line-height:1.75em;"><span style="text-align:justify;font-size:15px;color:rgb(63,63,63);letter-spacing:.5px;"><br></span></p><p style="text-align:justify;line-height:1.75em;margin-left:0em;"><span style="font-size:18px;"><strong><span style="text-align:justify;color:rgb(63,63,63);letter-spacing:.5px;">人脸检测 & Landmark检测</span></strong></span></p><p style="text-align:justify;line-height:1.75em;margin-left:0em;"><span style="text-align:justify;font-size:15px;color:rgb(63,63,63);letter-spacing:.5px;"><br></span></p><p style="text-align:justify;line-height:1.75em;margin-left:0em;"><span style="text-align:justify;font-size:15px;color:rgb(63,63,63);letter-spacing:.5px;">目前最流行的人脸及 Landmark 检测是 <strong>MTCNN</strong> </span><span style="text-align:justify;font-size:15px;letter-spacing:.5px;color:rgb(136,136,136);">[7]</span><span style="text-align:justify;font-size:15px;color:rgb(63,63,63);letter-spacing:.5px;">,但是 MTCNN 一方面偶尔检测不到 face,一方面 Landmark 检测不够精准。这两点都会给后续的对齐和识别带来不利影响。</span></p><p style="text-align:justify;line-height:1.75em;margin-left:0em;"><span style="text-align:justify;font-size:15px;color:rgb(63,63,63);letter-spacing:.5px;"><br></span></p><p style="text-align:justify;line-height:1.75em;margin-left:0em;"><span style="text-align:justify;font-size:15px;color:rgb(63,63,63);letter-spacing:.5px;">另外在 COCO Loss </span><span style="color:rgb(136,136,136);text-align:justify;font-size:15px;letter-spacing:.5px;">[8</span><span style="text-align:justify;font-size:15px;letter-spacing:.5px;color:rgb(136,136,136);">]</span><span style="text-align:justify;font-size:15px;color:rgb(63,63,63);letter-spacing:.5px;"> 论文里提到:好的检测和对齐方法,仅用 softmax 就能达到 99.75%,秒杀目前大多数最新论文的结果。COCO Loss 的 Github issue </span><span style="text-align:justify;font-size:15px;letter-spacing:.5px;color:rgb(136,136,136);">[16]</span><span style="text-align:justify;font-size:15px;color:rgb(63,63,63);letter-spacing:.5px;"> 里提到了更多细节。</span></p><p style="text-align:justify;line-height:1.75em;margin-left:0em;"><span style="text-align:justify;font-size:15px;color:rgb(63,63,63);letter-spacing:.5px;"><br></span></p><p style="text-align:justify;line-height:1.75em;margin-left:0em;"><span style="text-align:justify;font-size:15px;color:rgb(63,63,63);letter-spacing:.5px;">此外,因为 alignment 算法性能的区别,2017 年及以后的论文更加注重相对实验结果的比较,以排除 alignment 算法引入的优劣势,方便更直观比较各家的人脸识别算法,lfw 上轻松能达到 99% 以上也是现在更倾向于采用相对结果的原因。 </span></p><p style="text-align:justify;line-height:1.75em;margin-left:0em;"><span style="text-align:justify;font-size:15px;color:rgb(63,63,63);letter-spacing:.5px;"><br></span></p><p style="text-align:justify;line-height:1.75em;margin-left:0em;"><span style="font-size:18px;"><strong><span style="text-align:justify;color:rgb(63,63,63);letter-spacing:.5px;">人脸对齐 </span></strong></span></p><p style="text-align:justify;line-height:1.75em;margin-left:0em;"><span style="text-align:justify;font-size:15px;color:rgb(63,63,63);letter-spacing:.5px;"><br></span></p><p style="text-align:justify;line-height:1.75em;margin-left:0em;"><span style="text-align:justify;font-size:15px;color:rgb(63,63,63);letter-spacing:.5px;">人脸对齐做的是将检测到的脸和 Landmark 通过几何变换,将五官变换到图中相对固定的位置,提供较强的先验。</span></p><p style="text-align:justify;line-height:1.75em;margin-left:0em;"><span style="text-align:justify;font-size:15px;color:rgb(63,63,63);letter-spacing:.5px;"><br></span></p><p style="text-align:justify;line-height:1.75em;margin-left:0em;"><span style="text-align:justify;font-size:15px;color:rgb(63,63,63);letter-spacing:.5px;">广泛使用的对齐方法为 Similarity Transformation。更多对其变换方法和实验可以参考这篇知乎文章 <span style="color:rgb(136,136,136);font-size:15px;letter-spacing:.5px;text-align:justify;">[17]</span>。</span></p><p style="text-align:justify;line-height:1.75em;margin-left:0em;"><span style="text-align:justify;font-size:15px;color:rgb(63,63,63);letter-spacing:.5px;"><br></span></p><blockquote><p style="text-align:left;margin-left:0em;line-height:normal;"><span style="font-size:12px;color:rgb(136,136,136);"><span style="font-size:12px;text-align:justify;letter-spacing:.5px;">作者代码实现:</span></span></p><p style="text-align:left;margin-left:0em;line-height:normal;"><span style="font-size:12px;color:rgb(136,136,136);"><span style="font-size:12px;text-align:justify;letter-spacing:.5px;"><br></span></span></p><p style="text-align:left;margin-left:0em;line-height:normal;"><span style="font-size:12px;color:rgb(136,136,136);"><span style="font-size:12px;text-decoration:underline;">https://github.com/Joker316701882/Additive-Margin-Softmax/blob/master/align/align_lfw.py</span></span></p></blockquote><p style="text-align:justify;line-height:1.75em;margin-left:0em;"><span style="text-align:justify;font-size:15px;color:rgb(63,63,63);letter-spacing:.5px;"><br></span></p><p style="text-align:justify;line-height:1.75em;margin-left:0em;"><strong><span style="text-align:justify;font-size:15px;color:rgb(63,63,63);letter-spacing:.5px;">值得探讨的一个问题是:人脸检测和对齐真的有必要吗?</span></strong><span style="text-align:justify;font-size:15px;color:rgb(63,63,63);letter-spacing:.5px;">现实应用中常出现人脸 Landmark 无法检测的情况,没有 Landmark 就无法使用 Similarity Transoformation。</span></p><p style="text-align:justify;line-height:1.75em;margin-left:0em;"><span style="text-align:justify;font-size:15px;color:rgb(63,63,63);letter-spacing:.5px;"><br></span></p><p style="text-align:justify;line-height:1.75em;margin-left:0em;"><span style="text-align:justify;font-size:15px;color:rgb(63,63,63);letter-spacing:.5px;">针对这个问题也有相关研究,通过使用 <strong>Spatial Transform Network</strong></span><span style="text-align:justify;font-size:15px;letter-spacing:.5px;color:rgb(136,136,136);"> [9]</span><span style="text-align:justify;font-size:15px;color:rgb(63,63,63);letter-spacing:.5px;"> “让网络自己学习 alignment”,论文参考 <strong>End-to-End Spatial Transform Face Detection and Recognition</strong>。这方面的研究进展还不充分,所以实际系统中多数情况下还是使用了 detection->alignment 这套流程。</span></p><p style="text-align:justify;line-height:1.75em;margin-left:0em;"><span style="text-align:justify;font-size:15px;color:rgb(63,63,63);letter-spacing:.5px;"><br></span></p><p style="text-align:justify;line-height:1.75em;margin-left:0em;"><span style="font-size:18px;"><strong><span style="text-align:justify;color:rgb(63,63,63);letter-spacing:.5px;">人脸识别</span></strong></span></p><p style="text-align:justify;line-height:1.75em;margin-left:0em;"><span style="text-align:justify;font-size:15px;color:rgb(63,63,63);letter-spacing:.5px;"><br></span></p><p style="text-align:justify;line-height:1.75em;margin-left:0em;"><span style="text-align:justify;font-size:15px;color:rgb(63,63,63);letter-spacing:.5px;">可以说人脸识别的项目中绝大部分问题都是人脸检测和对齐的问题。识别模型之间的差距倒没有那么明显。不过训练 AM-softmax 过程中依然碰到了些值得注意的问题。</span></p><p style="text-align:justify;line-height:1.75em;margin-left:0em;"><span style="text-align:justify;font-size:15px;color:rgb(63,63,63);letter-spacing:.5px;"><br></span></p><p style="text-align:justify;line-height:1.75em;margin-left:0em;"><span style="text-align:justify;font-size:15px;color:rgb(63,63,63);letter-spacing:.5px;">Spheraface 里提出的 Resface20,AM-softmax 中也同样使用,一模一样复现情况下在 lfw 上只能达到 94%。</span></p><p style="text-align:justify;line-height:1.75em;margin-left:0em;"><span style="text-align:justify;font-size:15px;color:rgb(63,63,63);letter-spacing:.5px;"><br></span></p><p style="text-align:justify;line-height:1.75em;margin-left:0em;"><span style="text-align:justify;font-size:15px;color:rgb(63,63,63);letter-spacing:.5px;">TensorFlow 中能拟合的情况为如下配置:</span></p><p style="text-align:justify;line-height:1.75em;margin-left:0em;"><span style="text-align:justify;font-size:15px;color:rgb(63,63,63);letter-spacing:.5px;"><br></span></p><blockquote><p style="text-align:justify;line-height:1.75em;margin-left:0em;"><em><span style="text-align:justify;letter-spacing:.5px;color:rgb(136,136,136);font-size:12px;">Adam, no weight decay, use batch normalization.</span></em></p></blockquote><p style="text-align:justify;margin-left:0em;line-height:1.75em;"><span style="text-align:justify;font-size:15px;color:rgb(63,63,63);letter-spacing:.5px;"> <br></span></p><p style="margin-left:0em;letter-spacing:.5px;text-align:justify;line-height:1.75em;"><span style="font-size:15px;color:rgb(63,63,63);">对应原文配置:</span></p><p style="margin-left:0em;letter-spacing:.5px;text-align:justify;line-height:1.75em;"><span style="font-size:15px;color:rgb(63,63,63);"><br></span></p><blockquote style="letter-spacing:.5px;"><p style="margin-left:0em;text-align:justify;line-height:1.75em;"><em><span style="color:rgb(136,136,136);font-size:12px;">Momentum, weight decay, no batch normalization.</span></em></p></blockquote><p style="text-align:justify;line-height:1.75em;margin-left:0em;"><span style="font-size:15px;color:rgb(63,63,63);"><br></span></p><p style="text-align:justify;line-height:1.75em;margin-left:0em;"><span style="font-size:15px;color:rgb(63,63,63);">以及在实验中发现的: 除了 Adam 以外的任何一个 optimizer 都达不到理想效果,这可能是不同框架底层实现有所区别的原因,Sphereface,、AM-softmax都是基于 Caffe,本文所有实验全使用 TensorFlow,结论有区别也算正常。</span></p><p style="text-align:justify;line-height:1.75em;margin-left:0em;"><span style="font-size:15px;color:rgb(63,63,63);"><br></span></p><p style="text-align:justify;line-height:1.75em;margin-left:0em;"><span style="font-size:15px;color:rgb(63,63,63);">另一点,Sandberg FaceNet 中的 resnet-inception-v1 搬过来套用 AM-softmax 在 lfw 上的结果达不到 97%,这是过程中不太理解的点。</span></p><p style="text-align:justify;line-height:1.75em;margin-left:0em;"><span style="font-size:15px;color:rgb(63,63,63);"><br></span></p><p style="text-align:justify;line-height:1.75em;margin-left:0em;"><span style="font-size:15px;color:rgb(63,63,63);">从其他论文里看,如果 loss 选的没问题,那诸如 resnet-inception,不同深度的 Resnet,甚至 Mobile-net,Squeezenet 等结构的表现也不该有明显差距(AM-softmax 的情况下至少也该达到99%)。</span></p><p style="text-align:justify;line-height:1.75em;margin-left:0em;"><span style="font-size:15px;color:rgb(63,63,63);"><br></span></p><p style="text-align:justify;line-height:1.75em;margin-left:0em;"><span style="font-size:15px;color:rgb(63,63,63);">此外,直接套用 Arcface 也无法拟合,需要进一步实验。 </span></p><p style="text-align:justify;line-height:1.75em;margin-left:0em;"><span style="font-size:15px;color:rgb(63,63,63);"><br></span></p><p style="text-align:justify;line-height:1.75em;margin-left:0em;"><span style="font-size:15px;color:rgb(63,63,63);">最后,关于 Sandberg 的 code 中一个值得关注的点,他将 train_op 定义在了 facenet.train() 函数里,仔细阅读这个函数会发现,Sandberg 的代码中所有网络参数并不是采用每次更新梯度后的值,而是采用滑动平均值作为网络实际的参数值。</span></p><p style="text-align:justify;line-height:1.75em;margin-left:0em;"><span style="font-size:15px;color:rgb(63,63,63);"><br></span></p><p style="text-align:justify;line-height:1.75em;margin-left:0em;"><span style="font-size:15px;color:rgb(63,63,63);">也正是因为这个原因,解释了 Sandberg 在 batch_norm 的参数 configuration中,甚至没把”is_training”的值交给 placeholder,而是默认 train 和 test 时都采用 local statistics 的模式。</span></p><p style="text-align:justify;line-height:1.75em;margin-left:0em;"><span style="font-size:15px;color:rgb(63,63,63);"><br></span></p><p style="text-align:justify;line-height:1.75em;margin-left:0em;"><span style="font-size:15px;color:rgb(63,63,63);">如果不是因为所有参数都用了滑动平均,那么这种使用 batch_norm 的做法其实是错误的。Sandberg 这样实现的好坏只能交给实验结果来评判了。</span></p><p style="text-align:justify;line-height:1.75em;margin-left:0em;"><span style="font-size:15px;color:rgb(63,63,63);"><br></span></p><p style="text-align:justify;line-height:1.75em;margin-left:0em;"><span style="font-size:15px;color:rgb(63,63,63);">如果想正常使用网络参数和 batch norm,而不是用滑动平均参数和全程开着“is_training”,只需要将 facenet.train() 函数替换成普通的 Optimizer,然后将 batch_norm的“is_training”交给 placeholder 处理,详细可以参考我的 AM-softmax 实现。</span></p><p style="text-align:justify;margin-left:0em;line-height:1.75em;"><br></p><p style="text-align:center;"><img class="img_loading" src="https://ss.csdn.net/p?https://mmbiz.qpic.cn/mmbiz_png/VBcD02jFhgl3miacsukQl2KD81mEGzzM8libAL4EtqPHdJLEvegx8c4kAFTEoGd6fxmWlxib1pDTzTcK0UUbmic0Ug/640" alt="640"></p><p style="text-align:justify;line-height:1.75em;margin-left:0em;"><span style="text-align:justify;font-size:15px;color:rgb(63,63,63);letter-spacing:.5px;"><br></span></p><p style="text-align:justify;line-height:1.75em;margin-left:0em;"><span style="text-align:justify;font-size:15px;color:rgb(63,63,63);letter-spacing:.5px;">感谢大家坚持阅读到最后,以 TensorBoard 的 plot 作为结尾吧!</span></p><p style="text-align:justify;line-height:1.75em;margin-left:0em;"><span style="text-align:justify;font-size:15px;color:rgb(63,63,63);letter-spacing:.5px;"><br></span></p><p style="text-align:center;"><img class="img_loading" src="https://ss.csdn.net/p?https://mmbiz.qpic.cn/mmbiz_png/VBcD02jFhgl3miacsukQl2KD81mEGzzM8PLydUhXQ2y4VlTVTdZwXQZj1DefLATLndtTalB7oRsMfFThttELcqg/640" alt="640"></p><p style="margin-left:0em;font-size:16px;letter-spacing:.5px;color:rgb(62,62,62);text-align:justify;line-height:normal;"><br></p><h1 style="font-weight:bold;color:rgb(62,62,62);line-height:1.2;border-left-color:rgb(16,142,233);font-size:20px !important;border-left-width:6px !important;border-left-style:solid !important;letter-spacing:1px !important;word-spacing:1px !important;"><a name="t3"></a><span style="letter-spacing:.5px;">参考文献</span></h1><p style="margin-left:0em;font-size:16px;letter-spacing:.5px;color:rgb(62,62,62);text-align:justify;line-height:normal;"><span style="color:rgb(63,63,63);font-size:15px;"><br></span></p><p style="margin-left:0em;font-size:16px;letter-spacing:.5px;color:rgb(62,62,62);text-align:justify;line-height:normal;"><span style="font-size:12px;color:rgb(136,136,136);">[1] F. Schroff, D. Kalenichenko, and J. Philbin. Facenet: A unified embedding for face recognition and clustering. In Proc. CVPR, 2015. </span></p><p style="margin-left:0em;font-size:16px;letter-spacing:.5px;color:rgb(62,62,62);text-align:justify;line-height:normal;"><span style="font-size:12px;color:rgb(136,136,136);">[2] Y. Sun, X. Wang, and X. Tang. Deep learning face representation by joint identification-verification. CoRR, abs/1406.4773, 2014. </span></p><p style="margin-left:0em;font-size:16px;letter-spacing:.5px;color:rgb(62,62,62);text-align:justify;line-height:normal;"><span style="font-size:12px;color:rgb(136,136,136);">[3] O. M. Parkhi, A. Vedaldi, and A. Zisserman. Deep face recognition. In BMVC, 2015 </span></p><p style="margin-left:0em;font-size:16px;letter-spacing:.5px;color:rgb(62,62,62);text-align:justify;line-height:normal;"><span style="font-size:12px;color:rgb(136,136,136);">[4] A. Hermans, L. Beyer, and B. Leibe. In defense of the triplet loss for person re-identification. arXiv preprint arXiv:1703.07737, 2017 </span></p><p style="margin-left:0em;font-size:16px;letter-spacing:.5px;color:rgb(62,62,62);text-align:justify;line-height:normal;"><span style="font-size:12px;color:rgb(136,136,136);">[5] Wu, C. Manmatha, R. Smola, A. J. and Krahenb uhl, P. 2017. Sampling matters in deep embedding learning. arXiv preprint arXiv:1706.07567 </span></p><p style="margin-left:0em;font-size:16px;letter-spacing:.5px;color:rgb(62,62,62);text-align:justify;line-height:normal;"><span style="font-size:12px;color:rgb(136,136,136);">[6] W. Liu, Y. Wen, Z. Yu, M. Li, B. Raj, and L. Song. Sphereface: Deep hypersphere embedding for face recognition. In Proceedings of the IEEE conference on computer vision and pattern recognition, 2017 </span></p><p style="margin-left:0em;font-size:16px;letter-spacing:.5px;color:rgb(62,62,62);text-align:justify;line-height:normal;"><span style="font-size:12px;color:rgb(136,136,136);">[7] Zhang, K., Zhang, Z., Li, Z., Qiao, Y.: Joint face detection and alignment using multi-task cascaded convolutional networks. arXiv preprint, 2016 </span></p><p style="margin-left:0em;font-size:16px;letter-spacing:.5px;color:rgb(62,62,62);text-align:justify;line-height:normal;"><span style="font-size:12px;color:rgb(136,136,136);">[8] Yu Liu, Hongyang Li, and Xiaogang Wang. 2017. Learning Deep Features via Congenerous Cosine Loss for Person Recognition. arXiv preprint arXiv:1702.06890, 2017 </span></p><p style="margin-left:0em;font-size:16px;letter-spacing:.5px;color:rgb(62,62,62);text-align:justify;line-height:normal;"><span style="font-size:12px;color:rgb(136,136,136);">[9] M. Jaderberg, K. Simonyan, A. Zisserman, and K. Kavukcuoglu. Spatial transformer networks. In NIPS, 2015. </span></p><p style="margin-left:0em;font-size:16px;letter-spacing:.5px;color:rgb(62,62,62);text-align:justify;line-height:normal;"><span style="font-size:12px;color:rgb(136,136,136);">[10] W. Liu, Y. Wen, Z. Yu, and M. Yang. Large-margin softmax loss for convolutional neural networks. In ICML, 2016. </span></p><p style="margin-left:0em;font-size:16px;letter-spacing:.5px;color:rgb(62,62,62);text-align:justify;line-height:normal;"><span style="font-size:12px;color:rgb(136,136,136);">[11] F. Wang, W. Liu, H. Liu, and J. Cheng. Additive margin softmax for face verification. In arXiv:1801.05599, 2018. </span></p><p style="margin-left:0em;font-size:16px;letter-spacing:.5px;color:rgb(62,62,62);text-align:justify;line-height:normal;"><span style="font-size:12px;color:rgb(136,136,136);">[12] CosFace: Large Margin Cosine Loss for Deep Face Recognition </span></p><p style="margin-left:0em;font-size:16px;letter-spacing:.5px;color:rgb(62,62,62);text-align:justify;line-height:normal;"><span style="font-size:12px;color:rgb(136,136,136);">[13] Deng, J., Guo, J., Zafeiriou, S.: Arcface: Additive angular margin loss for deep face recognition. In: Arxiv preprint. 2018 </span></p><p style="margin-left:0em;font-size:16px;letter-spacing:.5px;color:rgb(62,62,62);text-align:justify;line-height:normal;"><span style="font-size:12px;color:rgb(136,136,136);">[14] Y. Wen, K. Zhang, Z. Li, and Y. Qiao. A discriminative feature learning approach for deep face recognition. In ECCV, 2016. </span></p><p style="margin-left:0em;font-size:16px;letter-spacing:.5px;color:rgb(62,62,62);text-align:justify;line-height:normal;"><span style="font-size:12px;color:rgb(136,136,136);">[15] Y. Liu, H. Li, and X. Wang. Rethinking feature discrimination and polymerization for large-scale recognition. arXiv:1710.00870, 2017.</span></p><p style="margin-left:0em;font-size:16px;letter-spacing:.5px;color:rgb(62,62,62);text-align:justify;line-height:normal;"><span style="font-size:12px;color:rgb(136,136,136);">[16] https://github.com/sciencefans/coco_loss/issues/9</span></p><p style="margin-left:0em;font-size:16px;letter-spacing:.5px;color:rgb(62,62,62);text-align:justify;line-height:normal;"><span style="font-size:12px;color:rgb(136,136,136);">[17] https://zhuanlan.zhihu.com/p/29515986</span></p><p style="margin-left:0em;font-size:16px;letter-spacing:.5px;color:rgb(62,62,62);text-align:justify;line-height:normal;"><br></p><p style="margin-left:0em;font-size:16px;color:rgb(51,51,51);text-align:center;line-height:normal;"><br></p><p style="margin-left:0em;font-size:16px;color:rgb(51,51,51);text-align:center;line-height:normal;"><span style="font-size:18px;letter-spacing:.5px;"></span></p><p style="color:rgb(62,62,62);font-size:16px;letter-spacing:.5px;"><img class="img_loading" style="visibility:visible !important;" src="https://ss.csdn.net/p?https://mmbiz.qpic.cn/mmbiz_jpg/VBcD02jFhgmsvubgibQtWV5t7M3ETKt3bbXiaAothCErMicibic9QCUBpxkuibuht62MGcCTcLyAxqGrsUXbv254InDA/640?" alt="640?"></p><p style="margin-left:0em;color:rgb(62,62,62);font-size:16px;letter-spacing:.5px;text-align:center;line-height:2em;"><br></p><p style="margin-left:0em;color:rgb(62,62,62);font-size:16px;letter-spacing:.5px;text-align:center;"><strong style="font-family:'Optima-Regular', 'PingFangTC-light';font-size:14px;"><img class="__bg_gif img_loading" style="visibility:visible !important;" src="https://ss.csdn.net/p?https://mmbiz.qpic.cn/mmbiz_gif/xuKyIMVqtF2cO2WSmiccOqL8YlIwp5Xv2cqdDp6ANbUt8yibCc1cgQQrPHLKhf73icQGHves57M2XMZLJxIhF0e7g/640?" alt="640?"></strong><span style="font-family:'Optima-Regular', 'PingFangTC-light';font-size:14px;"><strong>#</strong></span><span style="font-family:'Optima-Regular', 'PingFangTC-light';font-size:14px;color:rgb(214,168,65);"><strong>作 者 招 募<span style="color:rgb(0,0,0);">#</span></strong></span></p><p style="margin-left:0em;color:rgb(62,62,62);font-size:16px;letter-spacing:.5px;text-align:center;line-height:normal;"><span style="font-family:'Optima-Regular', 'PingFangTC-light';font-size:14px;color:rgb(214,168,65);"><strong><span style="color:rgb(0,0,0);"><br></span></strong></span></p><p style="margin-left:0em;color:rgb(62,62,62);font-size:16px;letter-spacing:.5px;text-align:center;line-height:1.75em;"><span style="text-decoration:underline;"><strong><span style="font-family:'Optima-Regular', 'PingFangTC-light';"><strong><span style="font-size:12px;"><a href="http://mp.weixin.qq.com/s?__biz=MzIwMTc4ODE0Mw==&mid=2247487954&idx=1&sn=d247e5b99ecb2c37e85d962d7f93d7d7&chksm=96e9ce52a19e474457e04affae41dc6b6fe521154f95ae7122260b46ec91f55ae7c8fb472c3c&scene=21#wechat_redirect" rel="nofollow" target="_blank">让你的文字被很多很多人看到,喜欢我们不如加入我们</a></span></strong></span></strong></span></p><p style="margin-left:0em;font-size:16px;color:rgb(51,51,51);text-align:center;line-height:1.75em;"><span style="font-size:18px;letter-spacing:.5px;"><br></span></p><p style="margin-left:0em;font-size:16px;color:rgb(51,51,51);text-align:center;line-height:1.75em;"><span style="font-size:18px;letter-spacing:.5px;"> </span></p><p style="margin-left:0em;font-size:16px;color:rgb(51,51,51);text-align:center;line-height:1.75em;"><span style="letter-spacing:.5px;"><span style="letter-spacing:.5px;font-size:18px;"> </span><span style="color:rgb(51,51,51);font-size:18px;letter-spacing:.5px;">我是彩蛋</span></span></p><p style="margin-left:0em;color:rgb(51,51,51);letter-spacing:0px;line-height:1.75em;"><span style="color:rgb(63,63,63);letter-spacing:.5px;"><strong> 解锁新功能:热门职位推荐!</strong></span></p><p style="margin-left:0em;color:rgb(51,51,51);letter-spacing:0px;line-height:normal;"><br></p><p style="margin-left:0em;color:rgb(51,51,51);letter-spacing:0px;line-height:1.75em;"><span style="font-size:12px;color:rgb(63,63,63);letter-spacing:.5px;">PaperWeekly小程序升级啦</span></p><p style="margin-left:0em;color:rgb(51,51,51);letter-spacing:0px;line-height:normal;"><br></p><p style="margin-left:0em;color:rgb(51,51,51);letter-spacing:0px;line-height:1.75em;"><span style="color:rgb(63,63,63);letter-spacing:.5px;"><strong><span style="letter-spacing:.5px;color:rgb(51,51,51);">今日arXiv√猜你喜欢√<strong style="color:rgb(71,168,218);font-size:16px;text-align:justify;"><span style="color:rgb(63,63,63);letter-spacing:.5px;font-size:14px;">热门职位</span></strong><strong style="color:rgb(63,63,63);"><span style="letter-spacing:.5px;color:rgb(51,51,51);">√</span></strong></span></strong></span></p><p style="margin-left:0em;color:rgb(51,51,51);letter-spacing:0px;line-height:normal;"><br></p><p style="margin-left:0em;letter-spacing:0px;line-height:1.75em;"><span style="color:rgb(63,63,63);letter-spacing:.5px;">找全职找实习都不是问题</span></p><p style="margin-left:0em;color:rgb(51,51,51);letter-spacing:0px;line-height:1.75em;"><span style="letter-spacing:.5px;"> </span></p><p style="margin-left:0em;color:rgb(51,51,51);letter-spacing:0px;line-height:1.75em;"><span style="letter-spacing:.5px;"><strong><span style="letter-spacing:.5px;color:rgb(255,255,255);"> 解锁方式 </span></strong></span></p><p style="margin-left:0em;color:rgb(51,51,51);letter-spacing:0px;line-height:1.75em;"><span style="color:rgb(63,63,63);font-size:12px;letter-spacing:.5px;">1. 识别下方二维码打开小程序</span></p><p style="margin-left:0em;color:rgb(51,51,51);letter-spacing:0px;line-height:1.75em;"><span style="color:rgb(63,63,63);font-size:12px;letter-spacing:.5px;">2. 用PaperWeekly社区账号进行登陆</span></p><p style="margin-left:0em;color:rgb(51,51,51);letter-spacing:0px;line-height:1.75em;"><span style="color:rgb(63,63,63);font-size:12px;letter-spacing:.5px;">3. 登陆后即可解锁所有功能</span></p><p style="margin-left:0em;color:rgb(51,51,51);letter-spacing:0px;line-height:1.75em;"><br></p><p style="margin-left:0em;letter-spacing:0px;color:rgb(51,51,51);line-height:1.75em;"><span style="letter-spacing:.5px;"><strong><span style="letter-spacing:.5px;color:rgb(255,255,255);"> 职位发布 </span></strong></span></p><p style="margin-left:0em;letter-spacing:0px;color:rgb(51,51,51);line-height:1.75em;"><span style="color:rgb(63,63,63);font-size:12px;letter-spacing:.5px;">请添加小助手微信(<strong><span style="font-size:12px;letter-spacing:.5px;color:rgb(136,136,136);">pwbot02</span></strong>)进行咨询</span></p><p style="margin-left:0em;color:rgb(51,51,51);letter-spacing:0px;line-height:1.75em;"><span style="letter-spacing:.5px;"> <br></span></p><p style="margin-left:0em;color:rgb(51,51,51);letter-spacing:0px;line-height:1.75em;"><span style="color:rgb(63,63,63);letter-spacing:.5px;"><strong>长按识别二维码,使用小程序</strong></span></p><p style="margin-left:0em;color:rgb(51,51,51);letter-spacing:0px;line-height:1.75em;"><span style="letter-spacing:.5px;"><span style="letter-spacing:.5px;font-size:12px;color:rgb(136,136,136);"></span><span style="letter-spacing:.5px;color:rgb(136,136,136);font-size:12px;text-align:center;">*点击阅读原文即可注册</span><span style="letter-spacing:.5px;font-size:12px;color:rgb(136,136,136);text-decoration:underline;"></span></span></p><p style="margin-left:0em;color:rgb(51,51,51);letter-spacing:0px;line-height:normal;"><br></p><p style="margin-left:0em;display:inline-block;width:180px;"><img border="0" class="img_loading" style="visibility:visible !important;" title="" width="180" src="https://ss.csdn.net/p?https://mmbiz.qpic.cn/mmbiz_jpg/VBcD02jFhgnwLopkg177jgoQCbq2j2UJqSZOScYnsaSZf7ibXORdFOUEicycYycARG6V9pvHMyY7jYpdZFKpxcSQ/640?" alt="640?"></p><p style="margin-left:0em;display:inline-block;width:180px;line-height:normal;"><br></p><p><br></p><p style="margin-left:0em;letter-spacing:.5px;line-height:1.75em;"><br></p><p><span style="color:rgb(71,168,218);letter-spacing:.5px;"><strong><span style="color:rgb(71,168,218);letter-spacing:.5px;font-size:14px;">关于PaperWeekly</span></strong><br></span></p><p style="margin-left:0em;color:rgb(62,62,62);font-size:16px;text-align:justify;letter-spacing:.5px;line-height:normal;"><span style="color:rgb(63,63,63);font-size:14px;letter-spacing:.5px;"><br></span></p><p style="margin-left:0em;color:rgb(62,62,62);font-size:16px;text-align:justify;line-height:1.5em;letter-spacing:.5px;"><span style="color:rgb(136,136,136);font-size:14px;letter-spacing:.5px;">PaperWeekly 是一个推荐、解读、讨论、报道人工智能前沿论文成果的学术平台。如果你研究或从事 AI 领域,欢迎在公众号后台点击<strong>「交流群」</strong>,小助手将把你带入 PaperWeekly 的交流群里。</span></p><p style="margin-left:0em;color:rgb(62,62,62);font-size:16px;text-align:justify;letter-spacing:.5px;line-height:1.75em;"><br></p><p style="text-align:center;"><img class="img_loading __bg_gif" src="https://ss.csdn.net/p?https://mmbiz.qpic.cn/mmbiz_gif/VBcD02jFhgkXb8A1kiafKxib8NXiaPMU8mQvRWVBtFNic4G5b5GDD7YdwrsCAicOc8kp5tdEOU3x7ufnleSbKkiaj5Dg/640?" alt="640?"></p><p style="margin-left:0em;color:rgb(62,62,62);font-size:16px;text-align:justify;letter-spacing:.5px;"><span style="letter-spacing:.5px;"><span style="letter-spacing:1px;text-align:justify;font-size:13px;color:rgb(63,63,63);">▽ 点击 | </span><span style="color:rgb(62,62,62);letter-spacing:1px;text-align:justify;font-size:13px;"><span style="letter-spacing:.5px;color:rgb(171,25,66);">阅读原文</span> <span style="letter-spacing:.5px;color:rgb(63,63,63);">| 进入作者博客</span></span></span></p></div></div></div>
如若内容造成侵权/违法违规/事实不符,请联系编程学习网邮箱:809451989@qq.com进行投诉反馈,一经查实,立即删除!
相关文章
- computer vision:algorithm and application计算机视觉算法与应用这本书中附录里的关于计算机视觉的一些测试数据集和源码站点
Lyanzhstu.scau.edu.cn http://blog.csdn.net/lyanzh 转自:http://blog.csdn.net/zhubenfulovepoem/article/details/7191794 以下是computer vision:algorithm and application计算机视觉算法与应用这本书中附录里的关于计算机视觉的一些测试数据集和…...
2024/4/20 20:45:47 - 十大预训练模型,助力入门深度学习(第1部分 - 计算机视觉)
作者 | Joey 介绍 对于希望运用某个现有框架来解决自己的任务的人来说,预训练模型可以帮你快速实现这一点。通常来说,由于时间限制或硬件水平限制大家往往并不会从头开始构建并训练模型,这也就是预训练模型存在的意义。大家可以使用预训练模…...
2024/4/20 20:45:48 - NVIDIA之AI Course:Getting Started with AI on Jetson Nano—Class notes(一)
NVIDIA之AI Course:Getting Started with AI on Jetson Nano—Class notes(一) 导读 在线参加面向初学者的深度学习研究院课程,可以自由掌握进度。 将学习收集图像数据,并用其为自定义任务(例如识别手势以及用于找到图像中…...
2024/4/20 17:56:31 - NVIDIA之AI Course:Getting Started with AI on Jetson Nano—Class notes(三)
NVIDIA之AI Course:Getting Started with AI on Jetson Nano—Class notes(三) Notice The original text comes from NVIDIA-AI Course. This article only provides Chinese translation. 目录 Image Classification AI And Deep Learning AI And Deep Learnin…...
2024/5/4 4:14:59 - AI能让杨超越跳舞?背后原理大揭秘!
上个月杨超越编程大赛在github上大火了一段时间,不过随着时间失衡其热度慢慢下降了,不过而该赛事的31号作品《YCY Dance Now》横空出世,能够做到让用户给定一段跳舞的源视频并上传到指定网站,然后就可以欣赏到杨超越(注意这里不是单纯的换脸,而是整个人连同装束全变),表…...
2024/4/20 4:54:32 - 【技术综述】人脸关键点检测的数据集与核心算法
人脸关键点检测是诸如人脸识别、表情分析、三维人脸重建等其它人脸相关任务的基础。近些年来,深度学习方法已被成功应用到了人脸的关键点检测,本章将介绍深度学习方法在人脸关键点检测方向的研究。包括人脸关键点任务,包括其关键点检测数据集…...
2024/5/4 10:24:50 - 6月份最热门的机器学习开源项目Top10
编译 | Debra编辑 | NatalieAI 前线导读: 燥热的 6 月天已经结束了,本月机器学习领域又有哪些开源项目值得一看呢?Mybridge AI 从将近 250 个机器学习开源项目中评选出排名 Top10 的项目。这是他们对在此期间新发布或进行重大发布的项目进行比…...
2024/4/21 1:20:20 - 大学英语综合教程三 Unit 1至Unit 8 课文内容英译中 中英翻译
大学英语综合教程三 Unit 1至Unit 8 课文内容英译中 中英翻译 大家好,我叫亓官劼(q guān ji ),在CSDN中记录学习的点滴历程,时光荏苒,未来可期,加油~博客地址为:亓官劼的博客 本文原…...
2024/4/21 1:20:19 - EEG公开数据集汇总
人脑连接组计划,该数据库目前被试数约1200人,包括结构MRI、静息态MRI、任务态fMRI、MEG等数据模态,其他数据还包括人口统计学数据、神经心理学数据、基因数据。网址:http://www.humanconnectome.org/1000功能连接组计划(1000 Func…...
2024/4/21 1:20:17 - 2019年9月Github上最热门的开源项目
9 月份 GitHub 上最热门的开源项目排行已经出炉啦,在本月的名单中,有开源书籍、有开源课程等,下面就是本月上榜的10个开源项目:1pure-bash-biblehttps://github.com/dylanaraps/pure-bash-bible Star 21281这是一位澳大利亚的工程…...
2024/4/21 1:20:16 - 2020年5月Github上最热门的开源项目
5月份GitHub上最热门的开源项目排行已经出炉啦,一起来看看上榜详情吧1cwa-app-androidhttps://github.com/corona-warn-app/cwa-app-android Star 1526Corona-Warn-App(简称CWA)意思是“新冠病毒预警 App”,基于苹果和谷歌的 Expo…...
2024/4/21 1:20:15 - 计算机视觉论文-2021-07-13
本专栏是计算机视觉方向论文收集积累,时间:2021年7月13日,来源:paper digest 欢迎关注原创公众号 【计算机视觉联盟】,回复 【西瓜书手推笔记】 可获取我的机器学习纯手推笔记! 直达笔记地址:机…...
2024/4/21 1:20:14 - 人工智能/数据科学比赛汇总 2019.7
内容来自 DataSciComp,人工智能/数据科学比赛整理平台。 Github:iphysresearch/DataSciComp 本项目由 ApacheCN 强力支持。 微博 | 知乎 | CSDN | 简书 | OSChina | 博客园 Data Science for Good: CareerVillage.org https://www.kaggle.com/c/data-sc…...
2024/4/20 9:58:58 - Top10机器学习开源项目发布,历时一个月评出 | 附GitHub地址
原作:Mybridge问耕 补充整理量子位 出品 | 公众号 QbitAI从将近250个机器学习开源项目中,综合各种条件进行打分排序,最终Mybridge团队评选出十大最新、最棒的机器学习开源项目。这份Top10名单中包括对象检测、换脸、预测等等最热的AI明星、话…...
2024/4/21 1:20:13 - [Samuel Ko]——我的2020年回顾
0. 写在前面 其实一直以来,CSDN博客就完全是我个人的技术成长方面的记录和总结,由于工作的原因,一些更新,更好的资料没办法上传上来。 之前的CSDN对我来讲,更像是一个纯技术文档,在这已经几年了,也完全没有发一些关于个人的动态或者经历。现在是2021年1月3号,时光荏苒…...
2024/4/21 1:20:11 - 行人检测资源【转】
来自:http://blog.csdn.net/hermito/article/details/51153837 行人检测资源(上)综述文献 http://www.cvrobot.net/pedestrian-detection-resource-1-summary-review-survey/ 行人检测资源(下)代码数据 http://www.cvr…...
2024/4/20 20:45:56 - ffmpeg图片转视频以及报Could find no file with path ‘F:\test/%05d.png‘ and index in the range 0-4这样的错误解决方法
F:\test\为图片所在文件夹image%04d.png为图片的命名格式例如:image0000、image0001有四位就写04,之前就是这个地方没设置对导致标题的报错。-s 1080*960为设置分辨率,这个设置不对会出现转换后的视频显示该项目的编码格式不支持。按照图片分…...
2024/4/20 20:45:56 - 成功解决ValueError: cannot convert float NaN to integer
成功解决ValueError: cannot convert float NaN to integer 目录 解决问题 解决思路 解决方法 1、如果是少量数据 2、如果是在dataframe中...
2024/4/20 20:45:54 - cannot convert float NaN to integer报错的解决方法
网址:https://github.com/konstantint/matplotlib-venn/issues/17 我在执行文件时发生报错,如下 报错: Service call failed: service [/plan_world_grasp] responded with an error: error processing request: cannot convert float NaN…...
2024/4/29 2:33:38 - python pickle导入numpy变量出错: ImportError: No module named multiarray
是的,今天我又来替大家趟坑了。 这个问题是 “ImportError: No module named multiarray”。 这个问题是这样出现的,我在做一个比赛的时候,需要抽一个特征,这个特征的计算比较复杂,需要的时间比较长。于是我就在我的…...
2024/4/20 20:45:53
最新文章
- 启动任何类型操作系统:不需要检索 ISO 文件 | 开源日报 No.243
netbootxyz/netboot.xyz Stars: 7.7k License: Apache-2.0 netboot.xyz 是一个方便的平台,可以不需要检索 ISO 文件就能启动任何类型操作系统或实用工具磁盘。它使用 iPXE 提供用户友好的 BIOS 菜单,让您轻松选择所需的操作系统以及特定版本或可引导标志…...
2024/5/4 11:23:51 - 梯度消失和梯度爆炸的一些处理方法
在这里是记录一下梯度消失或梯度爆炸的一些处理技巧。全当学习总结了如有错误还请留言,在此感激不尽。 权重和梯度的更新公式如下: w w − η ⋅ ∇ w w w - \eta \cdot \nabla w ww−η⋅∇w 个人通俗的理解梯度消失就是网络模型在反向求导的时候出…...
2024/3/20 10:50:27 - 【APUE】网络socket编程温度采集智能存储与上报项目技术------多路复用
作者简介: 一个平凡而乐于分享的小比特,中南民族大学通信工程专业研究生在读,研究方向无线联邦学习 擅长领域:驱动开发,嵌入式软件开发,BSP开发 作者主页:一个平凡而乐于分享的小比特的个人主页…...
2024/5/4 0:45:42 - ssm框架中各层级介绍
1、Spring(业务逻辑层): Spring框架提供了依赖注入(DI)和面向切面编程(AOP)等功能,可以帮助管理Java应用程序中的对象依赖关系和提供横切关注点的支持。 在SSM框架中,S…...
2024/5/3 3:42:05 - 【外汇早评】美通胀数据走低,美元调整
原标题:【外汇早评】美通胀数据走低,美元调整昨日美国方面公布了新一期的核心PCE物价指数数据,同比增长1.6%,低于前值和预期值的1.7%,距离美联储的通胀目标2%继续走低,通胀压力较低,且此前美国一季度GDP初值中的消费部分下滑明显,因此市场对美联储后续更可能降息的政策…...
2024/5/1 17:30:59 - 【原油贵金属周评】原油多头拥挤,价格调整
原标题:【原油贵金属周评】原油多头拥挤,价格调整本周国际劳动节,我们喜迎四天假期,但是整个金融市场确实流动性充沛,大事频发,各个商品波动剧烈。美国方面,在本周四凌晨公布5月份的利率决议和新闻发布会,维持联邦基金利率在2.25%-2.50%不变,符合市场预期。同时美联储…...
2024/5/2 16:16:39 - 【外汇周评】靓丽非农不及疲软通胀影响
原标题:【外汇周评】靓丽非农不及疲软通胀影响在刚结束的周五,美国方面公布了新一期的非农就业数据,大幅好于前值和预期,新增就业重新回到20万以上。具体数据: 美国4月非农就业人口变动 26.3万人,预期 19万人,前值 19.6万人。 美国4月失业率 3.6%,预期 3.8%,前值 3…...
2024/4/29 2:29:43 - 【原油贵金属早评】库存继续增加,油价收跌
原标题:【原油贵金属早评】库存继续增加,油价收跌周三清晨公布美国当周API原油库存数据,上周原油库存增加281万桶至4.692亿桶,增幅超过预期的74.4万桶。且有消息人士称,沙特阿美据悉将于6月向亚洲炼油厂额外出售更多原油,印度炼油商预计将每日获得至多20万桶的额外原油供…...
2024/5/3 23:10:03 - 【外汇早评】日本央行会议纪要不改日元强势
原标题:【外汇早评】日本央行会议纪要不改日元强势近两日日元大幅走强与近期市场风险情绪上升,避险资金回流日元有关,也与前一段时间的美日贸易谈判给日本缓冲期,日本方面对汇率问题也避免继续贬值有关。虽然今日早间日本央行公布的利率会议纪要仍然是支持宽松政策,但这符…...
2024/4/27 17:58:04 - 【原油贵金属早评】欧佩克稳定市场,填补伊朗问题的影响
原标题:【原油贵金属早评】欧佩克稳定市场,填补伊朗问题的影响近日伊朗局势升温,导致市场担忧影响原油供给,油价试图反弹。此时OPEC表态稳定市场。据消息人士透露,沙特6月石油出口料将低于700万桶/日,沙特已经收到石油消费国提出的6月份扩大出口的“适度要求”,沙特将满…...
2024/4/27 14:22:49 - 【外汇早评】美欲与伊朗重谈协议
原标题:【外汇早评】美欲与伊朗重谈协议美国对伊朗的制裁遭到伊朗的抗议,昨日伊朗方面提出将部分退出伊核协议。而此行为又遭到欧洲方面对伊朗的谴责和警告,伊朗外长昨日回应称,欧洲国家履行它们的义务,伊核协议就能保证存续。据传闻伊朗的导弹已经对准了以色列和美国的航…...
2024/4/28 1:28:33 - 【原油贵金属早评】波动率飙升,市场情绪动荡
原标题:【原油贵金属早评】波动率飙升,市场情绪动荡因中美贸易谈判不安情绪影响,金融市场各资产品种出现明显的波动。随着美国与中方开启第十一轮谈判之际,美国按照既定计划向中国2000亿商品征收25%的关税,市场情绪有所平复,已经开始接受这一事实。虽然波动率-恐慌指数VI…...
2024/4/30 9:43:09 - 【原油贵金属周评】伊朗局势升温,黄金多头跃跃欲试
原标题:【原油贵金属周评】伊朗局势升温,黄金多头跃跃欲试美国和伊朗的局势继续升温,市场风险情绪上升,避险黄金有向上突破阻力的迹象。原油方面稍显平稳,近期美国和OPEC加大供给及市场需求回落的影响,伊朗局势并未推升油价走强。近期中美贸易谈判摩擦再度升级,美国对中…...
2024/4/27 17:59:30 - 【原油贵金属早评】市场情绪继续恶化,黄金上破
原标题:【原油贵金属早评】市场情绪继续恶化,黄金上破周初中国针对于美国加征关税的进行的反制措施引发市场情绪的大幅波动,人民币汇率出现大幅的贬值动能,金融市场受到非常明显的冲击。尤其是波动率起来之后,对于股市的表现尤其不安。隔夜美国股市出现明显的下行走势,这…...
2024/5/2 15:04:34 - 【外汇早评】美伊僵持,风险情绪继续升温
原标题:【外汇早评】美伊僵持,风险情绪继续升温昨日沙特两艘油轮再次发生爆炸事件,导致波斯湾局势进一步恶化,市场担忧美伊可能会出现摩擦生火,避险品种获得支撑,黄金和日元大幅走强。美指受中美贸易问题影响而在低位震荡。继5月12日,四艘商船在阿联酋领海附近的阿曼湾、…...
2024/4/28 1:34:08 - 【原油贵金属早评】贸易冲突导致需求低迷,油价弱势
原标题:【原油贵金属早评】贸易冲突导致需求低迷,油价弱势近日虽然伊朗局势升温,中东地区几起油船被袭击事件影响,但油价并未走高,而是出于调整结构中。由于市场预期局势失控的可能性较低,而中美贸易问题导致的全球经济衰退风险更大,需求会持续低迷,因此油价调整压力较…...
2024/4/26 19:03:37 - 氧生福地 玩美北湖(上)——为时光守候两千年
原标题:氧生福地 玩美北湖(上)——为时光守候两千年一次说走就走的旅行,只有一张高铁票的距离~ 所以,湖南郴州,我来了~ 从广州南站出发,一个半小时就到达郴州西站了。在动车上,同时改票的南风兄和我居然被分到了一个车厢,所以一路非常愉快地聊了过来。 挺好,最起…...
2024/4/29 20:46:55 - 氧生福地 玩美北湖(中)——永春梯田里的美与鲜
原标题:氧生福地 玩美北湖(中)——永春梯田里的美与鲜一觉醒来,因为大家太爱“美”照,在柳毅山庄去寻找龙女而错过了早餐时间。近十点,向导坏坏还是带着饥肠辘辘的我们去吃郴州最富有盛名的“鱼头粉”。说这是“十二分推荐”,到郴州必吃的美食之一。 哇塞!那个味美香甜…...
2024/4/30 22:21:04 - 氧生福地 玩美北湖(下)——奔跑吧骚年!
原标题:氧生福地 玩美北湖(下)——奔跑吧骚年!让我们红尘做伴 活得潇潇洒洒 策马奔腾共享人世繁华 对酒当歌唱出心中喜悦 轰轰烈烈把握青春年华 让我们红尘做伴 活得潇潇洒洒 策马奔腾共享人世繁华 对酒当歌唱出心中喜悦 轰轰烈烈把握青春年华 啊……啊……啊 两…...
2024/5/1 4:32:01 - 扒开伪装医用面膜,翻六倍价格宰客,小姐姐注意了!
原标题:扒开伪装医用面膜,翻六倍价格宰客,小姐姐注意了!扒开伪装医用面膜,翻六倍价格宰客!当行业里的某一品项火爆了,就会有很多商家蹭热度,装逼忽悠,最近火爆朋友圈的医用面膜,被沾上了污点,到底怎么回事呢? “比普通面膜安全、效果好!痘痘、痘印、敏感肌都能用…...
2024/5/4 2:59:34 - 「发现」铁皮石斛仙草之神奇功效用于医用面膜
原标题:「发现」铁皮石斛仙草之神奇功效用于医用面膜丽彦妆铁皮石斛医用面膜|石斛多糖无菌修护补水贴19大优势: 1、铁皮石斛:自唐宋以来,一直被列为皇室贡品,铁皮石斛生于海拔1600米的悬崖峭壁之上,繁殖力差,产量极低,所以古代仅供皇室、贵族享用 2、铁皮石斛自古民间…...
2024/4/28 5:48:52 - 丽彦妆\医用面膜\冷敷贴轻奢医学护肤引导者
原标题:丽彦妆\医用面膜\冷敷贴轻奢医学护肤引导者【公司简介】 广州华彬企业隶属香港华彬集团有限公司,专注美业21年,其旗下品牌: 「圣茵美」私密荷尔蒙抗衰,产后修复 「圣仪轩」私密荷尔蒙抗衰,产后修复 「花茵莳」私密荷尔蒙抗衰,产后修复 「丽彦妆」专注医学护…...
2024/4/30 9:42:22 - 广州械字号面膜生产厂家OEM/ODM4项须知!
原标题:广州械字号面膜生产厂家OEM/ODM4项须知!广州械字号面膜生产厂家OEM/ODM流程及注意事项解读: 械字号医用面膜,其实在我国并没有严格的定义,通常我们说的医美面膜指的应该是一种「医用敷料」,也就是说,医用面膜其实算作「医疗器械」的一种,又称「医用冷敷贴」。 …...
2024/5/2 9:07:46 - 械字号医用眼膜缓解用眼过度到底有无作用?
原标题:械字号医用眼膜缓解用眼过度到底有无作用?医用眼膜/械字号眼膜/医用冷敷眼贴 凝胶层为亲水高分子材料,含70%以上的水分。体表皮肤温度传导到本产品的凝胶层,热量被凝胶内水分子吸收,通过水分的蒸发带走大量的热量,可迅速地降低体表皮肤局部温度,减轻局部皮肤的灼…...
2024/4/30 9:42:49 - 配置失败还原请勿关闭计算机,电脑开机屏幕上面显示,配置失败还原更改 请勿关闭计算机 开不了机 这个问题怎么办...
解析如下:1、长按电脑电源键直至关机,然后再按一次电源健重启电脑,按F8健进入安全模式2、安全模式下进入Windows系统桌面后,按住“winR”打开运行窗口,输入“services.msc”打开服务设置3、在服务界面,选中…...
2022/11/19 21:17:18 - 错误使用 reshape要执行 RESHAPE,请勿更改元素数目。
%读入6幅图像(每一幅图像的大小是564*564) f1 imread(WashingtonDC_Band1_564.tif); subplot(3,2,1),imshow(f1); f2 imread(WashingtonDC_Band2_564.tif); subplot(3,2,2),imshow(f2); f3 imread(WashingtonDC_Band3_564.tif); subplot(3,2,3),imsho…...
2022/11/19 21:17:16 - 配置 已完成 请勿关闭计算机,win7系统关机提示“配置Windows Update已完成30%请勿关闭计算机...
win7系统关机提示“配置Windows Update已完成30%请勿关闭计算机”问题的解决方法在win7系统关机时如果有升级系统的或者其他需要会直接进入一个 等待界面,在等待界面中我们需要等待操作结束才能关机,虽然这比较麻烦,但是对系统进行配置和升级…...
2022/11/19 21:17:15 - 台式电脑显示配置100%请勿关闭计算机,“准备配置windows 请勿关闭计算机”的解决方法...
有不少用户在重装Win7系统或更新系统后会遇到“准备配置windows,请勿关闭计算机”的提示,要过很久才能进入系统,有的用户甚至几个小时也无法进入,下面就教大家这个问题的解决方法。第一种方法:我们首先在左下角的“开始…...
2022/11/19 21:17:14 - win7 正在配置 请勿关闭计算机,怎么办Win7开机显示正在配置Windows Update请勿关机...
置信有很多用户都跟小编一样遇到过这样的问题,电脑时发现开机屏幕显现“正在配置Windows Update,请勿关机”(如下图所示),而且还需求等大约5分钟才干进入系统。这是怎样回事呢?一切都是正常操作的,为什么开时机呈现“正…...
2022/11/19 21:17:13 - 准备配置windows 请勿关闭计算机 蓝屏,Win7开机总是出现提示“配置Windows请勿关机”...
Win7系统开机启动时总是出现“配置Windows请勿关机”的提示,没过几秒后电脑自动重启,每次开机都这样无法进入系统,此时碰到这种现象的用户就可以使用以下5种方法解决问题。方法一:开机按下F8,在出现的Windows高级启动选…...
2022/11/19 21:17:12 - 准备windows请勿关闭计算机要多久,windows10系统提示正在准备windows请勿关闭计算机怎么办...
有不少windows10系统用户反映说碰到这样一个情况,就是电脑提示正在准备windows请勿关闭计算机,碰到这样的问题该怎么解决呢,现在小编就给大家分享一下windows10系统提示正在准备windows请勿关闭计算机的具体第一种方法:1、2、依次…...
2022/11/19 21:17:11 - 配置 已完成 请勿关闭计算机,win7系统关机提示“配置Windows Update已完成30%请勿关闭计算机”的解决方法...
今天和大家分享一下win7系统重装了Win7旗舰版系统后,每次关机的时候桌面上都会显示一个“配置Windows Update的界面,提示请勿关闭计算机”,每次停留好几分钟才能正常关机,导致什么情况引起的呢?出现配置Windows Update…...
2022/11/19 21:17:10 - 电脑桌面一直是清理请关闭计算机,windows7一直卡在清理 请勿关闭计算机-win7清理请勿关机,win7配置更新35%不动...
只能是等着,别无他法。说是卡着如果你看硬盘灯应该在读写。如果从 Win 10 无法正常回滚,只能是考虑备份数据后重装系统了。解决来方案一:管理员运行cmd:net stop WuAuServcd %windir%ren SoftwareDistribution SDoldnet start WuA…...
2022/11/19 21:17:09 - 计算机配置更新不起,电脑提示“配置Windows Update请勿关闭计算机”怎么办?
原标题:电脑提示“配置Windows Update请勿关闭计算机”怎么办?win7系统中在开机与关闭的时候总是显示“配置windows update请勿关闭计算机”相信有不少朋友都曾遇到过一次两次还能忍但经常遇到就叫人感到心烦了遇到这种问题怎么办呢?一般的方…...
2022/11/19 21:17:08 - 计算机正在配置无法关机,关机提示 windows7 正在配置windows 请勿关闭计算机 ,然后等了一晚上也没有关掉。现在电脑无法正常关机...
关机提示 windows7 正在配置windows 请勿关闭计算机 ,然后等了一晚上也没有关掉。现在电脑无法正常关机以下文字资料是由(历史新知网www.lishixinzhi.com)小编为大家搜集整理后发布的内容,让我们赶快一起来看一下吧!关机提示 windows7 正在配…...
2022/11/19 21:17:05 - 钉钉提示请勿通过开发者调试模式_钉钉请勿通过开发者调试模式是真的吗好不好用...
钉钉请勿通过开发者调试模式是真的吗好不好用 更新时间:2020-04-20 22:24:19 浏览次数:729次 区域: 南阳 > 卧龙 列举网提醒您:为保障您的权益,请不要提前支付任何费用! 虚拟位置外设器!!轨迹模拟&虚拟位置外设神器 专业用于:钉钉,外勤365,红圈通,企业微信和…...
2022/11/19 21:17:05 - 配置失败还原请勿关闭计算机怎么办,win7系统出现“配置windows update失败 还原更改 请勿关闭计算机”,长时间没反应,无法进入系统的解决方案...
前几天班里有位学生电脑(windows 7系统)出问题了,具体表现是开机时一直停留在“配置windows update失败 还原更改 请勿关闭计算机”这个界面,长时间没反应,无法进入系统。这个问题原来帮其他同学也解决过,网上搜了不少资料&#x…...
2022/11/19 21:17:04 - 一个电脑无法关闭计算机你应该怎么办,电脑显示“清理请勿关闭计算机”怎么办?...
本文为你提供了3个有效解决电脑显示“清理请勿关闭计算机”问题的方法,并在最后教给你1种保护系统安全的好方法,一起来看看!电脑出现“清理请勿关闭计算机”在Windows 7(SP1)和Windows Server 2008 R2 SP1中,添加了1个新功能在“磁…...
2022/11/19 21:17:03 - 请勿关闭计算机还原更改要多久,电脑显示:配置windows更新失败,正在还原更改,请勿关闭计算机怎么办...
许多用户在长期不使用电脑的时候,开启电脑发现电脑显示:配置windows更新失败,正在还原更改,请勿关闭计算机。。.这要怎么办呢?下面小编就带着大家一起看看吧!如果能够正常进入系统,建议您暂时移…...
2022/11/19 21:17:02 - 还原更改请勿关闭计算机 要多久,配置windows update失败 还原更改 请勿关闭计算机,电脑开机后一直显示以...
配置windows update失败 还原更改 请勿关闭计算机,电脑开机后一直显示以以下文字资料是由(历史新知网www.lishixinzhi.com)小编为大家搜集整理后发布的内容,让我们赶快一起来看一下吧!配置windows update失败 还原更改 请勿关闭计算机&#x…...
2022/11/19 21:17:01 - 电脑配置中请勿关闭计算机怎么办,准备配置windows请勿关闭计算机一直显示怎么办【图解】...
不知道大家有没有遇到过这样的一个问题,就是我们的win7系统在关机的时候,总是喜欢显示“准备配置windows,请勿关机”这样的一个页面,没有什么大碍,但是如果一直等着的话就要两个小时甚至更久都关不了机,非常…...
2022/11/19 21:17:00 - 正在准备配置请勿关闭计算机,正在准备配置windows请勿关闭计算机时间长了解决教程...
当电脑出现正在准备配置windows请勿关闭计算机时,一般是您正对windows进行升级,但是这个要是长时间没有反应,我们不能再傻等下去了。可能是电脑出了别的问题了,来看看教程的说法。正在准备配置windows请勿关闭计算机时间长了方法一…...
2022/11/19 21:16:59 - 配置失败还原请勿关闭计算机,配置Windows Update失败,还原更改请勿关闭计算机...
我们使用电脑的过程中有时会遇到这种情况,当我们打开电脑之后,发现一直停留在一个界面:“配置Windows Update失败,还原更改请勿关闭计算机”,等了许久还是无法进入系统。如果我们遇到此类问题应该如何解决呢࿰…...
2022/11/19 21:16:58 - 如何在iPhone上关闭“请勿打扰”
Apple’s “Do Not Disturb While Driving” is a potentially lifesaving iPhone feature, but it doesn’t always turn on automatically at the appropriate time. For example, you might be a passenger in a moving car, but your iPhone may think you’re the one dri…...
2022/11/19 21:16:57