SpringBoot完整版
SpringBoot
文章目录
- SpringBoot
- 1. SpringBoot核心功能
- 2. SpringBoot快速入门
- 2.1 环境准备
- 2.2 创建Maven工程
- 2.2.1 继承父亲项目
- 2.2.2 导入依赖和插件
- 2.3 编写代码
- 2.4 SpringBoot 三种启动方式
- 2.4.1 运行启动类的main方法
- 2.4.2 Maven命令
- 2.4.3 采用jar包的方式运行
- 2.5 Spring Initializr 创建
- 3. 配置文件
- 3.1 yaml的语法
- 3.2 添加自己的配置
- 3.2.1 在新的配置文件中配置
- 3.3 通过配置文件 注入复杂的值
- 3.3.1 带有转义字符的字符串
- 3.3.2 集合,数组,set
- 4. 多环境配置
- 4.1 在resoureces目录下,创建多个application-环境名.yaml 文件
- 4.1.2 application.yaml 文件中配置激活文件
- 4.1.3 生产的时候可以设置环境参数来切换环境
- 5. Spring 的 bean 的配置方式
- 5.1 xml 配置 第一代
- 5.2 注解配置成bean 第二代
- 5.3 配置类 第三代
- 6. 命令行
- 7. Spring
- 7.1 spring是一个什么样的框架?
- 8. Maven私服
- 8.1 maven私服的简介
- 8.2 Nexus
- 8.2.1 下载 解压 Nexus 私服
- 8.2.2 修改配置文件
- 8.2.3 安装启动
- 8.2.4 访问 Nexus 服务站点
- 8.2.5 仓库
- 9. 私服上传下载
- 9.1 上传下载版本v1.0
- 9.2 上传下载优化版本v1.1
- 9.3 上传下载优化版本v1.2
- 9.3.1 需求:
- 9.3.2 组件开发配置
- 9.3.3 组件使用配置
- 10.SpringBoot整合Mybatis
- 10.1 新建 Springboot 工程
- 10.2 配置pom.xml
- 10.3 配置dbconfig.peoperties
- 10.4 配置generatorConfig.xml
- 10.5 Mapper层
- 10.6 配置 application.yaml
- 10.7 启动类(主程序)
- 10.8 Entity层
- 10.9 Service层
- 10.10Controller层
- 10.11测试
- 10.12 开启日志,控制台打印 SQL 语句
- 10.13 数据库文件
- 11.restful
- 11.1 概念
- 11.2 关键
- 11.3 企业级 restful 接口规范
- 12 登录取钱案例
- 12.1 创建统一格式返回
- 12.1 创建业务异常类
- 12.3 枚举信息类
- 12.4 异常处理的增强类
- 12.5 Service 层
- 12.2.1 接口
- 12.5.2 实现类
- 12.6 Controller 层
- 12.7 前端
- 13. 跨域问题
- 13.1 跨域
- 13.1.1什么是跨域
- 13.2 跨域解决
- 13.2.1 jsonp
- 13.2.2 cors
- 13.2.3 代理
- 14. AOP
- 14.1 aop
- 14.2 新建 springboot 项目
- 14.2.1 添加切点
- 14.2.2 添加切面类 并写出增强逻辑
- 14.2.3 配置切入点
- 15. SpringBoot整合AOP
- 15.1 写注解 CheckLogin
- 15.2 在需要验证登录的方法上 加上此注解
- 15.3 切面类与增强逻辑
- 16. 注解
- 16.1 自定义注解
- 17. 获取注解的值
- 17.1 获取字节码对象
- 17.2 获取方法的字节码对象
- 17.3 获取方法上的注解的字节码对象
- 17.4 获取注解的值
- 17.5 优化版:aop,注解,反射
- 18. Swagger
- 18.1 依赖
- 18.2 配置
- 18. 文档注解
- 19. 集成日志
- 19.1 日志
- 19.2 常见解决方案
- 19.3 日志级别
- 19.4 准生产级别配置
- 19.4.1 配置文件
- 20 集成阿里云短信服务
- 20.1 准备工作
- 20.2 配置文件
- 20.3 读取配置信息的类
- 20.4 阿里云依赖
- 20.5 接口
- 20.6 实现类
- 20.7 前端
- 20.8 生成验证码的后台接口
- 20.9 登录的后台接口
1. SpringBoot核心功能
//1.1 独立运行spring项目,集成主流框架。//1.2 内嵌Servlet容器,无需打成War包//1.3 无代码生成和xml配置//1.4 自动配置Spring//1.5 提供starter简化Maven配置(自动依赖和版本控制)//1.6 准生产的应用监控//1.7 天然集成云计算
2. SpringBoot快速入门
2.1 环境准备
- jdk 1.8
- maven 3.5.4
- idea 2019.1
- springboot 2.1.6
2.2 创建Maven工程
2.2.1 继承父亲项目
<!--导入父工程依赖--><parent><groupId>org.springframework.boot</groupId><artifactId>spring-boot-starter-parent</artifactId><version>2.1.6.RELEASE</version></parent>
2.2.2 导入依赖和插件
<!--依赖 spring-boot-starter-**(场景)--><dependencies><dependency><groupId>org.springframework.boot</groupId><artifactId>spring-boot-starter-web</artifactId></dependency><dependency><groupId>org.springframework.boot</groupId><artifactId>spring-boot-starter-test</artifactId></dependency><dependency><groupId>org.projectlombok</groupId><artifactId>lombok</artifactId><version>1.18.0</version><!--只在编译阶段生效,不需要打入包中--><scope>provided</scope></dependency></dependencies><!--插件--><build><plugins><plugin><groupId>org.springframework.boot</groupId><artifactId>spring-boot-maven-plugin</artifactId></plugin></plugins></build>
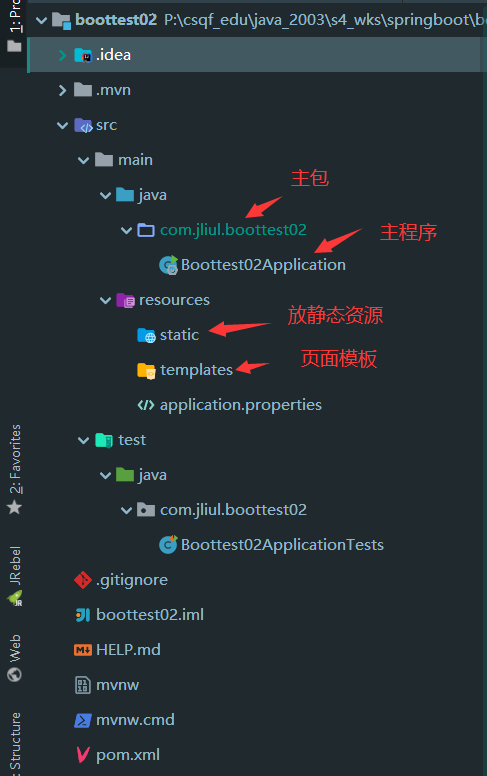
2.3 编写代码
- 主程序,一定写在主包下。
package com.jliul.boottest;import org.springframework.boot.SpringApplication;
import org.springframework.boot.autoconfigure.SpringBootApplication;/*** @author jliu.l* @date 2020/10/10*/
@SpringBootApplication
public class MySpringBootApplication {public static void main(String[] args) {SpringApplication.run(MySpringBootApplication.class);}
}- Controller类
- 在主程序MySpringBootApplication同级包或者子级包中创建TestController
package com.jliul.boottest.controller;import org.springframework.web.bind.annotation.GetMapping;
import org.springframework.web.bind.annotation.PathVariable;
import org.springframework.web.bind.annotation.RestController;/*** @author jliu.l* @date 2020/10/10*/
@RestController
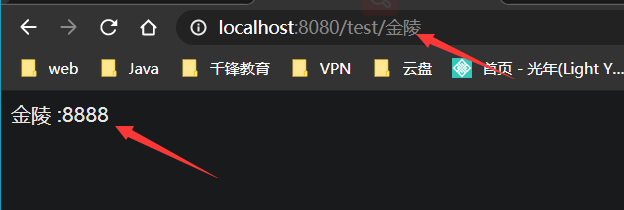
public class TestController {@GetMapping(value = "/test/{name}")public String getName(@PathVariable(value = "name") String name){return name;}
}- 配置文件[可选]
- 在resources下创建配置文件
- application.properties
- application.yaml(推荐)
2.4 SpringBoot 三种启动方式
2.4.1 运行启动类的main方法
运行main方法即可
2.4.2 Maven命令
mvn spring-boot:run
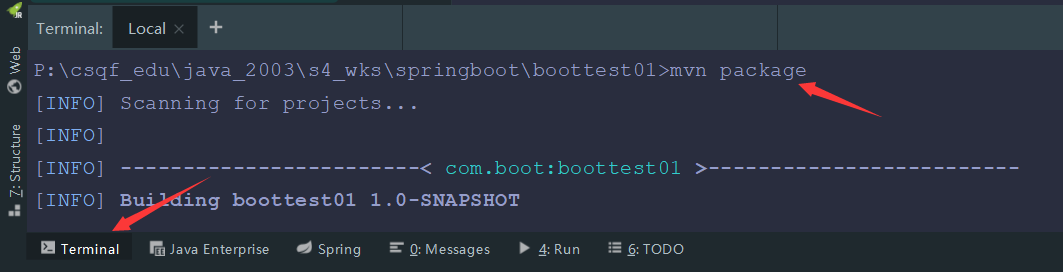
2.4.3 采用jar包的方式运行
//将当前项目打包成jar文件。并通过 java -jar ***.jar文件
mvn package
//进入target文件夹
cd target
//回退上一级
cd ..
//查看目录
dir

//启动springbootg
java -jar boottest01-1.0-SNAPSHOT.jar
//改变端口启动springboot
java -jar boottest01-1.0-SNAPSHOT.jar --server.port=8088

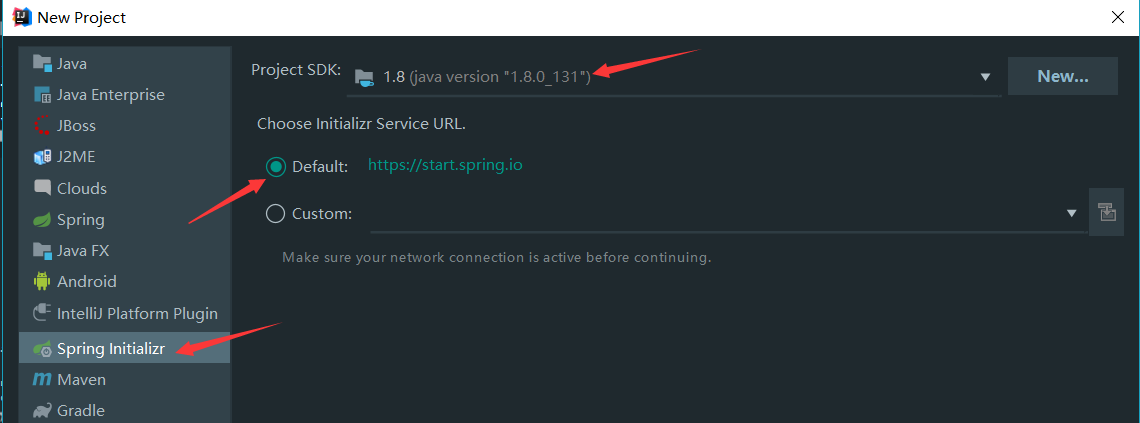
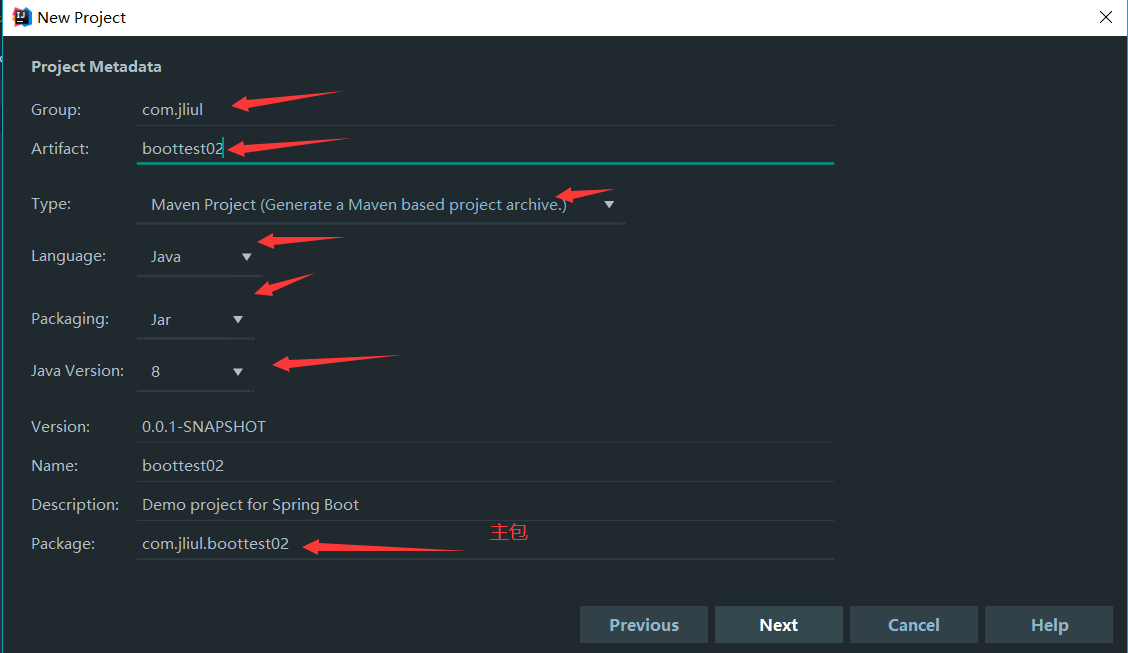
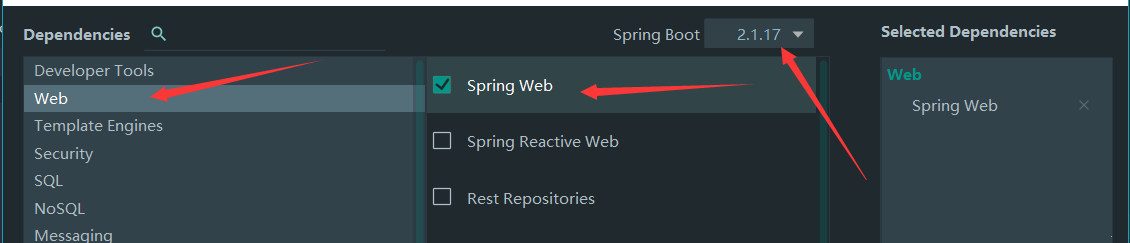
2.5 Spring Initializr 创建
3. 配置文件
3.1 yaml的语法
- 大小写敏感。
- 使用缩进表示层级关系。
- 缩进时不允许使用Tab键,只允许使用空格。
- 每个冒号后面一定要有一个空格。
3.2 添加自己的配置
application.yaml
server:port: 8080
student:name: jliulage: 18
一个一个属性读取
package com.jliul.boottest.entity;/*** @author jliu.l* @date 2020/10/10* 一个一个属性读取*/
@Data
@AllArgsConstructor
@NoArgsConstructor
@Component
public class Student {@Value(value = "${student.name}")//直接赋值//@Value(value = "jliul")private String name;@Value("${student.age}")private Integer age;
}
整体读取
package com.jliul.boottest.entity;/*** @author jliu.l* @date 2020/10/10* 整体读取*/
@Data
@AllArgsConstructor
@NoArgsConstructor
@Component
@ConfigurationProperties(prefix = "student")
public class Student {private String name;private Integer age;
}
test.java
package com.jliul.boottest;/*** @author jliu.l* @date 2020/10/10*/
@RunWith(SpringJUnit4ClassRunner.class)
@SpringBootTest
public class StudentTest {@Autowiredprivate Student student;@Testpublic void test01(){System.out.println(student);}
}
3.2.1 在新的配置文件中配置
新建 properties 文件

student.name=jliul
student.age=88
整体读取
@Data
@AllArgsConstructor
@NoArgsConstructor
@Component
@ConfigurationProperties(prefix = "student")
@PropertySource("classpath:student.properties")
public class Student {private String name;private Integer age;
}
3.3 通过配置文件 注入复杂的值
3.3.1 带有转义字符的字符串
name: "top.video.com is vary\ngood"
3.3.2 集合,数组,set
pets:- cat- dag- pig//List
private List<String> pets;
4. 多环境配置
- 开发环境,测试环境,生产环境
4.1 在resoureces目录下,创建多个application-环境名.yaml 文件
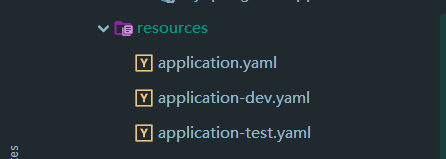
4.1.2 application.yaml 文件中配置激活文件
spring:profiles:active: test
4.1.3 生产的时候可以设置环境参数来切换环境
java -jar boottest01-1.0-SNAPSHOT.jar --spring.profiles.active=dev
5. Spring 的 bean 的配置方式
5.1 xml 配置 第一代
- 新建 beans.xml
<?xml version="1.0" encoding="UTF-8"?>
<beans xmlns="http://www.springframework.org/schema/beans"xmlns:xsi="http://www.w3.org/2001/XMLSchema-instance"xsi:schemaLocation="http://www.springframework.org/schema/beans http://www.springframework.org/schema/beans/spring-beans.xsd"><bean id="user" class="com.jliul.boottest.entity.User"/>
</beans>
@Autowiredprivate User user;@Testpublic void test02(){System.out.println(user);}
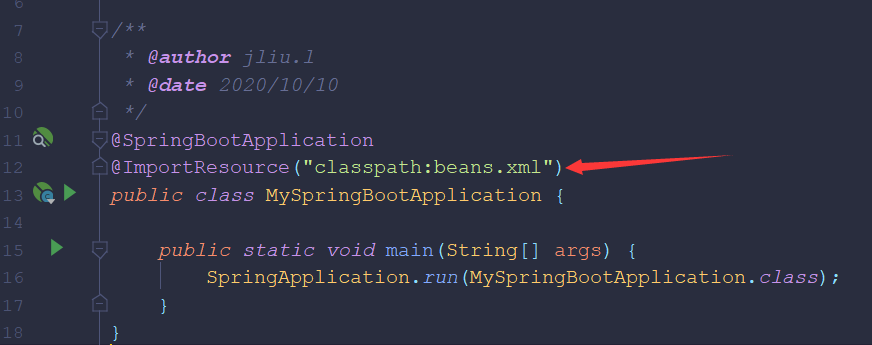
//导入配置文件,写下主程序中
@ImportResource("classpath:beans.xml")
5.2 注解配置成bean 第二代
//控制层 bean
@Controller
//业务层 bean
@Service
//Dao层 bean
@Repostory
//bean
@Conponent
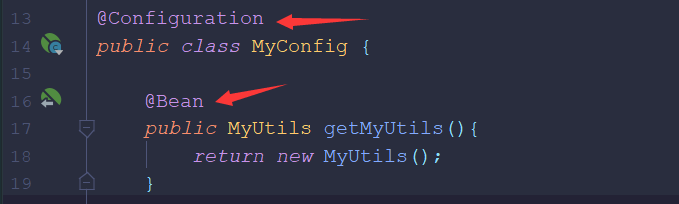
5.3 配置类 第三代
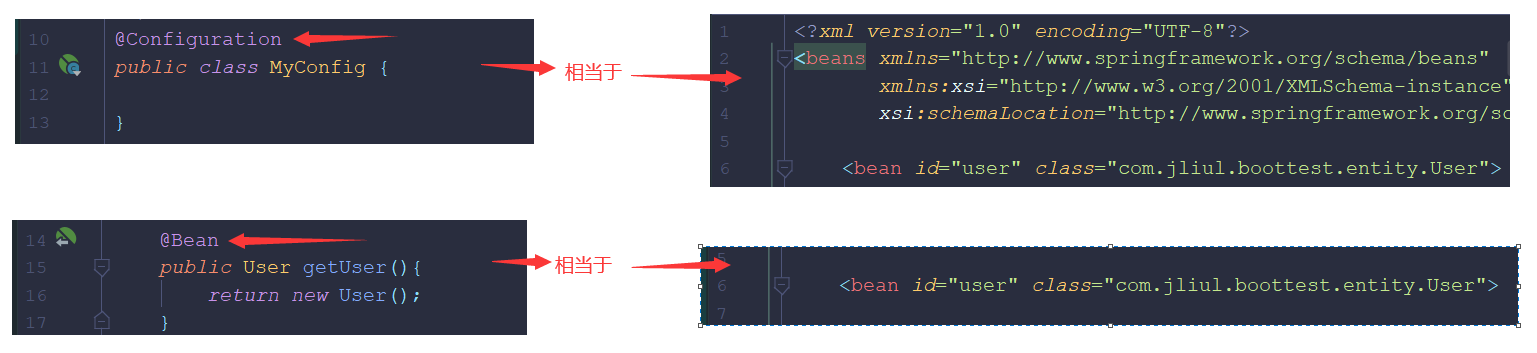
package com.jliul.boottest.config;/*** @author jliu.l* @date 2020/10/10*/
@Configuration
public class MyConfig {@Beanpublic User getUser(){return new User();}
}
6. 命令行
mvn package	//打包
mvn package -Dmaven.test.skip=true //跳过测试
mvn install //打包并发布到本地仓库
mvn deploy	//打包 发布到本地 再到私服
mvn clean deploy //清除,发布到私服
@ConfigurationProperties(prefix = "student")
@PropertySource("classpath:student.properties")
@Configuration
@ImportResource("classpath:beans.xml")
7. Spring
7.1 spring是一个什么样的框架?
胶水框架:  整合 市面上几乎所有的优秀框架
管理框架:   bean[生命周期【出生,活着的状态,死亡】]
//容器 和 beanspring 的容器 游泳池 bean 在 池子洗澡1:项目一启动 就要初始化 spring 的容器 2: spring 容器 在创建 bean 把bean 放在容器中 3: 要使用bean 的时候从容器中拿单例用完之后再放回去4: 销毁: 程序结束容器销毁 bean 销毁
//aop
事务
@ResponseBody
//代理模式
委托人(本体)代理人静态代理://实现接口1.代理人 和 委托人 实现同样的接口//继承2.代理人 是 委托人的 子类动态代理//spring 默认的动态代理1.jdk动态代理jdk的代理工厂 生产 代理对象和 委托人 实现了同一接口2.cglib代理 //继承cglib 代理工厂 生产 代理对象是 委托人 类的子类
8. Maven私服
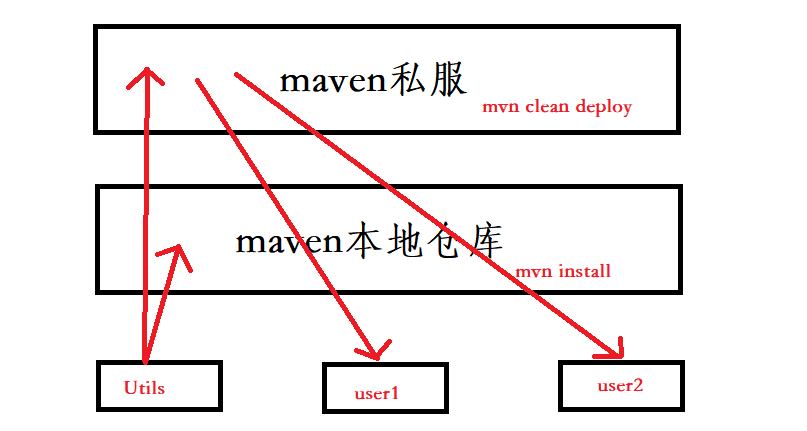
8.1 maven私服的简介
私服是一种特殊的远程仓库,它是架设在局域网内的仓库服务,私服代理广域网上的远程仓库,供局域网内的用户使用。当Maven需要下载构件的时候,它从私服请求,如果私服上不存在该组件,则从外部远程仓库下载,缓存在私服上之后,再为Maven的下载请求提供服务。私服的好处://1. 节省自己的外网带宽//2. 部署自己内部的第三方组件//3. 提高稳定性,增强控制//4. 降低中央仓库的负荷。//5. 加速maven构建
8.2 Nexus
8.2.1 下载 解压 Nexus 私服
8.2.2 修改配置文件
\nexus-2.12.0-01-bundle\nexus-2.12.0-01\conf\nexus.properties

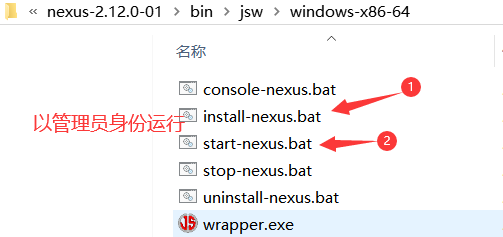
8.2.3 安装启动
//cmd命令行
nexus install // 安装
nexus start  // 开启
nexus stop  //关闭
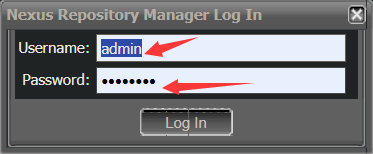
8.2.4 访问 Nexus 服务站点
http://localhost:18081/nexusadmin	//账号
admin123	//密码
8.2.5 仓库
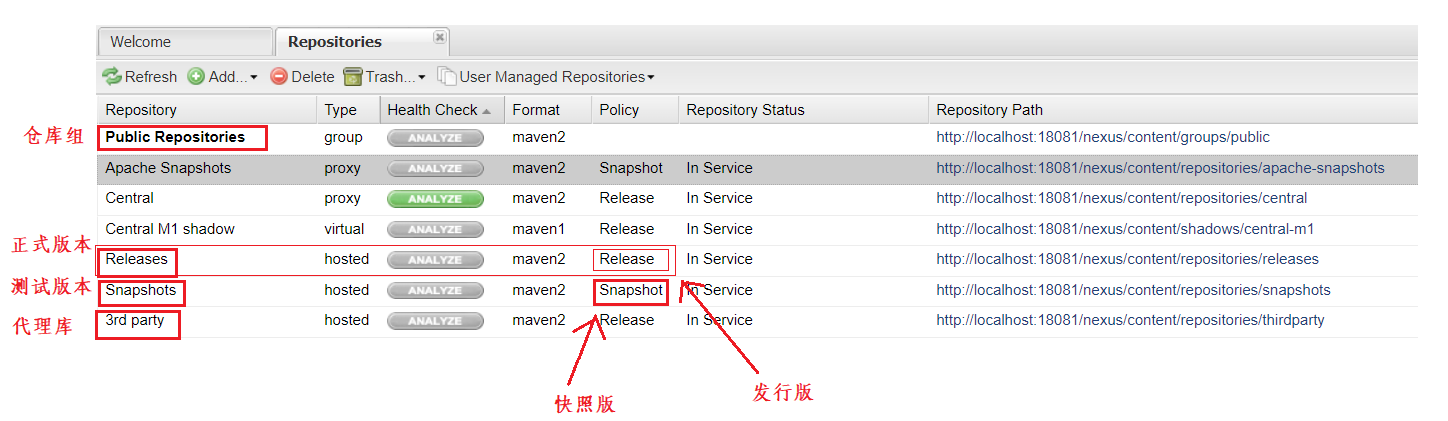
9. 私服上传下载
9.1 上传下载版本v1.0
- maven setting 配置文件
<profiles><!-- 在已有的profiles标签中添加profile标签 --><profile> <id>myjdk</id> <activation> <activeByDefault>true</activeByDefault> <jdk>1.8</jdk> </activation> <properties> <maven.compiler.source>1.8</maven.compiler.source> <maven.compiler.target>1.8</maven.compiler.target><maven.compiler.compilerVersion>1.8</maven.compiler.compilerVersion> </properties> </profile></profiles><!-- 激活 --><activeProfiles><activeProfile>myjdk</activeProfile></activeProfiles><servers><server> <id>nexus-public</id> <!-- nexus的认证id --><username>admin</username> <!--nexus中的用户名密码--><password>admin123</password> </server><server> <id>releases</id> <!-- nexus的认证id --><username>admin</username> <!--nexus中的用户名密码--><password>admin123</password> </server><server> <id>snapshots</id> <!-- nexus的认证id --><username>admin</username> <!--nexus中的用户名密码--><password>admin123</password> </server></servers>
- 上传 pom.xml
<distributionManagement><repository><id>releases</id><url>http://192.168.0.113:18081/nexus/content/repositories/releases</url></repository><snapshotRepository><id>snapshots</id><url>http://192.168.0.113:18081/nexus/content/repositories/snapshots</url></snapshotRepository></distributionManagement>
- 下载 pom.xml
<dependency><groupId>org.example</groupId><artifactId>myutils</artifactId><version>1.0-SNAPSHOT</version></dependency><repositories><repository><id>nexus</id><name>Nexus Repository</name><url>http://192.168.0.113:18081/nexus/content/groups/public/</url><snapshots><enabled>true</enabled></snapshots><releases><enabled>true</enabled></releases></repository></repositories><pluginRepositories><pluginRepository><id>nexus</id><name>Nexus Plugin Repository</name><url>http://192.168.0.113:18081/nexus/content/groups/public/</url><snapshots><enabled>true</enabled></snapshots><releases><enabled>true</enabled></releases></pluginRepository></pluginRepositories>
- 使用下载的组件,配置类自动注入
- 相关命令
mvn clean deploy //上传
9.2 上传下载优化版本v1.1
// 1. 在组件开发方写配置类
// 2. 将组件重新上传到私服mvn clean deploy
// 3. 使用方导入配置类(在主程序)@Import(MyConfig.class)

9.3 上传下载优化版本v1.2
9.3.1 需求:
//根据使用组件的工程的需求 来配置我们在使用 utils 组件的工程中 能根据需求配置
9.3.2 组件开发配置
//在组件工程中 组件类 添加额外配置的 属性
@Data
@AllArgsConstructor
@NoArgsConstructor
@Builder
public class DBUtils {private String username;private String password;
}
//在组件工程中添加配置类	@ConfigurationProperties
@Configuration
public class MyUtilsConfig {@Beanpublic MyUtils getMyUtils(){return new MyUtils();}@Bean@ConfigurationProperties(prefix = "db")  //谁用这个组件  谁就添加db 配置public DBUtils getDBUtils(){return new DBUtils();}
}
9.3.3 组件使用配置
//pom.xml 	导入依赖
<dependency><groupId>org.example</groupId><artifactId>myutils</artifactId><version>1.0-SNAPSHOT</version>
</dependency>
// .yaml配置文件中添加 db 配置
server:port: 8088
db:username: jliulpassword: 7894
//启动类(主程序) 导入配置类
@Import(MyConfig.class)
//直接注入 组件使用
@Autowired
private MyUtils myUtils;//测试
@Test
public void test03(){System.out.println(dbUtils);
}
10.SpringBoot整合Mybatis
10.1 新建 Springboot 工程
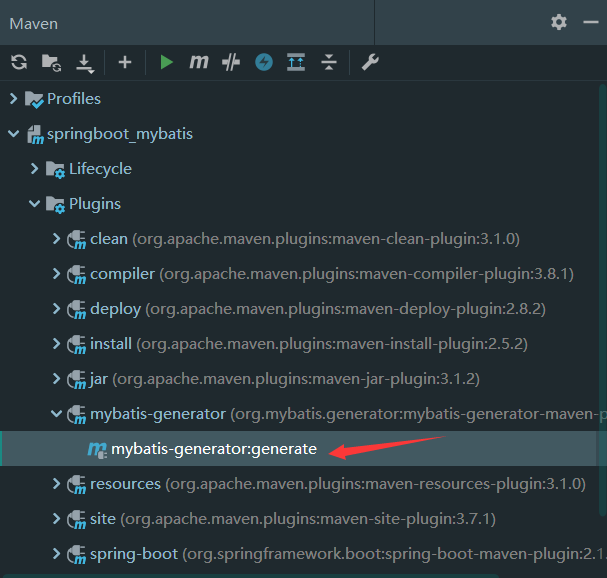
10.2 配置pom.xml
<?xml version="1.0" encoding="UTF-8"?>
<project xmlns="http://maven.apache.org/POM/4.0.0"xmlns:xsi="http://www.w3.org/2001/XMLSchema-instance"xsi:schemaLocation="http://maven.apache.org/POM/4.0.0 http://maven.apache.org/xsd/maven-4.0.0.xsd"><modelVersion>4.0.0</modelVersion><groupId>com.jliul</groupId><artifactId>springboot_mybatis</artifactId><version>1.0-SNAPSHOT</version><!--父工程--><parent><groupId>org.springframework.boot</groupId><artifactId>spring-boot-starter-parent</artifactId><version>2.1.16.RELEASE</version><!--父项目的pom.xml文件的相对路径。默认值为../pom.xml。maven首先从当前构建项目开始查找父项目的pom文件,然后从本地仓库,最后从远程仓库。RelativePath允许你选择一个不同的位置。--><relativePath/> <!-- lookup parent from repository --></parent><!--版本控制--><properties><java.version>1.8</java.version><mybatis.version>2.1.3</mybatis.version><druid.version>1.1.10</druid.version><pagehelper.version>1.2.3</pagehelper.version></properties><!--依赖(web,test,mybatis,lombok,druid,pagehelper)--><dependencies><dependency><groupId>org.springframework.boot</groupId><artifactId>spring-boot-starter-web</artifactId></dependency><dependency><groupId>org.mybatis.spring.boot</groupId><artifactId>mybatis-spring-boot-starter</artifactId><version>${mybatis.version}</version></dependency><dependency><groupId>mysql</groupId><artifactId>mysql-connector-java</artifactId><!--runtime:运行时范围--><scope>runtime</scope></dependency><dependency><groupId>org.projectlombok</groupId><artifactId>lombok</artifactId><!--此功能/此依赖可选--><optional>true</optional></dependency><dependency><groupId>org.springframework.boot</groupId><artifactId>spring-boot-starter-test</artifactId><!--runtime:测试范围--><scope>test</scope></dependency><!-- druid alibaba --><dependency><groupId>com.alibaba</groupId><artifactId>druid-spring-boot-starter</artifactId><version>${druid.version}</version></dependency><!--mybatis 分页插件--><dependency><groupId>com.github.pagehelper</groupId><artifactId>pagehelper-spring-boot-starter</artifactId><version>${pagehelper.version}</version></dependency></dependencies><!--插件--><build><plugins><!-- springboot 插件, mybatis 逆向工程插件(生成接口,实体类,.xml文件) --><plugin><groupId>org.springframework.boot</groupId><artifactId>spring-boot-maven-plugin</artifactId></plugin><plugin><groupId>org.mybatis.generator</groupId><artifactId>mybatis-generator-maven-plugin</artifactId><version>1.3.2</version><dependencies><dependency><groupId>mysql</groupId><artifactId>mysql-connector-java</artifactId><version>5.1.44</version></dependency></dependencies><configuration><!--配置文件的路径--><configurationFile>${basedir}/src/main/resources/generatorConfig.xml</configurationFile><overwrite>true</overwrite></configuration></plugin></plugins></build>
</project>
10.3 配置dbconfig.peoperties
jdbc.driverClass=com.mysql.jdbc.Driver
jdbc.url=jdbc:mysql://127.0.0.1:3306/cs2003?useUnicode=true&characterEncoding=utf-8&useSSL=false&serverTimezone=UTC
jdbc.user=root
jdbc.password=root# 生成的主包名
group.package=com.jliul.sbmtest
# 对应的数据库名
catalog.name=cs2003
10.4 配置generatorConfig.xml
<?xml version="1.0" encoding="UTF-8"?>
<!DOCTYPE generatorConfigurationPUBLIC "-//mybatis.org//DTD MyBatis Generator Configuration 1.0//EN""http://mybatis.org/dtd/mybatis-generator-config_1_0.dtd"><generatorConfiguration><!--引入配置文件--><properties resource="dbconfig.properties"/><context id="testTables" targetRuntime="MyBatis3"><!--生成java文件的编码--><property name="javaFileEncoding" value="UTF-8"/><!-- beginningDelimiter和endingDelimiter:指明数据库的用于标记数据库对象名的符号,比如ORACLE就是双引号,MYSQL默认是`反引号; --><property name="beginningDelimiter" value="`"/><property name="endingDelimiter" value="`"/><property name="lombok" value="Getter,Setter,ToString,Accessors"/><!--注释--><commentGenerator><!-- 是否去除自动生成的注释 true:是 : false:否 --><property name="suppressAllComments" value="true" /></commentGenerator><!--数据库连接的信息:驱动类、连接地址、用户名、密码 --><jdbcConnection driverClass="${jdbc.driverClass}"connectionURL="${jdbc.url}"userId="${jdbc.user}"password="${jdbc.password}"></jdbcConnection><!-- 默认false,把JDBC DECIMAL 和 NUMERIC 类型解析为 Integer,为 true时把JDBC DECIMAL 和 NUMERIC 类型解析为java.math.BigDecimal --><javaTypeResolver><property name="forceBigDecimals" value="false" /></javaTypeResolver><!-- targetProject:生成PO类的位置 --><javaModelGenerator targetPackage="${group.package}.entity"targetProject="src/main/java"><!-- enableSubPackages:是否让schema作为包的后缀 --><property name="enableSubPackages" value="false" /><!-- 从数据库返回的值被清理前后的空格 --><property name="trimStrings" value="true" /></javaModelGenerator><!-- targetProject:mapper映射文件生成的位置 --><sqlMapGenerator targetPackage="mapper"targetProject="src/main/resources"><!-- enableSubPackages:是否让schema作为包的后缀 --><property name="enableSubPackages" value="false" /></sqlMapGenerator><!-- targetPackage:mapper(dao)接口生成的位置 --><javaClientGenerator type="XMLMAPPER"targetPackage="${group.package}.mapper"targetProject="src/main/java"><!-- enableSubPackages:是否让schema作为包的后缀 --><property name="enableSubPackages" value="false" /></javaClientGenerator><!-- 指定数据库表 --><!-- % 代表全部 --><table schema="" tableName="account"/></context>
</generatorConfiguration>
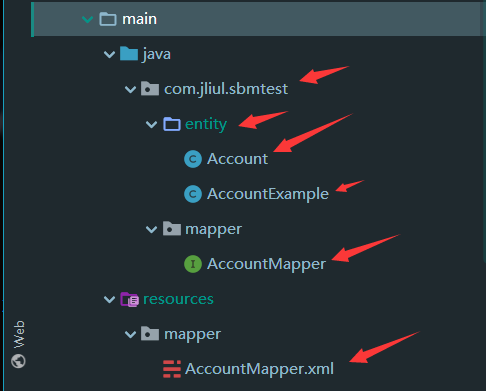
10.5 Mapper层
package com.jliul.sbmtest.mapper;import com.jliul.sbmtest.entity.Account;
import com.jliul.sbmtest.entity.AccountExample;
import java.util.List;
import org.apache.ibatis.annotations.Param;
import org.springframework.stereotype.Repository;@Repository
public interface AccountMapper {/*** 按条件记数* @param [example]* @return int*/int countByExample(AccountExample example);/*** 根据特定限制条件删除,具体使用的方法和查询的时候是一样的。* @param [example]* @return int*/int deleteByExample(AccountExample example);/*** 根据主键删除。* @param [id]* @return int */int deleteByPrimaryKey(Integer id);/*** insert会插入所有的信息,如果传入的对象某一属性为空,则插入空,如果数据库中设置了默认值,默认值就失效了。* @param [record] pojo* @return int*/int insert(Account record);/*** 只会插入含有数据的属性,对于为空的属性,不予以处理* @param [record] pojo* @return int*/int insertSelective(Account record);/*** 通过特定限制条件查询信息,example用于生成一个Criteria对象来设置查询条件* @param [example]* @return java.util.List<com.jliul.sbmtest.entity.Account>*/List<Account> selectByExample(AccountExample example);/*** 通过主键查询* @param [id]* @return com.jliul.sbmtest.entity.Account*/Account selectByPrimaryKey(Integer id);int updateByExampleSelective(@Param("record") Account record, @Param("example") AccountExample example);/*** 根据特定的限制条件更新数据* @param [record, example]* @return int*/int updateByExample(@Param("record") Account record, @Param("example") AccountExample example);/*** 通过ID更新值不为 null 的列。* @param [record]* @return int */int updateByPrimaryKeySelective(Account record);/*** 通过ID更新数据* @param [record]* @return int */int updateByPrimaryKey(Account record);
}
10.6 配置 application.yaml
# 端口号
server:port: 8090# 数据源(druid)
spring:datasource:druid:url:  jdbc:mysql://127.0.0.1:3306/cs2003?useUnicode=true&characterEncoding=utf-8&useSSL=false&serverTimezone=UTCdriver-class-name:  com.mysql.jdbc.Driverusername: rootpassword: "root"# 初始化连接数量(初始化时建立物理连接的个数)initial-size:  10# 最大连接池数量max-active:  50# 最小连接池数量min-idle:  10# 获取连接最大等待(超过)时间# 获取连接时最大等待时间,单位毫秒。配置了maxWait之后,缺省启用公平锁,并发效率会有所下降,如果需要可以通过配置useUnfairLock属性为true使用非公平锁。max-wait:  60000# 是否缓存preparedStatement,也就是PSCache。PSCache对支持游标的数据库性能提升巨大,比如说oracle。在mysql下建议关闭。# 打开PSCache,并且指定每个连接上PSCache的大小pool-prepared-statements:  truemax-pool-prepared-statement-per-connection-size:  20# mysql 数据库的特征  会关闭已经连接了8个小时的连接# 用来检测连接是否有效的sql,要求是一个查询语句。如果validationQuery为null,testOnBorrow、testOnReturn、testWhileIdle都不会其作用。validation-query:  SELECT 1 FROM DUAL# mybatis 分页插件
pagehelper:# 指定数据库helperDialect:  mysql# 默认是false。# 启用合理化时,如果pageNum<1会查询第一页。# 如果pageNum>pages(最大页数)会查询最后一页。# 禁用合理化时# 如果pageNum<1或pageNum>pages会返回空数据reasonable: true# 是否支持接口参数来传递分页参数,默认falsesupportMethodsArguments:  true# 为了支持startPage(Object params)方法,增加了该参数来配置参数映射,用于从对象中根据属性名取值, 可以配置 pageNum,pageSize,count,pageSizeZero,reasonable,不配置映射的用默认值, 默认值为pageNum=pageNum;pageSize=pageSize;count=countSql;reasonable=reasonable;pageSizeZero=pageSizeZero# 其余参数详情请看官方文档:https://pagehelper.github.io/docs/howtouse/params: count=countSql# mybtais 的其他配置
mybatis:# 扫描 .xml映射文件mapper-locations: classpath:mapper/*.xmlconfiguration:# 开启驼峰映射配置# 指将带有下划线的表字段映射为驼峰格式的实体类属性。如:book_namemap-underscore-to-camel-case: true
10.7 启动类(主程序)
package com.jliul.sbmtest;import org.mybatis.spring.annotation.MapperScan;
import org.springframework.boot.SpringApplication;
import org.springframework.boot.autoconfigure.SpringBootApplication;/*** @author jliu.l* @date 2020/10/12*   注解:*      @MapperScan:扫描 ampper 接口*/
@SpringBootApplication
@MapperScan("com.jliul.sbmtest.mapper")
public class BootMyApplication {public static void main(String[] args) {SpringApplication.run(BootMyApplication.class,args);}
}
10.8 Entity层
package com.jliul.sbmtest.entity;import lombok.Data;
/*** @author QzyLing*/
@Data
public class Account {private Integer id;private String accno;private Integer password;private Double balance;private String name;
}
10.9 Service层
package com.jliul.sbmtest.service;import com.github.pagehelper.PageInfo;
import com.jliul.sbmtest.entity.Account;
import java.util.List;/*** @author jliu.l* @date 2020/10/12*  service接口*/
public interface AccountService {/*** 根据id 查询Account* @param [id]* @return com.jliul.sbmtest.entity.Account*/Account findAccountById(Integer id);/*** 查询卡号等于 参数 accno, 并且余额大于 参数 balance* @param [accno, balance]* @return java.util.List<com.jliul.sbmtest.entity.Account>*/List<Account> findAccountByInput(String accno, Double balance);/*** 查询所有Account* @param []* @return java.util.List<com.jliul.sbmtest.entity.Account>*/List<Account> findAll();/*** 查询所有,并分页* @param [pageno, pagesize]* @return com.github.pagehelper.PageInfo<com.jliul.sbmtest.entity.Account>*/PageInfo<Account> findAllPaging(int pageno, int pagesize);
}
package com.jliul.sbmtest.service.impl;import com.github.pagehelper.PageHelper;
import com.github.pagehelper.PageInfo;
import com.jliul.sbmtest.entity.Account;
import com.jliul.sbmtest.entity.AccountExample;
import com.jliul.sbmtest.mapper.AccountMapper;
import com.jliul.sbmtest.service.AccountService;
import org.springframework.beans.factory.annotation.Autowired;
import org.springframework.stereotype.Service;import java.util.List;/*** @author jliu.l* @date 2020/10/12*  service实现类*/
@Service
public class AccountServiceImpl implements AccountService {private AccountMapper accountMapper;@Autowiredpublic void setAccountMapper(AccountMapper accountMapper) {this.accountMapper = accountMapper;}/*** 根据id 查询Account** @param id@return com.jliul.sbmtest.entity.Account*/@Overridepublic Account findAccountById(Integer id) {return accountMapper.selectByPrimaryKey(1);}/*** 查询卡号等于 参数 accno, 并且余额大于 参数 balance** @param accno 卡号* @param balance 余额* @return java.util.List<com.jliul.sbmtest.entity.Account>*/@Overridepublic List<Account> findAccountByInput(String accno, Double balance) {AccountExample example = new AccountExample();example.createCriteria().andAccnoEqualTo(accno).andBalanceGreaterThan(balance);List<Account> accounts = accountMapper.selectByExample(example);return accounts;}/*** 查询所有Account** @return java.util.List<com.jliul.sbmtest.entity.Account>*/@Overridepublic List<Account> findAll() {AccountExample example = new AccountExample();return accountMapper.selectByExample(example);}/*** 查询所有,并分页** @param pageno 当前页* @param pagesize 每页数据量* @return com.github.pagehelper.PageInfo<com.jliul.sbmtest.entity.Account>*/@Overridepublic PageInfo<Account> findAllPaging(int pageno, int pagesize) {PageHelper.startPage(pageno, pagesize);AccountExample example = new AccountExample();List<Account> accounts = accountMapper.selectByExample(example);PageInfo<Account> pageInfo = new PageInfo<>(accounts);System.out.println("当前页:" + pageInfo.getPageNum());System.out.println("每页数量:" + pageInfo.getPageSize());System.out.println("当前页数量:" + pageInfo.getSize());System.out.println("总记录数:" + pageInfo.getTotal());System.out.println("总页数:" + pageInfo.getPages());//此处有点问题,未解决(并不影响程序)System.out.println("结果集:" + pageInfo.getList());for (Account account : pageInfo.getList()) {System.out.println(account);}System.out.println("前一页:" + pageInfo.getPrePage());System.out.println("下一页:"+pageInfo.getNextPage());System.out.println("是否为第一页:"+pageInfo.isIsFirstPage());System.out.println("是否为最后一页"+pageInfo.isIsLastPage());System.out.println("是否有前一页:"+pageInfo.isHasPreviousPage());System.out.println("是否有下一页"+pageInfo.isHasNextPage());System.out.println("导航页码数:"+pageInfo.getNavigatePages());return pageInfo;}
}
10.10Controller层
package com.jliul.sbmtest.controller;import com.github.pagehelper.PageInfo;
import com.jliul.sbmtest.entity.Account;
import com.jliul.sbmtest.service.AccountService;
import org.springframework.beans.factory.annotation.Autowired;
import org.springframework.web.bind.annotation.GetMapping;
import org.springframework.web.bind.annotation.PathVariable;
import org.springframework.web.bind.annotation.RestController;import java.util.List;/*** @author jliu.l* @date 2020/10/12*  controller 层*/
@RestController
public class AccountController {private AccountService accountService;@Autowiredpublic void setAccountService(AccountService accountService) {this.accountService = accountService;}@GetMapping("/account/{id}")public Account findAccountById(@PathVariable("id") Integer id){return accountService.findAccountById(id);}@GetMapping(value = "/account/{accno}/{balance}")public List<Account> findAccountByInput(@PathVariable("accno")String accno,@PathVariable("balance")Double balance){return accountService.findAccountByInput(accno, balance);}@GetMapping("/account")public List<Account> testFindAll(){return accountService.findAll();}@GetMapping("/accountTo/{pageno}/{pagesize}")public PageInfo<Account>  testFindAllPaging(@PathVariable("pageno")int pageno,@PathVariable("pagesize")int pagesize){return accountService.findAllPaging(pageno, pagesize);}
}
10.11测试
package com.jliul.sbmtest;import com.github.pagehelper.PageInfo;
import com.jliul.sbmtest.entity.Account;
import com.jliul.sbmtest.service.AccountService;
import org.junit.Test;
import org.junit.runner.RunWith;
import org.springframework.beans.factory.annotation.Autowired;
import org.springframework.boot.test.context.SpringBootTest;
import org.springframework.test.context.junit4.SpringJUnit4ClassRunner;import java.util.List;/*** @author jliu.l* @date 2020/10/12*  测试*/
@SpringBootTest
@RunWith(SpringJUnit4ClassRunner.class)
public class AccountServiceTest {private AccountService accountService;@Autowiredpublic void setAccountService(AccountService accountService) {this.accountService = accountService;}@Testpublic void testFindAccountByInput(){List<Account> accountByInput = accountService.findAccountByInput("001", 1000D);for (Account account : accountByInput) {System.out.println(account);}}@Testpublic void testFindAll(){List<Account> all = accountService.findAll();for (Account account : all) {System.out.println(account);}}@Testpublic void testFindAllPaging(){PageInfo<Account> allPaging = accountService.findAllPaging(1, 2);for (Account account : allPaging.getList()) {System.out.println(account);}}
}
10.12 开启日志,控制台打印 SQL 语句
- .yaml 文件
# 其他代码的日志 还是走默认的级别(info)
# 唯独com.qf.dbtest.mapper 这个包中的代码 走debug
logging:level:com.jliul.sbmtest.mapper: debug
10.13 数据库文件
/*
SQLyog Ultimate v12.09 (64 bit)
MySQL - 5.7.31-log
*********************************************************************
*/
/*!40101 SET NAMES utf8 */;create table `account` (`id` int (10),`accno` varchar (54),`password` int (6),`balance` double ,`name` varchar (60)
);
insert into `account` (`id`, `accno`, `password`, `balance`, `name`) values('1','001','123456','7400','金陵');
insert into `account` (`id`, `accno`, `password`, `balance`, `name`) values('2','001','123456','4600','刘林');
insert into `account` (`id`, `accno`, `password`, `balance`, `name`) values('3','002','123456','1000','李四');
insert into `account` (`id`, `accno`, `password`, `balance`, `name`) values('4','001','123456','1000','王五');
insert into `account` (`id`, `accno`, `password`, `balance`, `name`) values('5','005','123456','1000','陆航');
源码获取
11.restful
11.1 概念
// restful restful 不是一种新的技术只是一种开发方式和设计风格
// 是一种开发风格,遵循此风格开发软件,符合REST风格,则是RESTFUL
| 请求类型 | URL | 功能意图 |
|---|---|---|
| GET | /users | 查询用户列表 |
| POST | /users | 创建(增加)一个用户 |
| GET | /users/id | 根据id查询一个用户 |
| PUT | /users/id | 根据id修改一个用户 |
| DELETE | /users/id | 根据id删除一个用户 |
11.2 关键
// 同样的url 可以访问不同的功能请求(方法)// 实现:通过不同的请求方式和地址 确定 意图
package com.jliul.sbmtest.controller;import org.springframework.web.bind.annotation.*;/*** @author jliu.l* @date 2020/10/14*  注解:*      @RestController :*          相当于 @ResponseBody + @Controller合在一起的作用。*              支持 REST 风格*  可使用 Postman 工具测试*/@RestController
public class TestController {@GetMapping("/test")public String testGet(){return "test get";}@PostMapping("/test")public String testPost(){return "test post";}@PutMapping("/test")public String testPut(){return "test put";}@DeleteMapping("/test")public String testDelete(){return "test delete";}
}
11.3 企业级 restful 接口规范
// 给前后端开发人员 提供一套统一的开发规范 提升工作效率 降低沟通成本cookie数据存放在客户的浏览器上,session数据放在服务器上。
package com.jliul.sbmtest.controller;import org.springframework.web.bind.annotation.*;/*** @author jliu.l* @date 2020/10/14*  注解:*      @RestController :*          相当于 @ResponseBody + @Controller合在一起的作用。*              支持 REST 风格*  可使用 Postman 工具测试*/@RestController
public class TestController {@GetMapping("/test")public String testGet(){return "test get";}@PostMapping("/test")public String testPost(){return "test post";}@PutMapping("/test")public String testPut(){return "test put";}@DeleteMapping("/test")public String testDelete(){return "test delete";}/*** 注解1:@RequestParam 用于将请求参数区数据映射到功能处理方法的参数上。* 注解2:@RequestHeader 用于将请求头数据映射到功能处理方法的参数上。* @param []* @return java.lang.String*/@PostMapping("/testHeader")public String testHeader(@RequestParam(value = "bname") String bname, @RequestHeader(value = "hname") String hname){System.out.println(hname + " : " + bname);return "testHeader";}
}
12 登录取钱案例
12.1 创建统一格式返回
package com.jliul.sbmtest.common.result;import lombok.AllArgsConstructor;
import lombok.Data;
import lombok.NoArgsConstructor;/*** @author jliu.l* @date 2020/10/13* RESTFULL 统一返回格式类*/
@Data
@AllArgsConstructor
@NoArgsConstructor
public class R {//状态码private String code;//提示信息private String message;//返回数据private Object data;public R(ResponseEnum responseEnum){this.code = responseEnum.getCode();this.message = responseEnum.getMessage();}public R(ResponseEnum responseEnum,Object data){this.code = responseEnum.getCode();this.message = responseEnum.getMessage();this.data = data;}
}
12.1 创建业务异常类
package com.jliul.sbmtest.common.exception;import com.jliul.sbmtest.common.result.ResponseEnum;
import lombok.AllArgsConstructor;
import lombok.Data;
import lombok.NoArgsConstructor;/*** @author jliu.l* @date 2020/10/13* 本系统的业务异常类*/
@Data
@AllArgsConstructor
@NoArgsConstructor
public class AppException extends RuntimeException {private String code;private String message;public AppException(ResponseEnum responseEnum) {this.code = responseEnum.getCode();this.message = responseEnum.getMessage();}
}
12.3 枚举信息类
package com.jliul.sbmtest.common.result;/*** @author jliu.l* @date 2020/10/13* 枚举枚举信息类*/
public enum  ResponseEnum {SUCCESS("200","成功登录"),LOGIN_USER_NO_EXISTS("700","用户名不存在"),ACCOUNT_PASSWORD_WRONG("701","账号或者密码错误"),ACCOUNT_NO_EXISTS("702","账户不存在"),ACCOUNT_BALANCE_LESS("800","余额不足"),ACCOUNT_BALANCE_NULL("801","请输入正确取款金额"),NO_LOGININ("802","请先登录"),ACCOUNT_BALANCE_SUCCESS("200","取款成功");private String code; //状态码private String message; //状态信息ResponseEnum(String code, String message) {this.code = code;this.message = message;}public String getCode() {return code;}public void setCode(String code) {this.code = code;}public String getMessage() {return message;}public void setMessage(String message) {this.message = message;}
}
12.4 异常处理的增强类
package com.jliul.sbmtest.common.exception;import com.jliul.sbmtest.common.result.R;
import org.slf4j.Logger;
import org.slf4j.LoggerFactory;
import org.springframework.web.bind.annotation.ControllerAdvice;
import org.springframework.web.bind.annotation.ExceptionHandler;
import org.springframework.web.bind.annotation.ResponseBody;/*** @author jliu.l* @date 2020/10/13* 异常处理的增强类* 自定义全局异常处理类* Controller 中抛出来的异常 不用处理,交给这个增强类来 处理*/
@ControllerAdvice
public class MyExceptionHandler {private static final Logger LOGGER = LoggerFactory.getLogger(MyExceptionHandler.class);/*** 如果 Controller 中抛出的异常是 AppException , 就由这个方法来处理* @param [ex] 抛出来的异常对象* @return com.jliul.sbmtest.common.result.R*/@ExceptionHandler(AppException.class)@ResponseBodypublic R doAppException(AppException ex){LOGGER.error(ex.getMessage());return new R(ex.getCode(), ex.getMessage(), null);}/*** 除了 AppException 异常之外的 异常 都交给这个方法处理* @param [ex]* @return com.jliul.sbmtest.common.result.R*/@ExceptionHandler(Exception.class)@ResponseBodypublic R doException(Exception ex){LOGGER.error(ex.toString());return new R("500", "发生未知异常,请联系管理员:jliul8712@qq.com", null);}
}
12.5 Service 层
12.2.1 接口
package com.jliul.sbmtest.service;import com.github.pagehelper.PageInfo;
import com.jliul.sbmtest.entity.Account;import java.math.BigDecimal;
import java.util.List;/*** @author jliu.l* @date 2020/10/12*  service接口*/
public interface AccountService {/*** 根据id 查询Account* @param [id]* @return com.jliul.sbmtest.entity.Account*/Account findAccountById(Integer id);/*** 查询卡号等于 参数 accno, 并且余额大于 参数 balance* @param [accno, balance]* @return java.util.List<com.jliul.sbmtest.entity.Account>*/List<Account> findAccountByInput(String accno, BigDecimal balance);/*** 查询所有Account* @param []* @return java.util.List<com.jliul.sbmtest.entity.Account>*/List<Account> findAll();/*** 查询所有,并分页* @param [pageno, pagesize]* @return com.github.pagehelper.PageInfo<com.jliul.sbmtest.entity.Account>*/PageInfo<Account> findAllPaging(int pageno, int pagesize);/*** 用户名 密码登录的方法* @param [accno, password]* @return com.jliul.sbmtest.entity.Account*/Account login1(String accno,String password);/*** 取钱* @param [money, id]* @return int*/void drawMoney(BigDecimal money, Integer id);
}
12.5.2 实现类
package com.jliul.sbmtest.service.impl;import com.github.pagehelper.PageHelper;
import com.github.pagehelper.PageInfo;
import com.jliul.sbmtest.common.annotation.CheckLogin;
import com.jliul.sbmtest.common.exception.AppException;
import com.jliul.sbmtest.common.result.ResponseEnum;
import com.jliul.sbmtest.entity.Account;
import com.jliul.sbmtest.entity.AccountExample;
import com.jliul.sbmtest.mapper.AccountMapper;
import com.jliul.sbmtest.service.AccountService;
import org.springframework.beans.factory.annotation.Autowired;
import org.springframework.stereotype.Service;import java.math.BigDecimal;
import java.util.List;/*** @author jliu.l* @date 2020/10/12*  service实现类*/
@Service
public class AccountServiceImpl implements AccountService {private AccountMapper accountMapper;@Autowiredpublic void setAccountMapper(AccountMapper accountMapper) {this.accountMapper = accountMapper;}/*** 根据id 查询Account** @param id@return com.jliul.sbmtest.entity.Account*/@Overridepublic Account findAccountById(Integer id) {return accountMapper.selectByPrimaryKey(id);}/*** 查询卡号等于 参数 accno, 并且余额大于 参数 balance** @param accno 卡号* @param balance 余额* @return java.util.List<com.jliul.sbmtest.entity.Account>*/@Overridepublic List<Account> findAccountByInput(String accno, BigDecimal balance) {AccountExample example = new AccountExample();example.createCriteria().andAccnoEqualTo(accno).andBalanceEqualTo(balance);return accountMapper.selectByExample(example);}/*** 查询所有Account** @return java.util.List<com.jliul.sbmtest.entity.Account>*/@Overridepublic List<Account> findAll() {AccountExample example = new AccountExample();return accountMapper.selectByExample(example);}/*** 查询所有,并分页** @param pageno 当前页* @param pagesize 每页数据量* @return com.github.pagehelper.PageInfo<com.jliul.sbmtest.entity.Account>*/@Overridepublic PageInfo<Account> findAllPaging(int pageno, int pagesize) {PageHelper.startPage(pageno, pagesize);AccountExample example = new AccountExample();List<Account> accounts = accountMapper.selectByExample(example);PageInfo<Account> pageInfo = new PageInfo<>(accounts);System.out.println("当前页:" + pageInfo.getPageNum());System.out.println("每页数量:" + pageInfo.getPageSize());System.out.println("当前页数量:" + pageInfo.getSize());System.out.println("总记录数:" + pageInfo.getTotal());System.out.println("总页数:" + pageInfo.getPages());System.out.println("结果集:" + pageInfo.getList());for (Account account : pageInfo.getList()) {System.out.println(account);}System.out.println("前一页:" + pageInfo.getPrePage());System.out.println("下一页:"+pageInfo.getNextPage());System.out.println("是否为第一页:"+pageInfo.isIsFirstPage());System.out.println("是否为最后一页"+pageInfo.isIsLastPage());System.out.println("是否有前一页:"+pageInfo.isHasPreviousPage());System.out.println("是否有下一页"+pageInfo.isHasNextPage());System.out.println("导航页码数:"+pageInfo.getNavigatePages());return pageInfo;}/*** 用户名 密码登录的方法** @param accno 账号* @param password 密码* @return com.jliul.sbmtest.entity.Account*/@Overridepublic Account login1(String accno, String password) {// 1.用户名是否存在AccountExample example = new AccountExample();example.createCriteria().andAccnoEqualTo(accno);//查询List<Account> accounts = accountMapper.selectByExample(example);if (accounts == null || accounts.size() == 0) {throw new AppException(ResponseEnum.LOGIN_USER_NO_EXISTS);}// 2.密码是否匹配Account account = accounts.get(0);if (!account.getPassword().equals(password)) {throw new AppException(ResponseEnum.ACCOUNT_PASSWORD_WRONG);}return account;}/*** 取钱** @param money 取款金额* @param id id* @return int*/@Overridepublic void drawMoney(BigDecimal money, Integer id) {Account account = accountMapper.selectByPrimaryKey(id);//判断获取的accout是否为空if (account == null) {throw new AppException(ResponseEnum.ACCOUNT_NO_EXISTS);}//判断余额if (account.getBalance().compareTo(money)<0) {throw new AppException(ResponseEnum.ACCOUNT_BALANCE_LESS);}if (money.compareTo(BigDecimal.ZERO)< 0) {throw new AppException(ResponseEnum.ACCOUNT_BALANCE_NULL);}account.setBalance(account.getBalance().subtract(money));accountMapper.updateByPrimaryKey(account);}
}
12.6 Controller 层
package com.jliul.sbmtest.controller;import com.alibaba.fastjson.JSON;
import com.jliul.sbmtest.common.annotation.CheckLogin;
import com.jliul.sbmtest.common.result.R;
import com.jliul.sbmtest.common.result.ResponseEnum;
import com.jliul.sbmtest.entity.Account;
import com.jliul.sbmtest.service.AccountService;
import org.springframework.beans.factory.annotation.Autowired;
import org.springframework.web.bind.annotation.*;import java.math.BigDecimal;/*** @author jliu.l* @date 2020/10/13*/
@RestController
@CrossOrigin(origins = "*",maxAge = 3600)
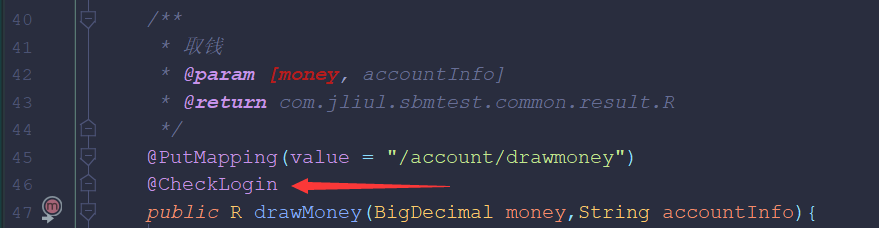
public class LoginController {private AccountService accountService;@Autowiredpublic void setAccountService(AccountService accountService) {this.accountService = accountService;}/*** 登录1(用户名,密码)* @param [accno, password]* @return com.jliul.sbmtest.common.result.R*/@PostMapping("/account/login1")public R login1(String accno,String password) {Account account = accountService.login1(accno, password);return new R(ResponseEnum.SUCCESS,account);}/*** 取钱* @param [money, accountInfo]* @return com.jliul.sbmtest.common.result.R*/@PutMapping(value = "/account/drawmoney")@CheckLoginpublic R drawMoney(BigDecimal money,String accountInfo){System.out.println(money);Account account = JSON.parseObject(accountInfo, Account.class);accountService.drawMoney(money, account.getId());Account accountById = accountService.findAccountById(account.getId());return new R(ResponseEnum.ACCOUNT_BALANCE_SUCCESS,accountById);}
}
12.7 前端
<!DOCTYPE html>
<html><head><meta charset="utf-8"><title>登录</title></head><body><p>用户名:<input type="text" id="accno" value="" /></p><p>密码:<input type="password" id="password" /></p><p><input type="button" id="btnlogin" value="login" /></p></body><script src="http://ajax.aspnetcdn.com/ajax/jQuery/jquery-2.1.1.min.js"></script><script>$("#btnlogin").on("click",function(){// 发出ajax 请求let url='http://localhost:8090/account/login1'let pdata={accno: $("#accno").val(),"password": $("#password").val()}$.post(url,pdata,function (jsondata) {if(jsondata.code==='200'){sessionStorage.setItem("accountInfo",JSON.stringify(jsondata.data))window.location.href='index.html'}else{alert(jsondata.message)}},"json")})</script>
</html>
<!DOCTYPE html>
<html><head><meta charset="utf-8"><title>取钱页面</title></head><body><h2>取钱页面</h2><hr /><p>金额:<input type="type" id="drawmoney" /><input type="button" id="btndraw" value="取钱" /></p></body><script src="http://ajax.aspnetcdn.com/ajax/jQuery/jquery-2.1.1.min.js"></script><script type="text/javascript">$("#btndraw").on("click",function(){//ajax请求var url="http://localhost:8090/account/drawmoney"var data={money: $("#drawmoney").val(),accountInfo: sessionStorage.getItem("accountInfo")}$.ajax({url: url,type: "PUT",data: data,success: function(jsondata){if(jsondata.code === "200"){alert("取款成功! 剩余金额:"+jsondata.data.balance)}else{alert(jsondata.message);}}})})</script>
</html>
13. 跨域问题
13.1 跨域

// 为什么会出现跨域问题 ?
浏览器的同源策略限制。阻止一个域的JavaScript脚本和另外一个域的内容进行交互。// 什么是同源相同协议,主机,端口号
13.1.1什么是跨域
// 当一个请求url 的协议,域名,端口 与当前页面 url 任意一个不同,即跨域。
| 当前页面 | 被请求的页面 | 是否跨域 | 原因 |
|---|---|---|---|
| http://www.jliul.top/ | http://www.jliul.top/index.html | 否 | 同源 |
| http://www.jliul.top/ | https://www.jliul.top/index.html | 跨域 | 协议不同 |
| http://www.jliul.top/ | http://www.bibi.top/ | 跨域 | 主域名不同 |
| http://www.jliul.top/ | http://video.jliul.top/ | 跨域 | 子域名不同 |
| http://www.jliul.top:8080/ | http://www.jliul.top:9001/ | 跨域 | 端口号不同 |
13.2 跨域解决
13.2.1 jsonp
// 有三个标签是允许跨域加载资源的<img src = *** /><link href = *** /><script src = *** />
// JSONP 原理利用 <script> 标签没有跨域的限制,可以得到从其他来源 动态产生的JSON 数据。JSON请求一定需要对方的服务器做支持才行。
// JSONP 缺点仅支持 get 方法,具有局限性。不安全 可能遭受 XXS 攻击。
13.2.2 cors
// CORS 需要浏览器和后端同时支持。// 在控制层加上注解
@CrossOrigin(origins = "*",maxAge = 3600)// origins : 表示跨域的url,* 代表所有url。// maxAge : 缓存最大等待时间。// 前端将Json 转化为 字符串
JSON.stringify(jsondata.data)//将信息保存到客户端,并取出
sessionStorage.setItem("accountInfo",JSON.stringify(jsondata.data))
accountInfo: sessionStorage.getItem("accountInfo")// json字符串 转 javaBean
JSON.parseObject(accountInfo, Account.class);
13.2.3 代理
14. AOP
14.1 aop
// Aop 核心概念
// 1. 连接点(joinpoint):被拦截到的点
// 2. 切入点(pointcut);被拦截的点
// 3. 通知(advice):拦截后要执行的代码after,before,round,throwing
14.2 新建 springboot 项目
// 添加 Aop 依赖
<dependency><groupId>org.springframework.boot</groupId><artifactId>spring-boot-starter-aop</artifactId>
</dependency>
14.2.1 添加切点
package com.jliul.aoptest.service.impl;import com.jliul.aoptest.comment.annotation.MyAnno;
import com.jliul.aoptest.service.TestService;
import org.springframework.stereotype.Service;/*** @author jliu.l* @date 2020/10/14*/
@Service
public class TestSeriveceImpl implements TestService {@Override@MyAnno("18")public void testAdd() {System.out.println("add");}@Overridepublic void testUdp() {System.out.println("update");}
}
14.2.2 添加切面类 并写出增强逻辑
package com.jliul.aoptest.comment.aspect;import com.jliul.aoptest.comment.annotation.MyAnno;
import org.aspectj.lang.JoinPoint;
import org.aspectj.lang.ProceedingJoinPoint;import org.aspectj.lang.annotation.Around;
import org.aspectj.lang.annotation.Aspect;
import org.aspectj.lang.annotation.Before;
import org.aspectj.lang.reflect.MethodSignature;
import org.springframework.stereotype.Component;/*** @author jliu.l* @date 2020/10/14*/
@Component
@Aspect
public class MyAspect {/*** 切入点之前的增强* @param [jp] 连接点* @return void*/@Before("@annotation(com.jliul.aoptest.comment.annotation.MyAnno)")public void before01(JoinPoint jp){// 获取本体System.out.println(jp.getTarget().getClass());// 获取切点方法System.out.println(jp.getSignature().getName());}
}
14.2.3 配置切入点
// 通过表达式
@Before("execution(* com.jliul.aoptest.service.impl.*.*(..))")
// 通过注解
@Before("@annotation(com.jliul.aoptest.comment.annotation.MyAnno)")//自定义注解
package com.jliul.aoptest.comment.annotation;import java.lang.annotation.ElementType;
import java.lang.annotation.Retention;
import java.lang.annotation.Target;import static java.lang.annotation.RetentionPolicy.RUNTIME;/*** @author QzyLing*/
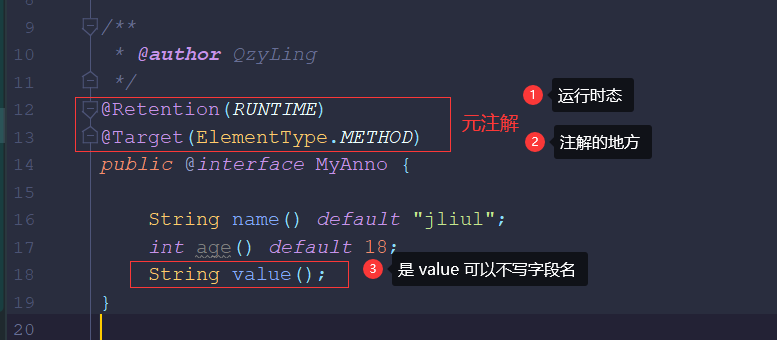
@Retention(RUNTIME)
@Target(ElementType.METHOD)
public @interface MyAnno {String name() default "jliul";int age() default 18;String value();
}
15. SpringBoot整合AOP
15.1 写注解 CheckLogin
package com.jliul.sbmtest.common.annotation;/*** @author QzyLing* 是否登录*/
public @interface CheckLogin {
}
15.2 在需要验证登录的方法上 加上此注解
15.3 切面类与增强逻辑
package com.jliul.sbmtest.common.acpect;import com.jliul.sbmtest.common.exception.AppException;
import com.jliul.sbmtest.common.result.ResponseEnum;
import org.aspectj.lang.ProceedingJoinPoint;
import org.aspectj.lang.annotation.Around;
import org.aspectj.lang.annotation.Aspect;
import org.springframework.stereotype.Component;
import org.springframework.util.StringUtils;
import org.springframework.web.context.request.RequestContextHolder;
import org.springframework.web.context.request.ServletRequestAttributes;import javax.servlet.http.HttpServletRequest;/*** @author jliu.l* @date 2020/10/14*/
@Component
@Aspect
public class MyAspect {/*** 环绕的增强逻辑,有返回值* @param [pjp] 可执行的切入点,是JoinPoint 子类。* @return java.lang.Object*/@Around("@annotation(com.jliul.sbmtest.common.annotation.CheckLogin)")public Object aroundCheckLogin(ProceedingJoinPoint pjp) throws Throwable {// 1.前置,进之前做什么// 获取requestServletRequestAttributes requestAttributes  =(ServletRequestAttributes)RequestContextHolder.getRequestAttributes();assert requestAttributes != null;HttpServletRequest request = requestAttributes.getRequest();String accountInfo = request.getParameter("accountInfo");System.out.println(accountInfo);if (StringUtils.isEmpty(accountInfo)) {throw new AppException(ResponseEnum.NO_LOGININ);}// 放行(运行本体)Object result = pjp.proceed();//后置,出来后做什么return result;}
}
//前端有类似的过滤器 aop 的机制  //不通过传参,获取request
ServletRequestAttributes requestAttributes  =(ServletRequestAttributes)RequestContextHolder.getRequestAttributes();
HttpServletRequest request = requestAttributes.getRequest();
16. 注解
16.1 自定义注解
// 1.注解中的属性(带有返回值的方法声明) // 2.关于注解中的属性的 类型的说明 8个基本数据类型 String enum Class 字节码 另外一个注解类型 以上几个类型的数组
17. 获取注解的值
17.1 获取字节码对象
//获取类的字节码对象
Class<TestSeriveceImpl> testSeriveceClass = TestSeriveceImpl.class;
17.2 获取方法的字节码对象
// 获取方法的字节码对象
Method method = testSeriveceClass.getDeclaredMethod("testAdd");
17.3 获取方法上的注解的字节码对象
//获取方法上注解的字节码对象
MyAnno annotation = method.getAnnotation(MyAnno.class);
17.4 获取注解的值
if(annotation == null){System.out.println("没有此注解");
}assert annotation != null;
System.out.println(annotation.value());
System.out.println(annotation.name());
17.5 优化版:aop,注解,反射
- 在切入点的方法上加上注解

- 在切面定义,拥有该注解的方法,才是 切除点。

- 进入增强方法后,通过反射获取 注解中的值
//获取切入点
MethodSignature methodSignature = (MethodSignature) pjp.getSignature();
// 获取method 上面的注解
MyAnno annotation = methodSignature.getMethod().getAnnotation(MyAnno.class);
System.out.println(annotation.value());
18. Swagger
// 1.Swagger 是一个规范和完整的框架,用于生成、描述、调用和可视化 RESTful 风格的 Web 服务。
// 2.一般来说,接口需要两套:
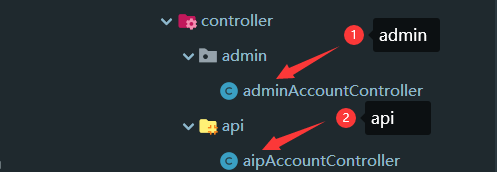
package com.jliul.sbmtest.controller.admin;import com.alibaba.fastjson.JSON;
import com.jliul.sbmtest.common.annotation.CheckLogin;
import com.jliul.sbmtest.common.result.R;
import com.jliul.sbmtest.common.result.ResponseEnum;
import com.jliul.sbmtest.entity.Account;
import com.jliul.sbmtest.service.AccountService;
import io.swagger.annotations.Api;
import io.swagger.annotations.ApiOperation;
import io.swagger.annotations.ApiParam;
import org.springframework.beans.factory.annotation.Autowired;
import org.springframework.web.bind.annotation.PostMapping;
import org.springframework.web.bind.annotation.PutMapping;
import org.springframework.web.bind.annotation.RequestMapping;
import org.springframework.web.bind.annotation.RestController;import java.math.BigDecimal;/*** @author jliu.l* @date 2020/10/15* admin 接口*/
@RestController
@RequestMapping("/admin")
@Api(description = "Account 后台管理")
public class adminAccountController {private AccountService accountService;@Autowiredpublic void setAccountService(AccountService accountService) {this.accountService = accountService;}/*** 登录1(用户名,密码)* @param [accno, password]* @return com.jliul.sbmtest.common.result.R*/@PostMapping("/account/login1")@ApiOperation("登录")public R login1(@ApiParam("账号") String accno, String password) {Account account = accountService.login1(accno, password);return new R(ResponseEnum.SUCCESS,account);}/*** 取钱* @param [money, accountInfo]* @return com.jliul.sbmtest.common.result.R*/@PutMapping(value = "/account/drawmoney")@CheckLoginpublic R drawMoney(BigDecimal money, String accountInfo){System.out.println(money);Account account = JSON.parseObject(accountInfo, Account.class);accountService.drawMoney(money, account.getId());Account accountById = accountService.findAccountById(account.getId());return new R(ResponseEnum.ACCOUNT_BALANCE_SUCCESS,accountById);}
}
package com.jliul.sbmtest.controller.api;import com.jliul.sbmtest.entity.Account;
import com.jliul.sbmtest.service.AccountService;
import io.swagger.annotations.Api;
import io.swagger.annotations.ApiOperation;
import io.swagger.annotations.ApiParam;
import lombok.extern.slf4j.Slf4j;
import org.springframework.beans.factory.annotation.Autowired;
import org.springframework.web.bind.annotation.GetMapping;
import org.springframework.web.bind.annotation.PathVariable;
import org.springframework.web.bind.annotation.RequestMapping;
import org.springframework.web.bind.annotation.RestController;/*** @author jliu.l* @date 2020/10/15* api 接口*/
@RestController
@RequestMapping("/api")
@Slf4j
@Api(description = "Account 用户管理")
public class aipAccountController {private AccountService accountService;@Autowiredpublic void setAccountService(AccountService accountService) {this.accountService = accountService;}@GetMapping("/account/{id}")@ApiOperation("查看用户")public Account findAccountById(@ApiParam("用户id") @PathVariable("id") Integer id){log.info("controller info");log.debug("controller debug");return accountService.findAccountById(id);}
}
18.1 依赖
<!--swagger-->
<dependency><groupId>io.springfox</groupId><artifactId>springfox-swagger2</artifactId><version>${swagger.version}</version></dependency><dependency><groupId>io.springfox</groupId><artifactId>springfox-swagger-ui</artifactId><version>${swagger.version}</version>
</dependency>
18.2 配置
package com.jliul.sbmtest.config;import com.google.common.base.Predicates;
import org.springframework.context.annotation.Bean;
import org.springframework.context.annotation.Configuration;
import springfox.documentation.builders.ApiInfoBuilder;
import springfox.documentation.builders.PathSelectors;
import springfox.documentation.service.ApiInfo;
import springfox.documentation.service.Contact;
import springfox.documentation.spi.DocumentationType;
import springfox.documentation.spring.web.plugins.Docket;
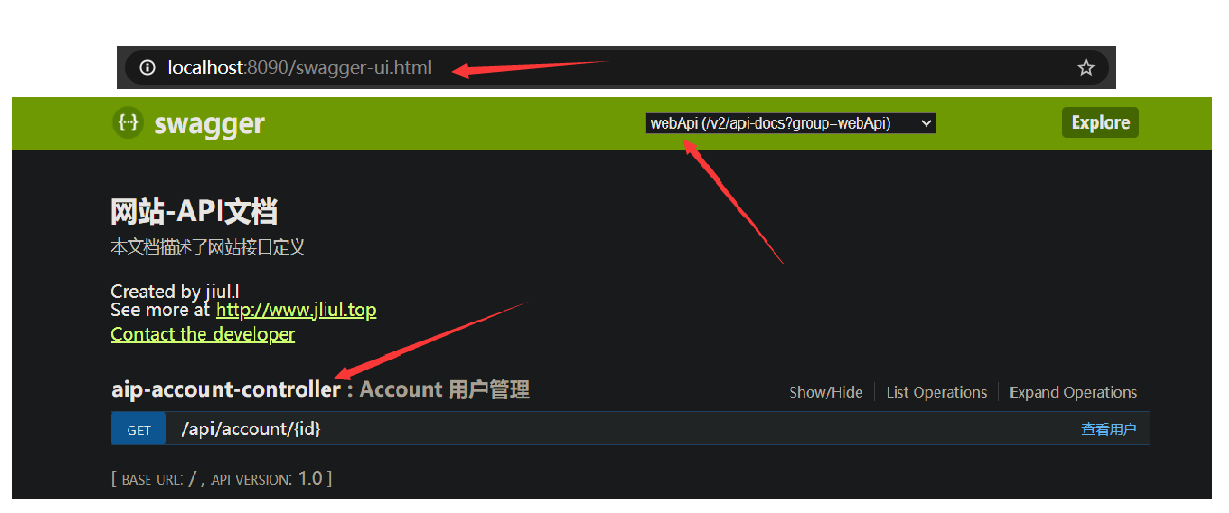
import springfox.documentation.swagger2.annotations.EnableSwagger2;/*** @author jliu.l* @date 2020/10/15* http://localhost:8090/swagger-ui.html*/
@Configuration
@EnableSwagger2 //允许使用swagger
public class SwaggerConfig {private ApiInfo webApiInfo(){return new ApiInfoBuilder().title("网站-API文档").description("本文档描述了网站接口定义").version("1.0").contact(new Contact("jiul.l", "http://www.jliul.top", "jliul8712@qq.com")).build();}private ApiInfo adminApiInfo(){return new ApiInfoBuilder().title("后台管理系统-API文档").description("本文档描述了后台管理系统接口定义").version("1.0").contact(new Contact("jiul.l", "http://www.jliul.top", "jliul8712@qq.com")).build();}@Beanpublic Docket webApiConfig(){return new Docket(DocumentationType.SWAGGER_2).groupName("webApi").apiInfo(webApiInfo()).select()//只显示api路径下的页面.paths(Predicates.and(PathSelectors.regex("/api/.*"))).build();}@Beanpublic Docket adminApiConfig(){return new Docket(DocumentationType.SWAGGER_2).groupName("adminApi").apiInfo(adminApiInfo()).select()//只显示admin路径下的页面.paths(Predicates.and(PathSelectors.regex("/admin/.*"))).build();}
}
18. 文档注解
// 1. 类上
@Api(description = "Account 后台管理")
// 2.方法上
@ApiOperation("登录")
// 3.属性
public R login1(@ApiParam("账号") String accno, String password)
19. 集成日志
19.1 日志
// 概述
1. 用于记录系统中发生的各种事件
2. 记录位置常有:控制台(开发),磁盘文件(准生产)等// 作用
1.通过日志观察,分析项目的运行情况(项目维护)
2.通过日志分析用户的使用情况(大数据分析)
19.2 常见解决方案
log4j [apache]logback [springbot 默认]// 以上均实现 slf4j 规范(接口)
19.3 日志级别
ALL,TRACE,DEBUG,INFO,WARN,ERROR,FATAL,OFF [日志级别从低 -> 高]//默认情况下,springboot 从控制台打印出的日志级别只有INFO 及以上//简单配置logging:level:root: infocom.jliul.sbmtest.mapper: debug
19.4 准生产级别配置
// 要求
1.开发日志:看 debug信息
2.生产日志:一般只要看到 error信息
19.4.1 配置文件
- logback-spring.xml
<?xml version="1.0" encoding="UTF-8"?>
<configuration  scan="true" scanPeriod="10 seconds"><contextName>logback</contextName><property name="log.path" value="p:/project/demo_log" /><property name="CONSOLE_LOG_PATTERN"value="%yellow(%date{yyyy-MM-dd HH:mm:ss}) |%highlight(%-5level) |%blue(%thread) |%blue(%file:%line) |%green(%logger) |%cyan(%msg%n)"/><!--文件日志格式--><property name="FILE_LOG_PATTERN"value="%date{yyyy-MM-dd HH:mm:ss} |%-5level |%thread |%file:%line |%logger |%msg%n" /><!--编码--><property name="ENCODING"value="UTF-8" /><!--输出到控制台name: 名字任意取class:ch.qos.logback.core.ConsoleAppenderfilter:框架提供level:打印的最低日志级别--><appender name="CONSOLE" class="ch.qos.logback.core.ConsoleAppender"><filter class="ch.qos.logback.classic.filter.ThresholdFilter"><!--日志级别--><level>DEBUG</level></filter><encoder><!--日志格式--><Pattern>${CONSOLE_LOG_PATTERN}</Pattern><!--日志字符集--><charset>${ENCODING}</charset></encoder></appender><!--输出到文件name: 名字任意取class:ch.qos.logback.core.rolling.RollingFileAppenderfilter:框架提供onMatch   接受  onMismatch  拒绝   只打印info--><appender name="INFO_FILE" class="ch.qos.logback.core.rolling.RollingFileAppender"><!--日志过滤器:此日志文件只记录INFO级别的--><filter class="ch.qos.logback.classic.filter.LevelFilter"><level>INFO</level><onMatch>ACCEPT</onMatch><onMismatch>DENY</onMismatch></filter><!-- 正在记录的日志文件的路径及文件名 --><file>${log.path}/log_info.log</file><encoder><pattern>${FILE_LOG_PATTERN}</pattern><charset>${ENCODING}</charset></encoder><!-- 日志记录器的滚动策略,按日期,按大小记录 --><rollingPolicy class="ch.qos.logback.core.rolling.TimeBasedRollingPolicy"><!-- 每天日志归档路径以及格式 --><fileNamePattern>${log.path}/info/log-info-%d{yyyy-MM-dd}.%i.log</fileNamePattern><timeBasedFileNamingAndTriggeringPolicy class="ch.qos.logback.core.rolling.SizeAndTimeBasedFNATP"><maxFileSize>100MB</maxFileSize></timeBasedFileNamingAndTriggeringPolicy><!--日志文件保留天数--><maxHistory>15</maxHistory></rollingPolicy></appender><appender name="WARN_FILE" class="ch.qos.logback.core.rolling.RollingFileAppender"><!-- 日志过滤器:此日志文件只记录WARN级别的 --><filter class="ch.qos.logback.classic.filter.LevelFilter"><level>WARN</level><onMatch>ACCEPT</onMatch><onMismatch>DENY</onMismatch></filter><!-- 正在记录的日志文件的路径及文件名 --><file>${log.path}/log_warn.log</file><encoder><pattern>${FILE_LOG_PATTERN}</pattern><charset>${ENCODING}</charset> <!-- 此处设置字符集 --></encoder><!-- 日志记录器的滚动策略,按日期,按大小记录 --><rollingPolicy class="ch.qos.logback.core.rolling.TimeBasedRollingPolicy"><fileNamePattern>${log.path}/warn/log-warn-%d{yyyy-MM-dd}.%i.log</fileNamePattern><timeBasedFileNamingAndTriggeringPolicy class="ch.qos.logback.core.rolling.SizeAndTimeBasedFNATP"><maxFileSize>100MB</maxFileSize></timeBasedFileNamingAndTriggeringPolicy><!--日志文件保留天数--><maxHistory>15</maxHistory></rollingPolicy></appender><appender name="ERROR_FILE" class="ch.qos.logback.core.rolling.RollingFileAppender"><!-- 日志过滤器:此日志文件只记录ERROR级别的 --><filter class="ch.qos.logback.classic.filter.LevelFilter"><level>ERROR</level><onMatch>ACCEPT</onMatch><onMismatch>DENY</onMismatch></filter><!-- 正在记录的日志文件的路径及文件名 --><file>${log.path}/log_error.log</file><encoder><pattern>${FILE_LOG_PATTERN}</pattern><charset>${ENCODING}</charset> <!-- 此处设置字符集 --></encoder><!-- 日志记录器的滚动策略,按日期,按大小记录 --><rollingPolicy class="ch.qos.logback.core.rolling.TimeBasedRollingPolicy"><fileNamePattern>${log.path}/error/log-error-%d{yyyy-MM-dd}.%i.log</fileNamePattern><timeBasedFileNamingAndTriggeringPolicy class="ch.qos.logback.core.rolling.SizeAndTimeBasedFNATP"><maxFileSize>100MB</maxFileSize></timeBasedFileNamingAndTriggeringPolicy><!--日志文件保留天数--><maxHistory>15</maxHistory></rollingPolicy></appender><!--开发环境--><springProfile name="dev"><!--可以灵活设置此处,从而控制日志的输出--><root level="INFO"><appender-ref ref="CONSOLE" /></root></springProfile><!--生产环境--><springProfile name="prod"><!--可以灵活设置此处,从而控制日志的输出--><root level="INFO"><appender-ref ref="INFO_FILE" /><appender-ref ref="WARN_FILE" /><appender-ref ref="ERROR_FILE" /></root></springProfile>
</configuration>
- application-dev.yaml
logging:level:com.jliul.sbmtest.mapper: debug
- application.yaml
spring:profiles:active: dev
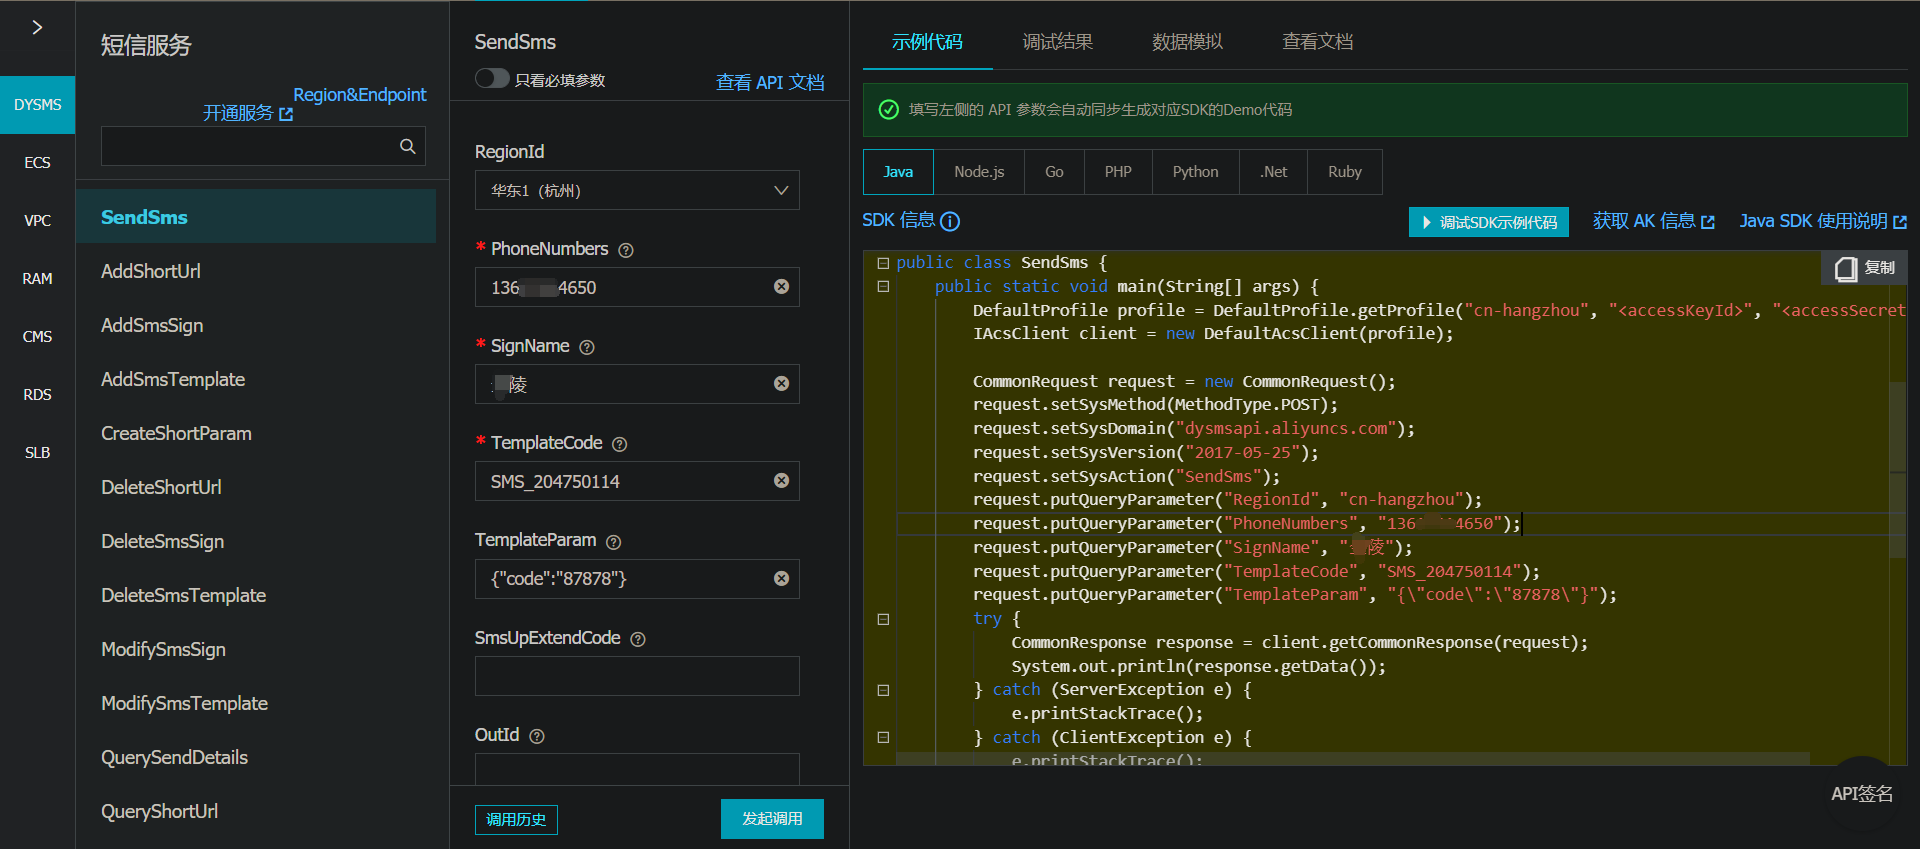
20 集成阿里云短信服务
20.1 准备工作
1. 注册阿里云的账号
2. 登录
3. 进入控制台
4. 选择短信服务
5. 国内消息a.申请签名b.申请短信模板c.申请密匙d.给新用户添加权限
6.阅读源码,发送第一条短信
20.2 配置文件
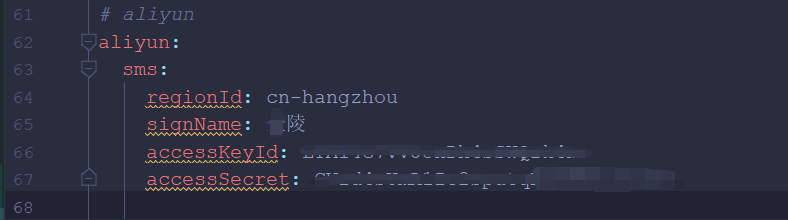
20.3 读取配置信息的类
package com.jliul.sbmtest.config;import lombok.AllArgsConstructor;
import lombok.Data;
import lombok.NoArgsConstructor;
import org.springframework.boot.context.properties.ConfigurationProperties;
import org.springframework.stereotype.Component;/*** @author jliu.l* @date 2020/10/15* SMS*/
@Component
@ConfigurationProperties("aliyun.sms")
@Data
@AllArgsConstructor
@NoArgsConstructor
public class SmsConfig {private String regionId;private String signName;private String accessKeyId;private String accessSecret;
}
20.4 阿里云依赖
<!--阿里云短信服务--><dependency><groupId>com.aliyun</groupId><artifactId>aliyun-java-sdk-core</artifactId><version>4.5.3</version></dependency>
20.5 接口
package com.jliul.sbmtest.service;import com.aliyuncs.exceptions.ClientException;/*** @author jliu.l* @date 2020/10/15* 短信服务*/
public interface SmsService {/*** 发送验证码* @param [phone, checkCode]* @return void*/void sendCheckCode(String phone,String checkCode) throws ClientException;
}
20.6 实现类
package com.jliul.sbmtest.service.impl;import com.alibaba.fastjson.JSON;
import com.aliyuncs.CommonRequest;
import com.aliyuncs.CommonResponse;
import com.aliyuncs.DefaultAcsClient;
import com.aliyuncs.IAcsClient;
import com.aliyuncs.exceptions.ClientException;
import com.aliyuncs.http.MethodType;
import com.aliyuncs.profile.DefaultProfile;
import com.jliul.sbmtest.common.exception.AppException;
import com.jliul.sbmtest.common.result.ResponseEnum;
import com.jliul.sbmtest.config.SmsConfig;
import com.jliul.sbmtest.service.SmsService;
import lombok.extern.slf4j.Slf4j;
import org.springframework.beans.factory.annotation.Autowired;
import org.springframework.stereotype.Service;import java.util.HashMap;
import java.util.Map;/*** @author jliu.l* @date 2020/10/15* SMS impl*/
@Service
@Slf4j
public class SmsServiceImpl implements SmsService{private SmsConfig smsConfig;@Autowiredpublic void setSmsConfig(SmsConfig smsConfig) {this.smsConfig = smsConfig;}/*** 发送验证码** @param phone 手机号* @param checkCode 验证码* @return void*/@Overridepublic void sendCheckCode(String phone, String checkCode) throws ClientException {DefaultProfile profile =DefaultProfile.getProfile(smsConfig.getRegionId(), smsConfig.getAccessKeyId(), smsConfig.getAccessSecret());//创建阿里云的客户端IAcsClient client = new DefaultAcsClient(profile);//请求对象CommonRequest request = new CommonRequest();request.setSysMethod(MethodType.POST);request.setSysDomain("dysmsapi.aliyuncs.com");request.setSysVersion("2017-05-25");request.setSysAction("SendSms");//地区request.putQueryParameter("RegionId", smsConfig.getRegionId());//手机号request.putQueryParameter("PhoneNumbers", phone);//签名request.putQueryParameter("SignName", smsConfig.getSignName());request.putQueryParameter("TemplateCode", "SMS_204750114");Map<String,String> noteMap = new HashMap<>(16);noteMap.put("code", checkCode);request.putQueryParameter("TemplateParam", JSON.toJSONString(noteMap));//发送短信CommonResponse response = client.getCommonResponse(request);//得到json字符串格式的响应结果String data = response.getData();System.out.println(data);//解析json字符串格式的响应结果//把阿里云响应给我们的json 字符串 转成mapHashMap map = JSON.parseObject(data, HashMap.class);String code = (String) map.get("Code");String message = (String) map.get("Message");//配置参考:短信服务->系统设置->国内消息设置//错误码参考://https://help.aliyun.com/document_detail/101346.html?spm=a2c4g.11186623.6.613.3f6e2246sDg6Ry//控制所有短信流向限制(同一手机号:一分钟一条、一个小时五条、一天十条)final String pf = "isv.BUSINESS_LIMIT_CONTROL";if (pf.equals(code)) {log.error("短信发送过于频繁 " + "【code】" + code + ", 【message】" + message);throw new AppException(ResponseEnum.SMS_SEND_ERROR_BUSINESS_LIMIT_CONTROL);}final String ok = "OK";if (!ok.equals(code)) {log.error("短信发送失败 " + " - code: " + code + ", message: " + message);throw new AppException(ResponseEnum.SMS_SEND_ERROR);}}
}
20.7 前端
<!DOCTYPE html>
<html lang="en"><head><meta charset="UTF-8"><meta name="viewport" content="width=device-width, initial-scale=1.0"><title>登录</title>
</head><body><h3>手机号快速登录</h3><p>用户名:<input type="text" id="phone" value="" /></p><p>验证码:<input type="text" id="checkCode" /><input type="button" id="btncode" value="发送验证码" /></p><p><input type="button" id="btnlogin2" value="login2" /></p>
</body>
<script src="http://ajax.aspnetcdn.com/ajax/jQuery/jquery-2.1.1.min.js"></script>
<script>// 向手机发验证码$("#btncode").on("click", function() {var url = "http://localhost:8090/admin/account/getCheckCode";var data = {"pphone": $("#phone").val()}$.ajax({url: url,type: "GET",data: data,success: function(jsondata) {if (jsondata.code != "200") {alert(jsondata.message)}}})})// 快速登录$("#btnlogin2").on("click", function() {var url = "http://localhost:8090/admin/account/login2/" + $("#phone").val() + "/" + $("#checkCode").val();$.ajax({url: url,type: "GET",success: function(jsondata) {if (jsondata.code === '200') {// sessionStorage.setItem("accountInfo",JSON.stringify(jsondata.data))window.location.href = 'index.html'} else {alert(jsondata.message)}}})})
</script></html>
20.8 生成验证码的后台接口
@GetMapping("/account/getCheckCode")@ApiOperation("给指定手机号,生成验证码")public R getCheckCode(@ApiParam("手机号")@RequestParam("pphone") String phone) throws ClientException {// 生成一个四位随机数int code = (int) (Math.random() * (9999 - 1000 + 1) + 1000);//发送短短信smsService.sendCheckCode(phone, code+"");// 保存验证码checkCodeMap.put(phone, code + "");return new R(ResponseEnum.SUCCESS,null);}
20.9 登录的后台接口
	/*** 登录2(手机号验证码快速登录)* @param [accno, password]* @return com.jliul.sbmtest.common.result.R*/@GetMapping("/account/login2/{phone}/{code}")@ApiOperation("手机验证码登录")public R login2(@ApiParam("手机号")@PathVariable("phone") String phone,@ApiParam("验证码")@PathVariable("code") String code) {String sc = checkCodeMap.get(phone);if (!sc.equals(code)) {throw new AppException(ResponseEnum.CHECKCODE_ERROR);}return new R(ResponseEnum.SUCCESS,null);}
}
如若内容造成侵权/违法违规/事实不符,请联系编程学习网邮箱:809451989@qq.com进行投诉反馈,一经查实,立即删除!
相关文章
- Kubernetes实战(第二版)--第三章 部署第一个应用程序
关注公众号:登峰大数据,阅读Kubernetes实战(第二版)(完整中文版),系统学习Kubernetes! 本章包括 在笔记本电脑上运行单节点Kubernetes集群 在谷歌Kubernetes引擎上设置Kubernetes集群 设置和使用kubectl命令行工具 在Kubernetes中部署应用…...
2024/4/25 13:19:27 - 阿里Nacos部署
Nacos的部署一、单机部署**4、修改 Nacos 存储为 Mysql**二、集群部署1、机器部署列表2、修改 nacos/conf/application.properties中的端口3、修改 nacos/conf/cluster.conf配置文件的值4、官方推荐集群部署方式5、页面上访问参考链接一、单机部署 1、本地安装 jdk1.8 2、下载…...
2024/4/6 9:12:50 - Docker 一篇就够了
Docker 一篇就够了1.Docker简介2.核心概念3.Docker 安装(基于centos7)4.Docker常用命令&操作4.1 镜像操作4.2 容器命令5. 数据共享5.1 端口映射5.2 磁盘挂载(数据卷)6. 生成新镜像6.1 基于容器创建新容器6.2 基于DockerFile创…...
2024/4/18 10:55:08 - 学堂在线刷课答题软件自动脚本简单易用
学堂在线自动刷课代码 疫情期间学校开展了网课,网课竟然是在学堂在线上面找了一些课程视频让我们自己刷。不得吐槽一下课节又多,时间又长,放完一节视频还不自动跳到下一节,每次还得自己调播放倍速,真麻烦。想投机取巧&…...
2024/4/25 0:48:11 - JAVA的环境环境变量的搭建———计算机语言简介
自学笔记 第一章JAVA的环境环境变量的搭建 一,常用的DOS命令(2) 1.1删除命令del,可以删除一个文件或多个文件夹 1.2如何查看本机的IP地址? 什么是IP地址?有什么用? A计算机在网络中想要定位到或连接到B计…...
2024/4/17 21:42:42 - 【记录】锐捷Windows认证客户端常见问题及处理方法
【记录】锐捷Windows认证客户端常见问题及处理方法前因: 同学和我说他的电脑忽然连不上校园网了 报错信息如下: 开始以为是网卡驱动出现了问题,折腾许久在锐捷官网上看到解决方法,原来是需要在网卡设置里将网卡修改为有线网卡。…...
2024/4/6 9:12:47 - Spring MVC 回顾
第一部分 Spring MVC应用 第1节 三层架构和MVC模式 Spring MVC是Spring 给我们提供的⼀个用于简化Web开发的框架 1.1 MVC 体系结构 经典三层架构(代码架构) 我们的开发架构⼀般都是基于两种形式,⼀种是 C/S 架构,也就是客户端…...
2024/4/6 9:12:47 - 破解Excel工作表密码
打开受保护的Excel表格,按“ALT”“F11”键新建一个模块复制一下命令 Public Sub AllInternalPasswords()Breaks worksheet and workbook structure passwords. Bob McCormickprobably originator of base code algorithm modified for coverageof workbook struct…...
2024/4/19 10:34:06 - 学习神经网络笔记
1. 过程笔记: 人工智能金融:芝麻信用人工智能内容创作:腾讯的DreamWriter和阿里的鲁班系统人工智能机器人人工智能>机器学习>深度学习 逻辑演绎vs归纳总结 调查问卷:每一个问题对应一个语义概念问题选项:同一…...
2024/4/21 23:27:40 - 深度学习框架Caffe简介(1)
来源于油管上的讲解视频 由伯克利大学开发,代码是用C编写的,但是提供了python和matlab的接口,可以用这两个编程语言实现;在训练和微调前馈模型时效果很好。 bolb:将data和label封装在blob里面; layer&…...
2024/4/20 19:10:17 - 什么是图灵完备性(Turing complete)?
作者:Ran C 链接:https://www.zhihu.com/question/20115374/answer/288346717 来源:知乎 著作权归作者所有。商业转载请联系作者获得授权,非商业转载请注明出处。 这是一篇旨在帮助理解图灵机及相关概念是什么,而非…...
2024/4/15 13:19:44 - VMware 虚拟机连外网,同时配置SecureCRT连接,不同网段配置
VMware 虚拟机连外网,同时配置SecureCRT连接,不同网段配置 1.检查本机连外网的网卡,打开 控制面板-》网络和 Internet-》网络连接,查看已连接网络的网卡 右击,查看状态,这里IPV4连接,已连接 Int…...
2024/4/6 9:12:41 - 2020年茶艺师(初级)考试题及茶艺师(初级)考试题库
题库来源:安全生产模拟考试一点通公众号小程序 2020年茶艺师(初级)考试题及茶艺师(初级)考试题库,包含茶艺师(初级)考试题答案和解析及茶艺师(初级)考试题库…...
2024/4/20 3:24:25 - Springboot源码解读
1.解读源码的意义: 为什么要解读源代码?直接使用别人封装好的框架不香吗?答案如下: 随着互联网的快速发展,加上java跨平台等强大特性,导致java程序员需求日益剧增,很多高校、培训机构都为了填补市场需求,…...
2024/4/21 9:40:35 - 2020年A特种设备相关管理(电梯)考试题及A特种设备相关管理(电梯)考试报名
题库来源:安全生产模拟考试一点通公众号小程序 2020年A特种设备相关管理(电梯)考试题及A特种设备相关管理(电梯)考试报名,包含A特种设备相关管理(电梯)考试题答案和解析及A特种设备…...
2024/4/6 6:41:13 - Android Framework (五) input子系统分析一 事件处理的起点
Android Framework (五)—input子系统 auther: 朱红喜 date: 2020-10-18 version: android 8.1Android Framework input子系统分析一 事件处理的起点 Android Framework input子系统分析二 服务端之事件收集者EventHub Android Framework input子系统分析三 服务端之事件…...
2024/4/17 14:29:29 - 关于刷机个人的一些总结
刷机总结 只是对于自己刷机过程中的一个总结,免得以后再次刷机的时候到处东奔西走找各种资源 rom和rec是两个系统!!! rom和rec是两个系统!!! rom和rec是两个系统!!&…...
2024/4/24 21:53:10 - mac版VMWare的vmnet8默认网关和ip配置
sudo vim /Library/Preferences/VMware\ Fusion/networking“vmnet8默认网关”配置文件 sudo vim /Library/Preferences/VMware\ Fusion/vmnet8/nat.confcentos6配置 vi /etc/udev/rules.d/70-persistent-net.rules,删除eth0有关内容,修改eth1为eth0, vim /etc/s…...
2024/4/6 9:12:39 - 假如你想学习亚马逊测评
假如你想做亚马逊测评你需要注意。 一定要有稳定的IP以及环境,没有?那就做好账号大量被封的可能性。 一定要有稳定的中介或者商家单,没有?那就做好接不到单或者被黑的准备。 一定要有靠谱点的卡商,没有?那就…...
2024/4/23 16:09:36 - 贺齐龙2020-10-18作业
...
2024/4/22 3:52:31
最新文章
- Linux文件/目录高级管理三 头歌
1Linux文件/目录setuid和setgid 编程要求 在右侧编辑器中补充代码,具体编程要求如下: 使用助记语法为系统已存在文件oldFile1(默认权限为:rw_rw_r__)设置setuid权限; 使用助记语法为系统已存在目录oldDir1(默认权限为:rwxrwxrw…...
2024/4/25 19:53:38 - 梯度消失和梯度爆炸的一些处理方法
在这里是记录一下梯度消失或梯度爆炸的一些处理技巧。全当学习总结了如有错误还请留言,在此感激不尽。 权重和梯度的更新公式如下: w w − η ⋅ ∇ w w w - \eta \cdot \nabla w ww−η⋅∇w 个人通俗的理解梯度消失就是网络模型在反向求导的时候出…...
2024/3/20 10:50:27 - Go语言map、slice、channel底层实现(go面试)
slice 切片是一个引用类型,其底层实现是一个结构体,包含以下字段: ptr:一个指向底层数组的指针,指针指向数组的第一个元素。 len:切片当前包含的元素数量。 cap:切片的容量,即底层…...
2024/4/24 19:38:16 - 自定义OPPO-r9s的kernel内核,并开启安卓支持docker
0. 版本说明 本文提供了OPPO手机r9s的内核编译方法,并开机支持docker。用的是开源lineage14.1的rom。 我这边基于开源lineage14.1,打了一个docker内核编译镜像(17380582683/r9s),大家可以在容器里,手动打出完整的rom包zip文件。…...
2024/4/23 2:13:16 - 416. 分割等和子集问题(动态规划)
题目 题解 class Solution:def canPartition(self, nums: List[int]) -> bool:# badcaseif not nums:return True# 不能被2整除if sum(nums) % 2 ! 0:return False# 状态定义:dp[i][j]表示当背包容量为j,用前i个物品是否正好可以将背包填满ÿ…...
2024/4/25 1:03:45 - 【Java】ExcelWriter自适应宽度工具类(支持中文)
工具类 import org.apache.poi.ss.usermodel.Cell; import org.apache.poi.ss.usermodel.CellType; import org.apache.poi.ss.usermodel.Row; import org.apache.poi.ss.usermodel.Sheet;/*** Excel工具类** author xiaoming* date 2023/11/17 10:40*/ public class ExcelUti…...
2024/4/24 1:17:44 - Spring cloud负载均衡@LoadBalanced LoadBalancerClient
LoadBalance vs Ribbon 由于Spring cloud2020之后移除了Ribbon,直接使用Spring Cloud LoadBalancer作为客户端负载均衡组件,我们讨论Spring负载均衡以Spring Cloud2020之后版本为主,学习Spring Cloud LoadBalance,暂不讨论Ribbon…...
2024/4/24 11:04:21 - TSINGSEE青犀AI智能分析+视频监控工业园区周界安全防范方案
一、背景需求分析 在工业产业园、化工园或生产制造园区中,周界防范意义重大,对园区的安全起到重要的作用。常规的安防方式是采用人员巡查,人力投入成本大而且效率低。周界一旦被破坏或入侵,会影响园区人员和资产安全,…...
2024/4/25 10:01:46 - VB.net WebBrowser网页元素抓取分析方法
在用WebBrowser编程实现网页操作自动化时,常要分析网页Html,例如网页在加载数据时,常会显示“系统处理中,请稍候..”,我们需要在数据加载完成后才能继续下一步操作,如何抓取这个信息的网页html元素变化&…...
2024/4/25 16:50:01 - 【Objective-C】Objective-C汇总
方法定义 参考:https://www.yiibai.com/objective_c/objective_c_functions.html Objective-C编程语言中方法定义的一般形式如下 - (return_type) method_name:( argumentType1 )argumentName1 joiningArgument2:( argumentType2 )argumentName2 ... joiningArgu…...
2024/4/25 13:02:58 - 【洛谷算法题】P5713-洛谷团队系统【入门2分支结构】
👨💻博客主页:花无缺 欢迎 点赞👍 收藏⭐ 留言📝 加关注✅! 本文由 花无缺 原创 收录于专栏 【洛谷算法题】 文章目录 【洛谷算法题】P5713-洛谷团队系统【入门2分支结构】🌏题目描述🌏输入格…...
2024/4/24 9:58:43 - 【ES6.0】- 扩展运算符(...)
【ES6.0】- 扩展运算符... 文章目录 【ES6.0】- 扩展运算符...一、概述二、拷贝数组对象三、合并操作四、参数传递五、数组去重六、字符串转字符数组七、NodeList转数组八、解构变量九、打印日志十、总结 一、概述 **扩展运算符(...)**允许一个表达式在期望多个参数࿰…...
2024/4/24 11:04:19 - 摩根看好的前智能硬件头部品牌双11交易数据极度异常!——是模式创新还是饮鸩止渴?
文 | 螳螂观察 作者 | 李燃 双11狂欢已落下帷幕,各大品牌纷纷晒出优异的成绩单,摩根士丹利投资的智能硬件头部品牌凯迪仕也不例外。然而有爆料称,在自媒体平台发布霸榜各大榜单喜讯的凯迪仕智能锁,多个平台数据都表现出极度异常…...
2024/4/25 17:43:17 - Go语言常用命令详解(二)
文章目录 前言常用命令go bug示例参数说明 go doc示例参数说明 go env示例 go fix示例 go fmt示例 go generate示例 总结写在最后 前言 接着上一篇继续介绍Go语言的常用命令 常用命令 以下是一些常用的Go命令,这些命令可以帮助您在Go开发中进行编译、测试、运行和…...
2024/4/25 17:43:00 - 用欧拉路径判断图同构推出reverse合法性:1116T4
http://cplusoj.com/d/senior/p/SS231116D 假设我们要把 a a a 变成 b b b,我们在 a i a_i ai 和 a i 1 a_{i1} ai1 之间连边, b b b 同理,则 a a a 能变成 b b b 的充要条件是两图 A , B A,B A,B 同构。 必要性显然࿰…...
2024/4/25 13:00:31 - 【NGINX--1】基础知识
1、在 Debian/Ubuntu 上安装 NGINX 在 Debian 或 Ubuntu 机器上安装 NGINX 开源版。 更新已配置源的软件包信息,并安装一些有助于配置官方 NGINX 软件包仓库的软件包: apt-get update apt install -y curl gnupg2 ca-certificates lsb-release debian-…...
2024/4/25 17:42:40 - Hive默认分割符、存储格式与数据压缩
目录 1、Hive默认分割符2、Hive存储格式3、Hive数据压缩 1、Hive默认分割符 Hive创建表时指定的行受限(ROW FORMAT)配置标准HQL为: ... ROW FORMAT DELIMITED FIELDS TERMINATED BY \u0001 COLLECTION ITEMS TERMINATED BY , MAP KEYS TERMI…...
2024/4/25 3:28:56 - 【论文阅读】MAG:一种用于航天器遥测数据中有效异常检测的新方法
文章目录 摘要1 引言2 问题描述3 拟议框架4 所提出方法的细节A.数据预处理B.变量相关分析C.MAG模型D.异常分数 5 实验A.数据集和性能指标B.实验设置与平台C.结果和比较 6 结论 摘要 异常检测是保证航天器稳定性的关键。在航天器运行过程中,传感器和控制器产生大量周…...
2024/4/25 3:39:58 - --max-old-space-size=8192报错
vue项目运行时,如果经常运行慢,崩溃停止服务,报如下错误 FATAL ERROR: CALL_AND_RETRY_LAST Allocation failed - JavaScript heap out of memory 因为在 Node 中,通过JavaScript使用内存时只能使用部分内存(64位系统&…...
2024/4/25 13:40:45 - 基于深度学习的恶意软件检测
恶意软件是指恶意软件犯罪者用来感染个人计算机或整个组织的网络的软件。 它利用目标系统漏洞,例如可以被劫持的合法软件(例如浏览器或 Web 应用程序插件)中的错误。 恶意软件渗透可能会造成灾难性的后果,包括数据被盗、勒索或网…...
2024/4/25 13:01:30 - JS原型对象prototype
让我简单的为大家介绍一下原型对象prototype吧! 使用原型实现方法共享 1.构造函数通过原型分配的函数是所有对象所 共享的。 2.JavaScript 规定,每一个构造函数都有一个 prototype 属性,指向另一个对象,所以我们也称为原型对象…...
2024/4/25 15:31:26 - C++中只能有一个实例的单例类
C中只能有一个实例的单例类 前面讨论的 President 类很不错,但存在一个缺陷:无法禁止通过实例化多个对象来创建多名总统: President One, Two, Three; 由于复制构造函数是私有的,其中每个对象都是不可复制的,但您的目…...
2024/4/25 17:31:15 - python django 小程序图书借阅源码
开发工具: PyCharm,mysql5.7,微信开发者工具 技术说明: python django html 小程序 功能介绍: 用户端: 登录注册(含授权登录) 首页显示搜索图书,轮播图࿰…...
2024/4/25 13:22:53 - 电子学会C/C++编程等级考试2022年03月(一级)真题解析
C/C++等级考试(1~8级)全部真题・点这里 第1题:双精度浮点数的输入输出 输入一个双精度浮点数,保留8位小数,输出这个浮点数。 时间限制:1000 内存限制:65536输入 只有一行,一个双精度浮点数。输出 一行,保留8位小数的浮点数。样例输入 3.1415926535798932样例输出 3.1…...
2024/4/25 1:03:22 - 配置失败还原请勿关闭计算机,电脑开机屏幕上面显示,配置失败还原更改 请勿关闭计算机 开不了机 这个问题怎么办...
解析如下:1、长按电脑电源键直至关机,然后再按一次电源健重启电脑,按F8健进入安全模式2、安全模式下进入Windows系统桌面后,按住“winR”打开运行窗口,输入“services.msc”打开服务设置3、在服务界面,选中…...
2022/11/19 21:17:18 - 错误使用 reshape要执行 RESHAPE,请勿更改元素数目。
%读入6幅图像(每一幅图像的大小是564*564) f1 imread(WashingtonDC_Band1_564.tif); subplot(3,2,1),imshow(f1); f2 imread(WashingtonDC_Band2_564.tif); subplot(3,2,2),imshow(f2); f3 imread(WashingtonDC_Band3_564.tif); subplot(3,2,3),imsho…...
2022/11/19 21:17:16 - 配置 已完成 请勿关闭计算机,win7系统关机提示“配置Windows Update已完成30%请勿关闭计算机...
win7系统关机提示“配置Windows Update已完成30%请勿关闭计算机”问题的解决方法在win7系统关机时如果有升级系统的或者其他需要会直接进入一个 等待界面,在等待界面中我们需要等待操作结束才能关机,虽然这比较麻烦,但是对系统进行配置和升级…...
2022/11/19 21:17:15 - 台式电脑显示配置100%请勿关闭计算机,“准备配置windows 请勿关闭计算机”的解决方法...
有不少用户在重装Win7系统或更新系统后会遇到“准备配置windows,请勿关闭计算机”的提示,要过很久才能进入系统,有的用户甚至几个小时也无法进入,下面就教大家这个问题的解决方法。第一种方法:我们首先在左下角的“开始…...
2022/11/19 21:17:14 - win7 正在配置 请勿关闭计算机,怎么办Win7开机显示正在配置Windows Update请勿关机...
置信有很多用户都跟小编一样遇到过这样的问题,电脑时发现开机屏幕显现“正在配置Windows Update,请勿关机”(如下图所示),而且还需求等大约5分钟才干进入系统。这是怎样回事呢?一切都是正常操作的,为什么开时机呈现“正…...
2022/11/19 21:17:13 - 准备配置windows 请勿关闭计算机 蓝屏,Win7开机总是出现提示“配置Windows请勿关机”...
Win7系统开机启动时总是出现“配置Windows请勿关机”的提示,没过几秒后电脑自动重启,每次开机都这样无法进入系统,此时碰到这种现象的用户就可以使用以下5种方法解决问题。方法一:开机按下F8,在出现的Windows高级启动选…...
2022/11/19 21:17:12 - 准备windows请勿关闭计算机要多久,windows10系统提示正在准备windows请勿关闭计算机怎么办...
有不少windows10系统用户反映说碰到这样一个情况,就是电脑提示正在准备windows请勿关闭计算机,碰到这样的问题该怎么解决呢,现在小编就给大家分享一下windows10系统提示正在准备windows请勿关闭计算机的具体第一种方法:1、2、依次…...
2022/11/19 21:17:11 - 配置 已完成 请勿关闭计算机,win7系统关机提示“配置Windows Update已完成30%请勿关闭计算机”的解决方法...
今天和大家分享一下win7系统重装了Win7旗舰版系统后,每次关机的时候桌面上都会显示一个“配置Windows Update的界面,提示请勿关闭计算机”,每次停留好几分钟才能正常关机,导致什么情况引起的呢?出现配置Windows Update…...
2022/11/19 21:17:10 - 电脑桌面一直是清理请关闭计算机,windows7一直卡在清理 请勿关闭计算机-win7清理请勿关机,win7配置更新35%不动...
只能是等着,别无他法。说是卡着如果你看硬盘灯应该在读写。如果从 Win 10 无法正常回滚,只能是考虑备份数据后重装系统了。解决来方案一:管理员运行cmd:net stop WuAuServcd %windir%ren SoftwareDistribution SDoldnet start WuA…...
2022/11/19 21:17:09 - 计算机配置更新不起,电脑提示“配置Windows Update请勿关闭计算机”怎么办?
原标题:电脑提示“配置Windows Update请勿关闭计算机”怎么办?win7系统中在开机与关闭的时候总是显示“配置windows update请勿关闭计算机”相信有不少朋友都曾遇到过一次两次还能忍但经常遇到就叫人感到心烦了遇到这种问题怎么办呢?一般的方…...
2022/11/19 21:17:08 - 计算机正在配置无法关机,关机提示 windows7 正在配置windows 请勿关闭计算机 ,然后等了一晚上也没有关掉。现在电脑无法正常关机...
关机提示 windows7 正在配置windows 请勿关闭计算机 ,然后等了一晚上也没有关掉。现在电脑无法正常关机以下文字资料是由(历史新知网www.lishixinzhi.com)小编为大家搜集整理后发布的内容,让我们赶快一起来看一下吧!关机提示 windows7 正在配…...
2022/11/19 21:17:05 - 钉钉提示请勿通过开发者调试模式_钉钉请勿通过开发者调试模式是真的吗好不好用...
钉钉请勿通过开发者调试模式是真的吗好不好用 更新时间:2020-04-20 22:24:19 浏览次数:729次 区域: 南阳 > 卧龙 列举网提醒您:为保障您的权益,请不要提前支付任何费用! 虚拟位置外设器!!轨迹模拟&虚拟位置外设神器 专业用于:钉钉,外勤365,红圈通,企业微信和…...
2022/11/19 21:17:05 - 配置失败还原请勿关闭计算机怎么办,win7系统出现“配置windows update失败 还原更改 请勿关闭计算机”,长时间没反应,无法进入系统的解决方案...
前几天班里有位学生电脑(windows 7系统)出问题了,具体表现是开机时一直停留在“配置windows update失败 还原更改 请勿关闭计算机”这个界面,长时间没反应,无法进入系统。这个问题原来帮其他同学也解决过,网上搜了不少资料&#x…...
2022/11/19 21:17:04 - 一个电脑无法关闭计算机你应该怎么办,电脑显示“清理请勿关闭计算机”怎么办?...
本文为你提供了3个有效解决电脑显示“清理请勿关闭计算机”问题的方法,并在最后教给你1种保护系统安全的好方法,一起来看看!电脑出现“清理请勿关闭计算机”在Windows 7(SP1)和Windows Server 2008 R2 SP1中,添加了1个新功能在“磁…...
2022/11/19 21:17:03 - 请勿关闭计算机还原更改要多久,电脑显示:配置windows更新失败,正在还原更改,请勿关闭计算机怎么办...
许多用户在长期不使用电脑的时候,开启电脑发现电脑显示:配置windows更新失败,正在还原更改,请勿关闭计算机。。.这要怎么办呢?下面小编就带着大家一起看看吧!如果能够正常进入系统,建议您暂时移…...
2022/11/19 21:17:02 - 还原更改请勿关闭计算机 要多久,配置windows update失败 还原更改 请勿关闭计算机,电脑开机后一直显示以...
配置windows update失败 还原更改 请勿关闭计算机,电脑开机后一直显示以以下文字资料是由(历史新知网www.lishixinzhi.com)小编为大家搜集整理后发布的内容,让我们赶快一起来看一下吧!配置windows update失败 还原更改 请勿关闭计算机&#x…...
2022/11/19 21:17:01 - 电脑配置中请勿关闭计算机怎么办,准备配置windows请勿关闭计算机一直显示怎么办【图解】...
不知道大家有没有遇到过这样的一个问题,就是我们的win7系统在关机的时候,总是喜欢显示“准备配置windows,请勿关机”这样的一个页面,没有什么大碍,但是如果一直等着的话就要两个小时甚至更久都关不了机,非常…...
2022/11/19 21:17:00 - 正在准备配置请勿关闭计算机,正在准备配置windows请勿关闭计算机时间长了解决教程...
当电脑出现正在准备配置windows请勿关闭计算机时,一般是您正对windows进行升级,但是这个要是长时间没有反应,我们不能再傻等下去了。可能是电脑出了别的问题了,来看看教程的说法。正在准备配置windows请勿关闭计算机时间长了方法一…...
2022/11/19 21:16:59 - 配置失败还原请勿关闭计算机,配置Windows Update失败,还原更改请勿关闭计算机...
我们使用电脑的过程中有时会遇到这种情况,当我们打开电脑之后,发现一直停留在一个界面:“配置Windows Update失败,还原更改请勿关闭计算机”,等了许久还是无法进入系统。如果我们遇到此类问题应该如何解决呢࿰…...
2022/11/19 21:16:58 - 如何在iPhone上关闭“请勿打扰”
Apple’s “Do Not Disturb While Driving” is a potentially lifesaving iPhone feature, but it doesn’t always turn on automatically at the appropriate time. For example, you might be a passenger in a moving car, but your iPhone may think you’re the one dri…...
2022/11/19 21:16:57